


Associated RC8.2e
 03-20-2016, 08:07 AM
#1

Thread Starter

One of the final pieces to the puzzle in my RC addiction. This buggy was a complete surprise to me in the fact that I came home from work and saw a green winning bid staring at me in the face. I thought for sure someone would outbid me while I was at work, but I walked away, and out the door at 38% off the lowest online hobby shop price  . Wife said it was her Christmas present to me. Sweet! Only problem was I had to wait a tad bit longer to get my hands on it.
So here I am. The pictures are from a couple of months back. I didn't want to post a in-depth/detailed "build" thread, so I won't bore you with a bunch of build pictures since this platform has been around awhile, and also discontinued on some hobby shop's sites. Since the platform is not a huge interest to anyone anymore, I guess I will just use this thread as a basic open personal journal with my dealings with the buggy.
I'm banking on Team Associated keeping up their past history (some of the best in the business) of parts availability for discontinued models long after their "expiration date".


Update 5/25/2017: 1/8 scale buggies is hands down the best platform for bashing IMO. Only thing that may be better, if you got the room, ...a truggy. The 8.2e buggy has not cost me a dime in broken parts (except boots, which I just opt to leave off drive line). Normal upkeep of some o-rings, and fluids were all that was needed to keep the buggy running for the past year.
. Wife said it was her Christmas present to me. Sweet! Only problem was I had to wait a tad bit longer to get my hands on it.So here I am. The pictures are from a couple of months back. I didn't want to post a in-depth/detailed "build" thread, so I won't bore you with a bunch of build pictures since this platform has been around awhile, and also discontinued on some hobby shop's sites. Since the platform is not a huge interest to anyone anymore, I guess I will just use this thread as a basic open personal journal with my dealings with the buggy.
I'm banking on Team Associated keeping up their past history (some of the best in the business) of parts availability for discontinued models long after their "expiration date".
Update 5/25/2017: 1/8 scale buggies is hands down the best platform for bashing IMO. Only thing that may be better, if you got the room, ...a truggy. The 8.2e buggy has not cost me a dime in broken parts (except boots, which I just opt to leave off drive line). Normal upkeep of some o-rings, and fluids were all that was needed to keep the buggy running for the past year.
Last edited by RustyUs; 09-07-2017 at 05:43 AM. Reason: added info
 03-20-2016, 08:47 AM
#3
Thread Starter
I wanted to build this buggy and run it in stock form. I've gone through a bunch of forums and got conflicting thoughts. Building the RC8.2e just as the manual instructs may turn out fine, but my notions tell me I better listen to others who have noted in their builds... what works better for the diffs. I believe I used two diff washers (2nd picture) behind the diff outdrive pins in all three diffs instead of just one being shown/used in the manual. And as far as the paper gaskets go...I used them to see if I would end up with leaky diffs, but have Mugen Seiki diff gaskets for replacements as they are a bit thicker and their composition feels better than the paper Associated ones supplied in the kit.
Update: The downloadable manual and kit supplied manual have two different formulas for number of diff washers behind diff outdrive pin. Downloadable manual shows the use of two diff washers, and paper manual shows only one washer.
Update: Kit is supplied with two different thicknesses of #89116 diff gaskets. Of the three supplied diff gaskets in the kit, one is thicker than the other two. The thicker Associated gasket is about the same thickness (0.52mm) of a Mugen Seiki #C0257 gasket, which is a perfect fit by the way.
Last edited by RustyUs; 05-28-2017 at 07:26 AM.
03-20-2016, 09:18 AM
#4
Thread Starter
Straight forward assembly of CVA bone and coupler. 2nd pita...tore the pin retainer boot  as many have done with their builds. Lesson learned and not needed. It's just the fact that I was so careful and I thought it wouldn't happen to me.
Another note: Front bearings that the diff pinion gears ride on (2nd picture)...make sure to fully seat the bearing in the gearbox! After I first assembled the gearbox, the ring and pinion gears felt "notchy", or not smooth. I chalked it up as they needed to be broken in and I went ahead and mounted the gearbox to the chassis. After getting through the rear bulkhead assembly with a noticeable "pop" of the bearings going into place as they should be, the rear gearbox/gears were silky smooth. Back to the front end I went...toke apart the front gearbox...sure enough, the diff pinion gear bearing was not seated completely . Quite a bit a force is needed to get that b*tch seat properly. All was "smooth sailing" after that.


as many have done with their builds. Lesson learned and not needed. It's just the fact that I was so careful and I thought it wouldn't happen to me. Another note: Front bearings that the diff pinion gears ride on (2nd picture)...make sure to fully seat the bearing in the gearbox! After I first assembled the gearbox, the ring and pinion gears felt "notchy", or not smooth. I chalked it up as they needed to be broken in and I went ahead and mounted the gearbox to the chassis. After getting through the rear bulkhead assembly with a noticeable "pop" of the bearings going into place as they should be, the rear gearbox/gears were silky smooth. Back to the front end I went...toke apart the front gearbox...sure enough, the diff pinion gear bearing was not seated completely
. Quite a bit a force is needed to get that b*tch seat properly. All was "smooth sailing" after that.
03-20-2016, 09:50 AM
#5
Thread Starter
I don't know about anyone else, but when I was setting up my turnbuckles, I orient the smooth edge of Associated's turnbuckles to the right side (when viewed from rear) instead of "drivers side" as stated in manual. Just, what does "drivers side" mean, and how many people do they think can fit in the buggy?

It was a little more work (disassemble pre-assembled turnbuckles) making sure the camber rod ends faced the correct way now that I turned them around. I do this because when I pull back (looking from the top & standing behind RC) on my turnbuckle wrenches, it will tighten (make shorter) steering and camber linkages. I have had all my vehicles set-up like this since as far back as I can remember, and I wasn't about to change my formula now.


It was a little more work (disassemble pre-assembled turnbuckles) making sure the camber rod ends faced the correct way now that I turned them around. I do this because when I pull back (looking from the top & standing behind RC) on my turnbuckle wrenches, it will tighten (make shorter) steering and camber linkages. I have had all my vehicles set-up like this since as far back as I can remember, and I wasn't about to change my formula now.
03-20-2016, 10:54 AM
#7
Thread Starter
One of the necessary evils (IMO) if you want a RC that is different from the rest...paint it yourself! I forgot, there is of course...Mr./Ms. RC Car Painter for hire, but then that will also come with a hefty $$$ bill.
I'm gonna try for a red, white, and blue color scheme in hopes of capturing what Team Associated means to me. I usually love AE's choice of paint colors on their RC's boxes. When I think of Associated, I normally think red, white, and blue for some reason. Ever since the RC10T came out...I think of the USA flag colors.
After masking up the Jconcepts Illuzion Punisher body...
03-20-2016, 11:07 AM
#8
Thread Starter
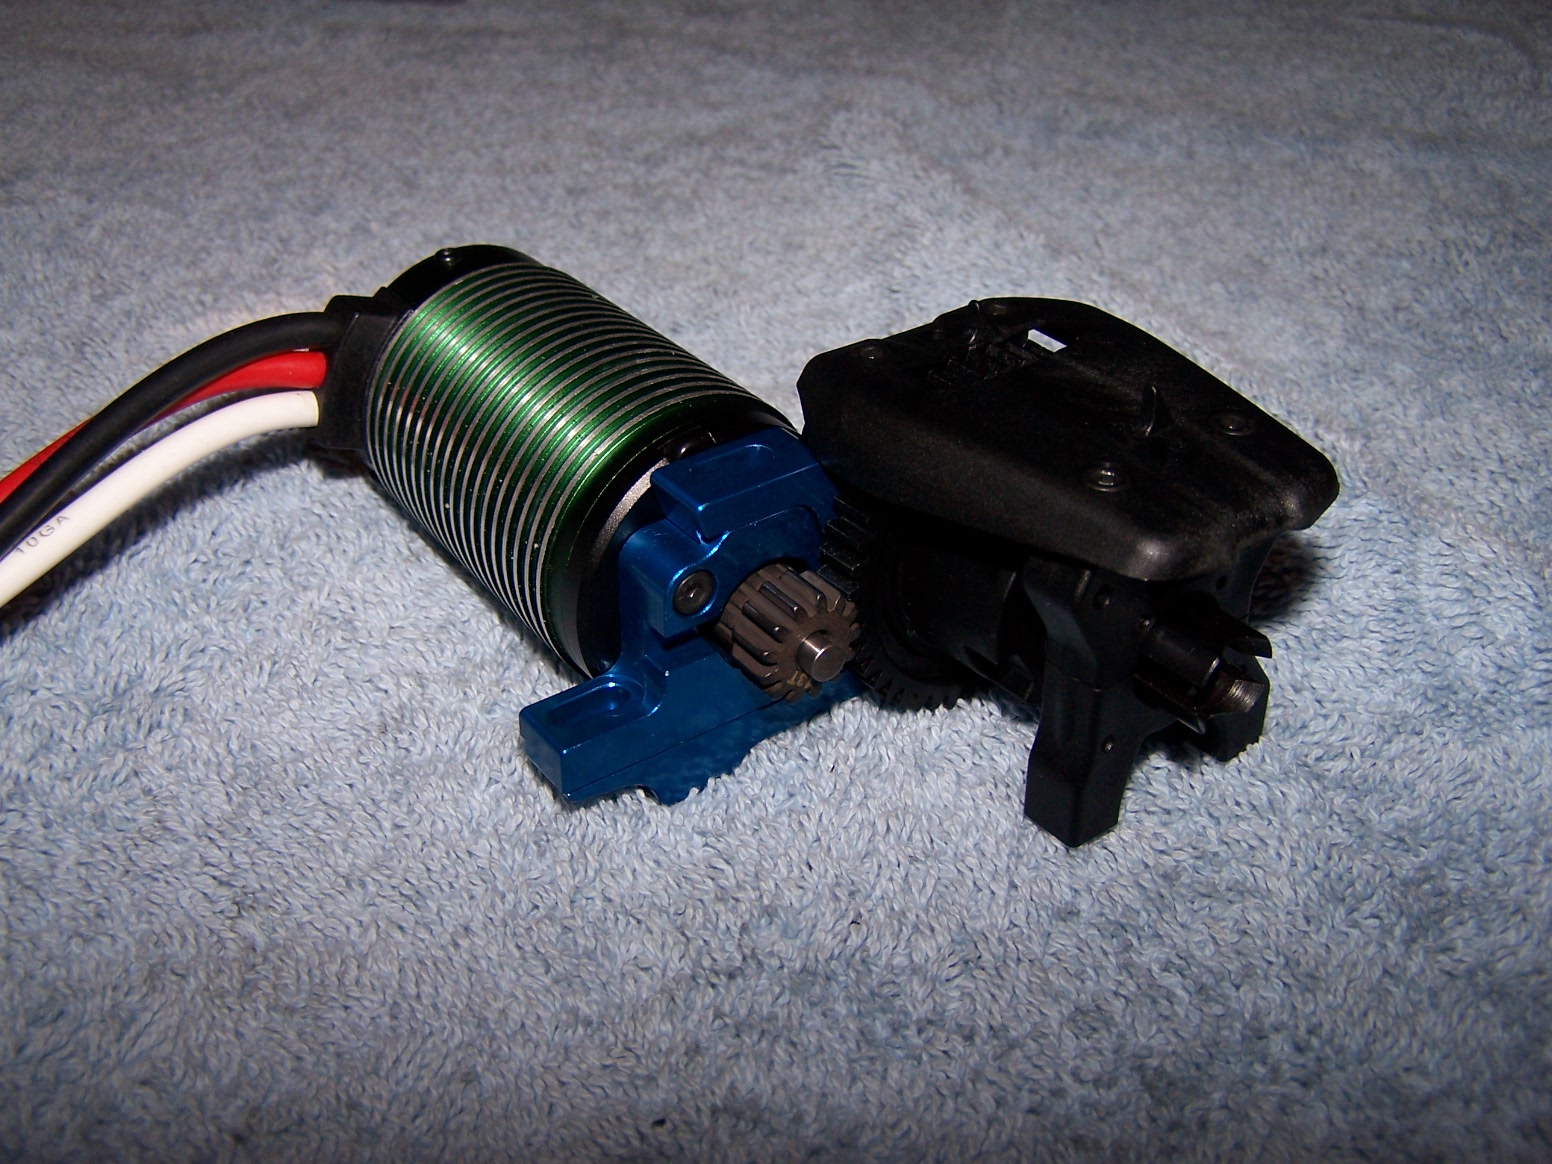
I found a reasonable priced Neu-Castle 1512 motor on the www's popular auction site (eBay) for this buggy's power-plant. Not racing at the moment, so sensored wasn't a must have for me.


03-20-2016, 11:25 AM
#9
Thread Starter
First coats of paint...OK, I lost the files. Now showing first couple of coats of paint and then some:


:Last edited by RustyUs; 03-21-2016 at 07:06 AM. Reason: wording
03-20-2016, 11:33 AM
#10
Thread Starter
Big Bores at their best. Manual shows shock boot washers...not included, and not needed. Built as manual with 30wt fluid and I have 1/4" rebound all around for now:


Last edited by RustyUs; 03-20-2016 at 12:02 PM.
03-20-2016, 12:00 PM
#11
Thread Starter
I couldn't find any 3/16" masking tape in any of the usual places around me. I picked up and used some 1/4" pin stripping as masking. Not sure how I feel about using it, as I found some bleeding being done...pin stripping lifted a bit. Ah well, getting there and I have some color to call my own:

Last edited by RustyUs; 03-22-2016 at 06:08 PM. Reason: wording
03-20-2016, 12:41 PM
#12
Thread Starter
Going with a "bottom of the barrel" Tyrannosaurus Rex 120A "Blue" ESC for controlling the current in my eBuggy. I did have to solder a 2�" extension onto the ESC's wires to make the plug reach the receiver. You can see it's quite a distance from back of the buggy to the receiver box...up and over the chassis brace & center drive shaft as well.
There is one thing I normally don't skimp on when building my RCs...that is what's steering them. I've been a Hitech/Hobbico servo fan since...forever it seems. Servo that is being used in this Associated ride is an Associated XP DS1015 Digital High Torque/Speed. I found a good deal on this servo and hope all the specs are not just hype.


There is one thing I normally don't skimp on when building my RCs...that is what's steering them. I've been a Hitech/Hobbico servo fan since...forever it seems. Servo that is being used in this Associated ride is an Associated XP DS1015 Digital High Torque/Speed. I found a good deal on this servo and hope all the specs are not just hype.
03-20-2016, 01:02 PM
#13
Thread Starter
What tires? What else would Team Knobby Large Lugs driver use...Big Blocks! I do have a pair of Pro-Line Badlands for backup, but I had to see how these eBay specials would hold up.


03-20-2016, 01:13 PM
#14
Thread Starter
The chrome/silver stripe is a bit thicker than I wanted, but she's done. The worst part of the build (painting) is done. I'm glad that's done. Can you tell I'm not a fan of painting. I just gotta trim, mount it, and sticker it up a bit.


03-21-2016, 11:55 AM
#15
Thread Starter
Done. I know there is a little false advertising going on with the Reedy Powered sticker and what's actually powering this thing, but hey, it makes up for the times I ran Reedy modified/stock motors back in the day without Reedy stickers on my buggies '. Maybe a few more stickers when end up on the lid, but she's up and running!
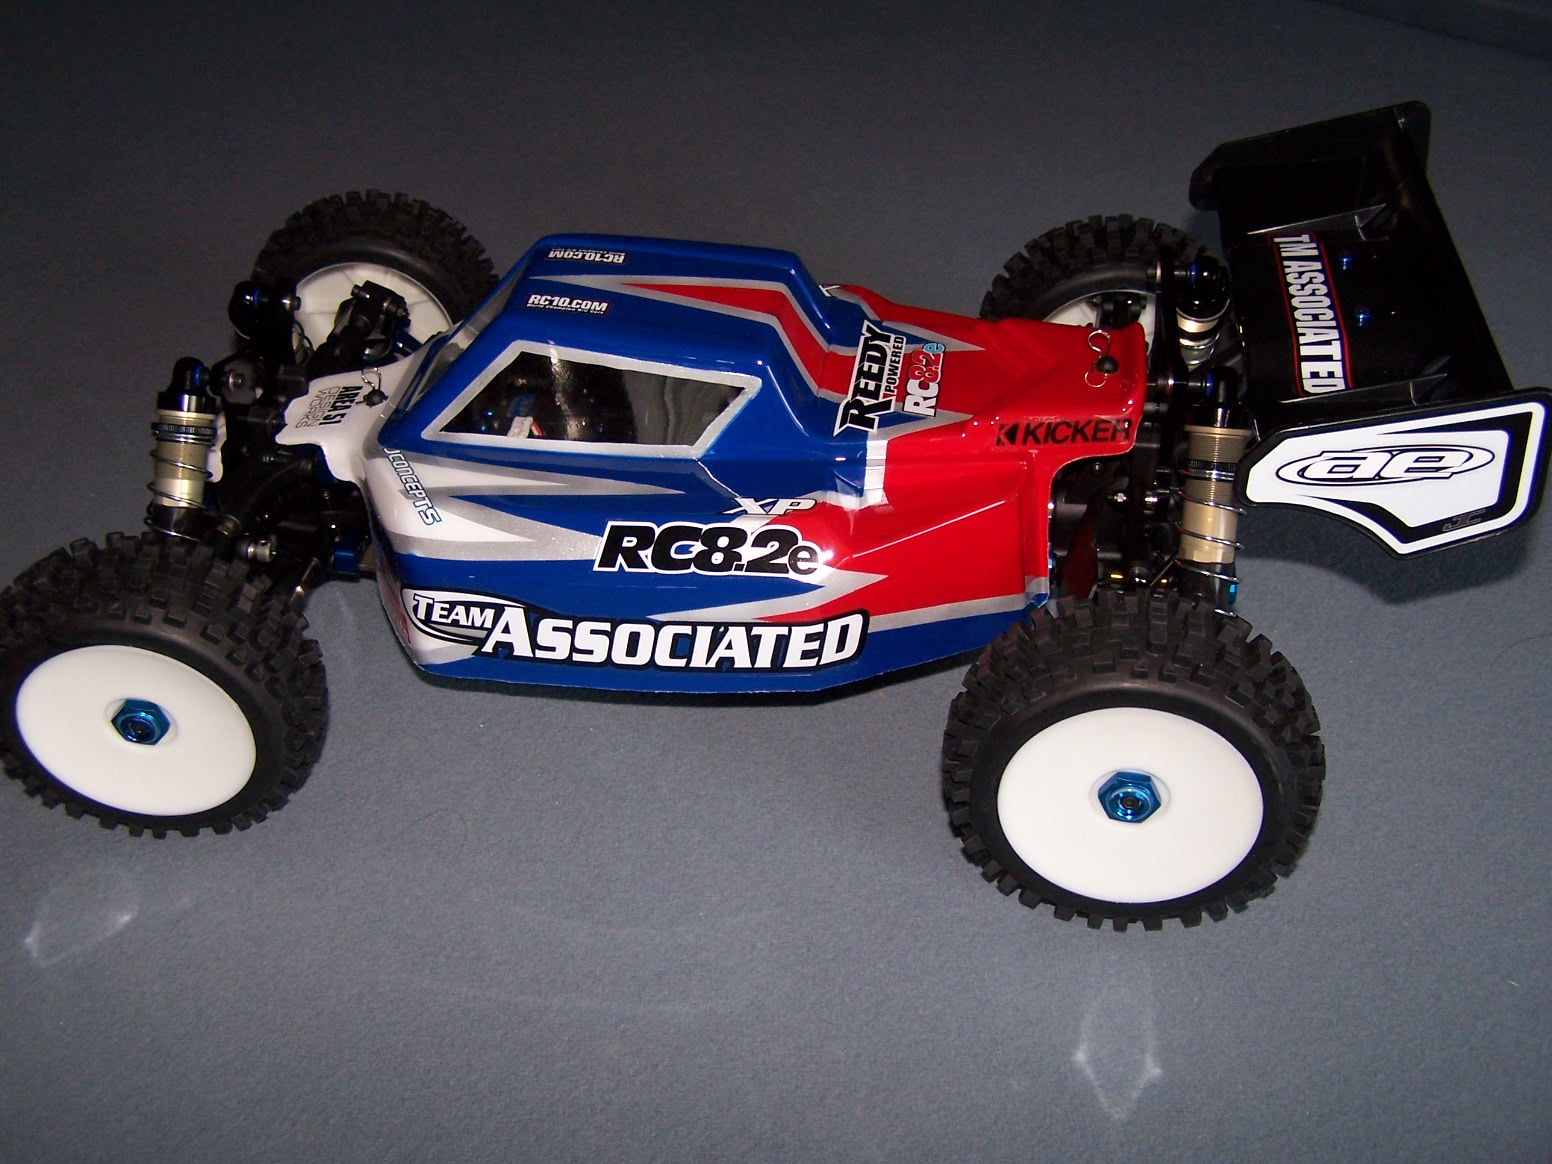


'. Maybe a few more stickers when end up on the lid, but she's up and running!Last edited by RustyUs; 03-22-2016 at 06:06 PM.
03-21-2016, 04:51 PM
#16

Nice rc8.2e! I myself had a RC8E-FT when they first came out. Didn't have it too long as I couldn't bring myself to bash it and someone I knew fell in love with it and took it off my hands without me losing much on it. The little I did run it I was impressed with it, always loved AE's FT shocks.
Those ebay special tires from suprasales? I had a set of them, put them on my Castle 1518 1800kv 5s powered LX1e and beat the snot out of them. Not as soft as badlands but they lasted forever. Only issue I had was mine were on spoked wheels and I cracked a wheel sliding sideways into a curb. Didn't notice it for a few runs until I took the wheel off, just used some CA on it and kept going. Decent enough traction on dirt and pavement (considering the power I had), great traction on grass I could actually traction roll the buggy.
Those ebay special tires from suprasales? I had a set of them, put them on my Castle 1518 1800kv 5s powered LX1e and beat the snot out of them. Not as soft as badlands but they lasted forever. Only issue I had was mine were on spoked wheels and I cracked a wheel sliding sideways into a curb. Didn't notice it for a few runs until I took the wheel off, just used some CA on it and kept going. Decent enough traction on dirt and pavement (considering the power I had), great traction on grass I could actually traction roll the buggy.
Last edited by Maj_Overdrive; 03-21-2016 at 04:53 PM.
03-22-2016, 06:03 PM
#17
Thread Starter
Thanks for the kind words.
The RC8.2e is filling the void that the Yeti left me with. The Typhon/Hyper SS was in the shopping cart (part out the electronics was my plan) until the Yeti kit came along, and made up my mind for me. For the price of a top notch eBuggy kit being out of my reach, I thought I'd never own one let alone an Associated. But thanks to eBay and Absolute Hobbyz, and wife, a new chapter is unfolding for this long time admirer of the RC8e/SC8e platform.
I remember reading about those spoked wheels being weak. I prefer spokes over dish wheels any day, sometimes it's not a choice (bye, bye Jconcepts Rulux wheels so sad to see you go ). I thought having more buggy (1/8 scale) coupled with big lugs, one needs a strong as possible wheel. Glad to know the BigBlock's tread will hold up to some abuse. For the price, I had to give them a shot.
The RC8.2e is filling the void that the Yeti left me with. The Typhon/Hyper SS was in the shopping cart (part out the electronics was my plan) until the Yeti kit came along, and made up my mind for me. For the price of a top notch eBuggy kit being out of my reach, I thought I'd never own one let alone an Associated. But thanks to eBay and Absolute Hobbyz, and wife
, a new chapter is unfolding for this long time admirer of the RC8e/SC8e platform.I remember reading about those spoked wheels being weak. I prefer spokes over dish wheels any day, sometimes it's not a choice (bye, bye Jconcepts Rulux wheels so sad to see you go
). I thought having more buggy (1/8 scale) coupled with big lugs, one needs a strong as possible wheel. Glad to know the BigBlock's tread will hold up to some abuse. For the price, I had to give them a shot.
03-22-2016, 07:53 PM
#18
It's funny the RC8e FT I had I put real Badlands on Relux's (I will miss them too and Wabash wheels as well) but they went with the buggy as the new owner loved that combo as much as I did. But the buggy was too shiny, sexy and expensive for me to stand scratching the beatiful black anodized chassis or God forbid those lovely carbon shock towers just bashing around so it had to go. When I eventually wanted another buggy and got the LX1e I had to have another set of knobbies. But since the LX1e was cheap I went cheap on the tires and got the knockoffs.
But enough about my old one. Replacing a Yeti huh? That's a big change. I'm curious, ever have a 1/8 ebuggy before? They're pretty addicting in my opinion. Every since my first one (was also my intro to 1/8 brushless) I've always had either a 1/8 ebuggy or etruggy.
But enough about my old one. Replacing a Yeti huh? That's a big change. I'm curious, ever have a 1/8 ebuggy before? They're pretty addicting in my opinion. Every since my first one (was also my intro to 1/8 brushless) I've always had either a 1/8 ebuggy or etruggy.
Last edited by Maj_Overdrive; 03-22-2016 at 08:02 PM.
03-23-2016, 04:21 PM
#19
Thread Starter
After work I ran 5 packs through the buggy. I pegged the throttle as hard as I could with 3S. Body got riddled with rock/pebbles and debris; dust flying everywhere with them BigBlocks getting a workout. I love them things! Especially when I could hear the neighbors and their kid's friends playing outside saying, "Look at that!" That just made me push the 8.2e harder.
I'm now hooked on the 1/8 buggy platform. Almost makes me want to start selling off my 1/10 scale collection that I've worked so hard at hoarding parts for. Then I sit back and have to remind myself of all the guilt I have for letting go of the RCs in my past.
I got rid of all my 4S packs along with my truggies I had. Those things were just way too big for my track and they were a money pit for me. The front universals would not last more than a couple of runs. Very bad quality of steel to say the least. I eventually gave up the search for replacements.
I'm now hooked on the 1/8 buggy platform. Almost makes me want to start selling off my 1/10 scale collection that I've worked so hard at hoarding parts for
. Then I sit back and have to remind myself of all the guilt I have for letting go of the RCs in my past.I got rid of all my 4S packs along with my truggies I had. Those things were just way too big for my track and they were a money pit for me. The front universals would not last more than a couple of runs. Very bad quality of steel to say the least. I eventually gave up the search for replacements.
03-25-2016, 02:55 PM
#20
Thread Starter
Well I can tell you one thing I don't like...the double sided tape that comes in the kit is just plain lousy. After about 15 packs put through the buggy, and changing the double sided tape twice, that's my only complaint. The last affixing of the ESC to the tray only lasted one run...my 3M tape is at work; I'm done for the night.
I probably shouldn't press my luck any more. I will have to go over the buggy; check for any loose screws and such. I get carried away sometimes and forget about the maintenance side of the hobby.
I probably shouldn't press my luck any more. I will have to go over the buggy; check for any loose screws and such. I get carried away sometimes and forget about the maintenance side of the hobby.
03-26-2016, 03:18 PM
#21
Thread Starter
When putting together the RC8.2e I guessed at what pinion gear to buy. My guess turned out to be a darn good one (for me anyway). I wasn't worried about speed. Anything in the 20 ~ 30 mph zone I'm happy with.
I'm running a 13T pinion gear at the moment (and stock 46T spur), with a Castle 4268 sized motor; I have maybe 1�mm of a gap between the motor and the chassis brace. With the gear mesh set just right, I also found out that I'm maxed out on the motor mount. I don't even think I could squeeze any more room for a 12T pinion. This is great for me as I was looking to get a bit more torque out of the 2650kv motor while running on 3S LiPo packs.
Curious to see some actual top speed results from Garmin here in the next 24 hours...after taking care of double sided tape issue with some E6000 curing time. I just have to know what my actually speeds are since my speeds that I'm obtaining are already to my liking with the Castle motor, 3S, and low gearing .
I'm running a 13T pinion gear at the moment (and stock 46T spur), with a Castle 4268 sized motor; I have maybe 1�mm of a gap between the motor and the chassis brace. With the gear mesh set just right, I also found out that I'm maxed out on the motor mount. I don't even think I could squeeze any more room for a 12T pinion. This is great for me as I was looking to get a bit more torque out of the 2650kv motor while running on 3S LiPo packs.
Curious to see some actual top speed results from Garmin here in the next 24 hours...after taking care of double sided tape issue with some E6000 curing time
. I just have to know what my actually speeds are since my speeds that I'm obtaining are already to my liking with the Castle motor, 3S, and low gearing .
03-28-2016, 01:57 PM
#22
Thread Starter
29.7mph with a fresh of the charger 3S pack. All compliments to the lowest possible gearing I can get with stock 46T spur and 13T pinion gear . I can certainly live with that number.
Trying to control anything 1/10 scale at speeds in the 20's; on the un-maintained rough track is a challenge. The RC8.2e was such a pleasure to drive; taking everything I threw at it.
Big Block tires holding up to track abuse with no signs of ungluing...definitely will be ordering more.
After all these years of only kicking around/racing 1/10 scale buggies and trucks (my 1/8 truggy doesn't count...long story short = too wide) ...I think I've finally hit RC nirvana!
I still have my eye on the HoBao Hyper VS buggy that I originally wanted, just waiting to see how this whole year pans out for the company.
Edit: Enough with this tread already Rusty...maybe I'll report back when something major happens or ...maybe not.
. I can certainly live with that number. Trying to control anything 1/10 scale at speeds in the 20's; on the un-maintained rough track is a challenge. The RC8.2e was such a pleasure to drive; taking everything I threw at it.
Big Block tires holding up to track abuse with no signs of ungluing...definitely will be ordering more.
After all these years of only kicking around/racing 1/10 scale buggies and trucks (my 1/8 truggy doesn't count...long story short = too wide) ...I think I've finally hit RC nirvana!
I still have my eye on the HoBao Hyper VS buggy that I originally wanted, just waiting to see how this whole year pans out for the company.
Edit: Enough with this tread already Rusty...maybe I'll report back when something major happens or ...maybe not.
Last edited by RustyUs; 03-28-2016 at 02:08 PM.
04-18-2016, 04:10 PM
#23
Thread Starter
Up and running again after the first ESC took a crap on me . Wired up the extension .
Good to go. This cheap ESC definitely put a damper on things. No way would I trust it in a racing situation.


. Wired up the extension .Good to go. This cheap ESC definitely put a damper on things. No way would I trust it in a racing situation.
04-24-2016, 10:55 AM
#24
Thread Starter
With about 20+ packs put through this buggy, I finally found one of my old nemesis coming to haunt me...loose wheel nut  . Just the left rear one. It didn't come all the way off, it just loosened up a bit to make a noticeably wobbly wheel.
. Just the left rear one. It didn't come all the way off, it just loosened up a bit to make a noticeably wobbly wheel.
04-24-2016, 11:10 AM
#25
Thread Starter
I've read many threads about the loosening of the steering block screws from possibly using too much thread lock on them. Too much will bound the steering block bushing and screw together; then the bushing "grabs" the screw and loosens it as you are steering...so they say. I just make sure, as the thread lock is curing, to occasionally move the steering blocks.
So I checked mine and they are still as tight as when I first put this buggy together.
So I checked mine and they are still as tight as when I first put this buggy together.
Last edited by RustyUs; 04-24-2016 at 02:41 PM.