


2nd Build: Outrigger Airboat
 02-03-2014, 09:12 PM
#101

Thread Starter

1qwksport2.5r That's not balsa wood is it? I don't want to be negative but I'm almost thinking you may still not have enough flotation in the new design, maybe pics don't do them justice. Do you think the only issue was the dropped angle on the nose of the sponsons causing it to dive?
 02-04-2014, 05:40 AM
#102
Thread Starter
Here's my current progress so far. Most of the frame work is done. They are quite strong and very light so far.
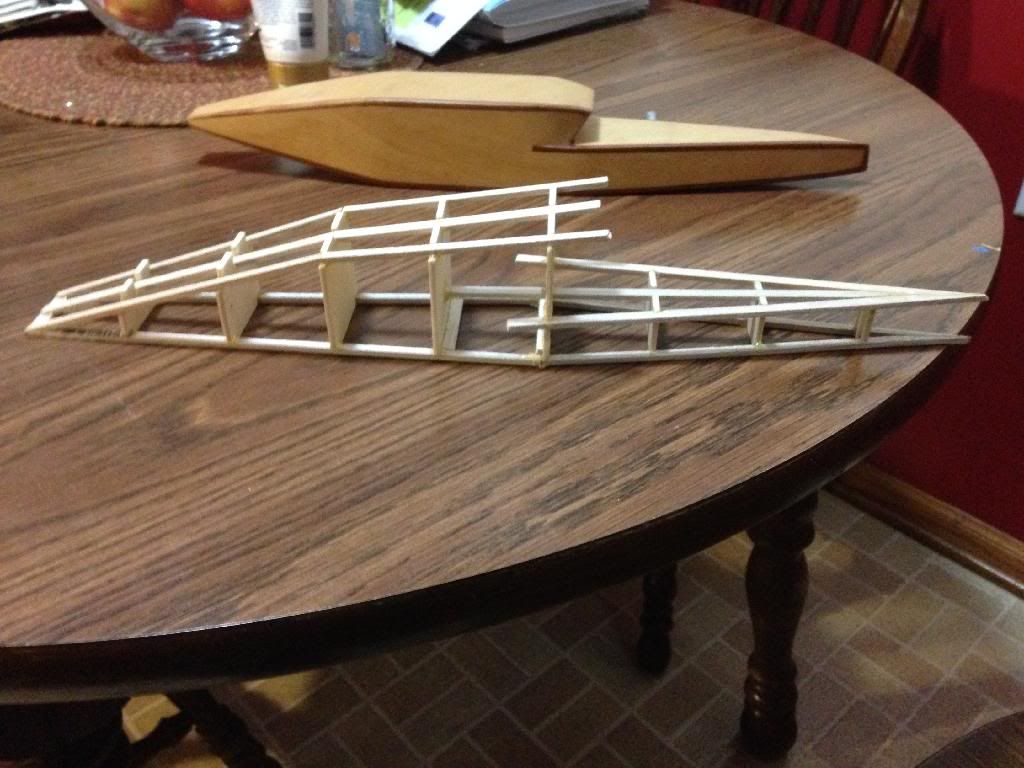
Overall length is the same as the old sponsons at 18", and sponson width is the same at 2 1/2" depth was increased to 2 1/2" from 2 1/4". The tail of the sponsons is 1" deep (aft of the step) which is the same as the old sponsons. I am pleased with how they're coming together so far.
Overall length is the same as the old sponsons at 18", and sponson width is the same at 2 1/2" depth was increased to 2 1/2" from 2 1/4". The tail of the sponsons is 1" deep (aft of the step) which is the same as the old sponsons. I am pleased with how they're coming together so far.
02-05-2014, 07:29 PM
#103
Senior Member

Join Date: Dec 2013
Posts: 432
Likes: 0
Received 0 Likes
on
0 Posts
1qwksport2.5r From the comparison pics it's not hard to see why the original ones failed, the new ones look great though. I wasn't aware balsa wood could be used but I guess if it's entirely encapsulated by stronger material it's nothing more than a frame to line things up, excellent I'll have to keep that in mind. I sense success in your future!
02-05-2014, 08:41 PM
#104
Thread Starter
1qwksport2.5r From the comparison pics it's not hard to see why the original ones failed, the new ones look great though. I wasn't aware balsa wood could be used but I guess if it's entirely encapsulated by stronger material it's nothing more than a frame to line things up, excellent I'll have to keep that in mind. I sense success in your future!
Old sponsons were skinned with 1/8" liteply and then 1/32" birch ply over that. The new sponsons will be 1/32" ply skin over the balsa frame with 3/16" birch ply doublers at the boom tubes. I may add a layer of liteply on the inside and outside of the sponsons before the birch ply skin, but not on the top and bottom if I can help it. I'll wait and see. As they sit right now, the frames will hold up a 4lb bag of sugar without crushing. The old sponsons are so strong I can stand on one of them with 175# of weight (me) and they don't so much as crack. That's strong enough I think.
02-05-2014, 08:54 PM
#105
Thread Starter
Here's the weight of the sponsons at the current stage in grams:
This is the most weight I could get the scale to read before it went to Overload. It's got an 11# capacity but it reads to 12 1/2#. Just my bare hand pushing down on it. Should stay together for awhile I hope.
PS; photo bucket blows. Pics coming soon.
This is the most weight I could get the scale to read before it went to Overload. It's got an 11# capacity but it reads to 12 1/2#. Just my bare hand pushing down on it. Should stay together for awhile I hope.
PS; photo bucket blows. Pics coming soon.
Last edited by 1QwkSport2.5r; 02-05-2014 at 09:17 PM.
 02-06-2014, 07:52 AM
#107
Thread Starter
Looks nice! Airboats are ludicrously fast on snow and ice. I don't like running on snow - no brakes really sucks.
What engine are you running on that?
What engine are you running on that?
02-08-2014, 08:26 AM
#109
Thread Starter
Sponsons are sanded and trimmed now. Hung them on the booms to see how it looks. They might be a tad too big but I don't think that will be a problem.
02-08-2014, 11:45 AM
#110
Senior Member
Join Date: Dec 2013
Posts: 432
Likes: 0
Received 0 Likes
on
0 Posts
Hey those look fantastic, great job! I sure hope they work for you this time after all the work you deserve it! What size are you boom tubes and what are you using for plugs? I have been having a miserable time trying to find either aluminum or carbon and a suitable match for plugs, EXASPERATED is more like it. Are you going to skin with balsa and then lite ply? Looking good 
Oh ya almost forgot, here's a suggestion for you don't know if it will be of interest or not, but what I anticipate doing is wrapping the hull and sponsons with saran wrap and doing a float test prior to skinning the surface that way it'll allow an opportunity to make it smaller or larger should it need it, just a thought....
Oh ya almost forgot, here's a suggestion for you don't know if it will be of interest or not, but what I anticipate doing is wrapping the hull and sponsons with saran wrap and doing a float test prior to skinning the surface that way it'll allow an opportunity to make it smaller or larger should it need it, just a thought....
Last edited by arcdude; 02-08-2014 at 11:53 AM.
02-08-2014, 04:59 PM
#111
Thread Starter
Hey those look fantastic, great job! I sure hope they work for you this time after all the work you deserve it! What size are you boom tubes and what are you using for plugs? I have been having a miserable time trying to find either aluminum or carbon and a suitable match for plugs, EXASPERATED is more like it. Are you going to skin with balsa and then lite ply? Looking good
Oh ya almost forgot, here's a suggestion for you don't know if it will be of interest or not, but what I anticipate doing is wrapping the hull and sponsons with saran wrap and doing a float test prior to skinning the surface that way it'll allow an opportunity to make it smaller or larger should it need it, just a thought....
Oh ya almost forgot, here's a suggestion for you don't know if it will be of interest or not, but what I anticipate doing is wrapping the hull and sponsons with saran wrap and doing a float test prior to skinning the surface that way it'll allow an opportunity to make it smaller or larger should it need it, just a thought....
My skin scheme will be a thin layer of Balsa if I need it, otherwise I was going to do 1/32" and 1/16" birch plywood over the balsa frame and 3/16" birch ply for the boom tube doublers. I think the size is about perfect or slightly too large but should work just fine. I suspect they should provide a significant boost in lift and being that much lighter should help with getting it on plane easier since the engine is up front. The prop should end up right at the sponsons' step so I'm on par with where the CG should be. I have some adjustability with the engine mount so balancing it out should be a breeze for the most part.
Plastic wrap isnt going to be water tight enough to keep the framework from getting wet which I would not want to have happen. Being that the boat floated perfectly with the old sponsons, I suspect it should float as well or better than before given the fact that my sponsons will be lighter and displace more volume. The trick will be getting it on plane and thats why I have my launch ramp I'll use if it wont plane off on its own. I think the better thing to do to do a "float test" before progress gets too far along would be to ziploc the sponsons and suck all of the air out of the bag and seal the holes around the boom tubes with tape or something... Unfortunately there's not a good physical way to float test without having everything water-tight. Taking into account the weight, and the amount of air volume, one should be able to extrapolate that information to determine if there is enough buoyancy. I tend to build by the seat of my pants so I dont usually go to that step and just build it, finish it, and float it afterward.
02-10-2014, 03:58 PM
#112
Senior Member
Join Date: Dec 2013
Posts: 432
Likes: 0
Received 0 Likes
on
0 Posts
I can relate to building by the seat of the pants I never have a plan just a thought and maybe a scribble or something that resembles one Lol! Do you know by any chance how high the tub bottom is above the bottom of the sponsons (water clearance)? The only reason I mentioned some form of float test is you have gone to quite a bit of trouble with this rig so far and if we can prevent an additional disappointment all the better. I just happen to get lucky today after a very long search for boom tubes, I found 1/2 in aluminum at Canadian Tire store and a 3/8 solid rod that fits inside of it, may need a little shimming or soomething, should work though. Lucky find!!
02-10-2014, 08:15 PM
#113
Thread Starter
I can relate to building by the seat of the pants I never have a plan just a thought and maybe a scribble or something that resembles one Lol! Do you know by any chance how high the tub bottom is above the bottom of the sponsons (water clearance)? The only reason I mentioned some form of float test is you have gone to quite a bit of trouble with this rig so far and if we can prevent an additional disappointment all the better. I just happen to get lucky today after a very long search for boom tubes, I found 1/2 in aluminum at Canadian Tire store and a 3/8 solid rod that fits inside of it, may need a little shimming or soomething, should work though. Lucky find!!
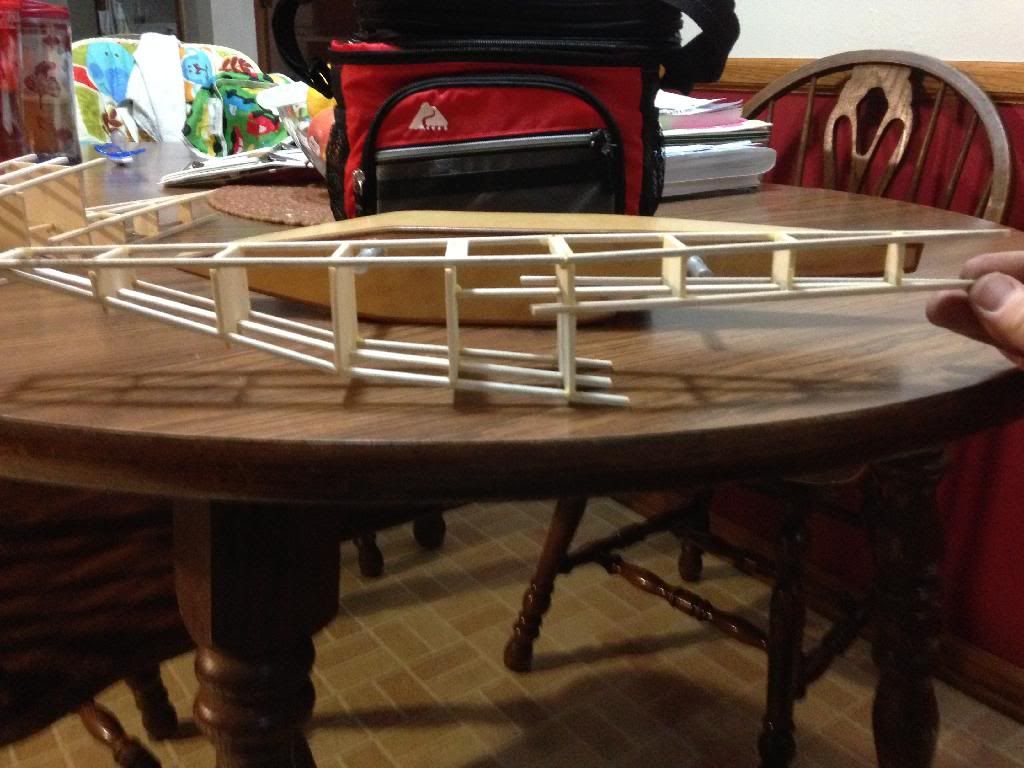
Some more pics of my rebuild follows.
02-11-2014, 06:58 PM
#115
Senior Member
Join Date: Dec 2013
Posts: 432
Likes: 0
Received 0 Likes
on
0 Posts
That is lookin pretty darn good! The overall styling is well done. Sounds like the same tubes for sure, should be strong enough. How do you find your motor mount, seem pretty solid without cross bridging? Just considering different types of mounts when I get started on mine. I notice from the pics at the back of the sponson where the tube insert attach's it seems to be a pretty small attachment point, do you think it'll be strong enough?
02-12-2014, 05:35 AM
#116
Thread Starter
That is lookin pretty darn good! The overall styling is well done. Sounds like the same tubes for sure, should be strong enough. How do you find your motor mount, seem pretty solid without cross bridging? Just considering different types of mounts when I get started on mine. I notice from the pics at the back of the sponson where the tube insert attach's it seems to be a pretty small attachment point, do you think it'll be strong enough?
The 5200 adhesive is so strong, it will by itself hold a 250hp 4-stroke to the transom of a fishing boat with no bolts! (Engine was being pulled off the boat for maintenance thus the bolts being removed).
02-17-2014, 08:39 PM
#117
Senior Member
Join Date: Dec 2013
Posts: 432
Likes: 0
Received 0 Likes
on
0 Posts
The motor mount was modified a few different times but strength-wise it handled a .46 at 17,000rpm okay. I normally use aluminum L channel to mount the engine onto and 3-16"-1/4" birch ply for the pylon uprights which works well. As for the sponsons' aft boom tube mount - it is reasonably strong as-is but I have some 3M '5200' marine adhesive/sealant that I used in the old sponsons. It is an incredibly strong adhesive I gooped around the boom tube mounts inside the sponsons and doubles as a waterproofer around where the skin meets the boom tube studs. I will use the same technique on v2.0 sponsons so I trust the strength will be good.
The 5200 adhesive is so strong, it will by itself hold a 250hp 4-stroke to the transom of a fishing boat with no bolts! (Engine was being pulled off the boat for maintenance thus the bolts being removed).
The 5200 adhesive is so strong, it will by itself hold a 250hp 4-stroke to the transom of a fishing boat with no bolts! (Engine was being pulled off the boat for maintenance thus the bolts being removed).
Are ya done yet? The 3M adhesives sound pretty much like the construction adhesive PL###, don't know if your familiar with them. Where do you get the 3M is that only available at a marine supply type store? I looked back through the thread and I couldn't find whether it's written or not what the angle of attack is on your sponson's? I have done a lot of research and can't seem to find a common denominator, everybody has they're own opinion.
02-18-2014, 04:51 AM
#118
Thread Starter
Are ya done yet? The 3M adhesives sound pretty much like the construction adhesive PL###, don't know if your familiar with them. Where do you get the 3M is that only available at a marine supply type store? I looked back through the thread and I couldn't find whether it's written or not what the angle of attack is on your sponson's? I have done a lot of research and can't seem to find a common denominator, everybody has they're own opinion.
No common concensus on AoA. I looked too. I shot from the hip on mine.
02-19-2014, 05:20 PM
#119
Senior Member
Join Date: Dec 2013
Posts: 432
Likes: 0
Received 0 Likes
on
0 Posts
1QwkSport2.5r That flu is a nasty one, I still have a little congestion since before Christmas. I'm really quite surprised there is so little information online in regards to air boats, all a person can do is sit back watch someone else do it and if it's successful proceed and if it flops forget about it, who knows maybe with Hooty's don't know if it's spelled correctly or not your boat and mine soon to be started we could be starting a trend. Get well you have a boat to finish!
02-19-2014, 06:57 PM
#120
Thread Starter
Yeah, being sick sucks. Especially when everything is achy, sore, or feels like someone has a 150psi air hose plugged into your ear. Makes life unpleasant.
Most guys building hydros are wet propped, these are the guys to pick for info. And for some reason they aren't as willing to share info to the air propped guys. Tried in the past. They think air propped can't be fast so why bother? Jerks. I have favored proven designs with most of my builds although I had more "show" than "go" with a couple. I've learned a lot from these mistakes and all I can do is share my mistakes and related lessons with others in hopes nobody makes the same mistakes I did. So with a little luck I'll have all of my boats ready to rock this summer.
I decided to use some 1/16" balsa sheet on the top and bottom of my new sponsons to add a little cushion to the skin just in case it's actually fast. I had to re-build the inside of the sponsons on my Jett powered SI3 due to excessive speed cracking the skin (with fiberglass on it even!). Didn't want to have to do that again so I'm adding some lightweight beef. I am hoping to have a little time soon to get some work done on these sponsons so I can get the boat re-rigged and float tested. I need to get some fresh electronics and probably rebuild the engine mount again too.
02-22-2014, 09:02 AM
#121
Senior Member
Join Date: Dec 2013
Posts: 432
Likes: 0
Received 0 Likes
on
0 Posts
Personally I believe air engine drive has a greater potential for speed and certainly is far more simplistic in it's implementation in comparison to a wet prop drive system. All that is required is for someone to stumble on the correct design to fully realize the potential.
Are you sure the cracking you mention is speed related and not moisture related, I have built things in the past that had a higher than expected moisture content in the wood to begin with and had cracking as it cured. That may be one advantage to using styrofoam core sponsons, the added benefit of vibration absorption. What is the issue with the motor mount, it seemed to work o.k.?
Are you sure the cracking you mention is speed related and not moisture related, I have built things in the past that had a higher than expected moisture content in the wood to begin with and had cracking as it cured. That may be one advantage to using styrofoam core sponsons, the added benefit of vibration absorption. What is the issue with the motor mount, it seemed to work o.k.?
02-22-2014, 02:18 PM
#122
Thread Starter
Personally I believe air engine drive has a greater potential for speed and certainly is far more simplistic in it's implementation in comparison to a wet prop drive system. All that is required is for someone to stumble on the correct design to fully realize the potential.
Are you sure the cracking you mention is speed related and not moisture related, I have built things in the past that had a higher than expected moisture content in the wood to begin with and had cracking as it cured. That may be one advantage to using styrofoam core sponsons, the added benefit of vibration absorption. What is the issue with the motor mount, it seemed to work o.k.?
Are you sure the cracking you mention is speed related and not moisture related, I have built things in the past that had a higher than expected moisture content in the wood to begin with and had cracking as it cured. That may be one advantage to using styrofoam core sponsons, the added benefit of vibration absorption. What is the issue with the motor mount, it seemed to work o.k.?
by thr water. Read here about 1/4 down the page: http://www.rcuniverse.com/forum/rc-a...t-hydro-5.html
The motor mount looks too redneck. I want it to look better. It will work as-is but not to the way I want it to.
03-01-2014, 08:04 AM
#123
Thread Starter
Not much progress due to illness, but this is where I'm at with my Sponson v2.0 rebuild.
Added some 1/16" balsa sheet to the top and some 1/8"X1/8" Mahogany "pin striping" as I did on the originals. I'm gong to use 1/16" birch ply for the bottom of the sponsons, and 1/32" birch ply for the sides and tops. These sponsons should be 25% lighter and at least 75% more efficient than the old ones.
Added some 1/16" balsa sheet to the top and some 1/8"X1/8" Mahogany "pin striping" as I did on the originals. I'm gong to use 1/16" birch ply for the bottom of the sponsons, and 1/32" birch ply for the sides and tops. These sponsons should be 25% lighter and at least 75% more efficient than the old ones.
03-18-2014, 06:01 AM
#125
Thread Starter
Not a lot of progress, but I'm getting closer. The skin for the sides are cut, I just need to get the skin glued on and drill the holes for the boom tube studs. After that I'll just have some trim work to do and I can get it sanded and glassed.
So far, as pictured, the old sponsons are 250 grams each. The new sponsons are 137 grams each. Strength is good and I'm coming out pretty close to dead square.
So far, as pictured, the old sponsons are 250 grams each. The new sponsons are 137 grams each. Strength is good and I'm coming out pretty close to dead square.