


Dumas Li'l Swamp Buggy Build Progress
 09-08-2013, 10:19 PM
#1
Junior Member
Thread Starter
Join Date: Jun 2013
Location: charles city, IA
Posts: 14
Likes: 0
Received 0 Likes
on
0 Posts
Hi all....I'm just getting back into R/C boats so starting off nice and easy here....Friday I purchased a Dumas Li'l Swamp Buggy kit and have the initial framework finished. My next step is to "skin" it with the supplied kit ply bottom sheeting and Mahogany top sections then install the R/C system and electric motor. That same day, I also purchased an Integy 300W Outrunner with ESC, a 1500mAh battery pack, quick charger and a variety of different pitch and length props plus a Sullivan control rod pack. I already had on hand a new in box but several year old Futaba 2 channel system for the boat. I've been lurking here checking out other peoples builds and am pretty impressed. Well, I posted a build progress video on youtube a bit ago for anyone interested at http://www.youtube.com/watch?v=Xss1tst-YI0& Please rate, comment and subscribe. I will post more updates as soon as I get more done.


 .
09-15-2013, 11:38 AM
.
09-15-2013, 11:38 AM
#3
Junior Member
Thread Starter
Join Date: Jun 2013
Location: charles city, IA
Posts: 14
Likes: 0
Received 0 Likes
on
0 Posts
Below is my progress so far besides my youtube video...I discovered that the standard Futaba S3004 servo is too tall from the radio set I have on hand so I have to wait another week to finish the boat to buy a new shorter servo so I'm kind of bummed.


09-15-2013, 11:45 AM
#4
Junior Member
Thread Starter
Join Date: Jun 2013
Location: charles city, IA
Posts: 14
Likes: 0
Received 0 Likes
on
0 Posts
Here's just a quick little tip for anyone interested. For the rudder "hinge" I used a 3/4 inch pop rivet. I pulled the nail part out and inserted it into the other end of the rivet and once installed up through the rudder mount hole and into the rudder it made a perfect hinge. You can just barely see the rivet end under the rudder mount in my last picture in my post above.
09-16-2013, 02:46 AM
#6
Junior Member
Thread Starter
Join Date: Jun 2013
Location: charles city, IA
Posts: 14
Likes: 0
Received 0 Likes
on
0 Posts
I bought a can of key lime spray paint for the hull and a can of semigloss black for the motor mount and rudder. The wood isn't as nice as it looks, it has nice looking grain yes but as others have commented, the wood looks as though it were cut in sheets using a dull chainsaw. There are deep grooves all the way across all of the mahogany sheets and I can't sand them all out without ending up with sheets that are too thin. Hopefully 3 or 4 coats of spray paint will fill in most of what I couldn't get sanded out though.
Well I woke up just now this morning and it seems my brain is working today, whereas not as much yesterday. I realized I can flip that standard servo that I'd mentioned earlier was too tall on its side and it will fit perfectly. I don't know why I hadn't thought of that yesterday. So today I should be able to finish the air boat and get a few coats of paint on it. I will post more update pictures when i get more done.


Well I woke up just now this morning and it seems my brain is working today, whereas not as much yesterday. I realized I can flip that standard servo that I'd mentioned earlier was too tall on its side and it will fit perfectly. I don't know why I hadn't thought of that yesterday. So today I should be able to finish the air boat and get a few coats of paint on it. I will post more update pictures when i get more done.
09-16-2013, 04:43 AM
#7
Senior Member
Join Date: Jan 2011
Location: Clive, IA
Posts: 439
Likes: 0
Received 0 Likes
on
0 Posts
Gentleman knows what he is doing without any info from me from what I gather..
Last edited by *delete M i k e u p delete*; 09-17-2013 at 03:49 PM. Reason: Info above says it all
 . Keep it up!
09-17-2013, 07:07 PM
. Keep it up!
09-17-2013, 07:07 PM
#10
Junior Member
Thread Starter
Join Date: Jun 2013
Location: charles city, IA
Posts: 14
Likes: 0
Received 0 Likes
on
0 Posts
Thanks Jeremy, There's not much to update today. Last night I discovered that upon test fitting the electric motor that the motor mount is too short since the 7x6 prop I have hits the deck so I'm adding some extensions to the sides of the mount. Also I've decided to just paint the rudder black because admittedly I'm too lazy to mask off the boat to paint the motor mount black so the whole boat will be Key Lime with semi-gloss black rudder. More updates as soon as I get more done.
Last edited by shawn32671; 09-23-2013 at 12:52 PM. Reason: added url to youtube video update
09-21-2013, 01:57 PM
#11
Junior Member
Thread Starter
Join Date: Jun 2013
Location: charles city, IA
Posts: 14
Likes: 0
Received 0 Likes
on
0 Posts
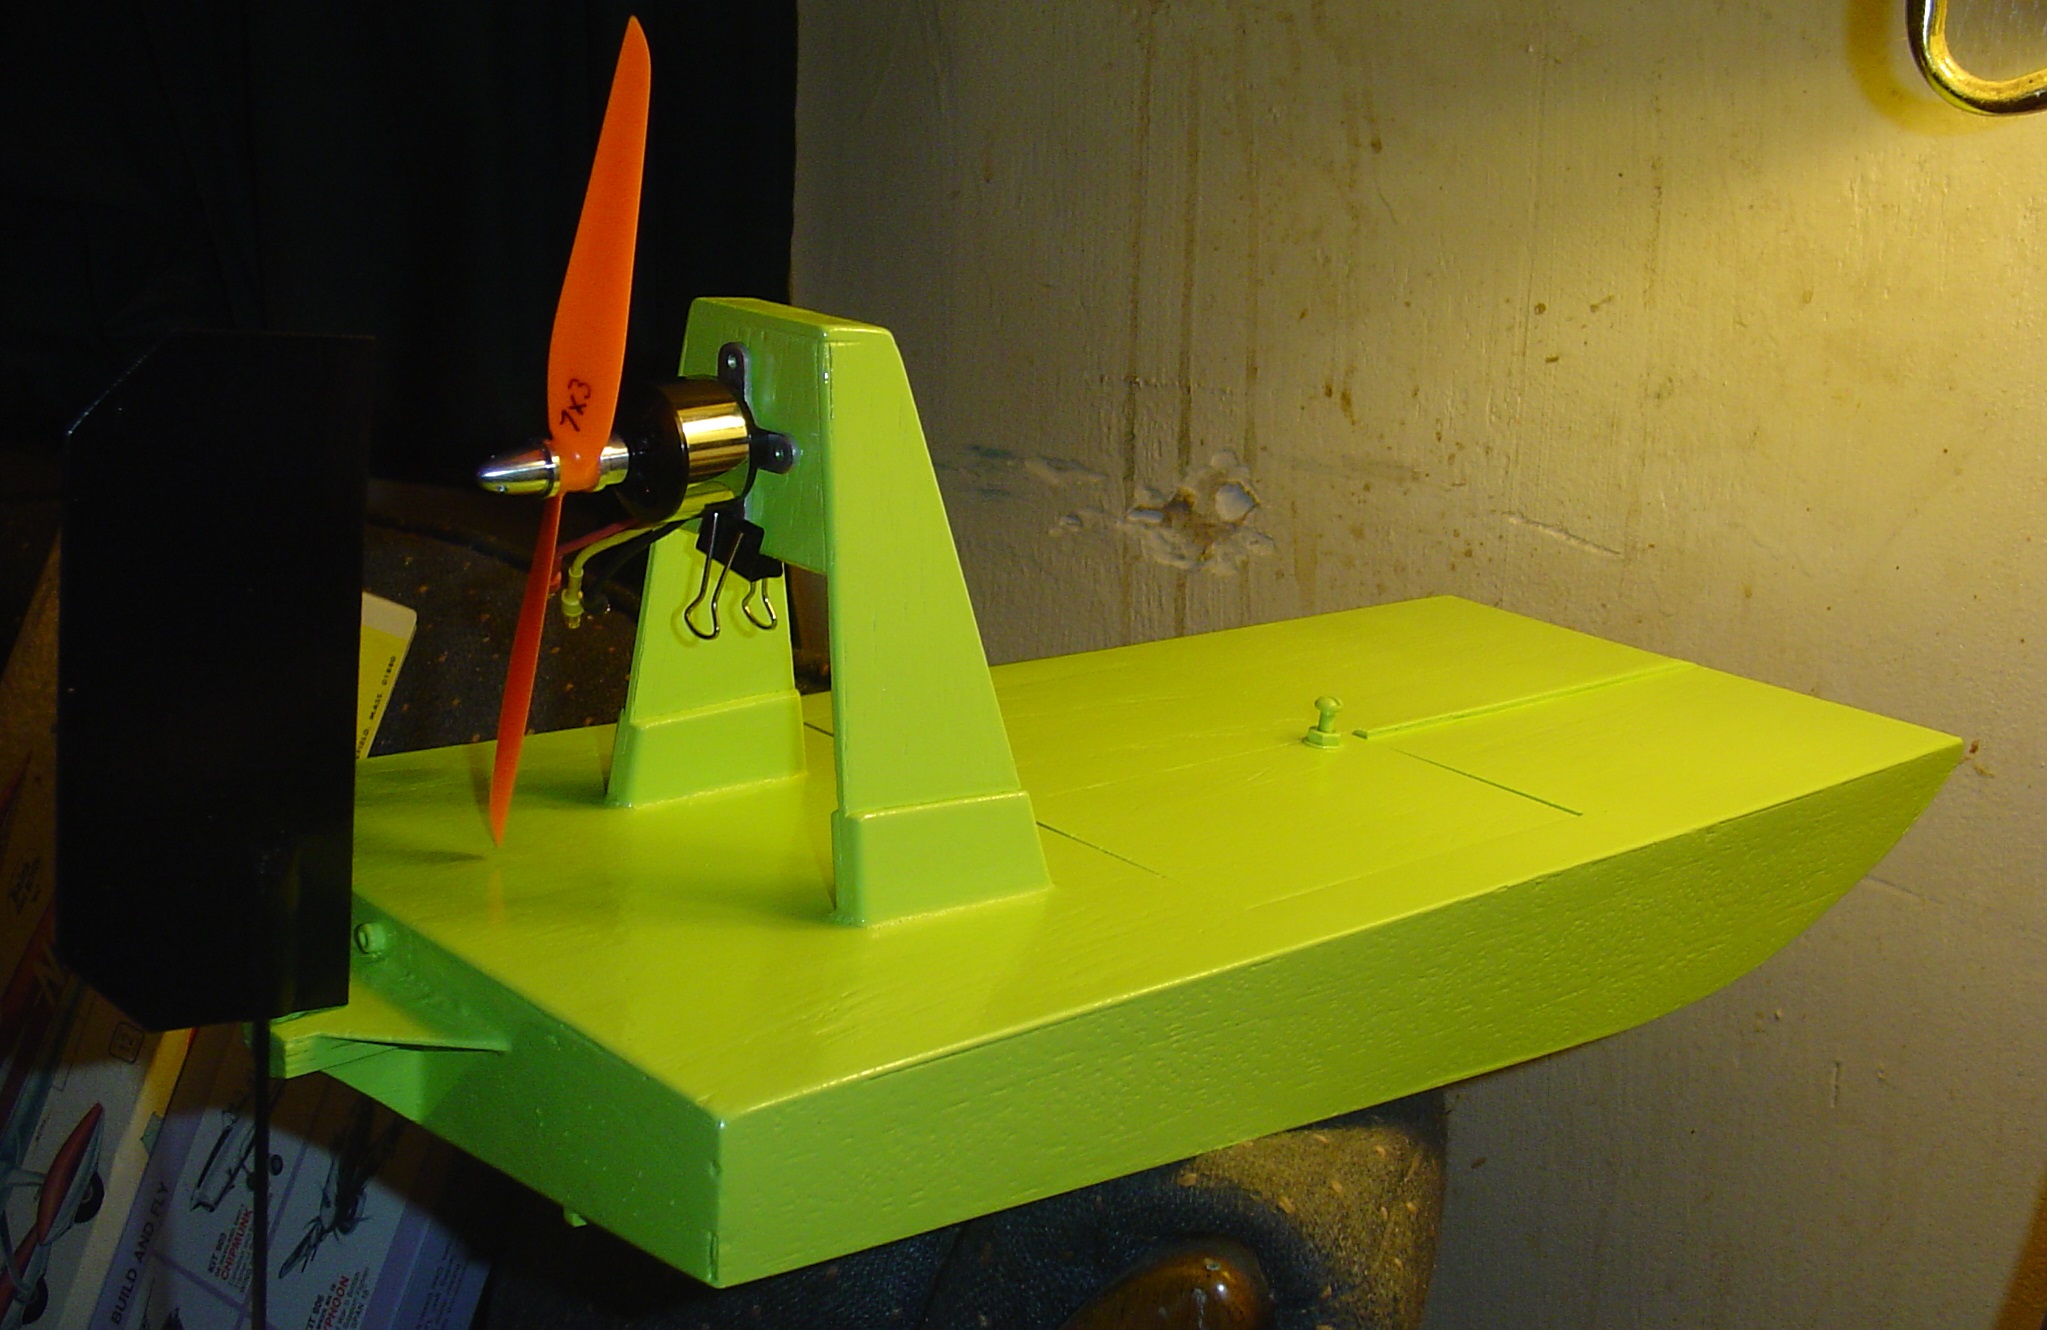
I finished painting my Dumas Li'l Swamp Buggy today. I sprayed 6 coats of Key Lime spray paint on the hull and 4 coats of semi-gloss black on the rudder. Although I couldn't get all of the deep wood grain filled in on the mahogany wood decking with the added coats of paint, the boat still ended up looking very nice and definitely water proofed. I plan to wait at least 24 hours to let the paint fully dry and cure and then install the radio equipment, electric motor and speed control, etc. The last picture shows the rudder and electric motor temporarily in place. I will update more as soon as I get more done.


Last edited by shawn32671; 09-22-2013 at 06:01 AM.
09-22-2013, 05:56 AM
#13
Junior Member
Thread Starter
Join Date: Jun 2013
Location: charles city, IA
Posts: 14
Likes: 0
Received 0 Likes
on
0 Posts
My newest progress video on youtube of this airboat build.
http://www.youtube.com/watch?v=MZPSHMQmoeo
http://www.youtube.com/watch?v=MZPSHMQmoeo
Last edited by shawn32671; 09-23-2013 at 12:52 PM.
09-22-2013, 04:18 PM
#15
Junior Member
Thread Starter
Join Date: Jun 2013
Location: charles city, IA
Posts: 14
Likes: 0
Received 0 Likes
on
0 Posts
Indeed very green lol...I'm trying to decide what else to do with it as far as graphics etc. It looks awful plain to me. I did finish the boat tonight though as far as install radio and electrics etc. and seems to have some good power to it as well. Hopefully i can get out to the local pond soon this week and get a video of it.
The prop I'm using is a 7x3 but it doesn't seem to blow as much air back at full throttle as I'd like...I really am stuck with max length of 7 inches for a prop so what pitch would be best? I assume the lower the number after the x in 7x3 means lower pitch, therefor less airflow?
The prop I'm using is a 7x3 but it doesn't seem to blow as much air back at full throttle as I'd like...I really am stuck with max length of 7 inches for a prop so what pitch would be best? I assume the lower the number after the x in 7x3 means lower pitch, therefor less airflow?
Last edited by shawn32671; 09-23-2013 at 04:52 AM. Reason: added question about the prop
09-23-2013, 04:48 AM
#16
Junior Member
Thread Starter
Join Date: Jun 2013
Location: charles city, IA
Posts: 14
Likes: 0
Received 0 Likes
on
0 Posts
I have some flame templates here and a can of Real Orange Rust-oleum Painters Touch spray paint that seems to match the orange prop on my air boat. What do you guys think of some orange flames at the front of the hull and a little at the rear end of the black rudder? The orange should really offset the color of the key lime nicely I think, what do you think?
Last edited by shawn32671; 09-23-2013 at 05:02 AM.
09-23-2013, 11:23 AM
#17
Junior Member
Thread Starter
Join Date: Jun 2013
Location: charles city, IA
Posts: 14
Likes: 0
Received 0 Likes
on
0 Posts
Well, I went with some orange flames at the bow and the front of the rudder. I know the flames don't look that great but I couldn't find my templates so I tried to make some and it didn't turn out quite as I'd hoped, plus the paint seemed awful thin. So, the boat is officially finished...Despite the crappy Dumas plans and very poor quality of the wood, this was overall an enjoyable build and a good start at getting back into the hobby after several years. Thanks to those who have commented and followed my build progress....I will still post a video of it on water once can get to the pond. I plan to find another boat in the future and give a build a try again.

Last edited by shawn32671; 09-23-2013 at 11:30 AM.
