


Airboat Outrigger build (foam core)
 07-13-2014, 04:03 AM
#176
Senior Member
Thread Starter

Join Date: Dec 2013
Posts: 432
Likes: 0
Received 0 Likes
on
0 Posts
With the need for an angle on the control rod, I'm thinking a bell crank might help. With one just behind the engine it would allow a vertical exit for the rod from the box, but cool if you have an angle solution. However, the more I think about it the more an up top servo suits to me.
I know a few folk who use grease seals effectively, but it's not a way for me. For them to work there has to be a set of spacers under the lid so that the grease is squeezed out to a certain thickness, say 2mm. Without that the layer can become very thin indeed, which means any hatch movement could create a leak path. With the thickness the grease can ebb and flow whilst keeping in contact with both sides. But, I think it's messy, and in that position it'll be streaked down the tub deck from the propwash. I'm sticking with hatch tape as the best option at the moment.
The bottle necks I use are around with all manner of drinks contents in them, they seem a common type, they have a lip or flange just under the lid which provides a nice surface for bonding. I leave about 4-5mm of the neck under the flange and fit that through the hatch hole, so the contact patch for epoxy or silicone sealant is large. I've never had one fail.
A reminder:

 07-13-2014, 04:07 AM
#177
Senior Member
Thread Starter
Join Date: Dec 2013
Posts: 432
Likes: 0
Received 0 Likes
on
0 Posts
Managed to get in some time to complete the rear sponson mounting and the air wing, much shorter bolts will be used for the finish, that is all I had on hand at the moment. All that is needed now is the control rods to angle the wing and some form of a guy wire from the tub up to the tops of the wing uprights and off to paint, woohooo!


 07-14-2014, 04:24 AM
#179
Senior Member
Thread Starter
Join Date: Dec 2013
Posts: 432
Likes: 0
Received 0 Likes
on
0 Posts
There is basically two ways to get the tub to sit 1 1/2" above the water line and had you bothered to take the time and read the purpose of the design that may have been evident. I have read posts recently where there is concern that the hobby is dwindling with little interest by newcomers, let me enlighten you a little. I have seen two guys join the board lately with obvious lack of building skills looking for assistance in their project to be met by individuals such as yourself with negative comments and nothing positive to add to the process other than narrow minded negativity and they haven't returned. Thanks for sharing!
07-15-2014, 04:42 AM
#181
Senior Member
Thread Starter
Join Date: Dec 2013
Posts: 432
Likes: 0
Received 0 Likes
on
0 Posts
I don't mind constructive criticism and it is more than welcome. Straight out negative remarks are uncalled for and only serve to drive people away from the hobby. If you have an alternative method or suggestions to accomplish the goals of this project your more than welcome to contribute.
07-16-2014, 12:22 PM
#182
Senior Member

Join Date: Aug 2013
Posts: 444
Likes: 0
Received 0 Likes
on
0 Posts
Nearly there then! Cool, looking forward to seeing how this runs now.
Your wing. It appears to be quite petite, so how are you approaching this, from a small one to start with way?
Some turnbuckles from an RC car, or maybe from some trim tabs, would be cool to allow slick adjustment of the wing, is that your plan?
Your wing. It appears to be quite petite, so how are you approaching this, from a small one to start with way?
Some turnbuckles from an RC car, or maybe from some trim tabs, would be cool to allow slick adjustment of the wing, is that your plan?
07-16-2014, 01:29 PM
#183
Senior Member
Thread Starter
Join Date: Dec 2013
Posts: 432
Likes: 0
Received 0 Likes
on
0 Posts
Nearly there then! Cool, looking forward to seeing how this runs now.
Your wing. It appears to be quite petite, so how are you approaching this, from a small one to start with way?
Some turnbuckles from an RC car, or maybe from some trim tabs, would be cool to allow slick adjustment of the wing, is that your plan?
Your wing. It appears to be quite petite, so how are you approaching this, from a small one to start with way?
Some turnbuckles from an RC car, or maybe from some trim tabs, would be cool to allow slick adjustment of the wing, is that your plan?
I built the turnbuckles already with threaded rod and two nylon control rod connectors, they seem simple enough at least to do the job. In the future I may try an active rear stabilizer without a sponson to see how that works, that is the beauty of this design, the flexibility to change any component.
As of now the boat is primed and working on touching up any minor defects or sanding scratch's with automotive glazing putty. I am wet sanding with 400-600 grit paper and it seems to be doing a good job so far. All aluminum parts have already had 3 finish coats of paint and lookin pretty.
I haven't installed anything in the radio box yet because the balance will change with the paint so I'll wait until the completed hull is fully assembled before making a final decision on battery placement. The radio box is 7" long so it'll allow me to move the balance quite significantly so patience is required at this stage I guess.
Off topic did you get the link I put in your message box to the german web page?
Last edited by arcdude; 07-16-2014 at 01:32 PM.
07-17-2014, 07:10 AM
#184
Senior Member
Thread Starter
Join Date: Dec 2013
Posts: 432
Likes: 0
Received 0 Likes
on
0 Posts
working on the prime coat wet sanding. What I use is regular primer, not the scratch coat type because what I like to do is use automotive glazing putty to contrast any defects in the surface, either method works equally as well I just find it much easier to see defects when they are contrasted by the colored glazing putty. I use luke warm water with a few drops of liquid dish soap to act as a lubricant and 400 grit wet paper makes a very easy job of it. For those that have no experience doing this it's very easy to do with little elbow grease and it only takes a few strokes to achieve a very smooth finish. In the pic I show the before and after wet sand on the two sponson's, and ready for a second coat of primer and a wet sand with around a 1000 grit paper to prep for paint. Everyone has their preferred method of doing this and all can acquire excellent results, this is just what I find works for me.

07-17-2014, 02:47 PM
#185
Senior Member
Join Date: Aug 2013
Posts: 444
Likes: 0
Received 0 Likes
on
0 Posts
As you say, trying it on the wing I guess, we know it's experimental and easy enough to adapt with your setup. So much depends on the need for keeping the tail down with the thrust/balance issue we've discussed. Only one way to find out

I must admit the glazing putty thing is confusing me a little. I've seen 'Stopper', air dry fine surface knifing fillers, but one for glazing is a mystery to me. Is it a single pack deal or does it have a catalyst hardener to mix in?
Have you chosen the topcoat grey colour yet?
07-17-2014, 03:29 PM
#186
Senior Member
Thread Starter
Join Date: Dec 2013
Posts: 432
Likes: 0
Received 0 Likes
on
0 Posts
Yes I did mate, there should be a reply in your inbox.
As you say, trying it on the wing I guess, we know it's experimental and easy enough to adapt with your setup. So much depends on the need for keeping the tail down with the thrust/balance issue we've discussed. Only one way to find out
I must admit the glazing putty thing is confusing me a little. I've seen 'Stopper', air dry fine surface knifing fillers, but one for glazing is a mystery to me. Is it a single pack deal or does it have a catalyst hardener to mix in?
Have you chosen the topcoat grey colour yet?
The glazing putty is made by 3M and is used as an autobody scratch, pinhole and minor defect putty, or by another name of bondo. It is compatible with all paints containing acetone, toluene and is easy as primer to sand so there is no difference in sanding elevation on the finished product whereas some products are quite hard and tend to leave a raised portion where you sand. The real benefit I've noticed is when sanding solid grey material you can't clearly see defects until you wipe them down from wet sanding and with the contrasting color of the putty you very clearly see defects as you sand so you know when enough is enough to prevent shallow spots in the work being done. I can't state how well it works and is easy to use one part in a little tube, pic below.
I'm not sure what to do really with the top coat if any and was only considering 3 final coats of grey, graphics by hand and a good buff and wax. Thoughts on the clear coat would be nice I've never used one and have heard many benefits to doing so.
07-17-2014, 04:59 PM
#187
Senior Member
Thread Starter
Join Date: Dec 2013
Posts: 432
Likes: 0
Received 0 Likes
on
0 Posts
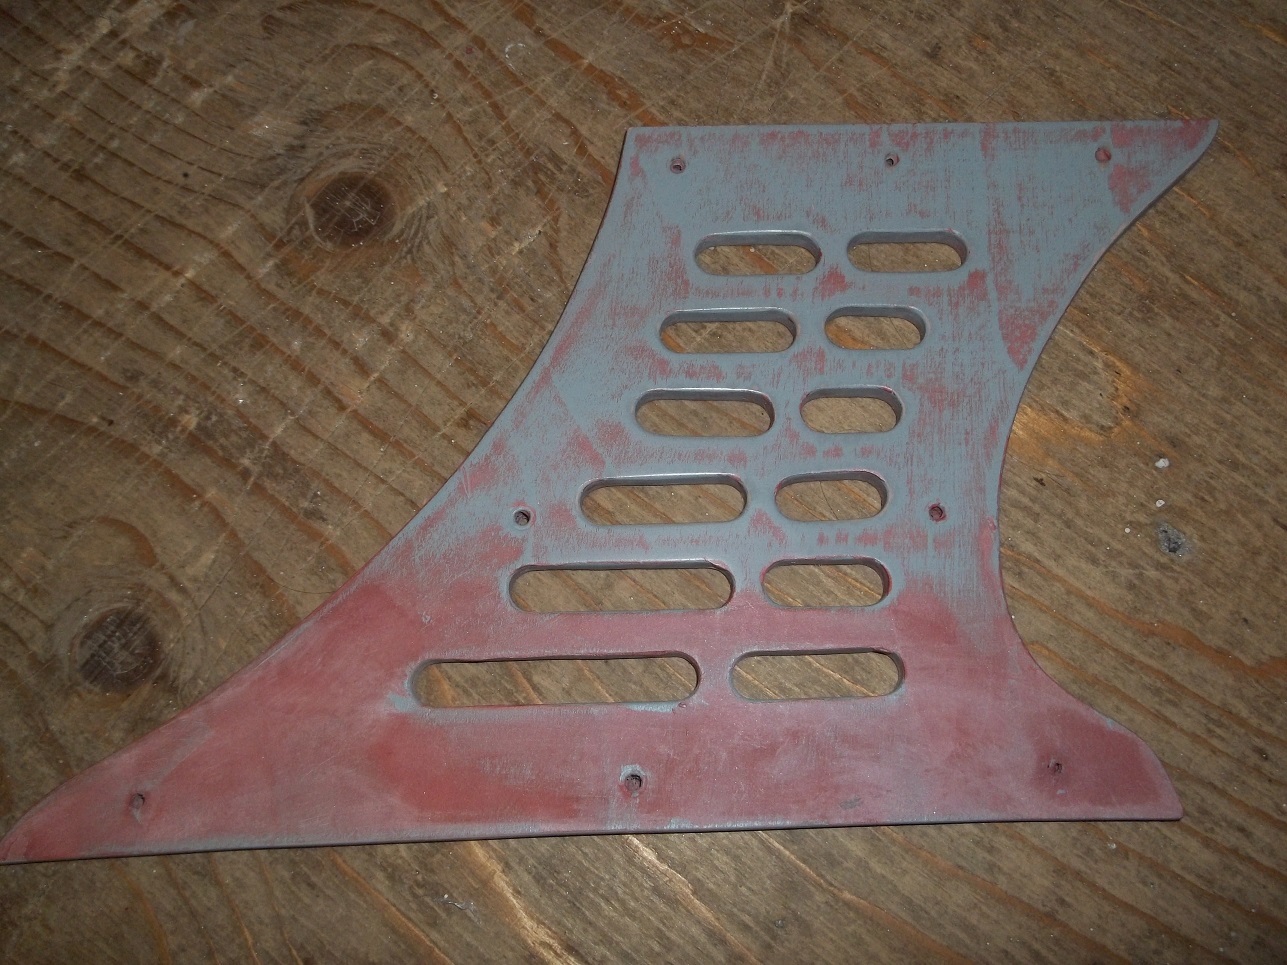
To show the benefit of the glazing putty in greater detail I have primed the engine mount side which is aircraft ply without a gel coat of any kind due to the slots which would have been a nightmare to sand so I put a quick skim coat of glazing putty on it and sanded the upper portion. In the pic you can clearly see every little defect in the wood surface from cutting sanding and the wood itself. The real asset to this is as I was sanding I could clearly see every little detail and gauge how much to sand as I went along and after the next prime coat I should have a close to glass like surface. The alternative is to prime and then take some patch type material and under strong lighting try to cover every defect which would have taken a great deal of time and likely would have had to do it more than once to get them all.
07-18-2014, 01:19 PM
#188
Senior Member
Join Date: Aug 2013
Posts: 444
Likes: 0
Received 0 Likes
on
0 Posts
OK got it, a knifing filler. It's the 'Glazing' bit that confused me, a term used more here for glass and pot glaze. A glazing putty is an old school non hardening filler used to bed in glass for windows etc. Trans continental variations . These days air dry knifing fillers have been replaced with 2 pack polyester types. Much the same as regular car body filler but a very much finer grind and through hardening irrespective of thickness.
Using colour difference is a standard body shop practice. For top flight finishes a 'guide coat', usually black, is laid down after priming stage as black is unforgiving when viewing a surface, it's colour is then used to direct the flatting process to keep control of what's being removed. The aim being to completely remove the black with the deepest depressions last to go.
Getting back to terminology, to me 'topcoats' are the coats applied after all surface prep has been done, so the colour coats and lacquers. So my question was about the colour of grey you're proposing to use. So is it the same as the primer?
Your final coat is going to have to be fuel proof. If you have something familiar for that then all is well. Many say that automotive acrylic is fuel proof. Well some are, and some certainly are not, so worth trying some. 2K lacquer is my favourite, but spraying kit needed, ideally. A superb fuel proofer though is Tufcote, probably the best of all.
. These days air dry knifing fillers have been replaced with 2 pack polyester types. Much the same as regular car body filler but a very much finer grind and through hardening irrespective of thickness.Using colour difference is a standard body shop practice. For top flight finishes a 'guide coat', usually black, is laid down after priming stage as black is unforgiving when viewing a surface, it's colour is then used to direct the flatting process to keep control of what's being removed. The aim being to completely remove the black with the deepest depressions last to go.
Getting back to terminology, to me 'topcoats' are the coats applied after all surface prep has been done, so the colour coats and lacquers. So my question was about the colour of grey you're proposing to use. So is it the same as the primer?
Your final coat is going to have to be fuel proof. If you have something familiar for that then all is well. Many say that automotive acrylic is fuel proof. Well some are, and some certainly are not, so worth trying some. 2K lacquer is my favourite, but spraying kit needed, ideally. A superb fuel proofer though is Tufcote, probably the best of all.
07-18-2014, 03:26 PM
#189
Senior Member
Thread Starter
Join Date: Dec 2013
Posts: 432
Likes: 0
Received 0 Likes
on
0 Posts
OK got it, a knifing filler. It's the 'Glazing' bit that confused me, a term used more here for glass and pot glaze. A glazing putty is an old school non hardening filler used to bed in glass for windows etc. Trans continental variations . These days air dry knifing fillers have been replaced with 2 pack polyester types. Much the same as regular car body filler but a very much finer grind and through hardening irrespective of thickness.
Using colour difference is a standard body shop practice. For top flight finishes a 'guide coat', usually black, is laid down after priming stage as black is unforgiving when viewing a surface, it's colour is then used to direct the flatting process to keep control of what's being removed. The aim being to completely remove the black with the deepest depressions last to go.
Getting back to terminology, to me 'topcoats' are the coats applied after all surface prep has been done, so the colour coats and lacquers. So my question was about the colour of grey you're proposing to use. So is it the same as the primer?
Your final coat is going to have to be fuel proof. If you have something familiar for that then all is well. Many say that automotive acrylic is fuel proof. Well some are, and some certainly are not, so worth trying some. 2K lacquer is my favourite, but spraying kit needed, ideally. A superb fuel proofer though is Tufcote, probably the best of all.
. These days air dry knifing fillers have been replaced with 2 pack polyester types. Much the same as regular car body filler but a very much finer grind and through hardening irrespective of thickness.Using colour difference is a standard body shop practice. For top flight finishes a 'guide coat', usually black, is laid down after priming stage as black is unforgiving when viewing a surface, it's colour is then used to direct the flatting process to keep control of what's being removed. The aim being to completely remove the black with the deepest depressions last to go.
Getting back to terminology, to me 'topcoats' are the coats applied after all surface prep has been done, so the colour coats and lacquers. So my question was about the colour of grey you're proposing to use. So is it the same as the primer?
Your final coat is going to have to be fuel proof. If you have something familiar for that then all is well. Many say that automotive acrylic is fuel proof. Well some are, and some certainly are not, so worth trying some. 2K lacquer is my favourite, but spraying kit needed, ideally. A superb fuel proofer though is Tufcote, probably the best of all.
My apologies I misunderstood you, I've read so much lately and in reference to topcoat at least for the most part it is eluding to the clear coat.
The finish grey is a little darker than the primer, I've included a pic to show the difference. The hope is it won't be too dark to see flying by at blistering speed or hard to locate if it sinks lol. I did quite a bit of experimenting with different brands and have settled on Krylon which I used on airplanes before without any issue, some say it isn't fuel proof some say it is and on and on, the typical debate. What I did was spray the different brands on a sample and after 3 days I poured raw fuel and let it sit there for 10 min. A couple of the samples bubbled and a few got a little soft and a couple including Krylon showed no ill effects so that is what I'll be using. It only comes in a spray can but I don't anticipate any problems. Should the paint show any deterioration after a period of time I can always clear coat the boat to preserve it.
I read up on the Tufcote a little and that seems to be a bit of a nasty product, it even has health Canada warnings to use a breathing apparatus. Don't know where to purchase it I don't recall ever seeing it at least in the big box stores.
07-19-2014, 07:59 AM
#191
Senior Member
Join Date: Aug 2013
Posts: 444
Likes: 0
Received 0 Likes
on
0 Posts
Your poor bench table ")
I use fume filter face masks for all spraying, working with Isocyanates kinda forces it. I wonder if Methanol and Nitro Methane come with a warning
Looking great mate. I've still not got back into my twin airboat, too busy playing with strimmers (weed whacker's) at the moment making prop adapters
I use fume filter face masks for all spraying, working with Isocyanates kinda forces it. I wonder if Methanol and Nitro Methane come with a warning
Looking great mate. I've still not got back into my twin airboat, too busy playing with strimmers (weed whacker's) at the moment making prop adapters
07-19-2014, 03:21 PM
#192
Senior Member
Thread Starter
Join Date: Dec 2013
Posts: 432
Likes: 0
Received 0 Likes
on
0 Posts
Your poor bench table
I use fume filter face masks for all spraying, working with Isocyanates kinda forces it. I wonder if Methanol and Nitro Methane come with a warning
Looking great mate. I've still not got back into my twin airboat, too busy playing with strimmers (weed whacker's) at the moment making prop adapters
I use fume filter face masks for all spraying, working with Isocyanates kinda forces it. I wonder if Methanol and Nitro Methane come with a warning
Looking great mate. I've still not got back into my twin airboat, too busy playing with strimmers (weed whacker's) at the moment making prop adapters
Prop adapters? aren't you the industrious one! Do you make a batch for the local hobby shop, club type thing? Summer is moving along quite quickly this year for some reason, hopefully you get back onto the twin's before too long.
On another note I've been experimenting with trying to fog two colors together with spray cans so I can blend the underbelly of the shark white with the top grey and possibly some black mixed in for good measure. Here is a pic to show the attempt, what I did was spray the grey then hold a piece of cardboard approx 1/2" above the material and spray the white on a sharp angle over the cardboard onto the base and then lightly rub the seam a little with rubbing compound and I seem to be able to control how much to blend the two to give a somewhat natural look to it, or at least that is the hope
Bare in mind this was done quickly just to see if it could work.
07-19-2014, 03:32 PM
#193
Senior Member
Join Date: Aug 2013
Posts: 444
Likes: 0
Received 0 Likes
on
0 Posts
Somewhere down the road I'll be making a gasser airboat, so I've been collecting garden machinery to play with
Your fading will work well with a rubbed out base colour, something different than the dodgy fades you see sometimes with it's sort of 'distressed' edge look, like it. Fades are harder to get right than folk might think.
07-19-2014, 04:02 PM
#194
Senior Member
Thread Starter
Join Date: Dec 2013
Posts: 432
Likes: 0
Received 0 Likes
on
0 Posts
Nah, I'm just tooling around with strimmer motors, mostly for an inflatable boat thingy that can't quite manage a Yamaha Outboard. I'm going to have a play tomorrow to see what props might suit:

Somewhere down the road I'll be making a gasser airboat, so I've been collecting garden machinery to play with
Your fading will work well with a rubbed out base colour, something different than the dodgy fades you see sometimes with it's sort of 'distressed' edge look, like it. Fades are harder to get right than folk might think.
I can offer you a few pics and info on doing so as I've made an outboard out of a 4 stroke for my canoe, the arthritic riddled elbows and shoulders can only do so much these days, got creative 
Not sure I'm following you on rubbing out the base coat? The center portion of the sample pic I posted is pretty accurate at least from all the pic's I've been looking at online, but certainly open to any other methods that may work.
07-20-2014, 02:33 PM
#195
Senior Member
Join Date: Aug 2013
Posts: 444
Likes: 0
Received 0 Likes
on
0 Posts
Yes, an outboard. I only want a trolling motor and the electrics are not quite there yet. Commercial outboards are too heavy, or just too big. Tried that lash up above today, down propped in diameter and went for a three blade in the end. But, methinks a strimmer with centrifugal clutch is going to be needed.
By 'Rubbing out' I mean the flatting of the surface, I mentioned it because the surface flatness affects the way the fade goes. Of course such features may well be desirable.
By 'Rubbing out' I mean the flatting of the surface, I mentioned it because the surface flatness affects the way the fade goes. Of course such features may well be desirable.
07-20-2014, 07:23 PM
#196
Senior Member
Thread Starter
Join Date: Dec 2013
Posts: 432
Likes: 0
Received 0 Likes
on
0 Posts
Yes, an outboard. I only want a trolling motor and the electrics are not quite there yet. Commercial outboards are too heavy, or just too big. Tried that lash up above today, down propped in diameter and went for a three blade in the end. But, methinks a strimmer with centrifugal clutch is going to be needed.
By 'Rubbing out' I mean the flatting of the surface, I mentioned it because the surface flatness affects the way the fade goes. Of course such features may well be desirable.
By 'Rubbing out' I mean the flatting of the surface, I mentioned it because the surface flatness affects the way the fade goes. Of course such features may well be desirable.
Okay understood, I sanded and buffed out my sample in the earlier pic and it works fantastic and leaves a realistic appearance, it would appear the paint job is as much an experiment as the rest of the boat. I do have one question, what grit paper do you use on the prime coat before paint?
Last edited by arcdude; 07-20-2014 at 07:30 PM.
07-21-2014, 11:20 AM
#197
Senior Member
Join Date: Aug 2013
Posts: 444
Likes: 0
Received 0 Likes
on
0 Posts
Grades of abrasives change according to the paint and the method being used, but over the years I've settled on P600 for primer flatting in most cases. Most paints I use can fill that OK. However, it would be worth finding out if your Krylon self etches. I use Krylon's camo colours on gun stocks and nothing but a de-nib with P1000 is needed. Probably the best aerosols I've used to be honest, warming in a bowl of hot water lowers the viscosity to allow better atomisation, and the flow rate is not dissimilar to a production gun for the given size of fan needed. So, paint a section and repaint without flatting first, see if it bonds OK by rubbing it down, even feathering will result if the bond is good. The idea is to get a good mechanical bond with the finest abrasive used beforehand.
07-21-2014, 12:06 PM
#198
Senior Member
Join Date: Aug 2013
Posts: 444
Likes: 0
Received 0 Likes
on
0 Posts
Don't know if you've seen this, but 'Hooty301', the chap who had an 84mph rigger, has just unveiled a new one: http://www.rcairboats.net/phpBB/view...p=34391#p34391
07-21-2014, 03:29 PM
#199
Senior Member
Thread Starter
Join Date: Dec 2013
Posts: 432
Likes: 0
Received 0 Likes
on
0 Posts
Grades of abrasives change according to the paint and the method being used, but over the years I've settled on P600 for primer flatting in most cases. Most paints I use can fill that OK. However, it would be worth finding out if your Krylon self etches. I use Krylon's camo colours on gun stocks and nothing but a de-nib with P1000 is needed. Probably the best aerosols I've used to be honest, warming in a bowl of hot water lowers the viscosity to allow better atomisation, and the flow rate is not dissimilar to a production gun for the given size of fan needed. So, paint a section and repaint without flatting first, see if it bonds OK by rubbing it down, even feathering will result if the bond is good. The idea is to get a good mechanical bond with the finest abrasive used beforehand.
07-21-2014, 03:32 PM
#200
Senior Member
Thread Starter
Join Date: Dec 2013
Posts: 432
Likes: 0
Received 0 Likes
on
0 Posts
Don't know if you've seen this, but 'Hooty301', the chap who had an 84mph rigger, has just unveiled a new one: http://www.rcairboats.net/phpBB/view...p=34391#p34391