


View Poll Results: Would you like to see a Bro******** e-book published
Yes - that would be great !


17
73.91%
Not particularly


6
26.09%
Voters: 23. You may not vote on this poll
Bro rc Surfer Custom Boards
 02-09-2014, 01:48 PM
#626

Thread Starter

Join Date: May 2009
Location: Cape Towm, SOUTH AFRICA
Posts: 2,769
Likes: 0
Received 0 Likes
on
0 Posts
Surfed Friday - Saturday - Sunday in some very pleasant 2 - 4 ft face surf. A rather gentle swell this time of the year in the bay ( False Bay) but always fun - beautifully set, with the mountain ranges surrounding it ...stunning time of year ....
Lisa-Marie got down to the beach with us this morning and captured a few good waves....
http://www.youtube.com/watch?v=23QWzU4WWd4
Lisa-Marie got down to the beach with us this morning and captured a few good waves....
http://www.youtube.com/watch?v=23QWzU4WWd4
 02-11-2014, 01:05 PM
#627
Thread Starter
Join Date: May 2009
Location: Cape Towm, SOUTH AFRICA
Posts: 2,769
Likes: 0
Received 0 Likes
on
0 Posts
Laid up the hatch cover to-day - white Gel coat - a few layers of cloth - giving it a texture deck finish - nice contrast...
The hump is to accommodate the 4s battery rather than add volume to the boards thickness.


Stopped off for a quick session on the way to gym - weather was to great to go straight indoors for a work out ......
http://www.youtube.com/watch?v=vjARoUp0KM8
The hump is to accommodate the 4s battery rather than add volume to the boards thickness.
Stopped off for a quick session on the way to gym - weather was to great to go straight indoors for a work out ......
http://www.youtube.com/watch?v=vjARoUp0KM8
02-13-2014, 11:27 PM
#629
Thread Starter
Join Date: May 2009
Location: Cape Towm, SOUTH AFRICA
Posts: 2,769
Likes: 0
Received 0 Likes
on
0 Posts
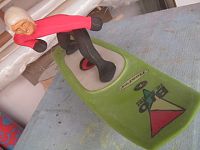
Another Bro is formed !
What makes it possible for myself to enjoy most every session and push the limits to whatever the surf offers, is the confidence I have in Bro's ( the surfer dude) ability to withstand most every wave it faces - whether it's pulling a huge air !...taking a big wipe out - crashing on the shore, in a dumping shore break - or - punching through a fat lip at big speed, pulling a Rodeo flip - Bro has proven over and over that it is up to the task...
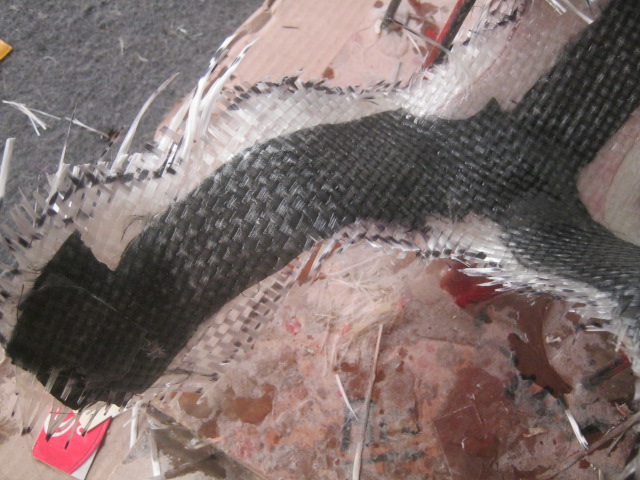
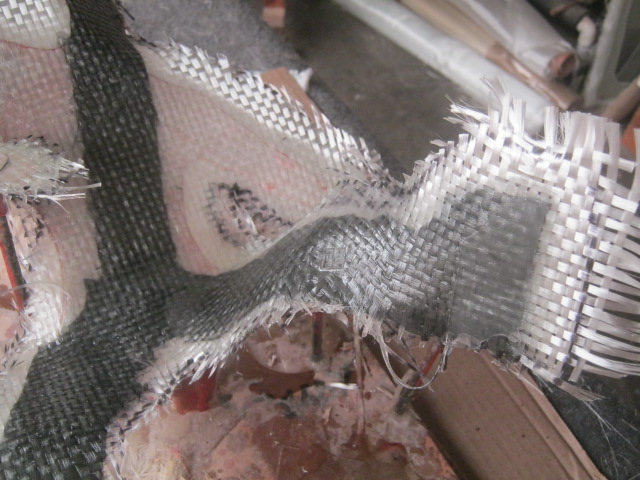
http://www.youtube.com/watch?v=5GEwCkDUPV8 What sets Bro apart from the traditional rc surfer dude construction ( foam core) is the 3D silhouette Moulded Flexible Core -MFC- made up of several layers of woven cloth reinforced with uni directional carbon fibre layers, in specific areas - post cured with epoxy resin. FLEXIBILITY is all important when 'impact' is part of the equation.
I have even noticed , when closely watching the surf videos - that when landing from a jump or move - Bro can be seen flexing - i.e. absorbing the landing inertia that could otherwise have pulled it over...

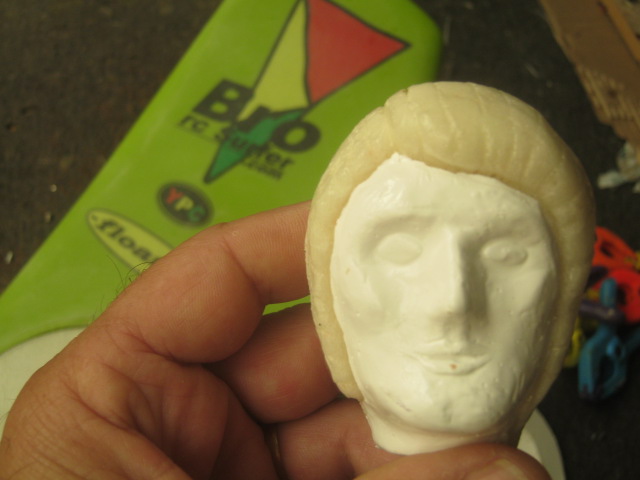
Bro's head is moulded using polyester gel for the face detail
and polyurethane\2 part - high density closed cell foam for the
bulk of the head. Making it very light and durable and buoyant.
The production is consistent and the head is very easily replaced
if ever damaged beyond repair.

What makes it possible for myself to enjoy most every session and push the limits to whatever the surf offers, is the confidence I have in Bro's ( the surfer dude) ability to withstand most every wave it faces - whether it's pulling a huge air !...taking a big wipe out - crashing on the shore, in a dumping shore break - or - punching through a fat lip at big speed, pulling a Rodeo flip - Bro has proven over and over that it is up to the task...
http://www.youtube.com/watch?v=5GEwCkDUPV8 What sets Bro apart from the traditional rc surfer dude construction ( foam core) is the 3D silhouette Moulded Flexible Core -MFC- made up of several layers of woven cloth reinforced with uni directional carbon fibre layers, in specific areas - post cured with epoxy resin. FLEXIBILITY is all important when 'impact' is part of the equation.
I have even noticed , when closely watching the surf videos - that when landing from a jump or move - Bro can be seen flexing - i.e. absorbing the landing inertia that could otherwise have pulled it over...
Bro's head is moulded using polyester gel for the face detail
and polyurethane\2 part - high density closed cell foam for the
bulk of the head. Making it very light and durable and buoyant.
The production is consistent and the head is very easily replaced
if ever damaged beyond repair.
Last edited by YPC; 02-14-2014 at 02:56 AM.
02-16-2014, 05:28 AM
#630
Thread Starter
Join Date: May 2009
Location: Cape Towm, SOUTH AFRICA
Posts: 2,769
Likes: 0
Received 0 Likes
on
0 Posts
Core cleaned up and trimmed.......


Carbon mounting pads fitted.........


Neoprene laminate both sides....


used a thicker Neoprene - give Bro 'more body


Looks even better on the board..


off to wardrobe and make up.......
Its all important for the surfer dude to be set with its buoyancy "off centre"- if not - you could end up with the boards 'not righting' - as the rotation cant be initiated if the buoyancy is dead centre.
I set my surfers buoyancy to the right rail ( in the design of bro's stance) so that the board rotates when self righting in the same direction as the props rotational torque. In very windy conditions, it always helps to use the prop rotational torque to help recovery....
Carbon mounting pads fitted.........
Neoprene laminate both sides....
used a thicker Neoprene - give Bro 'more body
Looks even better on the board..
off to wardrobe and make up.......
Its all important for the surfer dude to be set with its buoyancy "off centre"- if not - you could end up with the boards 'not righting' - as the rotation cant be initiated if the buoyancy is dead centre.
I set my surfers buoyancy to the right rail ( in the design of bro's stance) so that the board rotates when self righting in the same direction as the props rotational torque. In very windy conditions, it always helps to use the prop rotational torque to help recovery....
02-16-2014, 05:29 AM
#631
Thread Starter
Join Date: May 2009
Location: Cape Towm, SOUTH AFRICA
Posts: 2,769
Likes: 0
Received 0 Likes
on
0 Posts
make up and wardrobe done ......head will still receive a light coat of clear epoxy.
The rash vest is a tight fitting Lycra - adds dimension to Bro's figure and helps
stand out in the surf (various colour options)
Can't get more authentic than Neoprene and Lycra ....


The rash vest is a tight fitting Lycra - adds dimension to Bro's figure and helps
stand out in the surf (various colour options)
Can't get more authentic than Neoprene and Lycra ....
Last edited by YPC; 02-18-2014 at 02:02 AM.
02-18-2014, 02:11 AM
#632
Thread Starter
Join Date: May 2009
Location: Cape Towm, SOUTH AFRICA
Posts: 2,769
Likes: 0
Received 0 Likes
on
0 Posts
The current Bro which I am still surfing - has held up so well for close on a solid year now - of flat out surfing well over 150 sessions ....
Recently had a new hair colur and new rash vest .....


A comparison of the 30 mm thickness to the now new 40 mm thickness.....


40 mm definitely looks bulkier ( beefed up).....hoping it adds to the visual impact on the water.....


Recently had a new hair colur and new rash vest .....
A comparison of the 30 mm thickness to the now new 40 mm thickness.....
40 mm definitely looks bulkier ( beefed up).....hoping it adds to the visual impact on the water.....
02-18-2014, 10:46 PM
#633
Senior Member
Join Date: Aug 2012
Location: sydney, AUSTRALIA
Posts: 388
Likes: 0
Received 0 Likes
on
0 Posts
New flexy bro lookin good Brosurfer.
After bustin the o rings of kyo dude last week took my flexybro for some beach fun today.
Shore dump was goin off so took him into the line up. Only 3 to 4 foot but way crowded for a 10am weekday.....
Anyway flexy had great fun but mainly in the sand barrels, lol after one launch escaping a grinding sand tube landed on his head, on the beach!
Got some big airs, knocked out some of the foam i stuffed up his jumper, but all in all he is still going strong.
All good all the best.. bc
02-19-2014, 02:27 AM
#635
Thread Starter
Join Date: May 2009
Location: Cape Towm, SOUTH AFRICA
Posts: 2,769
Likes: 0
Received 0 Likes
on
0 Posts
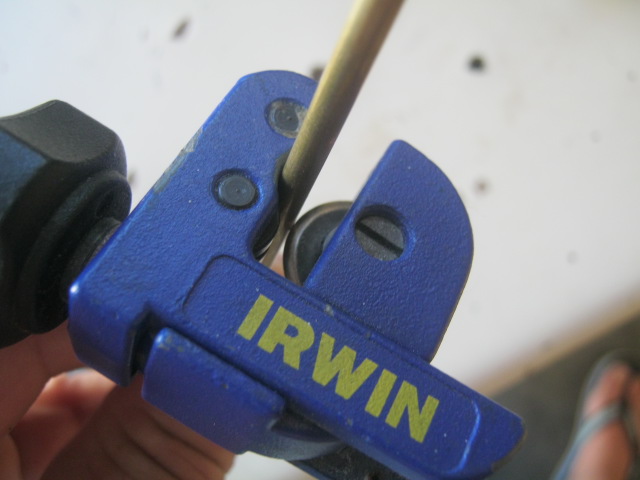
Using the miniature pipe cutter is very handy and also leaves a bevel around the
outside of the pipe which is good to avoid damaging the silicon water pipe when
slipping it over. The Du-Bro pipe bender is also a must to achieve a good bend
ensuring good flow.
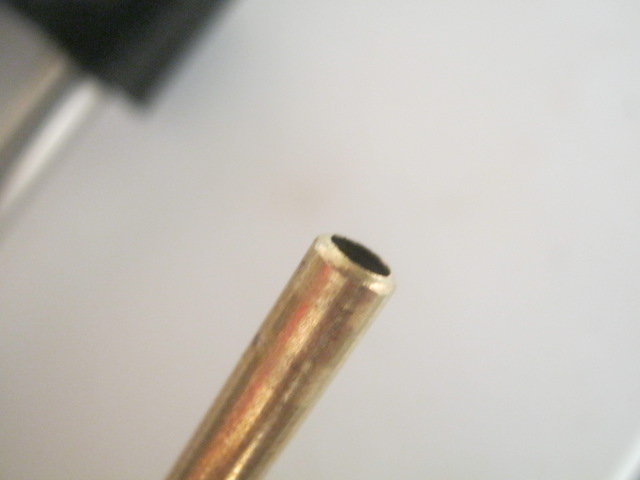
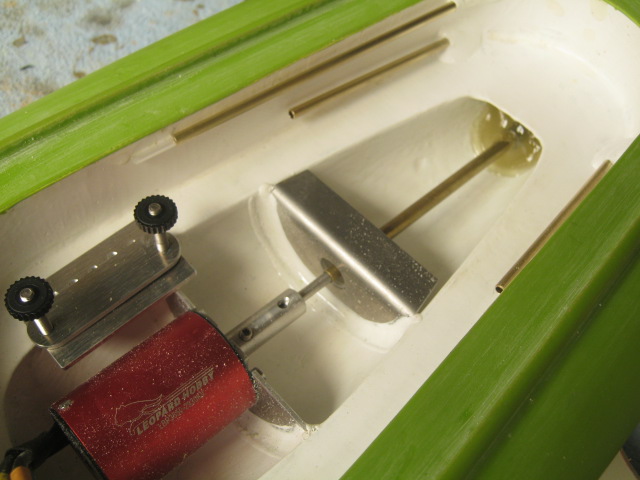
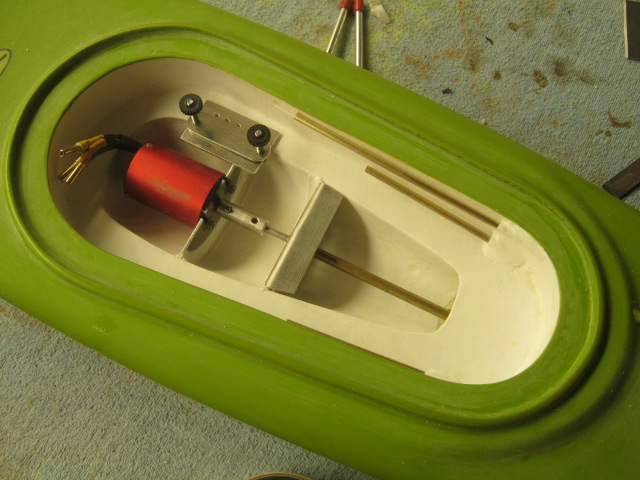
I like to mount the water pipes against the side of the housing for added strength.
A good 'block' of epoxy is used to mount them in place to be 100% water tight.
I use a single inlet - outlet water cooling system - Inlet on the left and outlet on
the right - flowing to the ESC - then to the motor. Protrusion at least 10mm en-
suring good pick up.

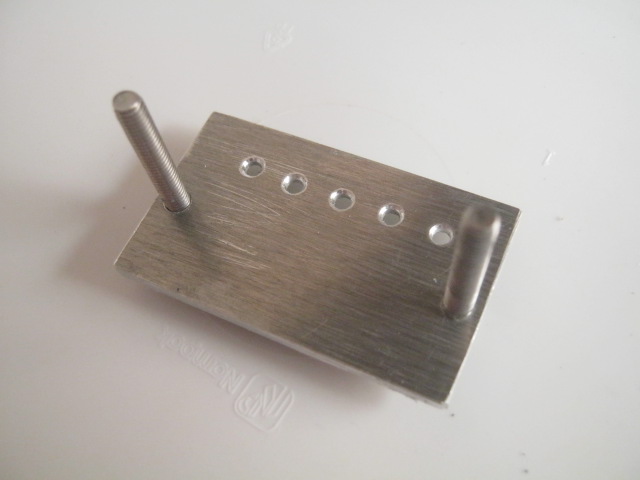
Servo tray /mount - holes drilled to add extra bonding strength - I have had the
mount pop lose once or twice from a big air landing.


outside of the pipe which is good to avoid damaging the silicon water pipe when
slipping it over. The Du-Bro pipe bender is also a must to achieve a good bend
ensuring good flow.
I like to mount the water pipes against the side of the housing for added strength.
A good 'block' of epoxy is used to mount them in place to be 100% water tight.
I use a single inlet - outlet water cooling system - Inlet on the left and outlet on
the right - flowing to the ESC - then to the motor. Protrusion at least 10mm en-
suring good pick up.
Servo tray /mount - holes drilled to add extra bonding strength - I have had the
mount pop lose once or twice from a big air landing.
02-19-2014, 03:54 AM
#636
Thread Starter
Join Date: May 2009
Location: Cape Towm, SOUTH AFRICA
Posts: 2,769
Likes: 0
Received 0 Likes
on
0 Posts
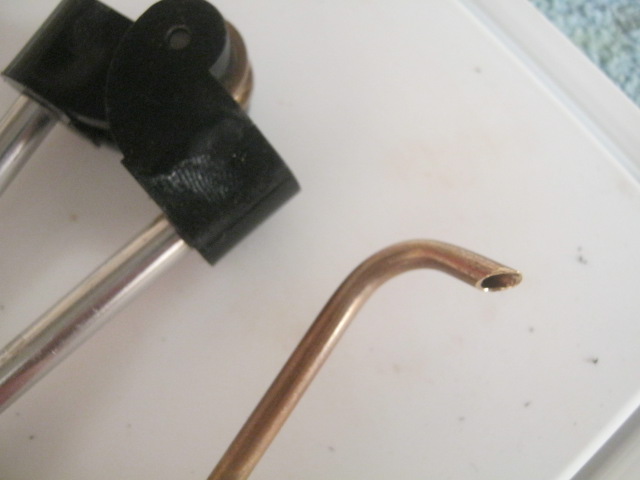
Fitting the steering push rod guide tube: also tucked against the side wall of the
housing for strength - out of the way - brass tube with a plastic tube within.
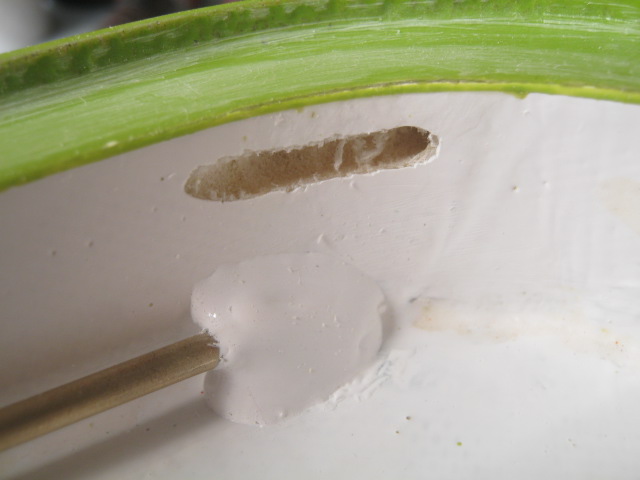

Epoxied in place as with the water cooling pipes - coated with coloured gel coat.
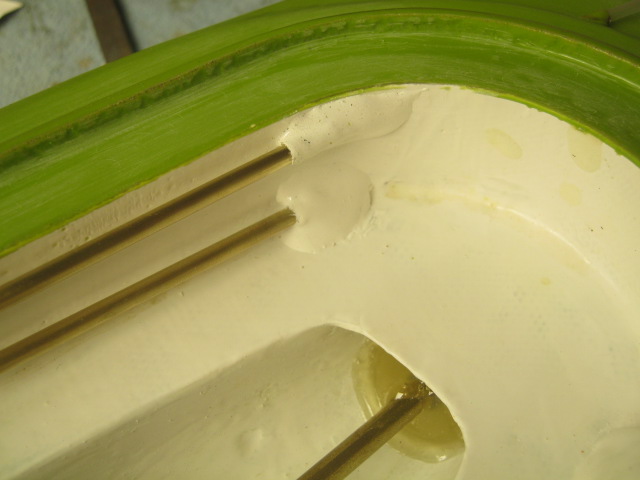
Board ready for a final fine sand - before two clear coats of resin to be applied for
a high gloss finish.
housing for strength - out of the way - brass tube with a plastic tube within.
Epoxied in place as with the water cooling pipes - coated with coloured gel coat.
Board ready for a final fine sand - before two clear coats of resin to be applied for
a high gloss finish.
02-20-2014, 12:25 AM
#638
Senior Member
Join Date: Aug 2012
Location: sydney, AUSTRALIA
Posts: 388
Likes: 0
Received 0 Likes
on
0 Posts
Might take you up on the vest offer Bro, pounded him on the beach again today had to drain the sand out of him... can't beleive board and bro are handling such hard hits haha... had a few enthusiasts wanting one (as usual) gave them your name. One guy was so wanting one he was in the water takin action shots to show his mates hoping they will all donate funds, they surf a sucking reef tube that only happens now and then and want to put him deep in a barrel.. didn't go into all the maintence/care/ rc/ battery issues with em but.. lol.
btw, was thinkin of making a flat deck to suit kyosho, then attaching another bro as his foot stance just fits.
Do you have any weight/height specs of your new guy?
btw, was thinkin of making a flat deck to suit kyosho, then attaching another bro as his foot stance just fits.
Do you have any weight/height specs of your new guy?
02-20-2014, 12:54 AM
#639
Thread Starter
Join Date: May 2009
Location: Cape Towm, SOUTH AFRICA
Posts: 2,769
Likes: 0
Received 0 Likes
on
0 Posts
Gloss Coat !
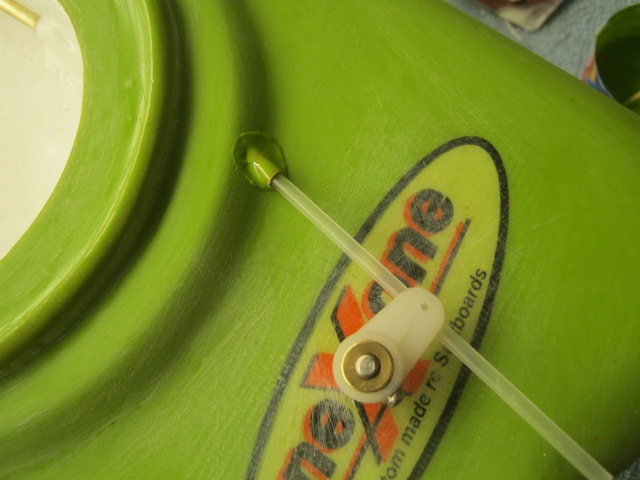
A final 600 grit fine sand - drip skirt applied - acetone wipe - tubes blocked up - ready for resin coat.


Deck Gloss Coat applied - once cured to be sanded and polished


I flow the resin richly around the various brass tubes to add strength and good
seal around each tube.


 .
.
The resin flow coat ( gloss) brings out the brilliance of the colour !

A final 600 grit fine sand - drip skirt applied - acetone wipe - tubes blocked up - ready for resin coat.
Deck Gloss Coat applied - once cured to be sanded and polished
I flow the resin richly around the various brass tubes to add strength and good
seal around each tube.
The resin flow coat ( gloss) brings out the brilliance of the colour !
02-20-2014, 01:39 AM
#640
Thread Starter
Join Date: May 2009
Location: Cape Towm, SOUTH AFRICA
Posts: 2,769
Likes: 0
Received 0 Likes
on
0 Posts
Howzit BC .....let me know what colour rash vest you would like ...
Sounds like you are having blast - the custom boards are tough - flexi - Bro can take a tumble - I have supplied a few Bro's for the Kyhosho boards - why not fit the current thinner Bro to the Kyhosho board and the thicker bro to the custom board....
The new Bro is the same height and stance - weighs in at around 170 g's ( 5 3/4 ounces) - roughly 35 grams more - but wont make significant difference to the peripheral force as the weight is overall '- the buoyancy will be quite a bit more - realising it has a 25% increase in volume.
02-20-2014, 04:49 AM
#641
Thread Starter
Join Date: May 2009
Location: Cape Towm, SOUTH AFRICA
Posts: 2,769
Likes: 0
Received 0 Likes
on
0 Posts
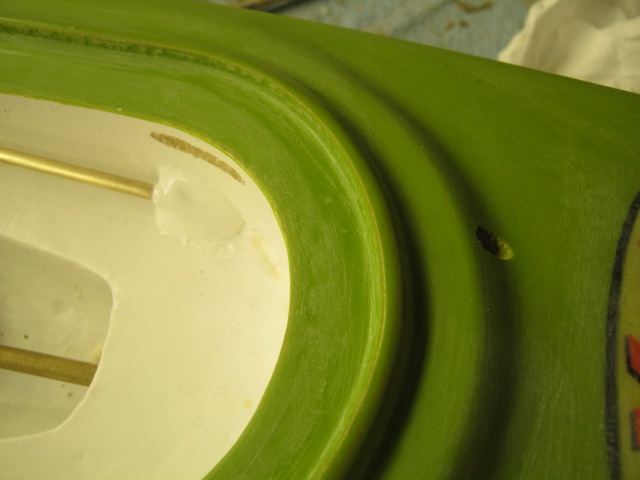
Hull fine sanded - rails drip taped - acetone wiped..


check for level in length and width ...'important


Liberal coat of flow resin ...especially around the
prortuding brass tubes for strength and seal.


Some fine sanding and polishing for an authentic glass over foam finish........

check for level in length and width ...'important
Liberal coat of flow resin ...especially around the
prortuding brass tubes for strength and seal.
Some fine sanding and polishing for an authentic glass over foam finish........
02-20-2014, 04:54 AM
#642
Senior Member
Join Date: Aug 2012
Location: sydney, AUSTRALIA
Posts: 388
Likes: 0
Received 0 Likes
on
0 Posts
Thanks for the specs Brosurfer.
Nice thought about changing riders but my flexy bro is glued solid to his deck no way i'm cuttin him off. Even though not centre for good turtle selfrighting i like the way he stands, extra bouancy workin good so far too.
My kyo dude is 25cm (10")high x 100g (3.5oz)in weight minimaly re-inforced... not sure if latest bro will suit but still thinking......
Btw.. Thinking of how to reduce the dinging of fiberglass when hitting reefs rocks, bought some cheap electricians tape and wrapped it round the rails.
Of course this leaves an edge where it shouldn't and am yet to bash the rails on some rocks but surprisingly no handling differences, will see how long it takes before it peels up
Some say Dog's only see in black and white but I've heard they can see reds and yellows too...
Anyway, my eyes are bad maybe i'm a dog... but Red vest bro with Red tape board rails i can see quite well...
woof out loud!
02-20-2014, 05:02 AM
#643
Thread Starter
Join Date: May 2009
Location: Cape Towm, SOUTH AFRICA
Posts: 2,769
Likes: 0
Received 0 Likes
on
0 Posts
Howzit BC - Bro looks good on your board !....... I see why you are having the righting problem - Bro's feet (front foot) needed to be centred - to the right- which would have presented the body buoyancy more to the right rail and initiated the self righting rotation better.
Only way to avoid 'rock dings' is to .......stay away from rocks .....LOL
Will sort the vest our ..
.
Only way to avoid 'rock dings' is to .......stay away from rocks .....LOL
Will sort the vest our ..
.
02-20-2014, 05:14 AM
#644
Thread Starter
Join Date: May 2009
Location: Cape Towm, SOUTH AFRICA
Posts: 2,769
Likes: 0
Received 0 Likes
on
0 Posts
02-21-2014, 01:51 AM
#645
Thread Starter
Join Date: May 2009
Location: Cape Towm, SOUTH AFRICA
Posts: 2,769
Likes: 0
Received 0 Likes
on
0 Posts
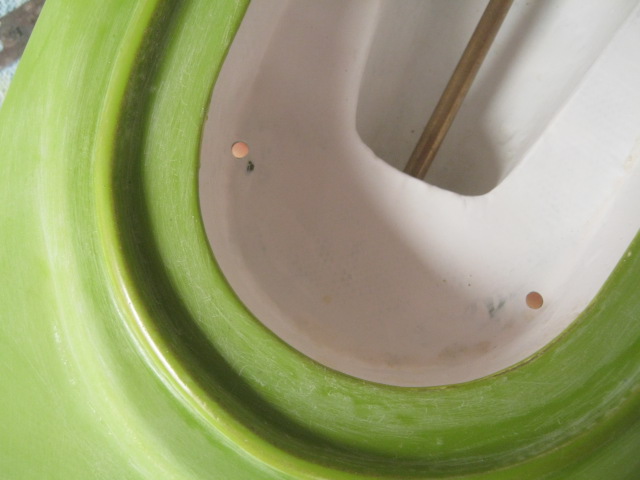
[h=2]Hatch Cover Studs ![/h]
INTEGRITY ! .....this process needs to be done 'absolutely correct' ......OR......you could end up losing your board !...
Setting/Bonding the threaded Hatch Cover Studs in place requires absolute
procedure to insure accuracy and INTEGRITY so as to ensure a 100 %
lasting seal 'at all time 'in all conditions....
Insure that the hatch cover is a good fit within the deflection rim rebate.


Mark out the hatch cover holes and drill accurately. Place tape on the area's
where the holes are to be drilled to ensure a clean surface on the flange area
when the epoxy is being applied.


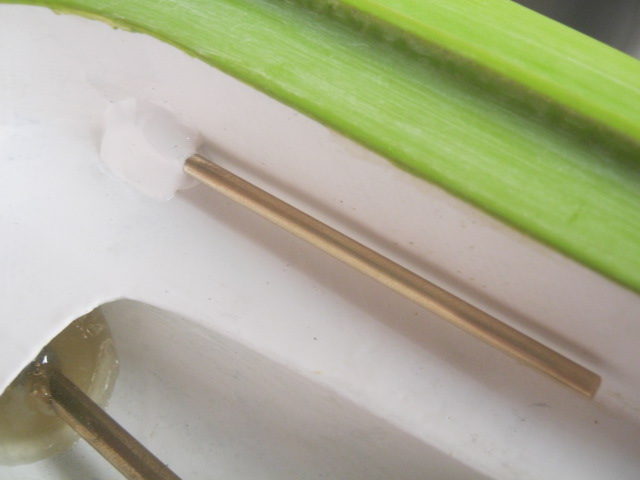
I use a 'stopper'on my drill bit so as to ensure I don't drill through the board.
Then - to ensure that I drill through the foam to the glass on the hull side, I
lightly hand drill - feeling for the glass on the opposite side. This will allow for
added bonding strength between the stud and hull.


Clean out the drilled hole with some air. IMPORTANT - degrease the studs
in some acetone or sortes to remove all oils.


Place small portions of silicon tubing over the stud end - measuring its
required protrusion - keeping the thread area clean - spacing the hatch
during bonding.


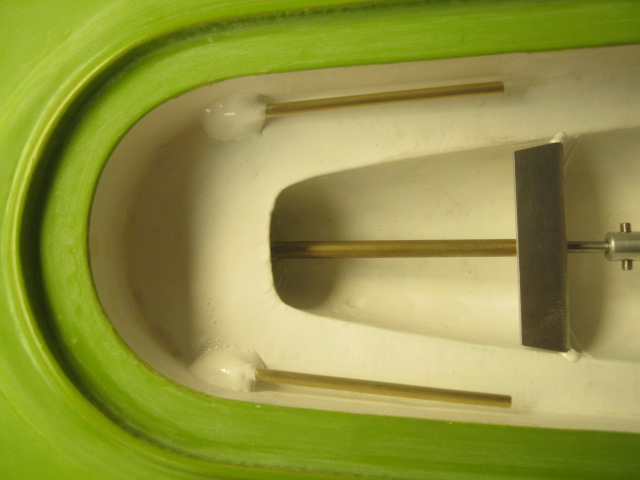
CHECK - CHECK - CHECK ! - before applying any epoxy - ensure that all
components fit 100%. Make sure that the syringe fits snug into the stud
hole.


The main reason for using a syringe to inject the 'slow curing'epoxy into
each hole is to use the 'hydraulic' pressure to force the epoxy into the foam
cells surrounding the stud, making for a good anchor.
When placing the studs into the epoxy filled holes - dont just push it down
Rotate the stud as if you are turning it into a threaded hole. this draws the
stud in and it coats the entirety of the thread. Clean excess epoxy away.


Once all studs are placed and excess epoxy cleaned away - place the hatch
cover over the studs to ensure perfect alignment. Tape over the top of the
studs, holding them down, in place, whilst the epoxy cures.


Leave for epoxy curing duration.....

Setting/Bonding the threaded Hatch Cover Studs in place requires absolute
procedure to insure accuracy and INTEGRITY so as to ensure a 100 %
lasting seal 'at all time 'in all conditions....
Insure that the hatch cover is a good fit within the deflection rim rebate.
Mark out the hatch cover holes and drill accurately. Place tape on the area's
where the holes are to be drilled to ensure a clean surface on the flange area
when the epoxy is being applied.
I use a 'stopper'on my drill bit so as to ensure I don't drill through the board.
Then - to ensure that I drill through the foam to the glass on the hull side, I
lightly hand drill - feeling for the glass on the opposite side. This will allow for
added bonding strength between the stud and hull.
Clean out the drilled hole with some air. IMPORTANT - degrease the studs
in some acetone or sortes to remove all oils.
Place small portions of silicon tubing over the stud end - measuring its
required protrusion - keeping the thread area clean - spacing the hatch
during bonding.
CHECK - CHECK - CHECK ! - before applying any epoxy - ensure that all
components fit 100%. Make sure that the syringe fits snug into the stud
hole.
The main reason for using a syringe to inject the 'slow curing'epoxy into
each hole is to use the 'hydraulic' pressure to force the epoxy into the foam
cells surrounding the stud, making for a good anchor.
When placing the studs into the epoxy filled holes - dont just push it down
Rotate the stud as if you are turning it into a threaded hole. this draws the
stud in and it coats the entirety of the thread. Clean excess epoxy away.
Once all studs are placed and excess epoxy cleaned away - place the hatch
cover over the studs to ensure perfect alignment. Tape over the top of the
studs, holding them down, in place, whilst the epoxy cures.
Leave for epoxy curing duration.....
02-21-2014, 02:52 AM
#646
Thread Starter
Join Date: May 2009
Location: Cape Towm, SOUTH AFRICA
Posts: 2,769
Likes: 0
Received 0 Likes
on
0 Posts
Whilst I was epoxying Bro's head with a final coat... I thought he was looking more like .......Mick Fanning ...2007 - 2009 & 2013 ASP World Champ.........


02-21-2014, 08:38 AM
#647
Thread Starter
Join Date: May 2009
Location: Cape Towm, SOUTH AFRICA
Posts: 2,769
Likes: 0
Received 0 Likes
on
0 Posts
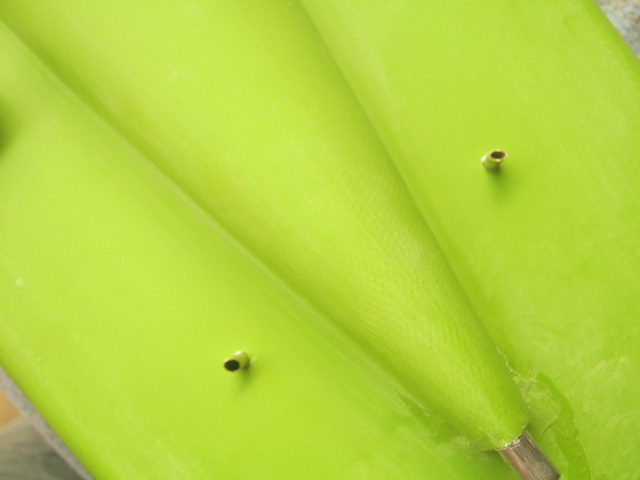
When the epoxy has 'semi cured'its a good time to trim around the stud
and remove the tape from the flange to reveal a spotless / bonded stud.


I open the hatch holes from 4mm - 4.5mm's just to loosen the fit over the
studs, ever so slightly. I prefer the knurled nuts to the wing nuts, from
an ascetic point of view and to prevent over tightening, which can lead to
the studs bond being disrupted....


Hatch cover done !

and remove the tape from the flange to reveal a spotless / bonded stud.
I open the hatch holes from 4mm - 4.5mm's just to loosen the fit over the
studs, ever so slightly. I prefer the knurled nuts to the wing nuts, from
an ascetic point of view and to prevent over tightening, which can lead to
the studs bond being disrupted....
Hatch cover done !
Last edited by YPC; 02-23-2014 at 01:52 AM.
02-21-2014, 10:47 PM
#648
Thread Starter
Join Date: May 2009
Location: Cape Towm, SOUTH AFRICA
Posts: 2,769
Likes: 0
Received 0 Likes
on
0 Posts
Once the hatch is masked up with tape - mark
around the foot pads accurately - ensuring the
correct stance.


Cut out foot pad areas and grind surface area in preparation for epoxy


Coat both surfaces with epoxy ( slow cure) to ensure 100% contact.
Bring together - apply pressure, ensuring that the epoxy is well spread.
Clean away excess epoxy around the footpads - THEN - remove the Tape.


Left with a clean / neat bond - leave to cure - ensuring that it cannot move
from its set position whilst curing............

around the foot pads accurately - ensuring the
correct stance.
Cut out foot pad areas and grind surface area in preparation for epoxy
Coat both surfaces with epoxy ( slow cure) to ensure 100% contact.
Bring together - apply pressure, ensuring that the epoxy is well spread.
Clean away excess epoxy around the footpads - THEN - remove the Tape.
Left with a clean / neat bond - leave to cure - ensuring that it cannot move
from its set position whilst curing............
Last edited by YPC; 02-21-2014 at 10:53 PM.
02-22-2014, 05:29 AM
#649
Senior Member
Join Date: Aug 2012
Location: sydney, AUSTRALIA
Posts: 388
Likes: 0
Received 0 Likes
on
0 Posts
Brosurfer.
Saw dickboard vid on RCU, just watched it again here ...
Bloody Australians, laughing swearing then rooting everything in sight, surfin the new dickboard, then laughin some more.
LOL
Saw dickboard vid on RCU, just watched it again here ...
Bloody Australians, laughing swearing then rooting everything in sight, surfin the new dickboard, then laughin some more.
LOL
02-22-2014, 05:40 AM
#650
Senior Member
Join Date: Aug 2012
Location: sydney, AUSTRALIA
Posts: 388
Likes: 0
Received 0 Likes
on
0 Posts
btw... funny you mention Mick Fanning similarities!
Same was mentioned by some enthusiastic real surfers watchin my last sesh with flexy bro... mentioned it before they were close enough to see his face too!
Blond hair, maybe his stance..... ??
Same was mentioned by some enthusiastic real surfers watchin my last sesh with flexy bro... mentioned it before they were close enough to see his face too!
Blond hair, maybe his stance..... ??