


1/6 hummer crawler
 06-26-2014, 11:57 AM
#1

Thread Starter
someone had asked for more pics, so here they are.
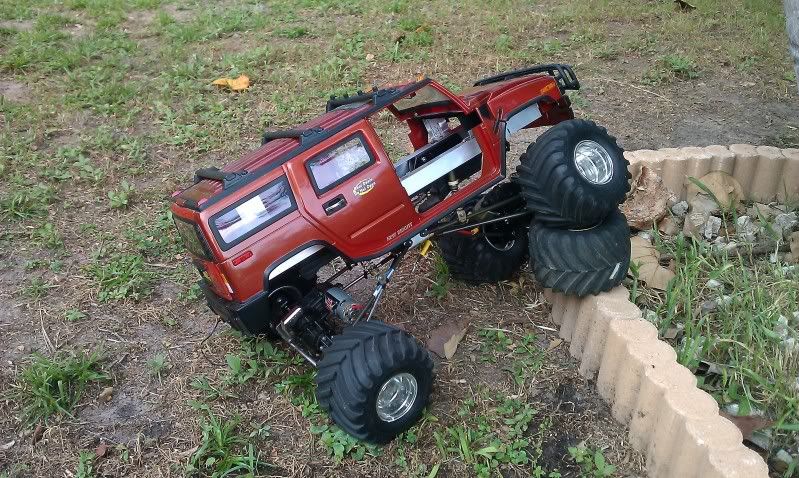
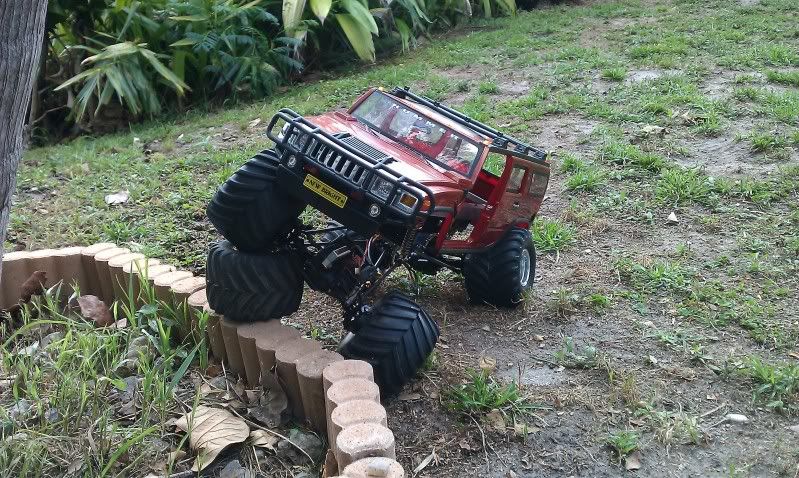
simple conversion, New Bright 1/6 hummer body, metal frame attaching the exceed mad torque crawler to the body and shocks mounted right to the body.
ESC, rx and lipo fit very nice right under the flip up hood.
A goal was to get the right height looking scale while still having a good amount of suspension flex. The shocks are fully compressed at rest giving a fairly low ride height while still allowing the suspension to have a couple inches of travel (at each corner)
still needs some tweaks, but I ran it for nearly 2 hours at a crawler meet and it worked well. The truck is 29'' long and around 12 pounds.
 06-26-2014, 09:32 PM
#2

I actually asked for more pics but somehow got confused about who I was talking to and I actually meant to ask someone else (phmaximus) for more pics. Too many threads, too little time and too early or late at nite when I'm posting is my excuse! But somehow you also have a very cool 1/6 Hummer with 1/10 running gear under it, what are the odds! Even if it was a mistake on my part thanks for showing us your cool rig. I never tire of custom builds and stretching smaller platforms to larger scales is one of my favorites.
Edit: Posted this before going back to the other thread and reading your post mentioning this truck. From where I'm sitting it's still funny how it all worked out.
Edit: Posted this before going back to the other thread and reading your post mentioning this truck. From where I'm sitting it's still funny how it all worked out.
Last edited by Maj_Overdrive; 06-26-2014 at 09:40 PM.
06-26-2014, 09:57 PM
#3
Thread Starter
it was actually 1/8 running gear (1/8 moa crawler) but it does look way cooler with the hummer body and revised suspension.
I have some work planned to do on it tomorrow so I can take it to a crawler meet this Saturday. I want to add more scale touches and change the springs in the shocks to reduce body roll.
I paid $125 for the exceed, $55 for the body, and $20 for some alum stock. Not bad for a massive $200 crawler
I will try and get some good driving footage of it this weekend. even tho it is large, it can climb some pretty steep grades.
06-26-2014, 11:02 PM
#4
I thought it might be 1/8 with those hex adapters but I don't know crawlers or exceed very well. Either way 1/8, 1/10 I still love adapting and seeing others using smaller, lighter drivetrains under big bodies. The results are usually a really cool scale look like this too. The reduced cost is just another bonus, $200 combined with some cutting, drilling and fabricating to come up with this sounds like a good time and a very reasonable investment.

 06-30-2014, 05:18 PM
#7
Thread Starter
nice jandg
I finally got around to changing the springs in the front shocks. I think the travel is improved. Now I need to do the same on the rear.
And I also got out today and shot some video of it actually crawling:
https://www.youtube.com/watch?v=MiNTJu4Tvag&feature=youtu.be
I finally got around to changing the springs in the front shocks. I think the travel is improved. Now I need to do the same on the rear.
And I also got out today and shot some video of it actually crawling:
https://www.youtube.com/watch?v=MiNTJu4Tvag&feature=youtu.be
07-03-2014, 02:06 PM
#10
Thread Starter
thanx guys. I will try and tweak the rear shocks this weekend, that should help reduce body roll a little more.
I also want to add some scale details. Im keeping my eye out for a canoe to strap to the roof.
If I had the money, id buy a ram tech v8 engine sound module for it
But a better ESC that can handle 3s will come first.
Also guys, maybe you can help me figure out this issue:
the front lights I wired to a 9v battery and they turn on super bright...but then go out after a few minutes. I turn them off, wait, turn them on and they will work again! Does this me 9v is too much? That is the only explanation I can come up with.
I don't want to power them off the Rx, since the servo is also weak enough as it is. I don't want any other things sucking amps from the BEC.
07-04-2014, 06:31 AM
#11
From what I've seen and done, If you put too much voltage to a LED it will be very bright, then the light it emits will change color before it burns out completely. I've never had or heard of an LED working again after that so that's very strange. If you know the specs of the Led's there are calculators to figure out the proper input voltage or what resistors to use for a certain input voltage.
When end you say powering the LED off of the Bec, do you mean an external Bec or the one built into the esc? If you have an external Bec you can power the LED's off the esc with a little wiring. I'm a huge fan of external Bec's particularly Castle's 10amp unit. It's output voltage is adjustable to get max performance out of any servo. Plus being 10amps means that voltage will not drop under load unlike the typical 5amp internal or external Bec. Trust me, I've tried 5amp external Bec's and even with a single servo pulling an average of .75amp with spikes to around 1amp voltage did drop under load so it's well worth spending a little more for a 10amp unit.
When end you say powering the LED off of the Bec, do you mean an external Bec or the one built into the esc? If you have an external Bec you can power the LED's off the esc with a little wiring. I'm a huge fan of external Bec's particularly Castle's 10amp unit. It's output voltage is adjustable to get max performance out of any servo. Plus being 10amps means that voltage will not drop under load unlike the typical 5amp internal or external Bec. Trust me, I've tried 5amp external Bec's and even with a single servo pulling an average of .75amp with spikes to around 1amp voltage did drop under load so it's well worth spending a little more for a 10amp unit.
07-04-2014, 07:33 AM
#12
Thread Starter
From what I've seen and done, If you put too much voltage to a LED it will be very bright, then the light it emits will change color before it burns out completely. I've never had or heard of an LED working again after that so that's very strange. If you know the specs of the Led's there are calculators to figure out the proper input voltage or what resistors to use for a certain input voltage.
When end you say powering the LED off of the Bec, do you mean an external Bec or the one built into the esc? If you have an external Bec you can power the LED's off the esc with a little wiring. I'm a huge fan of external Bec's particularly Castle's 10amp unit. It's output voltage is adjustable to get max performance out of any servo. Plus being 10amps means that voltage will not drop under load unlike the typical 5amp internal or external Bec. Trust me, I've tried 5amp external Bec's and even with a single servo pulling an average of .75amp with spikes to around 1amp voltage did drop under load so it's well worth spending a little more for a 10amp unit.
When end you say powering the LED off of the Bec, do you mean an external Bec or the one built into the esc? If you have an external Bec you can power the LED's off the esc with a little wiring. I'm a huge fan of external Bec's particularly Castle's 10amp unit. It's output voltage is adjustable to get max performance out of any servo. Plus being 10amps means that voltage will not drop under load unlike the typical 5amp internal or external Bec. Trust me, I've tried 5amp external Bec's and even with a single servo pulling an average of .75amp with spikes to around 1amp voltage did drop under load so it's well worth spending a little more for a 10amp unit.
I want to buy the RC4wd Outcry duel motor esc (had one on my 1st 1/6 crawler build) It lets me use a 3s lipo and it has an external BEC. It is a pretty nice ESC for $60.
07-04-2014, 07:54 PM
#13
personally I like to power LED's from the main battery, because of the higher voltage u can wire them in parallel and series.
have u thought about a online LED calculator? they are great for calculating the resistor value
have u thought about a online LED calculator? they are great for calculating the resistor value
07-05-2014, 04:02 PM
#14
Thread Starter
I finally got around to changing the rear shocks. Now both front and rear shocks keep the body roll down to a minimum. It side-hills sooo much better than before. It is much more controlled in how it articulates.
I also painted the sub-frame black so that it doesn't stand out as bad.
I also painted the sub-frame black so that it doesn't stand out as bad.
07-05-2014, 04:47 PM
#15
The problem is finding out the "voltage forward" and "current forward" values of the LED's you have on hand. The value is usually not on the LED only on the packaging. There are ways to figure out these values though if you have a multimeter. If the online calculator you're using doesn't tell you how to figure out these values I can help out with that.
07-05-2014, 06:39 PM
#16
Thread Starter
more footage. I think you can tell that the revised rear shocks help keep it more stable.
https://www.youtube.com/watch?v=KphJki_b8y0&feature=youtu.be
https://www.youtube.com/watch?v=KphJki_b8y0&feature=youtu.be
07-05-2014, 08:07 PM
#17
The problem is finding out the "voltage forward" and "current forward" values of the LED's you have on hand. The value is usually not on the LED only on the packaging. There are ways to figure out these values though if you have a multimeter. If the online calculator you're using doesn't tell you how to figure out these values I can help out with that.
How do u figure out the values tho?? I'm very interested in that. If it's easy that sounds better than guessing based on averages
07-05-2014, 08:22 PM
#19
Thread Starter
it is hard to tell from the angle of the camera, but some of those rocks could almost swallow up a 1/10 scale truck.
When I have some extra money (may be a while) I plan to buy some spare parts for the exceed. I am really liking this truck and so far it is holding up very well. I had the front motor lock up from driving threw really thick mud (got into the motor) and ive had one of the upper links pop off once. Other than that, it has about 5 hours of runtime without any issues. and it has taken a few nasty rolls down a hill without breaking. The body is tougher than I thought it would be.
I have a metal airplane gas tank...ive been thinking that it looks about the right size to be a muffler. might get some brake line and attach it and make a exhaust system. I want to fill in some of the voids under the body. Id like to make a skid plate on the front as well.
for the LEDs, I think I just need to wire up a pair of AA batteries. I watched a video of the new bright and the lights were half as bright as mine were on 9v. so I am likely putting twice the voltage they are supposed to have. I think I am lucky they didn't just burn out the first time. I will try and see, but something between 3-5 volts is probably what they need.
07-06-2014, 02:10 PM
#20
Before the body was kinda flopping side to side, definitely way more controlled now. Looks like you got the handling right where you want it and a pretty darn cool look too. Those bodies are kinda like a glass bottle. They'll usually surprise you at the hit they can take, but then you look at it funny and it shatters in a million pieces. At least that's how it was with the H3 body I put on my EMaxx.
It's actually been awhile since I had to figure out LED's but I saved the research I did at the time. Okay there's no real way of figuring out the forward current, but 20ma is a safe figure to use in a calculator for most LED's. To figure out forward voltage, hookup a LED through a 330 ohm resistor to a 9v battery. Then, measure the voltage across the LED. This will be its forward voltage, the amount of voltage the LED "drops" when running at its rated forward current.
It's actually been awhile since I had to figure out LED's but I saved the research I did at the time. Okay there's no real way of figuring out the forward current, but 20ma is a safe figure to use in a calculator for most LED's. To figure out forward voltage, hookup a LED through a 330 ohm resistor to a 9v battery. Then, measure the voltage across the LED. This will be its forward voltage, the amount of voltage the LED "drops" when running at its rated forward current.
