


Problem Need Help.
 08-04-2016, 07:10 PM
#1
Member
Thread Starter
Join Date: Aug 2016
Posts: 30
Likes: 0
Received 0 Likes
on
0 Posts
So i just got an AMP MT for my 30th birthday, my first RC. been running it for less than an hour a day for less than a week on my street no major crashes no moisture. run it off curbs, climb low curbs some taller grass, just having fun with it while being a newb at the hobby.
Anyways today after driving through some wood chips at my local playground i did a couple cirlces with my rc, went to climb a curb and when the car hit the curb at low speed the wheel locked to the right. using the radio i couldnt turn at all, manually straightened the wheels and i could turn left again however after i turned right again it locked right again. Turned off my car and came home, cleaned out loose wood chips that flew into the body, tried changing my radios batteries, charged the car battery aswell, turned it on a couple hours after the incident and no change, the car works great fowards an backwards (minus that heavy sway when reversing) however it cant turn at all in either direction. The servo makes nonoise when i turn the wheel on the radio. Assume the servo is fried, how could it have fried after 4-5 hours of light use? Ive already emailed ECX but im hoping to get a response faster than corporate level.
Anyone have any ideas what to test/how to fix? if its not fixable what is a good replacement for the servo, i heard these ones are underpowered anyways.
 08-04-2016, 07:49 PM
#2

First step I would take is to check connections ( make sure they are plugged in ) .
Then make sure your trim and dual rate knobs have not been turned out of whack .
If you turn your trim knob on the transmitter do the wheels move ?
Disconnect the servo from the steering and see if it can turn , there might be something binding in the steering .
Then make sure your trim and dual rate knobs have not been turned out of whack .
If you turn your trim knob on the transmitter do the wheels move ?
Disconnect the servo from the steering and see if it can turn , there might be something binding in the steering .
08-04-2016, 08:35 PM
#3
Member
Thread Starter
Join Date: Aug 2016
Posts: 30
Likes: 0
Received 0 Likes
on
0 Posts
checked the connections unplugged them replugged them ect all seemfine, no wires just dangling oranything likethat.
played with all theknobs on the radio and the ones that used to adjust how stiff steering was and which tire had preference no longer adjust anything i can see.
Turning theknob on the transmitter does absolutely nothing, no noise come servo no movement of any sort on the car. with it upside down or anything. As far as disconnecting servo from steering i dont have a screwdriver presently to do that. but if it were trying to move and were jammed i cannot imagine it wouldnt makesome sort of noise. sorry somany lack of spaces, spacebar is busted.
08-05-2016, 08:54 AM
#4
Senior Member

Join Date: Dec 2014
Location: Tennessee
Posts: 105
Likes: 0
Received 0 Likes
on
0 Posts
without being able to take the stock servo saver or servo horn(whichever one it has) off the servo, you cant visually see if the servo is working. the servo could be toast or it could have stripped the spline on the shaft off or stripped the servo arm. in either instances, you'll probablly be best served by buying a replacement metal gear servo. solar make a reliable, cheap, fast and strong digital servos that wont break the bank.here ya go.http://www.hobbypartz.com/33p-solarservo-d771.html.
08-05-2016, 12:11 PM
#5
Member
Thread Starter
Join Date: Aug 2016
Posts: 30
Likes: 0
Received 0 Likes
on
0 Posts
so i gotmy jewellers screwdrivers today took the whole front end off so i could getto the servo arm and servo. with nothing connected to the front of the servo it is still unresponsive, zero movement of any sort. so i guess after 4 hours of use i managed to burn it out, i realize it was a stock plastic piece of crap however is there something i could have done wrong to cause it to burn so quickly? trying to avoid having to spend 20 dollars on a new servo every couple of days. i amgoing to order that solar servo that you recommended. i dont know anything about thembut all metal is better than plastic any day.
unrelated tomy problem, anyone who is familiar withthe amp mt, is there anything elsethat is a MUST upgrade out of thebox? i bought a 5100 nickle metal battery to upgrade its duration and a new charger for them so i could see progress but thats all ive bought so far.
unrelated tomy problem, anyone who is familiar withthe amp mt, is there anything elsethat is a MUST upgrade out of thebox? i bought a 5100 nickle metal battery to upgrade its duration and a new charger for them so i could see progress but thats all ive bought so far.
08-06-2016, 08:25 AM
#6
Senior Member
Join Date: Dec 2014
Location: Tennessee
Posts: 105
Likes: 0
Received 0 Likes
on
0 Posts
Well one reason I recommeded that servo is that you dont have to spend 100 bucks to get a good servo, its fast and stronger than you really need for a small 1/10 2wd truck,so it will increaee the responsiveness and also that it has a 23 spline shaft, which is the same as spektrum, so you wont have any probelms bolting it right up since your relatively new at this. Im not really familiar with that exact truck, but the setup is generically pretty much the same as other 2wd trucks. You need to start learning how to use lipo's as they offer much greater run time and punch and can be had for the same price as a lot of nimh packs.
08-06-2016, 09:34 AM
#7
As for servo's crapping out that is nothing new in RTR's most RTR's I've seen are sold with the bare minimum to make them run. Hell I bought a 1/8th scale buggy years back the steering, and throttle(it was a nitro) servos were so weak it couldn't even turn the wheels on the buggy unless it was moving, and the throttle servo could barely brake the buggy(I only read how bad they were so I already had better ones bought). Took them off, and tried them on a 1/10th scale buggy, and still couldn't turn the wheels(which was purely pathetic).
08-06-2016, 11:25 PM
#8
Member
Thread Starter
Join Date: Aug 2016
Posts: 30
Likes: 0
Received 0 Likes
on
0 Posts
okay thanks for the story haha, as long as im not doing some newb mistake thats gonna costme tons of money. im okay with them just shipping with crap parts and once i upgrade it to something decent not having to worry about it again for a bit.
08-07-2016, 03:41 AM
#9

Exceeding Endpoints = Servo killer
If and when someone gets a new servo, setting the steering endpoints (maximum throw in either direction) is what I call "crucial" for the longevity of the servo's gears. Some RTR radios have end point adjustment dials/knobs that make it easy to setup a servo. More than likely you will have to make due with your transmitter's steering rate/dual rate dial/knob. Just be sure not to make the servo go beyond your steering arm's maximum travel.
If and when someone gets a new servo, setting the steering endpoints (maximum throw in either direction) is what I call "crucial" for the longevity of the servo's gears. Some RTR radios have end point adjustment dials/knobs that make it easy to setup a servo. More than likely you will have to make due with your transmitter's steering rate/dual rate dial/knob. Just be sure not to make the servo go beyond your steering arm's maximum travel.
08-07-2016, 10:21 AM
#11
Member
Thread Starter
Join Date: Aug 2016
Posts: 30
Likes: 0
Received 0 Likes
on
0 Posts
yes my radio has this which allows me to either turn really sharp or not at all. isit not safe to assume that the servo cannot handle going to the maximum setting that the radio lets me set it to aka 10? i have throttle set on 10 aswell.
so you say dont extend the maximum travel, how do i know how far that is? and will i have to setup my new servo in any way to stop it from breaking?
so you say dont extend the maximum travel, how do i know how far that is? and will i have to setup my new servo in any way to stop it from breaking?
08-07-2016, 11:15 AM
#12
You will know by watching the steering arm.
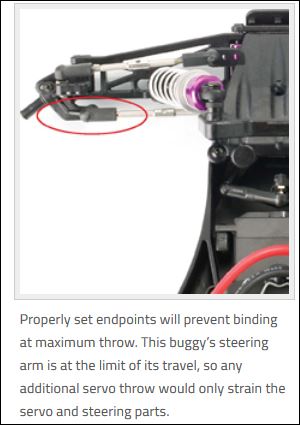
When you have the servo horn disconnected from the servo, you will be able to manipulate the steering linkage easily. Doing so, you will feel maximum left and right travel allowed by your steering blocks/steering arms/knuckles (whatever you want to call them, and circled in above picture).
When you have the servo horn disconnected from the servo, you will be able to manipulate the steering linkage easily. Doing so, you will feel maximum left and right travel allowed by your steering blocks/steering arms/knuckles (whatever you want to call them, and circled in above picture).
Last edited by RustyUs; 08-07-2016 at 11:33 AM.
08-07-2016, 12:11 PM
#13
There are a couple of ways people center everything up when installing a new servo. This video is just one of many that shows and tells the basic way to mount a servo. At the end of the install, you should only need to adjust the transmitter's steering trim by a few degrees either way to get your RC tracing straight.
https://www.youtube.com/watch?v=GJUETdO7ees
https://www.youtube.com/watch?v=GJUETdO7ees
08-07-2016, 09:02 PM
#14
 08-12-2016, 03:29 PM
#16
Member
Thread Starter
Join Date: Aug 2016
Posts: 30
Likes: 0
Received 0 Likes
on
0 Posts
alright so new servo camein, and another problem. it is about half an inch shorter than the other one, meaning that it will not fit where the old servo was thegap between the where the servo gets screwed on and where the cable comesout the side is toonarrow. am i just supposed to start chipping away at the blockon the cord side of the servo until there is proper clearance?
08-13-2016, 07:32 AM
#17

You mean to say that some part of the chassis is sort of jammed up against where the servo wire comes out of the housing? Can you flip the servo over so the wire comes out the other side? (You DO have to pay attention to case dimensions when buying servos) Like syco said most RTR servos crap out within a month.
I hope you have better luck with that Solar servo than I did. I have had good luck with some cheap servos, but the last time, I went through several of them pretty quickly, and finally gave up and bought a $30 Hitec servo. Ya get what ya pay for sometimes.
I hope you have better luck with that Solar servo than I did. I have had good luck with some cheap servos, but the last time, I went through several of them pretty quickly, and finally gave up and bought a $30 Hitec servo. Ya get what ya pay for sometimes.
08-13-2016, 08:29 AM
#18
Member
Thread Starter
Join Date: Aug 2016
Posts: 30
Likes: 0
Received 0 Likes
on
0 Posts
i mean this servo waslike 20dollars. and no flipping it wouldntmakeitfit, its a symmetrical design, as far as looking atdimensions beforebuying aservo, i wish that was something that someone mentioned to me previously. even the hobby horizons store or whatever made this thing, doesnt have replacement servos.
http://i1067.photobucket.com/albums/u421/Mathew_Lacombe/20160812_203706_zpshw0rjvoi.jpg
http://i1067.photobucket.com/albums/u421/Mathew_Lacombe/20160812_203706_zpshw0rjvoi.jpg
08-13-2016, 08:48 AM
#19
You wouldn't want a "replacement servo" anyway, mate, it'd just be another POS.
That picture is odd. Looks like the non-wire side of the servo is hanging over the edge of the chassis? Get a ruler, measure the case dimensions of the original servo. Now measure the new one. What are the dimensions?
That picture is odd. Looks like the non-wire side of the servo is hanging over the edge of the chassis? Get a ruler, measure the case dimensions of the original servo. Now measure the new one. What are the dimensions?
08-13-2016, 10:41 AM
#20
Member
Thread Starter
Join Date: Aug 2016
Posts: 30
Likes: 0
Received 0 Likes
on
0 Posts
width they are the same however height are different here is apicture comparing the two. the servo can fit between the two posts and lines up properly for the screwshowever the new one is too short. 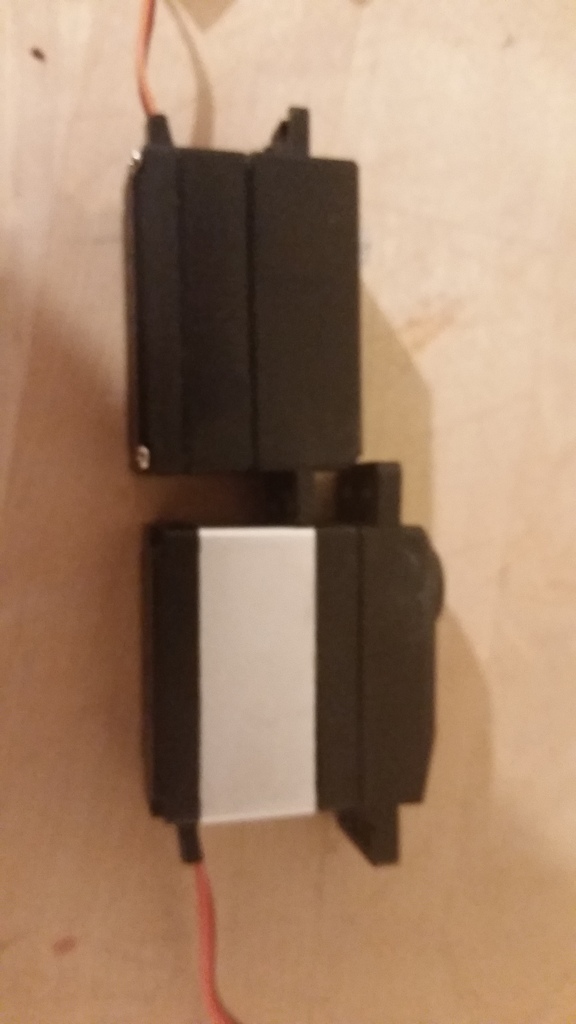
was thinking i could shave the post off a littlebit on the wire side so that it could fit, dont know if that is a good thing to do or not, does it really affect the servo even if i switch to a longer one or anything as long as it still screws in and all that?
sorry i dont have anything to measure themwith, but you can see from the picture it is easilly a third of an inch taller than the new one. and that third of the inch is why the wiring from my new one comes out still on top of the block the servo screws into on the chasis.
Last edited by Menaceofri; 08-13-2016 at 10:50 AM.
08-13-2016, 01:53 PM
#21
Looks like a low profile servo you got there. I don't know what the servo looks like inside, or what kind of tools you have. So the simplest solution is to get a standard size servo. Servo mounts come in all shapes and sizes as well. That would be another possibility. Some are made of plastic, and some are aluminum. Finding which one would work the best for your servo...that's a different story. Lastly, get out a Dremel tool and start hacking away until the servo wires clear the mount (just don't mess with the side of the mounts that attach to the chassis).
Last edited by RustyUs; 08-13-2016 at 02:35 PM. Reason: wording
08-13-2016, 02:17 PM
#22
I know the Amp's servo mounts probably have a little "indentation" on the bottom where they mate up with the chassis' raised area. If worst comes to worst, grind the chassis' bumps (where the servo mounts align with) and maybe use something like this: http://www3.omnimodels.com/cgi-bin/w...I=ASCC6337&P=7
I'm sure you can find something similar in black, and easier on the eyes, but the servo mounts linked above was the first ones that come to mind. I know, they are so old school. Right? Simple, yet effective though.
With Dr. Emel (dremel) and a little ingenuity, good things can happen. I'd probably start with trimming the stock servo mounts and see where that gets you. You only need to trim a few millimeters off to allow the servo's wires to pass the servo mount.
Last edited by RustyUs; 08-13-2016 at 02:39 PM.
08-13-2016, 10:54 PM
#23
Member
Thread Starter
Join Date: Aug 2016
Posts: 30
Likes: 0
Received 0 Likes
on
0 Posts
i have noidea what those things youlinked are for, lol literally know nothing about building an rc thats why i got an RTR. yeahi was planning tohack some away, was gonna use a steak knife but i guess a dremel wouldnt be a bad idea either haha.. also need some velcro or something to hold down the esc/reciever because the tape that was under it let go on day 2.
08-14-2016, 03:25 AM
#24
 Those are servo mounts in the link above.
 Here is another option that has been sitting in front of me the whole time: http://www.ebay.com/sch/i.html?_odkw...C7336&_sacat=0
And it has spacers to put in/take out allowing you to customize fit.
08-14-2016, 04:02 AM
#25
i have noidea what those things youlinked are for, lol literally know nothing about building an rc thats why i got an RTR. yeahi was planning tohack some away, was gonna use a steak knife but i guess a dremel wouldnt be a bad idea either haha.. also need some velcro or something to hold down the esc/reciever because the tape that was under it let go on day 2.
Any files at your disposal?

