


The Evader Coalition ~ T.E.C. Part 2.
 07-20-2012, 11:53 AM
#401


Join Date: Jul 2012
Location: Grand Haven, MI
Posts: 2,984
Likes: 0
Received 0 Likes
on
0 Posts
Are those df02 trucks durable? Can you upgrade the shocks to metal and a metal tranny? Do they take a standard 540 motor? Can I upgrade the ESC and Motor with another Traxxas 3S system? Overall are they good trucks (As good as an Evader ST)?
 07-20-2012, 12:06 PM
#402
Senior Member
Join Date: Mar 2008
Location: kalamazoo, MI
Posts: 6,812
Likes: 0
Received 0 Likes
on
0 Posts
i once ran into a tree head on at 35 mph. it just bounced off. the diff rings and pinions are metal, the spur is plastic. you can put aluminum shocks on it but they arent necessary. i's a 1/10 scale 4wd buggy that uses 12mm hexes and can take standard 2.2" st tires and wheels no problem. i fried the 4000kv motor trying to run a set of masher 2000's. they are actually a little better than the evaders i've had, but "better" is dependent on the person and use. 3s is a no go on this buggy, it simply wont fit. you could run the system, but it WILL be a hand full. it's a kit, but you could wimp out and get the rtr.
07-20-2012, 07:24 PM
#403
Join Date: Jul 2012
Location: Grand Haven, MI
Posts: 2,984
Likes: 0
Received 0 Likes
on
0 Posts
In the Evader Brushless Diff, do you put the little metal rings bellow the shims or the o-rings? I put the metal rings and no grease has leaked out yet.
07-22-2012, 03:15 PM
#406
Member
Join Date: Jul 2012
Location: Monroe, MI
Posts: 59
Likes: 0
Received 0 Likes
on
0 Posts
I was planning on changing the diff in my son's st to the geared ext diff but I guess the trans is different? I guess I'll just stick to rebuilding his diff....[ ]
]
]
07-22-2012, 04:09 PM
#407
Senior Member
Join Date: Mar 2008
Location: kalamazoo, MI
Posts: 6,812
Likes: 0
Received 0 Likes
on
0 Posts
yeah, the bearings for the diffs are different and they dont make them in the required size. you can however put the ext/ext2/BL gearbox in the st. the holes should line up for the most part.
07-22-2012, 05:16 PM
#408
Join Date: Jul 2012
Location: Grand Haven, MI
Posts: 2,984
Likes: 0
Received 0 Likes
on
0 Posts
I just finished putting the metal Brushless Evader Diff in my Evader ST. Heres what you need...
Gearbox Set
Diff Joint Set
Diff Joint Spring Set
Rear Axle Set
10x15mm Ball Bearing
Dogbone Set
Rear Chassis Plate
4mm Locknuts
Wheelie Bar
Washer (OD-0.5" ID-0.2" Th-0.012 for diff.)
Assembled Differential
2x6mm Screws for diff.
That's all for the Brushless Evader or EXT. Just make sure the"Assembled Differential"is the Brushless version.(Ext is plastic Brushless is metal)The Assembled Differential is not actually assembled. Heres the link on how to assemble it. http://www.youtube.com/watch?v=FbKBUVOzNdg
If you can get the washers I listed, then you don't have to make them like they do in the video. Everything works and there are no redneck fixes on installation. How it helps. I have a few extra shims that are the right size. If you decide to do it, send me a pm.
ORIGINAL: Harlow
I was planning on changing the diff in my son's st to the geared ext diff but I guess the trans is different? I guess I'll just stick to rebuilding his diff....[]
I was planning on changing the diff in my son's st to the geared ext diff but I guess the trans is different? I guess I'll just stick to rebuilding his diff....[
]
07-22-2012, 06:22 PM
#409
Member
Join Date: Jul 2012
Location: Monroe, MI
Posts: 59
Likes: 0
Received 0 Likes
on
0 Posts
Thanks for the list of parts. Yeah, it's something I want to do. So I have to change the rear chassis plate? His has been upgraded with the st pro metal plate and graphite arms. but that can be changed.lol ....pm coming your way. Thanks!
07-23-2012, 05:21 AM
#410
Join Date: Jul 2012
Location: Grand Haven, MI
Posts: 2,984
Likes: 0
Received 0 Likes
on
0 Posts
Yeah. The new gearbow doesn't fit on any of the chassis plates but the Evader Brushless. You don't have to change the graphite arms, they will fit on the new chassis plate. And you can keep the top shaft and spur. That all fits in the new gearbox. I know the part numbers on the gearbox brace are different, but it's different because the shock tower on the Brushless is different. No need to change the brace or tower.
07-23-2012, 06:10 AM
#411
Junior Member
Join Date: Mar 2004
Location: McLean,
VA
Posts: 24
Likes: 0
Received 0 Likes
on
0 Posts
I just read this post so I'll reply.
I just got my Brushless Evader on Friday (7/20), charged up my two 8000mAh LiPos and drove it on Saturday. I got the Onyx 235 Charger and the Onyx 8000mAh LiPos. The charger worked great, it took about 100 minutes each to get the batteries charged. I did have an challenge with those big LiPos and getting the Battery Strap installed - it would not fit (the part that goes under the ESC mount and therefore was useless to me - I used a clear packing tape solution, which worked for the most part.) This is not a permanent solution and I emailed DuraTrax about the battery compartment issue and have not heard back yet.
I didn't have a chance to run the Evader outside yet because of the rain, which is very frustrating. So, in my office building we have a some unoccupied office space which is carpeted and so that's where I ran my truck for four hours this weekend. It was the perfect place to get a feel for this new vehicle and it was loads of fun. This truck is very fast and handles very nicely. I got bored after a little while and got some carboard and made a little road course with four ramps and some foam obstacles. It wasn't like being on dirt but it was fun. Also, it was steps away from my office (with bathroom, breakroom, fridge nearby) and the only cleaning I had to do is blow off the carpet dust with compressed air.
If you have had this same issue with the battery compartment please respond to this post with your fix.
Thanks for all the great tips, advice and stories,
TSNF
07-23-2012, 10:17 AM
#413
Junior Member
Join Date: Mar 2004
Location: McLean,
VA
Posts: 24
Likes: 0
Received 0 Likes
on
0 Posts
I thought I'd put this information out there for anyone with an Onyx 235 Charger and Onyx 8000 mAh LiPo batteries.
I labeled the batts, BATTERY 1 and BATTERY 2 and started charging BATTERY 1 first. I had some initial issues with the Onyx 235 but it was me that was the problem. I took the charger over to my LHS (Fairfax Hobby Works in Fairfax, VA) and Courtney, the Manager, got my confusion cleared away. Great shop, good people. Anywho, here's the numbers:
1st Charging (new out of box at this point) BATTERY 1 (these are the scrolling message that the Onyx 235 dislplays under the word COMPLETE)
47:31
3404mAh
12.24Vi
8.42Vo
8.42.Vp
1 4.211V
2 4.211V
BATTERY 2
48:17
3425mAh
12.24Vi
8.41Vo
8.41.Vp
1 4.211V
2 4.211V
As you can expect and experienced by myself, the numbers are different for both.
Below are numbers after charging (after I had run both batteries out - 2 plus hours runtime each):
BATTERY 1
96:25
8229mAh
12.24Vi
8.42Vo
8.42Vp
1 4.211V
2 4.211V
BATTERY 2
98:24
8225mAh
12.24Vi
8.42Vo
8.42Vp
1 4.211V
2 4.211V
As you can see from the numbers, the difference in mAh between charge 1 and charge 2 was at least 100% of charge 1 - which made me nervous after just charge 1 (why was there only 3400mAh in each battery at the end of the charge? Also, why did they both only charge for 48 minutes - on the first charge?)
I was reading something about LiPo batts and they are shipped in a "state of charge" that allows for safe storage and shipping and that the first charge will..."wake up" the battery, for lack of a better term.
Well I hope this information is helpful to someone - I know it was to me. I plan on keeping a battery diary for these batteries. I will run one of the charged batteries tonight, if it doesn't rain and report how much run time I get out of 8225mAh. It should be interesting.
Cheers,
TSNF
07-25-2012, 11:42 AM
#417
Junior Member
Join Date: Mar 2004
Location: McLean,
VA
Posts: 24
Likes: 0
Received 0 Likes
on
0 Posts
The LiPo is too thick and it won't fit under the ESC. Well, fixed that by gluing some small washers where the ESC screws go and the ESC and the bracket allow the battery strap in BUT the other end of the battery strap is blocked by the thickness of the battery as well.
I have two photos that show this issue well. I can't upload at work...so I'll try to edit later with pictures. I'll break out the Dremel and get something figured out, shouldn't be too difficult. It's still loads of fun to drive even using the "tape solution".
TSNF
I have two photos that show this issue well. I can't upload at work...so I'll try to edit later with pictures. I'll break out the Dremel and get something figured out, shouldn't be too difficult. It's still loads of fun to drive even using the "tape solution".
TSNF
07-25-2012, 08:18 PM
#419

My Feedback: (-1)
Join Date: Feb 2004
Location: milford,
PA
Posts: 163
Likes: 0
Received 0 Likes
on
0 Posts
TNSF ,,i have the same setup as you ,,i took my battery strap off and add the double sided velcro tape ,,works good so far ,,
07-26-2012, 04:35 AM
#420
Junior Member
Join Date: Mar 2004
Location: McLean,
VA
Posts: 24
Likes: 0
Received 0 Likes
on
0 Posts
Thanks vic2367 and BurningEvader1458, both good suggestions. I appreciate the feedback. I will do this on the weekend, along with tuning up the T-Maxx, so my son and I can go running together.
07-26-2012, 06:52 AM
#421
Senior Member
Join Date: Nov 2007
Location: Bridgewater,
NJ
Posts: 3,961
Likes: 0
Received 0 Likes
on
0 Posts
TSNF, another suggestion I have it to take an exact-o knife and put a couple of slits in the chassis (right up against the battery tray) and just run a zip-tie through the slit, under the chassis, back through a slit on the other side and over the battery.
07-26-2012, 11:03 AM
#422
Member
Join Date: Jul 2012
Location: Monroe, MI
Posts: 59
Likes: 0
Received 0 Likes
on
0 Posts
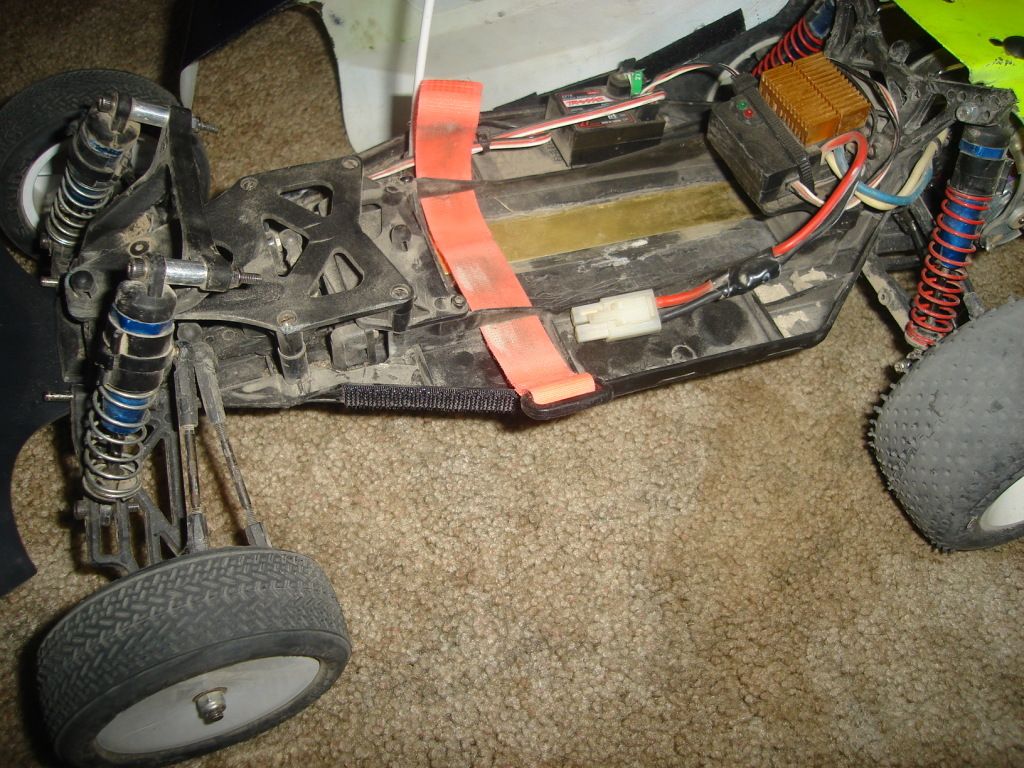
TNSF this is hoe my son's evade exb was set up when I bought it. They cut slits on the sides and put a velcro strap through the slits. Works quite well. heres a pic.
 07-27-2012, 05:17 AM
#425
Junior Member
Join Date: Mar 2004
Location: McLean,
VA
Posts: 24
Likes: 0
Received 0 Likes
on
0 Posts
Thanks Harlow and pede 187 for two more good suggestions. I will let you guys (all guys, right?) know what my solution is after the weekend. I've the Dremel, velcro, zip ties, tin snips, etc. so, we'll see.
Happy Friday.
TSNF
Happy Friday.
TSNF

