


My RC10GT brushless conversion w/ pics
 09-02-2010, 07:50 PM
#1
Junior Member
Thread Starter
Join Date: Jul 2010
Location: falmouth, VA
Posts: 3
Likes: 0
Received 0 Likes
on
0 Posts
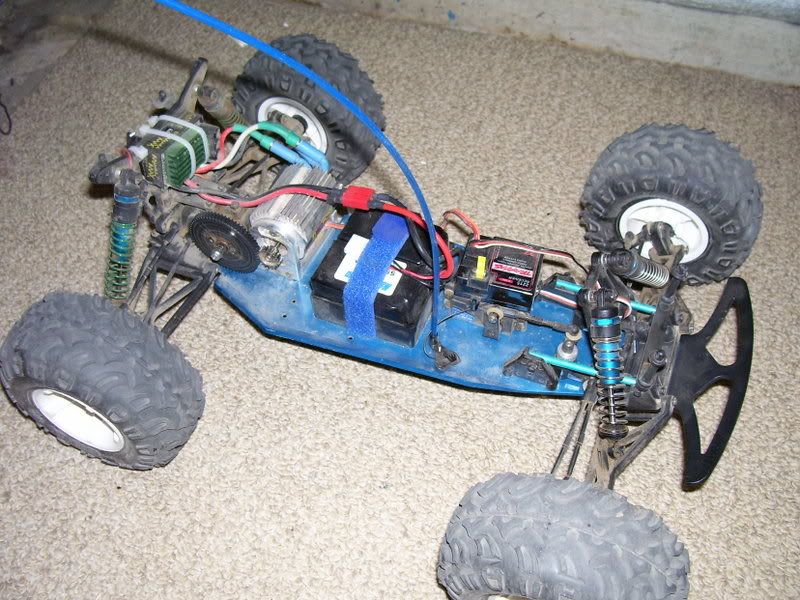
My brother had a 'like new" AE RC10GT and gave it to me. I hopped it up a bit with factory team accessories and a little carbon fiber. I decided to go ahead and fabricate a motor mount, battery tray/holder and a mount for the ESC to ride on. I chose the Velineon VXL brushless setup due to it's massive torque and ability to run on 2 or 3s lipo's up to 8000milamps/11v for a TON of muscle. After a few weeks work, the truck is done. It is VERY fast and the torque is off the hook ! I am most pleased with this conversion. Enjoy the pics !


 09-02-2010, 08:13 PM
#2
Senior Member
My Feedback: (8)
Join Date: Aug 2009
Location: central, KY
Posts: 1,725
Likes: 0
Received 0 Likes
on
0 Posts
ORIGINAL: crazdgunman
My brother had a 'like new" AE RC10GT and gave it to me. I hopped it up a bit with factory team accessories and a little carbon fiber. I decided to go ahead and fabricate a motor mount, battery tray/holder and a mount for the ESC to ride on. I chose the Velineon VXL brushless setup due to it's massive torque and ability to run on 2 or 3s lipo's up to 8000milamps/11v for a TON of muscle. After a few weeks work, the truck is done. It is VERY fast and the torque is off the hook ! I am most pleased with this conversion. Enjoy the pics !
My brother had a 'like new" AE RC10GT and gave it to me. I hopped it up a bit with factory team accessories and a little carbon fiber. I decided to go ahead and fabricate a motor mount, battery tray/holder and a mount for the ESC to ride on. I chose the Velineon VXL brushless setup due to it's massive torque and ability to run on 2 or 3s lipo's up to 8000milamps/11v for a TON of muscle. After a few weeks work, the truck is done. It is VERY fast and the torque is off the hook ! I am most pleased with this conversion. Enjoy the pics !
Gonna have to get some vid of that beast.
09-03-2010, 11:16 AM
#3
Senior Member
Join Date: Mar 2006
Location: La Palma,
CA
Posts: 140
Likes: 0
Received 0 Likes
on
0 Posts
That's a really nice looking conversion. Did you make the motor mount by hand or with a cnc machine? Will it still wheelie with that motor placement?
09-03-2010, 11:56 AM
#4
Junior Member
Thread Starter
Join Date: Jul 2010
Location: falmouth, VA
Posts: 3
Likes: 0
Received 0 Likes
on
0 Posts
I made the mount out of some 2"x2" L-stock aluminum using my handtools and belt grinder. The truck will not wheelie anymore which is a good thing. Popping/riding wheelie'slooks cool but is a waste of power. The truck handles extremely well and is very responsive. It will drive/handle circles around my 2wd Slash and is noticably faster as well.
09-03-2010, 12:11 PM
#5
Member
Join Date: Nov 2005
Location: Canby, OR
Posts: 30
Likes: 0
Received 0 Likes
on
0 Posts
nice setup....
i was wondering how to convert my extra rc10gt chassis to electric. your pics explain alot on what i need to do to convert one.
would you consider making a motor mount and selling it?
i was wondering how to convert my extra rc10gt chassis to electric. your pics explain alot on what i need to do to convert one.
would you consider making a motor mount and selling it?
09-03-2010, 01:09 PM
#6
Senior Member
My Feedback: (32)
Join Date: Nov 2007
Location: Shakopee,
MN
Posts: 970
Likes: 0
Received 0 Likes
on
0 Posts
Agreed, if you could sell the mount for say $15-20 I bet a lot of people would buy them (you would be able to make a ton of mounts out of one piece of angle iron)
09-03-2010, 04:45 PM
#7
Junior Member
Thread Starter
Join Date: Jul 2010
Location: falmouth, VA
Posts: 3
Likes: 0
Received 0 Likes
on
0 Posts
I had about 2 hours of time invested in the mount. Getting it right and using the existing mounting holes that were already in the chassis that the nitro motor used was the challenge. I am not really into the idea of making a bunch and selling. I did this mount using a hacksaw, a belt grinder/sander, files and sandpaper and alot of polishing. I will tell you how to do it though.
1. Make a working pattern out of a piece of stiff poster board to use as a guide. After removing the existing nitro mount, lay it flat on your poster board and trace it & mark your mounting holes.
2. leave enough on your pattern so you can bend one end up to 90 degrees. This is where your motor to bolt to.
3. carefully cut out your pattern and do a test fit....eyeball it the best you can.
4. get a piece of 1/8" thick 2"x2" aluminum angle from Lowes and rough cut your pattern on it using a hacksaw then use metel files for final shaping. TESTFITYOURWORKASYOUPROGRESS.
5. drill all mounting holes for the mount on a drill press if you have one. A hand-power drill can be used if you have a steady hand .
6. test fit your motor on the mount and do a teat fit on the chassis. Be sure to allow enough movement in the mount to adjust gear mesh.
7. Once satisfied with the overall fit....do a final sanding job with 320 sandpaper and polish to your liking. Look closely at my pics as a guide to get a general idea of the shape of my mount.
Good luck !
09-03-2010, 10:14 PM
#8
Senior Member
Join Date: Mar 2006
Location: La Palma,
CA
Posts: 140
Likes: 0
Received 0 Likes
on
0 Posts
Wow you certainly have a lot of patience with metal. I've made a few motor mounts but they usually come out looking pretty rough since I'm in a hurry to get the car running. Overall that has to be one of the cleanest electric conversions I've ever seen. None of my rc cars wheelie either and I prefer it that way. Its nice to be able to floor the throttle and watch the tires balloon up! Are you going to post a video?
 11-04-2010, 10:25 AM
#10
Member
Join Date: Jan 2006
Location: Malden,
MA
Posts: 97
Likes: 0
Received 0 Likes
on
0 Posts
Your truck came out really nice. Great job on the motor mount and battery holder. What type of lipo's are you using and how do you like them.
Here is a picture of my brushless RC10GT. It has a little different setup right now but I'm looking to change the batteries and battery location.
Nick
Here is a picture of my brushless RC10GT. It has a little different setup right now but I'm looking to change the batteries and battery location.
Nick
12-25-2010, 06:47 AM
#12

Join Date: Feb 2007
Location: Owensboro, KY
Posts: 5,527
Likes: 0
Received 0 Likes
on
0 Posts
ORIGINAL: depro
That's a really nice looking conversion.
That's a really nice looking conversion.
Wow! Imagine a brushless RC with manual brakes. He could have a servo operate the brakes.[8D]
