


Custom made 1:10 RWD solid axle Escort MK2


 01-11-2016, 09:11 PM
#277

Thread Starter

Worked on the cable steering tonight. I don't have enough cable to make the actual setup but I really wanted to make sure it was doable so I just cut in half what I had and started messing around.
I made a bracket to attach to the sliding bar via two holes that were already in the bar and of correct diameter:


Then I was trying to figure it out in my head but decided to draw it and see if it made sense. The idea is to solder metal tabs to the newly attached bar, and solder each cable to these tabs:

Just crimped in place, soaked in flux and ready for solder:

All soldered, now just need to find how to hold the sheat for the cables:

Out of plastic, I made a block with a slot for the bar, and holes for the sheat and cable. The idea was to drill half of the hole at sheat diameter, and the other half at wire diameter, but the plastic is too soft, so that one will only be a prototype (the block) and I will need to make something harder (probably out of aluminum):


And a small vid, I am just pulling and pushing on one of the cable while trying to hold the iphone at the same time lol
http://youtu.be/PhxZg5Ua3l0
I made a bracket to attach to the sliding bar via two holes that were already in the bar and of correct diameter:


Then I was trying to figure it out in my head
but decided to draw it and see if it made sense. The idea is to solder metal tabs to the newly attached bar, and solder each cable to these tabs:
Just crimped in place, soaked in flux and ready for solder:

All soldered, now just need to find how to hold the sheat for the cables:

Out of plastic, I made a block with a slot for the bar, and holes for the sheat and cable. The idea was to drill half of the hole at sheat diameter, and the other half at wire diameter, but the plastic is too soft, so that one will only be a prototype (the block) and I will need to make something harder (probably out of aluminum):


And a small vid, I am just pulling and pushing on one of the cable while trying to hold the iphone at the same time lol
http://youtu.be/PhxZg5Ua3l0
Last edited by Frederik_b; 01-12-2016 at 04:28 AM.
02-14-2016, 07:25 PM
#278
Thread Starter
Hey guys, sorry for lack of updates, here is something new I got in the mail. Looks like it was made to be there  So do you think I should leave it in?


Fits just right in with the ESC up front.. That's one thick looking radiator though lol Really tempted to use it, with the extra weight of the car, the torque will be welcome. (It is a Castle 3800kv 4 pole and I would use it with the 2s saddle pack)
Maybe you can help with a question I have, I also have a 4600kv 4 pole but it looks like it might be shorted, it is very hard to turn compared to the other one, very notchy, can almost not turn the shaft by hand when there is no pinion on it. I also made the test of shorting two wires and try to turn it by hand and it is not really harder to turn when you do, whereas with the known good 3800kv there is a huge difference between shorted wires and not shorted. Any of you guys have both motors and can compare them, see if the 4600 is way notchy compared to the 3800?
I also swapped the front springs for shorter and softer ones, from a CC-01. Sits a tad lower and closer to what it should now. Should be perfect once everything is on it.
So do you think I should leave it in? 


Fits just right in with the ESC up front.. That's one thick looking radiator though lol Really tempted to use it, with the extra weight of the car, the torque will be welcome. (It is a Castle 3800kv 4 pole and I would use it with the 2s saddle pack)
Maybe you can help with a question I have, I also have a 4600kv 4 pole but it looks like it might be shorted, it is very hard to turn compared to the other one, very notchy, can almost not turn the shaft by hand when there is no pinion on it. I also made the test of shorting two wires and try to turn it by hand and it is not really harder to turn when you do, whereas with the known good 3800kv there is a huge difference between shorted wires and not shorted. Any of you guys have both motors and can compare them, see if the 4600 is way notchy compared to the 3800?
I also swapped the front springs for shorter and softer ones, from a CC-01. Sits a tad lower and closer to what it should now. Should be perfect once everything is on it.
02-18-2016, 03:25 PM
#279

Now you can make the radiator cut-out as needed on the RS 2000 aswell! LOL! Looks very nice as always. And i know that "did they made it to fit in here?"-feeling that you got when you installed it into the car
03-17-2016, 05:55 PM
#280
Thread Starter
Thank you Lars
I have been searching for the radiator cut out of the RS2000 but I am not quite sure what it is, do you have a picture?Also, huge milestone last night! Steering works!

And also.... I ran it!!!
I completed my first working prototype of the steering, and I was about to just push it around on the floor with my foot and steer it, and it struck me, I can just put the motor and an ESC, duct tape the drive shaft and go for a ride!!! I thought I could not do that first run and not film it, I am trying to upload it as I type this, it is a pretty poor vid with not much space to go (cluttered garage!) but at least I got one!
There was only the driveshaft extension I made which is missing a setscrew but I wrapped some duct tape around and it held pretty good! No grip though on the garage floor.
Here is the vid, sorry about the quality! I put the MK1 body because I needed the front part off to put the clamp for the steering assembly
and the MK1 happened to not have the front half bolted.And I mistakenly recorded at 120 frames per second so I'll be able to edit the vid and slow it down without losing frame rate (that will be a second video upload later though).
Lol I love how the still picture of the video looks like it is doing a burnout lol
http://youtu.be/0lz-7sZus1A
A couple vids showing the steering :
http://youtu.be/8K6sm_GjXKo
http://youtu.be/usA6prXDIvA
First outside run. I promise sometime soon I will make a proper video where I will (try to) follow the car with the camera
for now it is another vid with the iPhone sitting by itself on the ground lol And you don't see on the camera when I rolled it, you can hear it though!http://youtu.be/zHm_UhRdi3U
03-18-2016, 03:46 PM
#281
Thread Starter
I re-uploaded the first outside run video in HD, the first upload was really crappy quality, on that last one you can see much better how the suspension works! I think once the battery is at the final location (at the seats) it will handle very nicely!
http://youtu.be/Qsb265itfkU
http://youtu.be/Qsb265itfkU
06-19-2016, 04:04 PM
#282
Thread Starter
Small update! I made a new front beam, the aluminum one was not far forward enough to bolt the skid plate to it, so I made one out of steel. It looks much nicer too, but quite heavier than the alu one, so I drilled some speed holes in it Might drill more on the part facing down to remove some more weight.


Now that I think of it I should have tried to do dimple holes to add strenght! Not sure how I would do that though I have never experimented with that.
I also cut the mock up steering cables at the servo to start and think of how I'll run these to the back where I want the servo. I think I will make them go through the firewall as low as possible (like the one on the right in that engine bay pic, just above frame rail), and run them near the door sills.

This is where I want the servo, with the servo arm poking up through the floor. It will have the two cables attached to the same servo horn hole, one coming from each door sill. Hopefully the added curves in the cable to get there do not induce too much steering slop or friction.


I'll have to think of a way to keep the servo clean (probably a rubber balloon?) given where it is. I don't pan to go through water but certainly some dirt!
I wanted to do more but got interrupted. At least I can now put the body on and have the steering bolted, without a big clamp up front lol!
Might drill more on the part facing down to remove some more weight.


Now that I think of it I should have tried to do dimple holes to add strenght! Not sure how I would do that though I have never experimented with that.
I also cut the mock up steering cables at the servo to start and think of how I'll run these to the back where I want the servo. I think I will make them go through the firewall as low as possible (like the one on the right in that engine bay pic, just above frame rail), and run them near the door sills.

This is where I want the servo, with the servo arm poking up through the floor. It will have the two cables attached to the same servo horn hole, one coming from each door sill. Hopefully the added curves in the cable to get there do not induce too much steering slop or friction.


I'll have to think of a way to keep the servo clean (probably a rubber balloon?) given where it is. I don't pan to go through water but certainly some dirt!
I wanted to do more but got interrupted. At least I can now put the body on and have the steering bolted, without a big clamp up front lol!
11-14-2016, 08:37 PM
#283
Thread Starter
Wow that was a long time without updates! We moved house this summer so did not have much time for hobby, but things have settled now and I have my new hobby area ready to continue It is a large area upstairs of the garage:

Sooo I have a small tiny wee update! I was able to make use of the new hobby space a bit tonight. No huge progress but I started to work on replacing the tiny steering cables I used for testing with actual length, desolder the cables, but then I could not find where I put the solder flux when moving...
So I moved on to other things I have been pushing for a while, and as suggested a long time ago by Lars I proceeded to replace the little m2 screws and bolts holding the chassis rails to floor with larger M3, threaded in the chassis rails. Don't need bolts anymore, and the button heads are inside the car, so they are flusher inside, and I ground the other end flush under the chassis. Nicer!

Then I found the flux paste so I was able to resume working on the steering. I cut the yellow sheat to correct lenght, and made mounts for the steering servo. Here is where I am at now, with the button head screws on the floor instead of bulky bolts and nuts, and ready to do the thingy that will tie the cables to servo horn. That might be tomorrow night


It is a large area upstairs of the garage:Sooo I have a small tiny wee update! I was able to make use of the new hobby space a bit tonight. No huge progress but I started to work on replacing the tiny steering cables I used for testing with actual length, desolder the cables, but then I could not find where I put the solder flux when moving...
So I moved on to other things I have been pushing for a while, and as suggested a long time ago by Lars I proceeded to replace the little m2 screws and bolts holding the chassis rails to floor with larger M3, threaded in the chassis rails. Don't need bolts anymore, and the button heads are inside the car, so they are flusher inside, and I ground the other end flush under the chassis. Nicer!

Then I found the flux paste
so I was able to resume working on the steering. I cut the yellow sheat to correct lenght, and made mounts for the steering servo. Here is where I am at now, with the button head screws on the floor instead of bulky bolts and nuts, and ready to do the thingy that will tie the cables to servo horn. That might be tomorrow night 
 11-16-2016, 02:17 PM
#284
Thread Starter
Last night I continued the steering in the rear (lol strange to say!) I made two blocks, with one small hole halfway through, size of the sheat, and another tiny hole going through just the size of the cable. This acts as a sheat stopper, so I had the cables arranged like this:


Then I prepared the soldering of the cable to a metal plate I can attach to the servo horn. I did not expect what happened next, maybe you can figure by looking how it is before soldering

.....

The metal plate soldered to the floor... lol :banghead: I ground the hole larger to make a bit more room.
My problem at the moment is the cable moves horizontally and the servo arm moves as a radius so it moves up and down throughout the travel... The cables won't flex to follow this so I need to find a way to have the servo horn.
 01-07-2017, 05:44 PM
#286
Thread Starter
I finished the steering tonight!
That's a good news, I was all excited to try it out, I had put back everything in, ESC, receiver, taped the battery and the body on etc.. Getting the iphone ready for a quick vid, first pull of the trigger, the car moves like 1 inch and the esc cuts because the battery is dead.. AARRRGGG!!! lolI had the time to snap a couple pics and a small steering video before the iphone battery also died lol I am uploading them and will post them shortly.
More exciting video coming tomorrow
By the way you will notice the front looks much lower because I removed the 10mm springs spacers up front, need to put back like 5mm of lift.http://youtu.be/tIe0KX2NBfg
 01-07-2017, 05:46 PM
#287
Thread Starter
Made a vid in the garage, it is painted plywood so it slips wayy to much... kind of hard to have the suspension work when there is no grip. It is quite a handful to drive lol especially since the place is not all that big, can't get much speed before hit something lol
http://youtu.be/ruwZTBvJa3c
Oh and the bumpers are not there anymore since I hit something and they fell all three lol they were held with a dot of hot glue each so.. yeah
http://youtu.be/ruwZTBvJa3c
Oh and the bumpers are not there anymore since I hit something and they fell all three lol they were held with a dot of hot glue each so.. yeah
01-07-2017, 05:46 PM
#288
Thread Starter
I did another vid this morning, slow motion of the suspension when dropping the car on the table from a few inches. Probably need to replace the pistons in the rear shocks for a bit more damping, and also the rear axle linkage touches the steering servo so it kind of bottoms out weirdly, but otherwise pretty good!
http://youtu.be/C7f8Mv3RdRA
http://youtu.be/C7f8Mv3RdRA
01-07-2017, 05:47 PM
#289
Thread Starter
Did some practice tonight, I'm getting better at keeping the car in control, placed the battery for 50-50 weight distribution, and played with different tires. Ended up with the same tamiya rally tires in the rear but with a different kind of threaded rally tires up front, so the car won't suddenly switch from oversteer to understeer. But what helped most is the throttle EPA (limitation) and the throttle exponential which I cranked all the way down (for a slower throttle response on the trigger). Makes for easier modulation of throttle and avoid unnecessarily high rev.

Also I'm getting ready to try out the 2S lipo saddle pack :crazy: the sweet spot for weight distribution is just in front of the rear suspension 4-link boxes, so one saddle on each side of the driveshaft tunnel. That makes for about 50-50 or just a tad front bias. That's cool they are that far back, I was afraid the best position for accurate weight distribution would interfere with eventual seats...


Also I'm getting ready to try out the 2S lipo saddle pack :crazy: the sweet spot for weight distribution is just in front of the rear suspension 4-link boxes, so one saddle on each side of the driveshaft tunnel. That makes for about 50-50 or just a tad front bias. That's cool they are that far back, I was afraid the best position for accurate weight distribution would interfere with eventual seats...
 01-28-2017, 07:55 PM
#290
Thread Starter
I did not do much progress lately, but I do take it out from time to time for a spin (I think that's the right word lol!)
I accidentally went over an angled cardboard and was surprised how easy it climbed right up! So I did it a few more times on a video
http://youtu.be/W1UVPdMgUjQ
I accidentally went over an angled cardboard and was surprised how easy it climbed right up! So I did it a few more times on a video
http://youtu.be/W1UVPdMgUjQ
02-18-2017, 07:25 PM
#291
Thread Starter
I got the car to my office where we have a precision scale and it now weigh in at 4.3 lbs, functional with battery and all. Also there are larger areas of carpet at the office, more grip and speed which is scary in a tight corridor with this car since it currently has pretty soft suspension and higher CG!
Also removed the oil from the front struts as it was way too thick, makes more sense now but slightly bouncy lol will have to find lighter oil. Made a small vid too, tried to follow the car with the iPhone while at the same time driving the car... I am getting pretty good at driving it but with the camera the skillz dropped significantly lol ! Look away a split second and the tail is gone! I was able to catch a few nice beginning of slides in slo motion though. I took a couple of new pics of the chassis too.
http://youtu.be/uR02PfzYzxg


Now I am thinking of doing a roll cage but unsure how. I have brake line and a bender, but only have stuff for soldering, no brazing. Might give it a go since it is not going to be abused like a rock crawler, should hold pretty good. Searched for some reference pictures to have ideas:


which is scary in a tight corridor with this car since it currently has pretty soft suspension and higher CG!Also removed the oil from the front struts as it was way too thick, makes more sense now but slightly bouncy lol will have to find lighter oil. Made a small vid too, tried to follow the car with the iPhone while at the same time driving the car... I am getting pretty good at driving it but with the camera the skillz dropped significantly lol ! Look away a split second and the tail is gone! I was able to catch a few nice beginning of slides in slo motion though. I took a couple of new pics of the chassis too.
http://youtu.be/uR02PfzYzxg


Now I am thinking of doing a roll cage but unsure how. I have brake line and a bender, but only have stuff for soldering, no brazing. Might give it a go since it is not going to be abused like a rock crawler, should hold pretty good. Searched for some reference pictures to have ideas:


 04-11-2017, 04:46 PM
#292
Thread Starter
Last night I made the front fender thingy, the rounded part that protrudes inside the car and allows the wheels to turn. So I have one less hole in the floor now!
Started with a brake cleaner bottle:

Fits almost directly! Needed to trim the hole just a little bit. Also the can has some kind of plastic coating inside, I burnt it off with the torch, also burnt the paint and it was all very easy to buff off the remains after that.

Then the real work started:

Held in place with a clip:


And soldered (I drilled two holes for M2 screws to hold it in place secure while soldering, then removed the screws):

Clears the small wheels good:


And clears the larger wheels just fine too!

All in all still ugly soldering but it seems to hold good, and I might put some JB weld when all done before painting to hide whatever is not nice enough.
 04-21-2017, 06:22 PM
#293
Thread Starter
I made the second side last night, went pretty good and the result looks better than the first so I guess I am improving somewhat
Nice to not have holes in there anymore! Next is to do rear wheels tubs from similar material. Sorry for another set of pics looking almost the same lol!!
Ready to solder:
[ATTACH]2210765[/IMG]
Soldered, and also cleaned a bit of rust and gunk off the chassis here and there:
[ATTACH]2210766[/IMG]
[ATTACH]2210767[/IMG]
[ATTACH]2210768[/IMG]
As a bonus I also accidentally made a custom scale sword from solder dripping on work bench:
[ATTACH]2210769[/IMG]
Fred
04-21-2017, 06:26 PM
#296
Thread Starter
And just for fun a couple pics with the latest 1.55s I just got
[ATTACH]2210780[/IMG]
[ATTACH]2210781[/IMG]
[ATTACH]2210782[/IMG]
[ATTACH]2210783[/IMG]
With larger fenders cut out it would look like the rally/baja muscle cars � la Olds 442 below :
[ATTACH]2210784[/IMG]
[ATTACH]2210780[/IMG]
[ATTACH]2210781[/IMG]
[ATTACH]2210782[/IMG]
[ATTACH]2210783[/IMG]
With larger fenders cut out it would look like the rally/baja muscle cars � la Olds 442 below :
[ATTACH]2210784[/IMG]
05-08-2017, 02:06 AM
#297
Thread Starter
Made some tests for roll cage design, only mock ups using solder wire and tape. The design will change but it helps gets the ideas coming and refining. Can't start the rear part yet since the wheel tubs are not there, and the tubs top part is where all the back tubes meet.
Front doors will have X and not just one diagonal, but did not bother for now. My reference pics are google search for group-4 escort mk2
I have received the brass tubes for the cage this week so that pushed me starting the design a bit The solder wire is a bit smaller than the brass tubes which are 4mm but it still ok for design, easy to bend to shape. I made new calculation since I thought maybe 4mm was too small, but the wheelbase scales at 1:9.57, so the 4mm tubes scales perfect for the 38mm tube dimension I was targeting (38.28 mm). Though I just read sometimes the main hoop is 45mm.. but I guess I'll be fine
[ATTACH]2213962[/IMG]
[ATTACH]2213963[/IMG]
[ATTACH]2213964[/IMG]
Front doors will have X and not just one diagonal, but did not bother for now. My reference pics are google search for group-4 escort mk2
I have received the brass tubes for the cage this week so that pushed me starting the design a bit
The solder wire is a bit smaller than the brass tubes which are 4mm but it still ok for design, easy to bend to shape. I made new calculation since I thought maybe 4mm was too small, but the wheelbase scales at 1:9.57, so the 4mm tubes scales perfect for the 38mm tube dimension I was targeting (38.28 mm). Though I just read sometimes the main hoop is 45mm.. but I guess I'll be fine [ATTACH]2213962[/IMG]
[ATTACH]2213963[/IMG]
[ATTACH]2213964[/IMG]
05-09-2017, 01:49 AM
#299
Thread Starter
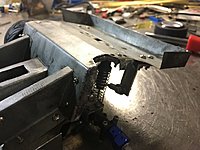
So I had to veer off a bit of the cage and work on the rear tubs.. spent a few hours trying to find the best shape. Thing is while at it I thought I should correct the shocks placement and put them in between frame and wheel instead of being too narrow (close to diff). It has been bugging me for a while for a few reasons, it was not accurate, it caused the car to roll too much, and the shocks had to hang too low to the ground (too big of a bracket at the axle). So I started by removing the reinforcement I had soldered to the side, and made a big notch for the shock:

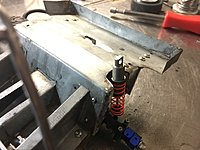
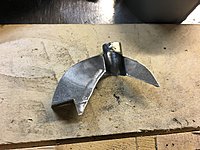
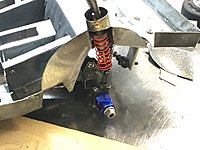
This is the shape I came up with, it is only the vertical piece of the tub, with a shock hole integrated. The shock hole protrudes higher than the tub and will have a pin through to hold the shock, and likely a cap on which the roll cage tubes will attach to. I might shorten the cylindrical tube a bit once I am sure of final position and shock mounting height.

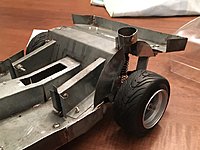

Maybe you noticed, the cylinder part is brazed first brazing ever for me haha! Takes some crazy amount of heat compared to solder. The idea is to braze the tubs as a unit (will be like 3 or 4 pieces probably) and then solder the tub assembly to the chassis (cannot braze it since the whole car will melt under the heat)
Not a big update as far as amount of parts, I was hoping I would at least have one tub completed, but that's the result of a few hours of head scratching ans scrapping some air duct pieces I'm still happy with it because I found a way to do this in one piece, with the shock hoop thing integrated.
This is the shape I came up with, it is only the vertical piece of the tub, with a shock hole integrated. The shock hole protrudes higher than the tub and will have a pin through to hold the shock, and likely a cap on which the roll cage tubes will attach to. I might shorten the cylindrical tube a bit once I am sure of final position and shock mounting height.
Maybe you noticed, the cylinder part is brazed first brazing ever for me haha! Takes some crazy amount of heat compared to solder. The idea is to braze the tubs as a unit (will be like 3 or 4 pieces probably) and then solder the tub assembly to the chassis (cannot braze it since the whole car will melt under the heat)
Not a big update as far as amount of parts, I was hoping I would at least have one tub completed, but that's the result of a few hours of head scratching ans scrapping some air duct pieces
I'm still happy with it because I found a way to do this in one piece, with the shock hoop thing integrated.
05-09-2017, 01:51 AM
#300
Thread Starter
Why does the pictures now always show as thumbnails?? It kind of sucks to have to click them all to see the pic, and not see them right away just like it was before. I don't think I am embedding them any different but it now does that, only on this forum?