


Scratch Designed/Built Sailplane
 04-21-2012, 07:46 PM
#51

Thread Starter

Join Date: Feb 2012
Location: Fairfield, CT
Posts: 416
Likes: 0
Received 0 Likes
on
0 Posts
I got 90% of the v-tail done today, SWEET!
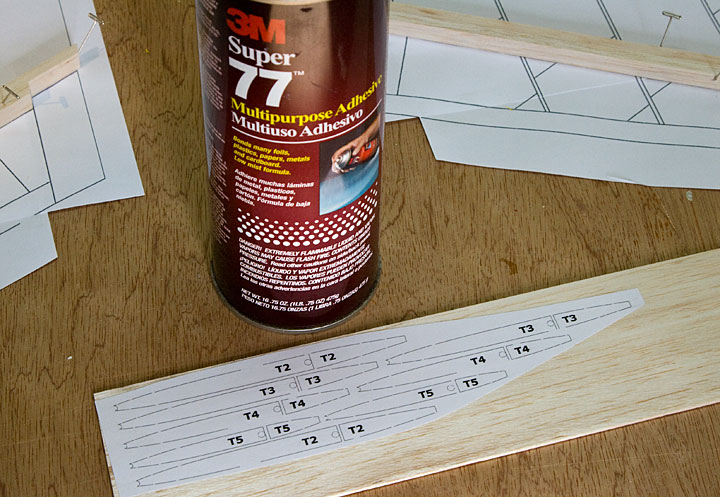
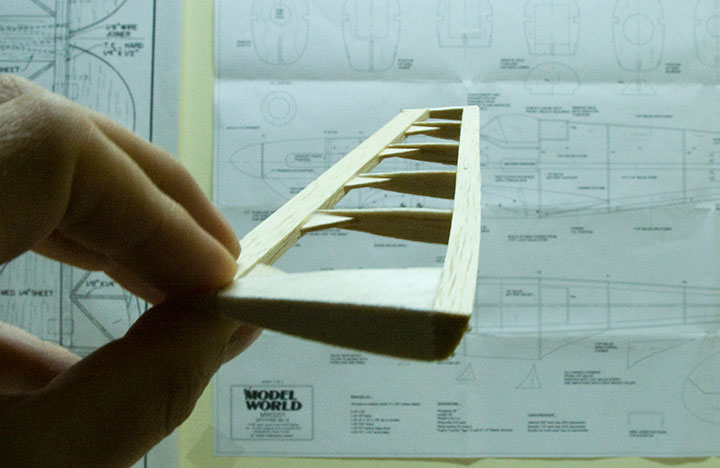
I decided to do things properly & use a symmetrical airfoil for the tail feathers. Flat stabs tend to stall sooner than those with an airfoil... stalling = bad. I printed a set of tail ribs & contact cemented them to the wood...
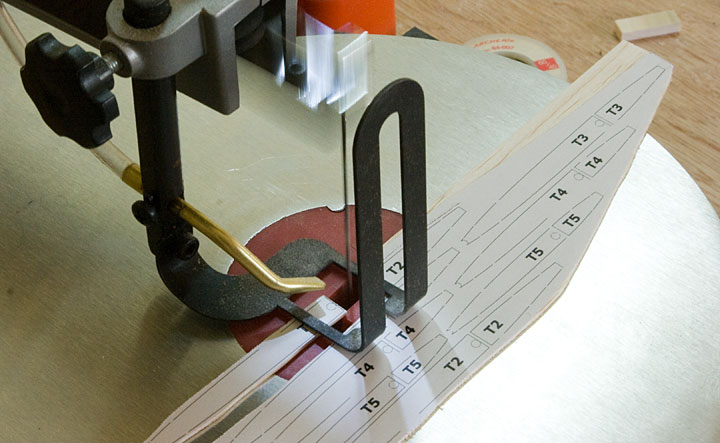
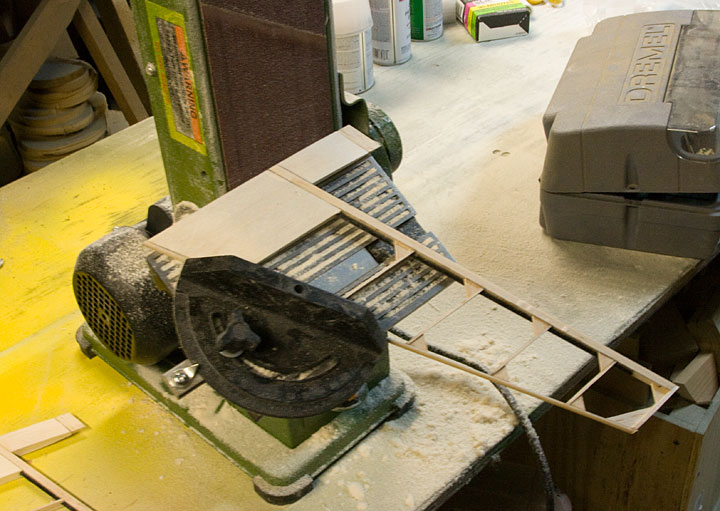
Used my scroll saw to rough-cut the ribs...
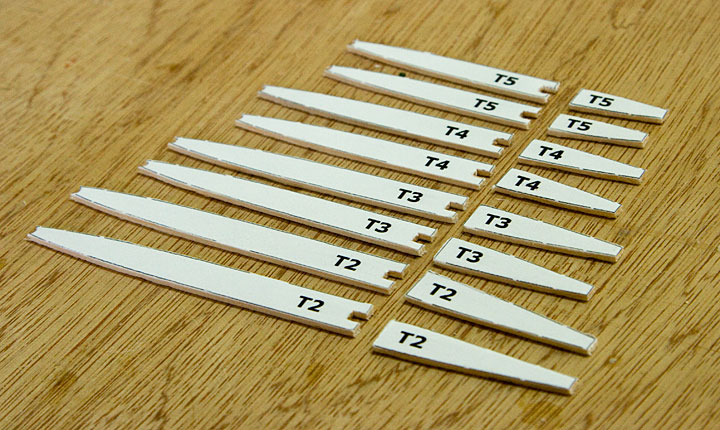
Finished up the rib shapes with a sanding block...
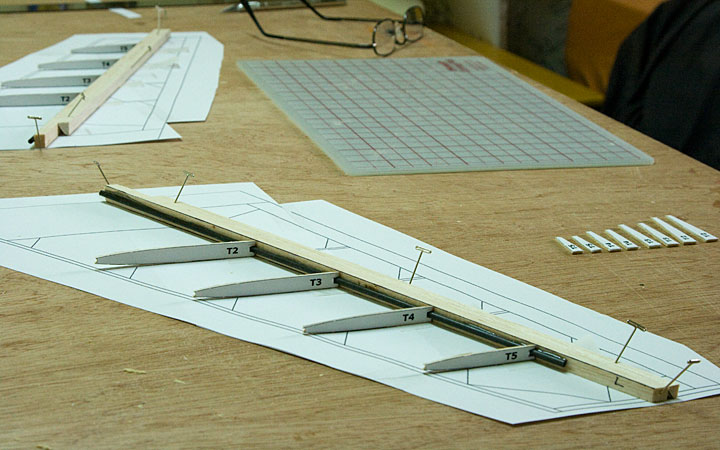
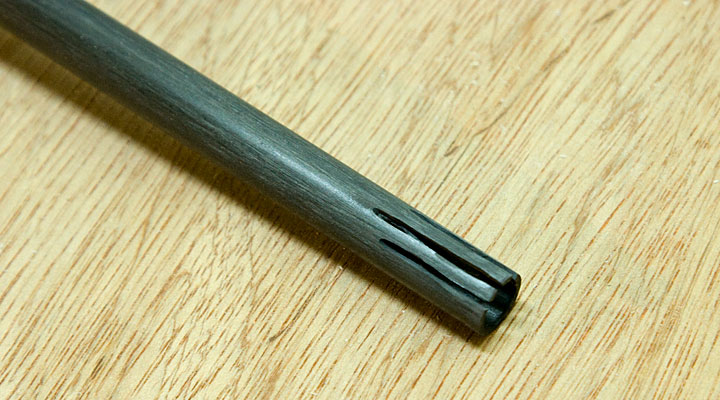
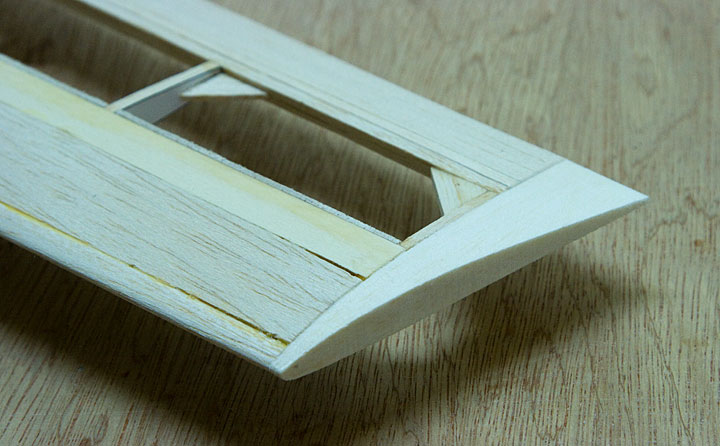
The notch in the ribs is to accommodate some carbon fiber reinforcing. I glued a small CF tube to the center spar, it should make the tail nice & rigid...
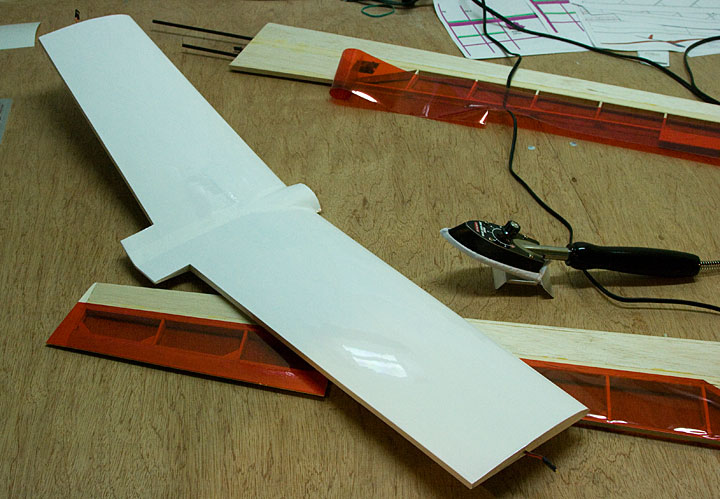
The root of the v-tail is made from some fairly dense 3/8" balsa, carved to the airfoil shape. It should give a nice solid foundation for the tail & hopefully make mounting everything to the tail boom a snap...
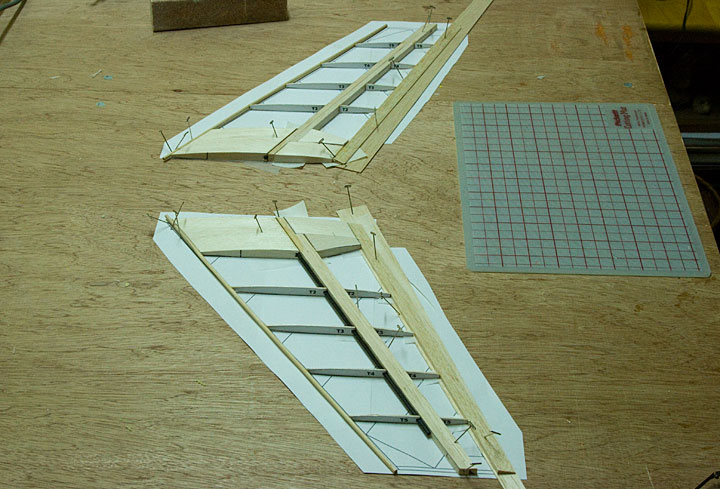
Looks like something that belongs on a jet... fun fun. I still need to add the strengthening gussets & do some sanding. Will pick that up tomorrow...
I decided to do things properly & use a symmetrical airfoil for the tail feathers. Flat stabs tend to stall sooner than those with an airfoil... stalling = bad. I printed a set of tail ribs & contact cemented them to the wood...
Used my scroll saw to rough-cut the ribs...
Finished up the rib shapes with a sanding block...
The notch in the ribs is to accommodate some carbon fiber reinforcing. I glued a small CF tube to the center spar, it should make the tail nice & rigid...
The root of the v-tail is made from some fairly dense 3/8" balsa, carved to the airfoil shape. It should give a nice solid foundation for the tail & hopefully make mounting everything to the tail boom a snap...
Looks like something that belongs on a jet... fun fun. I still need to add the strengthening gussets & do some sanding. Will pick that up tomorrow...
 04-22-2012, 10:35 AM
#53
Thread Starter
Join Date: Feb 2012
Location: Fairfield, CT
Posts: 416
Likes: 0
Received 0 Likes
on
0 Posts
ORIGINAL: highfly3D
very nice build.. Which scroll saw are you using for cutting the ribs?
very nice build.. Which scroll saw are you using for cutting the ribs?
04-22-2012, 05:02 PM
#54
Thread Starter
Join Date: Feb 2012
Location: Fairfield, CT
Posts: 416
Likes: 0
Received 0 Likes
on
0 Posts
Why is it the last 10% takes 90% of the time?
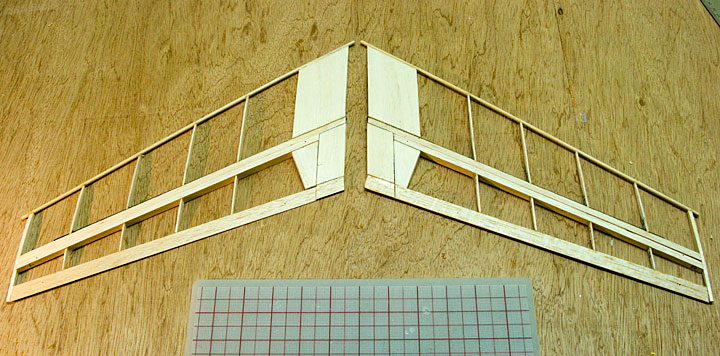
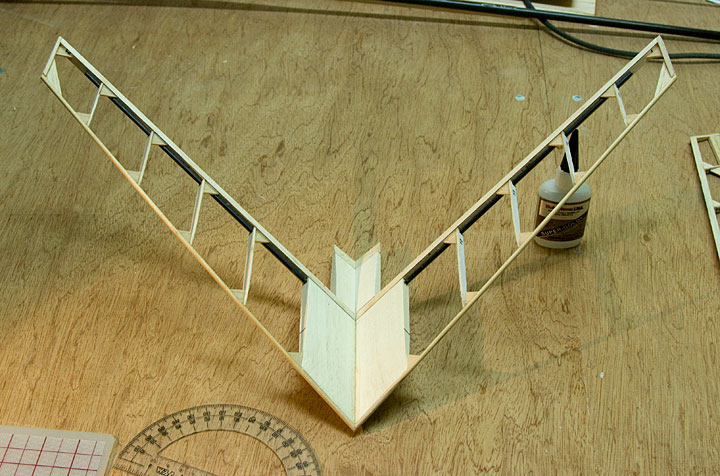
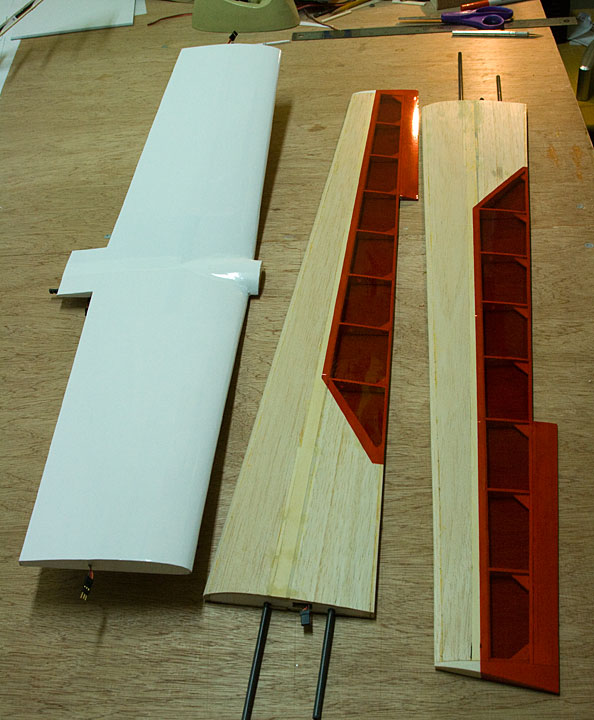
So I started adding gussets to the v-tail. I carefully measured the required angle then set about making 32 of these little buggers...
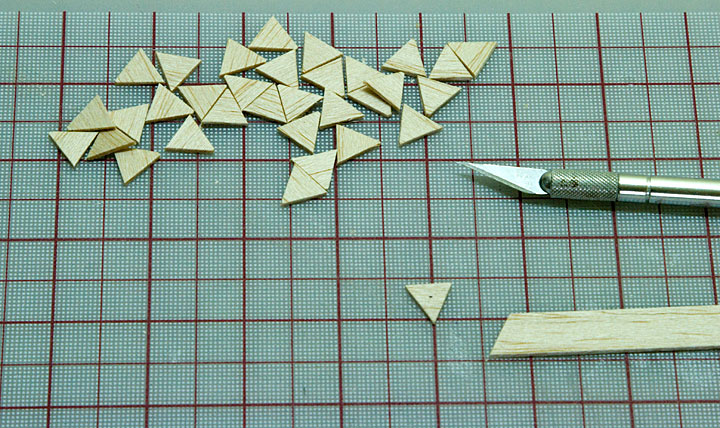
Then I noticed, duh, I'd need different shaped gussets for different areas of the tail. The leading edge, for example, runs at a different angle to the ribs than at trailing edge. After a long groan I tossed most of them & set about cutting out a new set. Anyway here's a panel with the corrected gussets installed. Came out nice & strong & fairly light...

And now for the next time sucking issue...
One of my ruddervators (love that word) annoyingly appears to have developed a moderate warp along its hinge line...
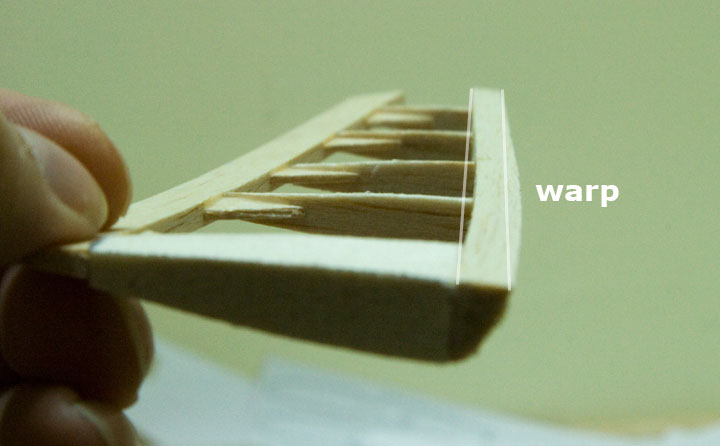
So back to my damp sponge trick, I saturated the wood then using a straight-edge as a guide, secured it to my workbench. I'll let it sit overnight, fingers crossed she'll be straightened out come morning...

So I started adding gussets to the v-tail. I carefully measured the required angle then set about making 32 of these little buggers...
Then I noticed, duh, I'd need different shaped gussets for different areas of the tail. The leading edge, for example, runs at a different angle to the ribs than at trailing edge. After a long groan I tossed most of them & set about cutting out a new set. Anyway here's a panel with the corrected gussets installed. Came out nice & strong & fairly light...
And now for the next time sucking issue...
One of my ruddervators (love that word) annoyingly appears to have developed a moderate warp along its hinge line...
So back to my damp sponge trick, I saturated the wood then using a straight-edge as a guide, secured it to my workbench. I'll let it sit overnight, fingers crossed she'll be straightened out come morning...
 04-23-2012, 08:54 PM
#56
Thread Starter
Join Date: Feb 2012
Location: Fairfield, CT
Posts: 416
Likes: 0
Received 0 Likes
on
0 Posts
Theoretically you could take a piece of balsa, bend it around so one end touches the other. Just add water, bend, let dry & repeat. Its pretty malleable stuff if you take your time. Steaming or heating in an oven are other wood bending techniques.
04-23-2012, 08:56 PM
#57
Thread Starter
Join Date: Feb 2012
Location: Fairfield, CT
Posts: 416
Likes: 0
Received 0 Likes
on
0 Posts
I had a great session today, got a lot done. Best of all I'm not all grumpy like I was yesterday.
The warp in my ruddervator is better but I'm still not happy with it. Will give it another go with the damp sponge trick & see where that takes me...
So anyway, I'm not letting that issue slow me down. Time to make a V out of my tail...
I needed to add a 55° bevel to each of my tail-feathers. I spent some time scratching my head, thinking up all sorts of crazy jigs & whatnot. In the end I decided to just get on with it & adjusted the table on my belt sander to 55° & went for it...
With very little fine tuning from the block sander, amazingly she went together at exactly 110°, SWEET!..
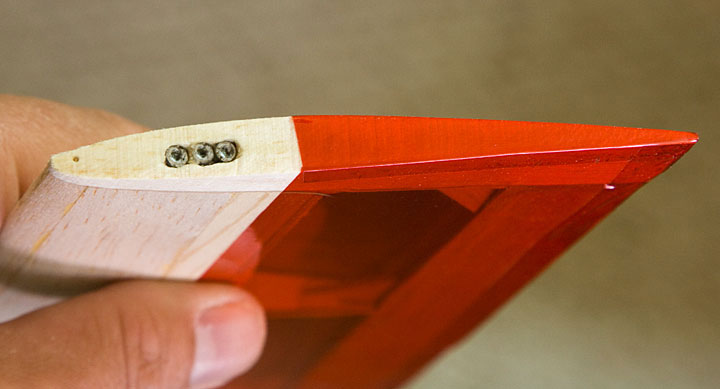
Again with the head scratching, I needed a way to attach the v-tail to my CF tail-boom. Actually that's the easy part, I'm just going to fiberglass it around the tail-boom. The tricky part was finding a way to make sure the tail lines up straight. So here's what I came up with... I temporarily tacked a short section of scrap CF tube to the v-tail making sure it ran down the joint precisely. I then epoxied two small strips of plywood either side to just the tail, not the CF...

While that set I carved a few short slots in the very end of the tail-boom. The thinking here is that'll give the glue something to index & hopefully keep the tail from working loose & spinning on the shaft. I also roughed up the CF with some course sandpaper...
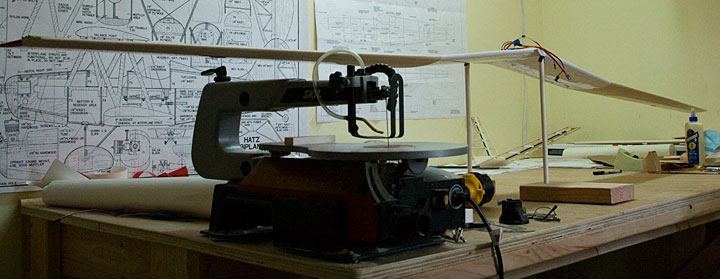
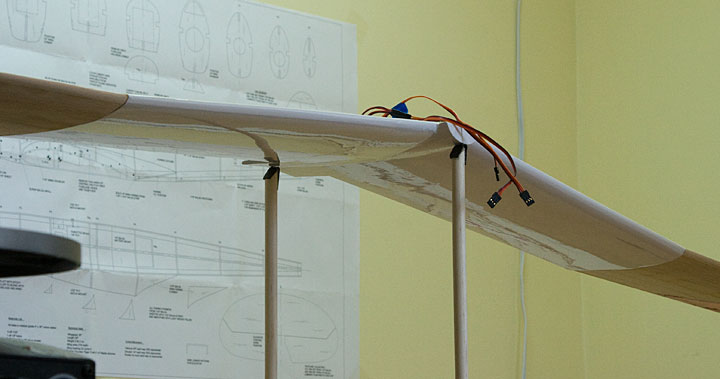
Next I mounted the wing center section to the fuselage & used a bunch of clamps to hold the wing perfectly level with my work bench...
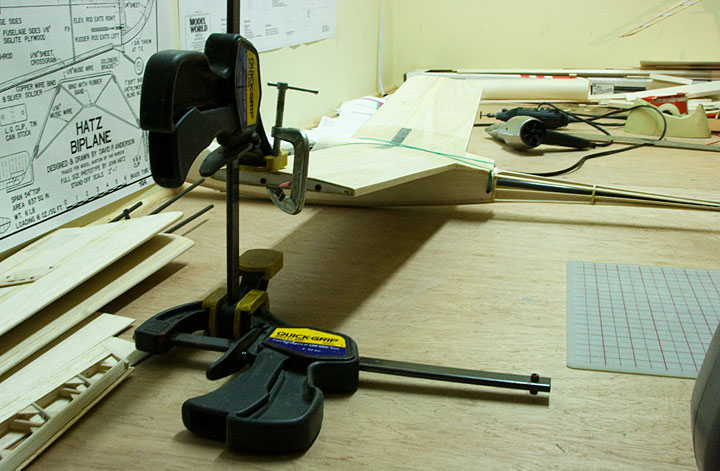
Yet another use for the amazing Quick Grip clamp, love those things. Once I had the airframe squared up I removed the temporary CF tube from the tail then went ahead & epoxied the v-tail to the tail-boom. I used a ruler to check it was square with the bench, propped it up with a glue bottle & I'm leaving this puppy to set overnight...
Tomorrow I'll reinforce the tail joint with fiberglass. Feels great to finally get the tail on there. Another major milestone achieved, YIPPY!
The warp in my ruddervator is better but I'm still not happy with it. Will give it another go with the damp sponge trick & see where that takes me...
So anyway, I'm not letting that issue slow me down. Time to make a V out of my tail...
I needed to add a 55° bevel to each of my tail-feathers. I spent some time scratching my head, thinking up all sorts of crazy jigs & whatnot. In the end I decided to just get on with it & adjusted the table on my belt sander to 55° & went for it...
With very little fine tuning from the block sander, amazingly she went together at exactly 110°, SWEET!..
Again with the head scratching, I needed a way to attach the v-tail to my CF tail-boom. Actually that's the easy part, I'm just going to fiberglass it around the tail-boom. The tricky part was finding a way to make sure the tail lines up straight. So here's what I came up with... I temporarily tacked a short section of scrap CF tube to the v-tail making sure it ran down the joint precisely. I then epoxied two small strips of plywood either side to just the tail, not the CF...
While that set I carved a few short slots in the very end of the tail-boom. The thinking here is that'll give the glue something to index & hopefully keep the tail from working loose & spinning on the shaft. I also roughed up the CF with some course sandpaper...
Next I mounted the wing center section to the fuselage & used a bunch of clamps to hold the wing perfectly level with my work bench...
Yet another use for the amazing Quick Grip clamp, love those things. Once I had the airframe squared up I removed the temporary CF tube from the tail then went ahead & epoxied the v-tail to the tail-boom. I used a ruler to check it was square with the bench, propped it up with a glue bottle & I'm leaving this puppy to set overnight...
Tomorrow I'll reinforce the tail joint with fiberglass. Feels great to finally get the tail on there. Another major milestone achieved, YIPPY!
04-24-2012, 07:42 PM
#60
Thread Starter
Join Date: Feb 2012
Location: Fairfield, CT
Posts: 416
Likes: 0
Received 0 Likes
on
0 Posts
Odds & Ends
No photos today. I didn't really do anything photo-worthy, just lots of odds & ends. Here's a quick list of what I got done...
No photos today. I didn't really do anything photo-worthy, just lots of odds & ends. Here's a quick list of what I got done...
- [*]Visited hobby shop & picked up nicknacks, control horns, pushrods etc[*]Finished fiber-glassing the v-tail to the tail-boom[*]Fixed the warped ruddervator by sanding it straight[*]Trimmed to length all the control surfaces[*]Installed the two ruddervator pushrods[*]Did more sanding here & there[/list]Movie night tomorrow so not sure how much I'll get done but I believe I've arrived at yet another milestone. It might finally be time to break out the Ultracoat, WOOHOO!
04-25-2012, 05:49 AM
#61
ORIGINAL: Nodd
Odds & Ends
No photos today. I didn't really do anything photo-worthy, just lots of odds & ends. Here's a quick list of what I got done...
Odds & Ends
No photos today. I didn't really do anything photo-worthy, just lots of odds & ends. Here's a quick list of what I got done...
- [*]Visited hobby shop & picked up nicknacks, control horns, pushrods etc[*]Finished fiber-glassing the v-tail to the tail-boom[*]Fixed the warped ruddervator by sanding it straight[*]Trimmed to length all the control surfaces[*]Installed the two ruddervator pushrods[*]Did more sanding here & there[/list]Movie night tomorrow so not sure how much I'll get done but I believe I've arrived at yet another milestone. It might finally be time to break out the Ultracoat, WOOHOO!
 04-26-2012, 09:05 PM
#62
Thread Starter
Join Date: Feb 2012
Location: Fairfield, CT
Posts: 416
Likes: 0
Received 0 Likes
on
0 Posts
Here's a detail of how the tail was fiber-glassed to the tail-boom...
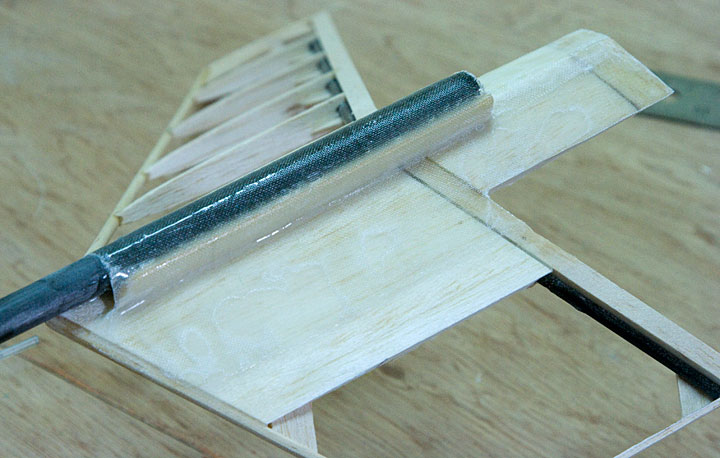
Added some stylish wingtips...
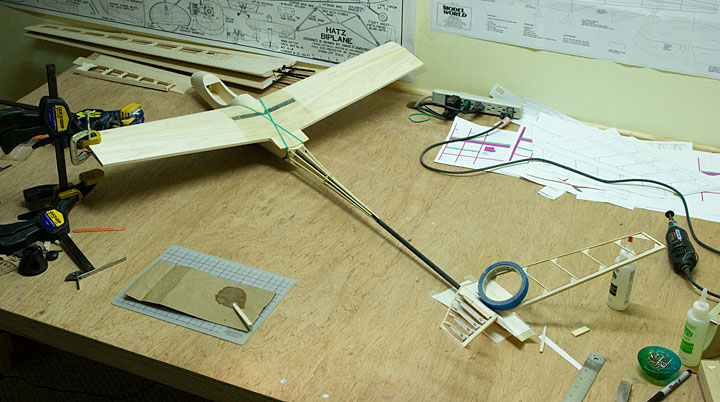
Bare-Bones
And with that the airframe is complete, wO0t! Before she's covered I thought I'd take a few bare-bones photos to help celebrate...
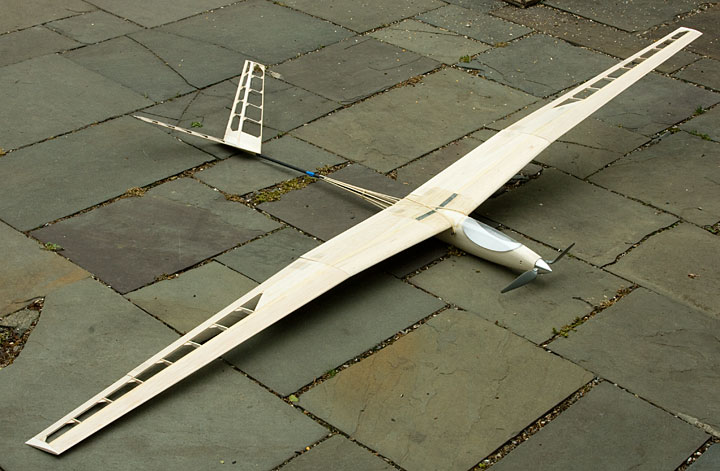
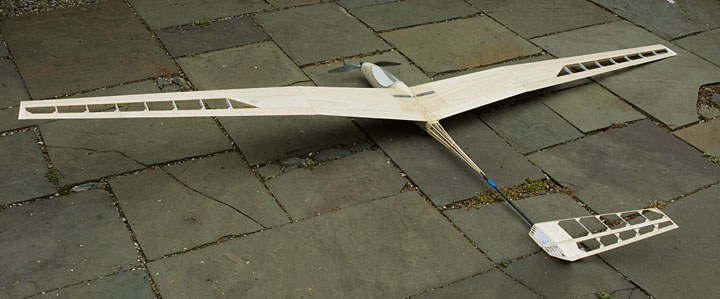
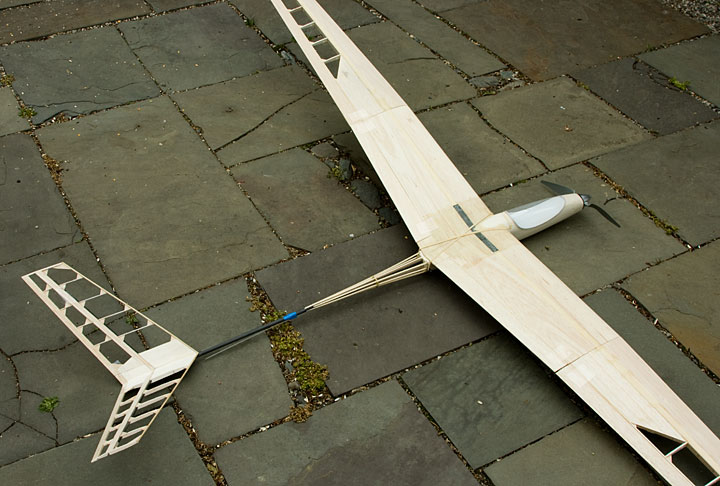


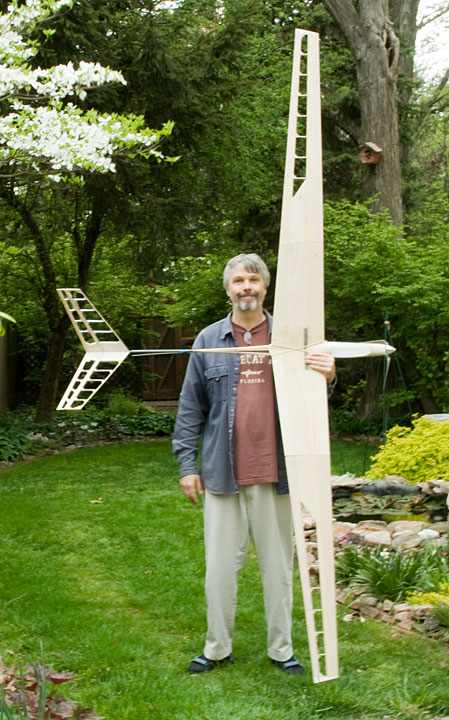
Feels great to have gotten this far.
Added some stylish wingtips...
Bare-Bones
And with that the airframe is complete, wO0t! Before she's covered I thought I'd take a few bare-bones photos to help celebrate...
Feels great to have gotten this far.
04-26-2012, 09:32 PM
#63


Join Date: Oct 2002
Location: Chilliwack, BC, CANADA
Posts: 12,425
Likes: 0
Received 22 Likes
on
19 Posts
I'm beginning to get all goose pimply thinking about the test flight post.
It's coming along great. And you've done a really fine job of doing a comprehensive build thread.
It's coming along great. And you've done a really fine job of doing a comprehensive build thread.
04-28-2012, 07:34 PM
#65
Thread Starter
Join Date: Feb 2012
Location: Fairfield, CT
Posts: 416
Likes: 0
Received 0 Likes
on
0 Posts
Thanks guys. Yeah I'm not sure which I've spent more time on, the plane or this silly build thread LOL
Wrapping Things Up
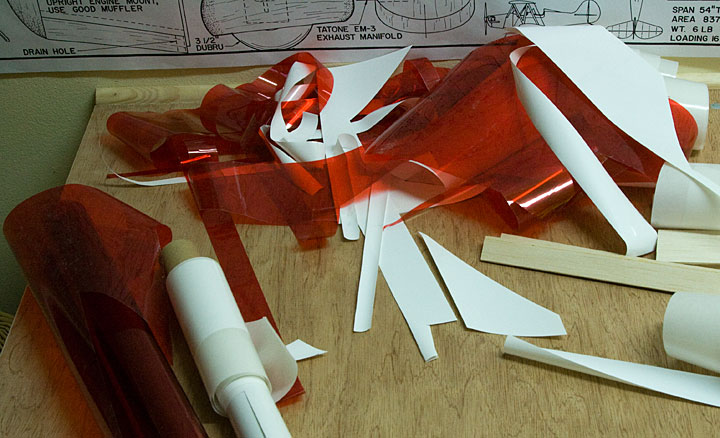
Well we can't have this glider parading around naked, time to do some covering. I chose to use Hanger 9 Ultracoat as I've worked with it before & like the way it applies. Low temperature to activate the adhesive then switch to higher temp to do the shrink-wrapping. Its also pretty forgiving & most wrinkles can be eliminated with some heat...
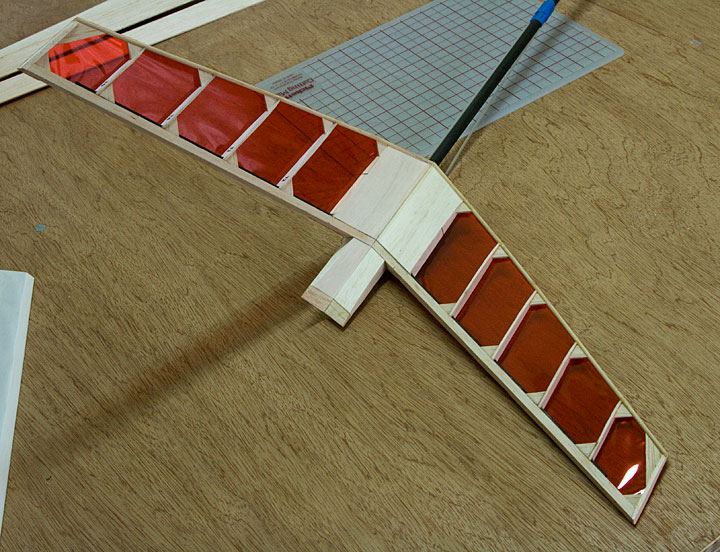
I wanted to show off the built up structure so I'm using transparent red on the open areas & opaque white everywhere else...
Before I got too far into the wing covering I performed another balance check...
I centered the wing on my balance stand & added weight to the light side...
Three small nails on the left wingtip & she balances perfectly. There is a school of though that says its a mistake to add weight at the tips as this adds unwanted mass way out on the ends of the wing, not where you want it. Its often better to add weight further in & keep the tips as light as possible. The down side is you need more weight to achieve the same result. As my wing was already balanced fairly close & needed just a few grams I felt it was fine to just stick the nails into the end of the wing...

If you use nails for weight you should pre-drill the holes. Don't go hammering away at your wingtips, bad idea. Once in place a drop of CA glued keeps them secure...
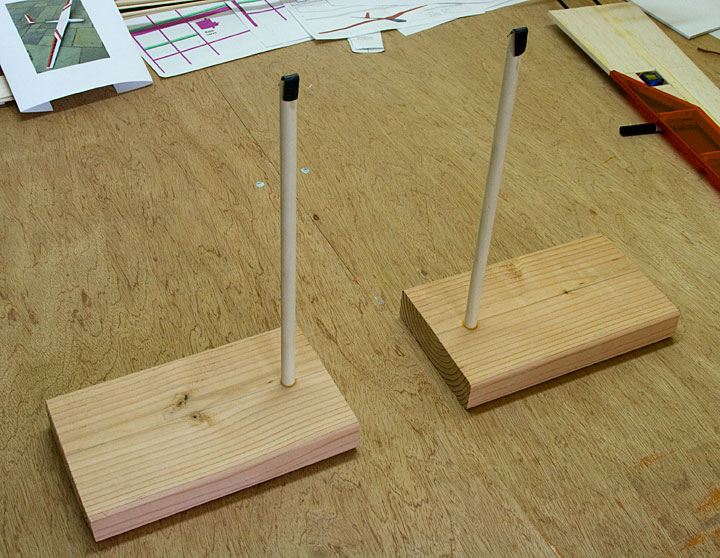
Here's my home-brewed CG balance stand. Simple & because its in two pieces it fits just about any airplane. Note the spiffy rubber tips to keep things from slipping while balancing...
Anyway with the wing balanced I covered over the nail holes & turned my attention to the v-tail...
I'm trying something new on this model. I usually use CA hinges but I noticed one of my ARF gliders uses just the covering its self as a hinge joint. The result is a gap-less joint that's fairly sturdy & doesn't seem to bind at all. If my ruddervators start to fall off in a month or so I guess its back to CA hinges but my other glider has been around for years & no signs of hinge fatigue yet. So I thought I'd give it a try. Here's how my hinges are laid out...
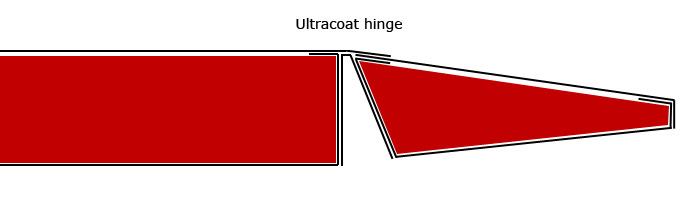
From the top at least the joint looks totally seamless. Obviously there's a small slot on the under-side to allow the control surface to move downwards but aerodynamically its pretty clean. I like...
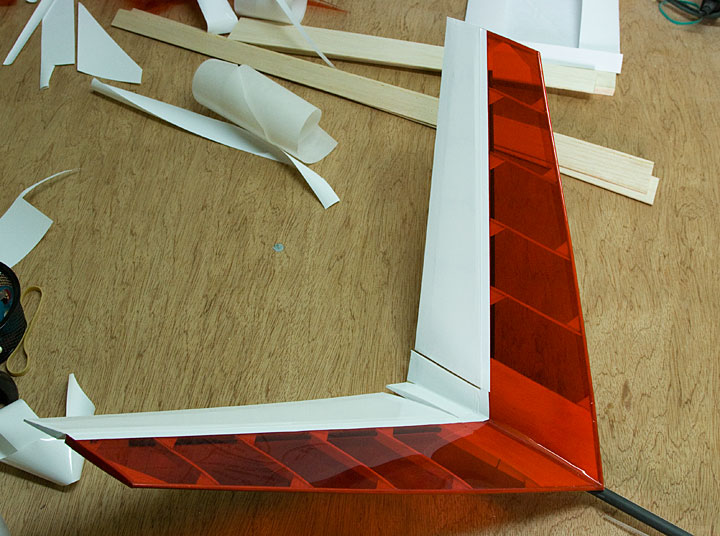
Well that's enough for today. I'll tackle the rest tomorrow...
Wrapping Things Up
Well we can't have this glider parading around naked, time to do some covering. I chose to use Hanger 9 Ultracoat as I've worked with it before & like the way it applies. Low temperature to activate the adhesive then switch to higher temp to do the shrink-wrapping. Its also pretty forgiving & most wrinkles can be eliminated with some heat...
I wanted to show off the built up structure so I'm using transparent red on the open areas & opaque white everywhere else...
Before I got too far into the wing covering I performed another balance check...
I centered the wing on my balance stand & added weight to the light side...
Three small nails on the left wingtip & she balances perfectly. There is a school of though that says its a mistake to add weight at the tips as this adds unwanted mass way out on the ends of the wing, not where you want it. Its often better to add weight further in & keep the tips as light as possible. The down side is you need more weight to achieve the same result. As my wing was already balanced fairly close & needed just a few grams I felt it was fine to just stick the nails into the end of the wing...
If you use nails for weight you should pre-drill the holes. Don't go hammering away at your wingtips, bad idea. Once in place a drop of CA glued keeps them secure...
Here's my home-brewed CG balance stand. Simple & because its in two pieces it fits just about any airplane. Note the spiffy rubber tips to keep things from slipping while balancing...
Anyway with the wing balanced I covered over the nail holes & turned my attention to the v-tail...
I'm trying something new on this model. I usually use CA hinges but I noticed one of my ARF gliders uses just the covering its self as a hinge joint. The result is a gap-less joint that's fairly sturdy & doesn't seem to bind at all. If my ruddervators start to fall off in a month or so I guess its back to CA hinges but my other glider has been around for years & no signs of hinge fatigue yet. So I thought I'd give it a try. Here's how my hinges are laid out...
From the top at least the joint looks totally seamless. Obviously there's a small slot on the under-side to allow the control surface to move downwards but aerodynamically its pretty clean. I like...
Well that's enough for today. I'll tackle the rest tomorrow...
04-29-2012, 03:35 AM
#67
Member
This "silly build thread" is the most educational thing I've seen here.
On the other hand, it's depressing to see how much work I have to do on my covering technique. I'd better get another build started for practice.
On the other hand, it's depressing to see how much work I have to do on my covering technique. I'd better get another build started for practice.
04-30-2012, 11:34 AM
#69
Join Date: Oct 2002
Location: Chilliwack, BC, CANADA
Posts: 12,425
Likes: 0
Received 22 Likes
on
19 Posts
The plastic covering films work fine on slower flying models even up to 3 meter span gliders. For a faster powered or contest sailplane where high speeds will be regularly used then I like the security of proper hinge with some sort of sealing film or tape. In the case of a sport glider such as what Nodd is doing here I'd be using the film hinges as well. Simple, clean, and workable for a model such as this.
Nodd, the first sign of any possible "hinge distress" will tend to show up on the longer hinge lines such as on the ailerons. This can occur if the wings flex up under load and you're flexing the ailerons at the same time. So keep an eye on all the hinges but especially the ailerons.
Nodd, the first sign of any possible "hinge distress" will tend to show up on the longer hinge lines such as on the ailerons. This can occur if the wings flex up under load and you're flexing the ailerons at the same time. So keep an eye on all the hinges but especially the ailerons.
04-30-2012, 01:46 PM
#70
Senior Member
Join Date: Apr 2010
Location: Fort St. John,
BC, CANADA
Posts: 122
Likes: 0
Received 1 Like
on
1 Post
I'm trying something new on this model. I usually use CA hinges but I noticed one of my ARF gliders uses just the covering its self as a hinge joint. The result is a gap-less joint that's fairly sturdy & doesn't seem to bind at all. If my ruddervators start to fall off in a month or so I guess its back to CA hinges but my other glider has been around for years & no signs of hinge fatigue yet. So I thought I'd give it a try. Here's how my hinges are laid out...
Now, if it makes you feel any better.....I have been using that "covering hinge" method for quite a few years. When done properly it is a superb, trouble free system. To reiterate what Bruce said, it is best on slower aircraft such as gliders and park flyers, and you will have no problems with yours at all. Now, just to show you how well they can stand up even on an aircraft that is able to fly a bit faster and put more loads on the controls................
This nice green airplane does not have a single "proper hinge" anywhere. Every control, ailerons, elevator, and rudder, are ALL done with the exact system you show above in your diagram. After 1 full season of hard flying, includinga bunch of glider towing.
04-30-2012, 02:35 PM
#72
Senior Member
Join Date: Apr 2010
Location: Fort St. John,
BC, CANADA
Posts: 122
Likes: 0
Received 1 Like
on
1 Post
Sorry Nodd, we are heading slightly off topic for a couple minutes
Hi Flyer, that there green machine is a just good ole' Sig Kadet Seniorita kit, somewhat modified. It was made ataildragger, ailerons were added, went to a bolt on wing.The drooped STOL tips were hand carved/sanded until "they looked about right", and Ialso added mounts for floats while building it. It is powered by a Saito .30 with an APC 12X4. Wingspan on the box is listed at 63", Ihaven't measured to see how close it is with my fancy tips installed. It came out at 3.7 pounds, all up ready to fly, so you can imaging how nice and slow it can go with that much wing!! I built it mainly to be able to tow small (2-3m) sport gliders, and to date it has succesfully towed a GP Spirit 2m and a 111" span Sagitta 900. Plus, it is just a whole lot of fun to fly when a guy feels like a relaxing putt-putt sort of flight.
Anyhow......back on topic..............Ihave a question for Nodd, what are you going to call that beauty that you built. (Maybe you already said, but I might have missed it)
Nice Rhall999! Is that a Hoerner wingtip you have on the green airplane? What are the specs?
Anyhow......back on topic..............Ihave a question for Nodd, what are you going to call that beauty that you built. (Maybe you already said, but I might have missed it)
04-30-2012, 02:57 PM
#73
Thread Starter
Join Date: Feb 2012
Location: Fairfield, CT
Posts: 416
Likes: 0
Received 0 Likes
on
0 Posts
Nice Kadet. Yeah some of the guys I fly with are into the aerotow thing. I'm planning to attend the New England Aerotow 2012 next month. Trying to get my 4m Discus ready for that. Will probably bring this plane with me too as they allow motor-gliders. Should be fun.
An excellent question which unfortunatly I have no answer for just yet. I do have a few ideas though. We'll see.
ORIGINAL: rhall999
...Ihave a question for Nodd, what are you going to call that beauty that you built. (Maybe you already said, but I might have missed it)...
...Ihave a question for Nodd, what are you going to call that beauty that you built. (Maybe you already said, but I might have missed it)...
04-30-2012, 03:18 PM
#74
Thread Starter
Join Date: Feb 2012
Location: Fairfield, CT
Posts: 416
Likes: 0
Received 0 Likes
on
0 Posts
ORIGINAL: BMatthews
...Nodd, the first sign of any possible "hinge distress" will tend to show up on the longer hinge lines such as on the ailerons. This can occur if the wings flex up under load and you're flexing the ailerons at the same time. So keep an eye on all the hinges but especially the ailerons...
...Nodd, the first sign of any possible "hinge distress" will tend to show up on the longer hinge lines such as on the ailerons. This can occur if the wings flex up under load and you're flexing the ailerons at the same time. So keep an eye on all the hinges but especially the ailerons...
04-30-2012, 03:21 PM
#75
Senior Member
Join Date: Apr 2010
Location: Fort St. John,
BC, CANADA
Posts: 122
Likes: 0
Received 1 Like
on
1 Post
An excellent question which unfortunatly I have no answer for just yet. I do have a few ideas though. We'll see.
 Personally, I can't wait to see the completed photos. It is going to look great!!
Nice Kadet. Yeah some of the guys I fly with are into the aerotow thing. I'm planning to attend the New England Aerotow 2012 next month. Trying to get my 4m Discus ready for that. Will probably bring this plane with me too as they allow motor-gliders. Should be fun.