


Scratch Designed/Built Sailplane
 04-09-2012, 08:03 PM
#26

Thread Starter

Join Date: Feb 2012
Location: Fairfield, CT
Posts: 416
Likes: 0
Received 0 Likes
on
0 Posts
Yeah I love this build thread thing. I get to share my tips & tricks & at the same time get advice from you folks. Win-Win senerio. Back to the build...
It seems my damp sponge fix for a warped aileron did the trick, removed it from my workbench this morning & she's straight as an arrow...
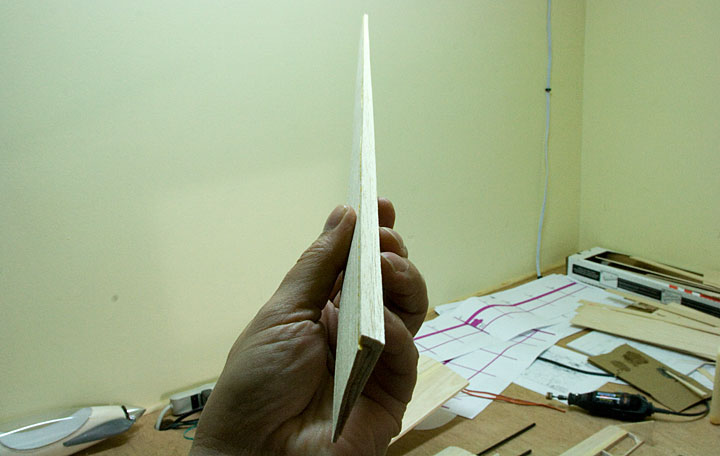
I cut the trailing edge at the fourth rib from the tip & glued the non aileron section to the wing...
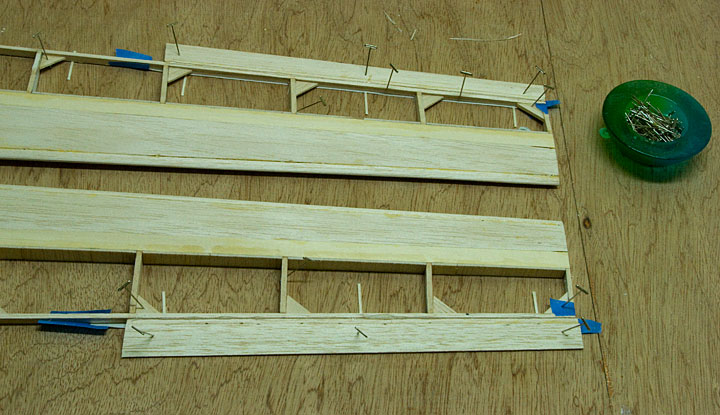
I did the same with the flaps, glued the non moving parts to the wing's center...
Sweet! The wing is beginning to look like a wing, a BIG one at that...
Weight
With the wing & fuselage mostly complete I decided it was time to see how I was doing on weight. Here's where we're at so far...
It seems my damp sponge fix for a warped aileron did the trick, removed it from my workbench this morning & she's straight as an arrow...
I cut the trailing edge at the fourth rib from the tip & glued the non aileron section to the wing...
I did the same with the flaps, glued the non moving parts to the wing's center...
Sweet! The wing is beginning to look like a wing, a BIG one at that...
Weight
With the wing & fuselage mostly complete I decided it was time to see how I was doing on weight. Here's where we're at so far...
530g/18.7oz - wing
163g/5.75oz - fuselage
216g/7.65oz - motor & prop
155g/5.50oz - 1800mAh LiPo battery
66g/2.30oz - 6 servos
39g/1.40oz - ESC
____________________
1169g/41.23oz - total
That equates to a wing loading of 8.7oz/square foot which should make her a real floater. Sounds good to me except we're missing a few important things like a tail, covering, receiver, & all the other nicknacks needed to finish her. So with that in mind it looks like we're on track for a mid-range thermalling ship. Sounds good to me.
163g/5.75oz - fuselage
216g/7.65oz - motor & prop
155g/5.50oz - 1800mAh LiPo battery
66g/2.30oz - 6 servos
39g/1.40oz - ESC
____________________
1169g/41.23oz - total


 04-10-2012, 07:26 PM
#28
Thread Starter
Join Date: Feb 2012
Location: Fairfield, CT
Posts: 416
Likes: 0
Received 0 Likes
on
0 Posts
*grin* sailplanes rock. Some think they're boring but I've spent many happy years floating around chasing lift. I find the challenge of staying aloft, sniffing out thermals, chasing hawks, running ridges etc, keeps things interesting. Unlike my powered planes, which I also enjoy a lot, every flight with a sailplane is different. Fun stuff.
Well anyway, I got the aileron servos mounted today, woohoo! Here's how that went.
I have an ARF foamy & a built-up I got at a swap-shop, both of which have the servos glued into the airframe. I can't say I'm a fan of that although I guess it works, well until you strip a gear & have to go digging to replace it. IMO a servo should be mounted using screws. To that end I set about creating a spot in my wing to mount the aileron servos...
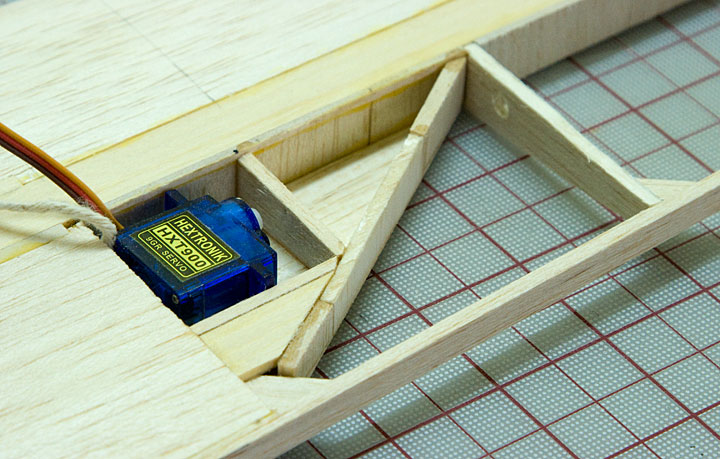
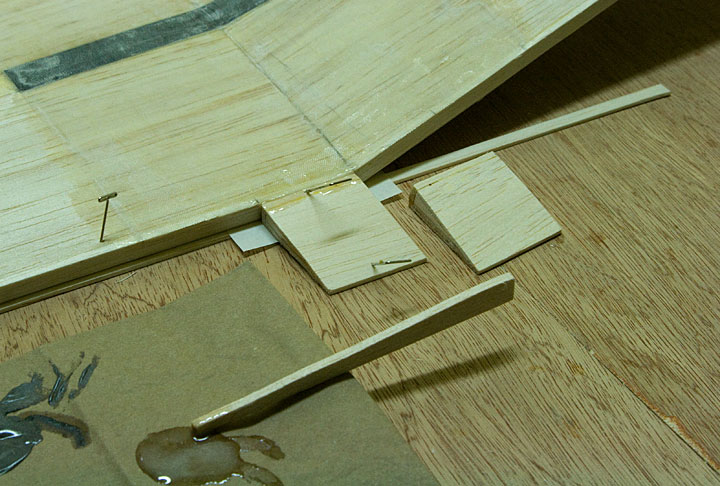
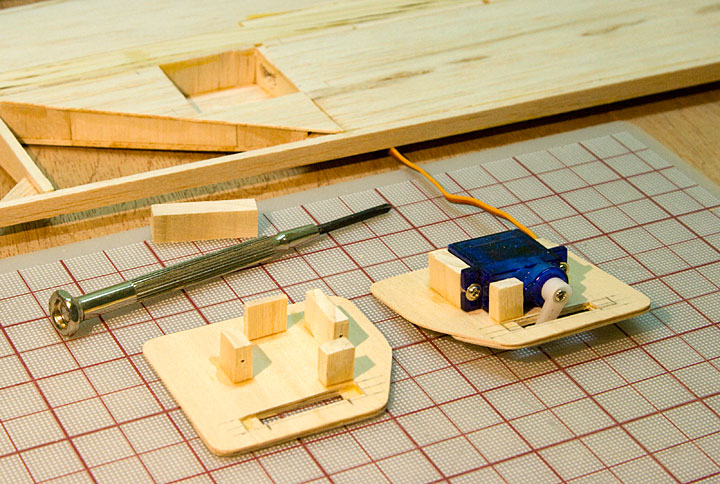
I decided to first mount the servos to a small hatch which would then be screwed securely to the wing. I used hardwood for the hatch covers & the mounting blocks...
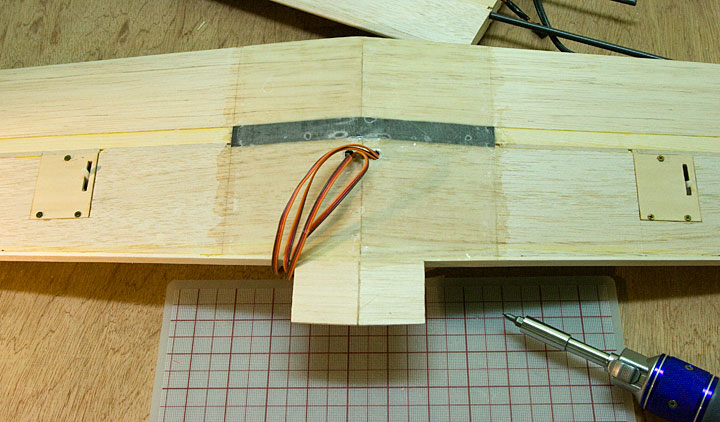
With the hatches complete the next step was to fish the servo wire through the wing. This is where the string I threaded through the ribs earlier came into play. Using electrical tape I attached the end of the wire to the string...
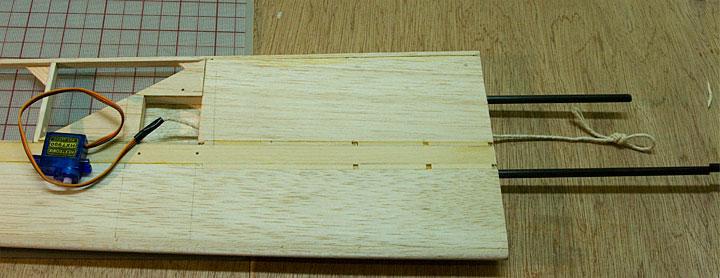
A few gentle tugs & we're in business...

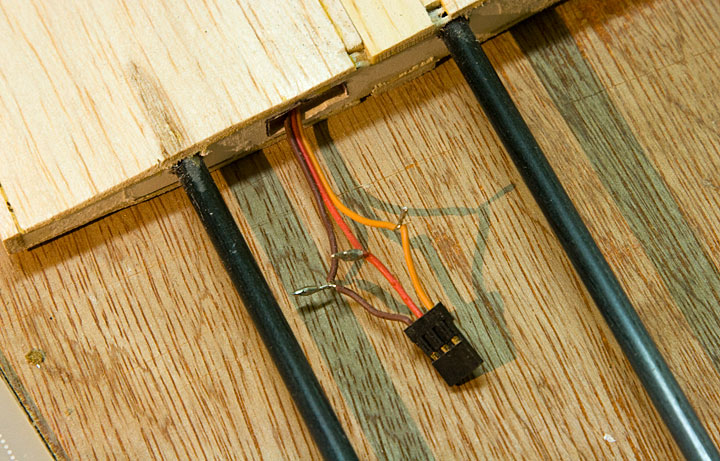
Fat fingers & tiny wires, oh yay. After fiddling with my way over-sized soldering iron I successfully wired up the servo plugs...
After insulating the wires I mounted the servos to the hatches, then the hatches to the wing...
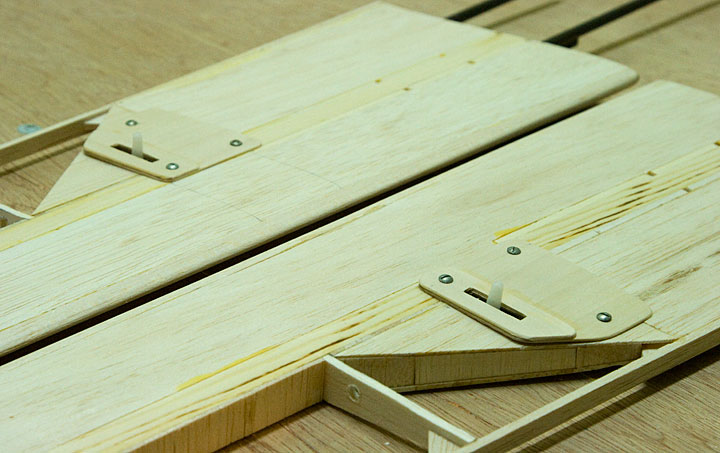
Ideally I would have liked the hatches to sit flush with the bottom of the wing but again with the thin airfoil, the servo takes up too much room. Compounding the problem, I also had to reenforce the hatch around the control arm slot as it was kinda flimsy at first. Still, compared to this huge wing these tiny hatches should have negligible effect. I'm pretty pleased with the instillation, came out fairly tidy. The wing is a little thicker where I'm planning to install the flap servos so hopefully those will go in flush. Will have to see.
Well anyway, I got the aileron servos mounted today, woohoo! Here's how that went.
I have an ARF foamy & a built-up I got at a swap-shop, both of which have the servos glued into the airframe. I can't say I'm a fan of that although I guess it works, well until you strip a gear & have to go digging to replace it. IMO a servo should be mounted using screws. To that end I set about creating a spot in my wing to mount the aileron servos...
I decided to first mount the servos to a small hatch which would then be screwed securely to the wing. I used hardwood for the hatch covers & the mounting blocks...
With the hatches complete the next step was to fish the servo wire through the wing. This is where the string I threaded through the ribs earlier came into play. Using electrical tape I attached the end of the wire to the string...
A few gentle tugs & we're in business...
Fat fingers & tiny wires, oh yay. After fiddling with my way over-sized soldering iron I successfully wired up the servo plugs...
After insulating the wires I mounted the servos to the hatches, then the hatches to the wing...
Ideally I would have liked the hatches to sit flush with the bottom of the wing but again with the thin airfoil, the servo takes up too much room. Compounding the problem, I also had to reenforce the hatch around the control arm slot as it was kinda flimsy at first. Still, compared to this huge wing these tiny hatches should have negligible effect. I'm pretty pleased with the instillation, came out fairly tidy. The wing is a little thicker where I'm planning to install the flap servos so hopefully those will go in flush. Will have to see.
04-11-2012, 05:17 AM
#29
I think you made the right choice using hatches for the servos, everytime I ever glued them I came to regret it. I will ocassional retire a plan but recycle the servos and then later on reinstall them a fly another day.
Nodd, can you recommend a source on sailplane how tos for someone living out here in the flat land of the plains like Oklahoma, Kansas, and Nebraska?
Nodd, can you recommend a source on sailplane how tos for someone living out here in the flat land of the plains like Oklahoma, Kansas, and Nebraska?
04-12-2012, 06:53 PM
#30
Thread Starter
Join Date: Feb 2012
Location: Fairfield, CT
Posts: 416
Likes: 0
Received 0 Likes
on
0 Posts
Not sure specifically where to go for sailplane how-to info. You could start here, maybe poke around in the sailplane section of these forums. Best bet is a Google search, just ask away. YouTube & Vimeo both have loads of videos on gliding. If you're already an RC flyer the transition to sailplanes shouldn't be a problem, just remember don't try-n fly up *grin*. Unlike a powerd plane that keeps toolin' along even if you're pitched up slightly, an unpowered sailplane will slow, then stall if you attempt to climb. An obvious difference but takes a little getting used too. Anyway, back to the build...
More servos to mount! Unlike the aileron servos which are mounted in a mirrored orientation so they move in opposite directions, thankfully I realized in time, the flap servos should be mounted using the same orientation. That way they move the flaps up/down together. Glad I caught that before installing them, although I guess there's a number of ways to reverse a servo if needed...
As I'd hoped, there was sufficient room to flush-mount the flap servo hatches...
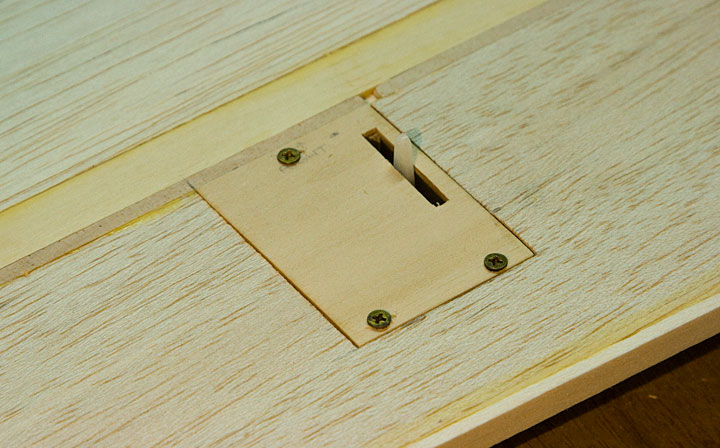
I may go back & tweak the aileron servo hatches to see if I can clean them up aerodynamically but for now I need to concentrate on getting the rest of this plane built.
More servos to mount! Unlike the aileron servos which are mounted in a mirrored orientation so they move in opposite directions, thankfully I realized in time, the flap servos should be mounted using the same orientation. That way they move the flaps up/down together. Glad I caught that before installing them, although I guess there's a number of ways to reverse a servo if needed...
As I'd hoped, there was sufficient room to flush-mount the flap servo hatches...
I may go back & tweak the aileron servo hatches to see if I can clean them up aerodynamically but for now I need to concentrate on getting the rest of this plane built.
04-14-2012, 08:41 PM
#31
Thread Starter
Join Date: Feb 2012
Location: Fairfield, CT
Posts: 416
Likes: 0
Received 0 Likes
on
0 Posts
SHE'S OFFICIALLY AN RC AIRPLANE!
I spent a couple of hours today adding servo plugs to the spaghetti hanging out of my wing. I hooked up a receiver, ESC, LiPo & the wing & bound it all to my radio. Although far from complete, I think its safe to say this collection of parts can now officially be called an RC airplane. ITS ALIVE! muhahaha
I'm trying to decide what next to tackle. Although I've yet to start on the v-tail, I also need to devise a way to mount the wing to the fuselage. I'm thinking it makes sense to get the wing mounted first. That way I have something to align the v-tail too. I'll post more soon.
04-15-2012, 02:42 AM
#32
Senior Member
applause !
APPLAUSE !
Now we need a picture. They make an excellent picture while still just bones.
(Consider using transparent covering.)
APPLAUSE !
Now we need a picture. They make an excellent picture while still just bones.
(Consider using transparent covering.)
04-16-2012, 01:42 PM
#34
Thread Starter
Join Date: Feb 2012
Location: Fairfield, CT
Posts: 416
Likes: 0
Received 0 Likes
on
0 Posts
Yeah I know what you mean about bare bones wood structures. I get the same way when I see a new house in its early frame-up stage. There's just something about that look, probably the engineer in me wanting to come out & play.
I've been considering using transparent covering on the open areas perhaps. Once we get closer to that time I'll likely start mocking up some graphics & color scemes using my CAD software. We're not quite there yet though.
I've been considering using transparent covering on the open areas perhaps. Once we get closer to that time I'll likely start mocking up some graphics & color scemes using my CAD software. We're not quite there yet though.
04-16-2012, 01:45 PM
#35
Thread Starter
Join Date: Feb 2012
Location: Fairfield, CT
Posts: 416
Likes: 0
Received 0 Likes
on
0 Posts
Grumble Grumble Grumble
Well I was making good progress working on attaching the wing to the fuselage. In preparation for that I fiber-glassed the trailing edge of the wing's center section yesterday. I guess I rushed the mixing of the second batch of 15 minute epoxy as 24 hours later its still tacky. GROAN :-(
I did some reading up on the subject & other than waiting a week to see what happens there's a few tricks to help get the stuff to dry. Applying heat with a heat gun was recommended (just not too much heat). I did that & it helped some. Next I left the wing out in the sun for a few hours...
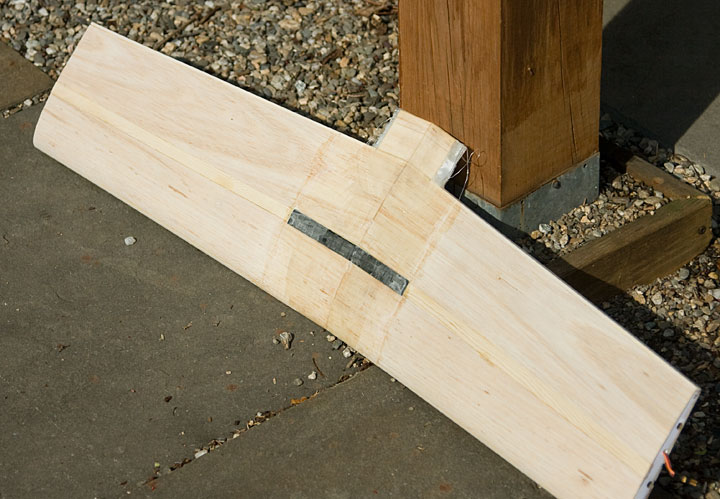
Again that's helped a little, still tacky though GRRRR. In other reading I hear acetone or vinegar can be used to remove uncured epoxy. I think I'll give it another day before stinking up my airplane with vinegar or whatnot. Fingers crossed it'll be dry tomorrow. In the mean time I'm constructing a PVC pipe plane rack for my over crowded workshop.
Well I was making good progress working on attaching the wing to the fuselage. In preparation for that I fiber-glassed the trailing edge of the wing's center section yesterday. I guess I rushed the mixing of the second batch of 15 minute epoxy as 24 hours later its still tacky. GROAN :-(
I did some reading up on the subject & other than waiting a week to see what happens there's a few tricks to help get the stuff to dry. Applying heat with a heat gun was recommended (just not too much heat). I did that & it helped some. Next I left the wing out in the sun for a few hours...
Again that's helped a little, still tacky though GRRRR. In other reading I hear acetone or vinegar can be used to remove uncured epoxy. I think I'll give it another day before stinking up my airplane with vinegar or whatnot. Fingers crossed it'll be dry tomorrow. In the mean time I'm constructing a PVC pipe plane rack for my over crowded workshop.
04-16-2012, 04:28 PM
#36
Thread Starter
Join Date: Feb 2012
Location: Fairfield, CT
Posts: 416
Likes: 0
Received 0 Likes
on
0 Posts
Although kinda off topic I thought this might be of interest. Here's how my PVC pipe plane rack turned out. I can't take credit for the idea, saw similar racks on a few YouTube videos. Sure is nice to have my park flyers up & out of the way...
04-16-2012, 05:54 PM
#37
Senior Member
Acetone is epoxy thinner. It won't do anything much to cured epoxy, but yours apparently isn't. Work with it outside for sure.
Never heard of vinegar. Not sure I'd use it knowing how good acetone works.
Never heard of vinegar. Not sure I'd use it knowing how good acetone works.
04-16-2012, 06:54 PM
#38
Thread Starter
Join Date: Feb 2012
Location: Fairfield, CT
Posts: 416
Likes: 0
Received 0 Likes
on
0 Posts
Yeah the vinegar suggestion came from some sailboat forum. The guy said it was a good non-toxic alternative to using acetone for cleanup or dealing with uncured stickiness. I also heard rubbing alcohol works. I'll likely give acetone a try first. Hoping it doesn't come to that, fingers crossed she's curred by tomorrow. Thanks for the advice.
04-16-2012, 07:35 PM
#39
Thread Starter
Join Date: Feb 2012
Location: Fairfield, CT
Posts: 416
Likes: 0
Received 0 Likes
on
0 Posts
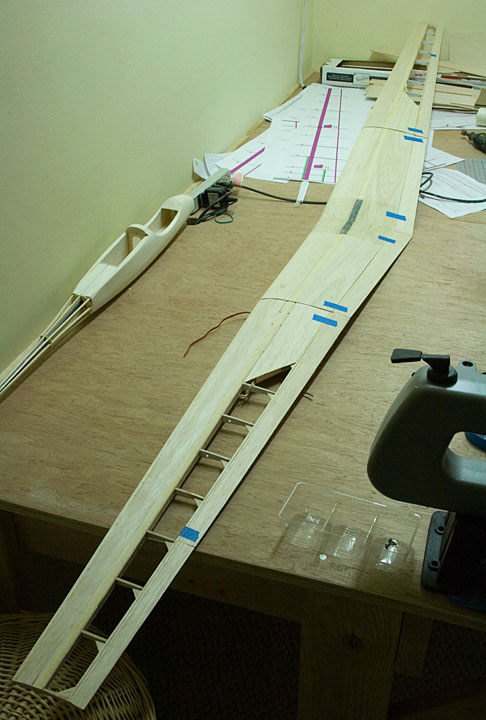
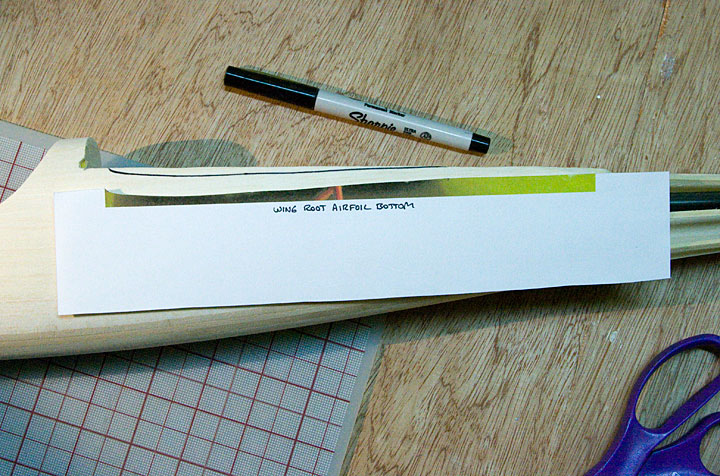
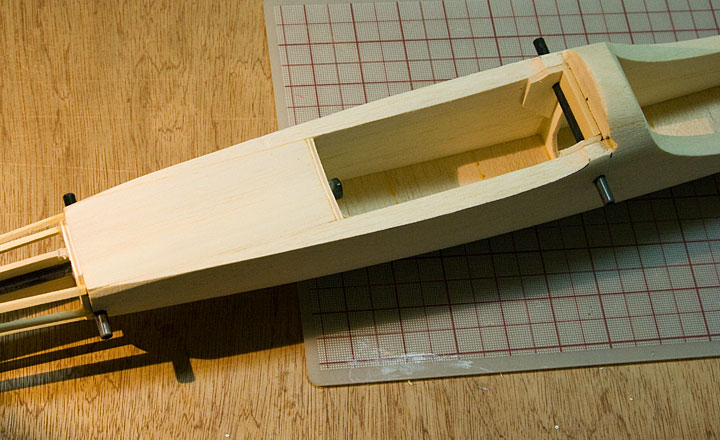
Even though I have a sticky wing to work with tonight I decided to push on & see if I can get the wing to sit pretty on the fuselage. The first challenge was to carve the airfoil bottom profile into the wing saddle area of the fuselage. I could have used my original airfoil graph but I wanted real world measurements to insure a good fit. To do this I took a photo of the wing's root area then created a template from the printed photo...
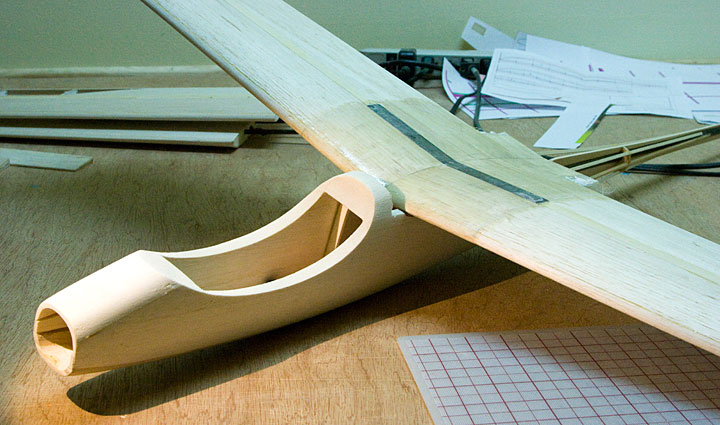
Next I sanded the wing saddle to my marks. The center of the wing has 14° of dihedral so I needed a way to carve out a V shape in the saddle. Turns out I already had the perfect tool sitting in my waste basket. Earlier I hacked off the center section trailing edge as I wanted to install something a little beefier in that area. I glued some sandpaper to the discarded part & presto, a custom sanding jig tailor made for the job...
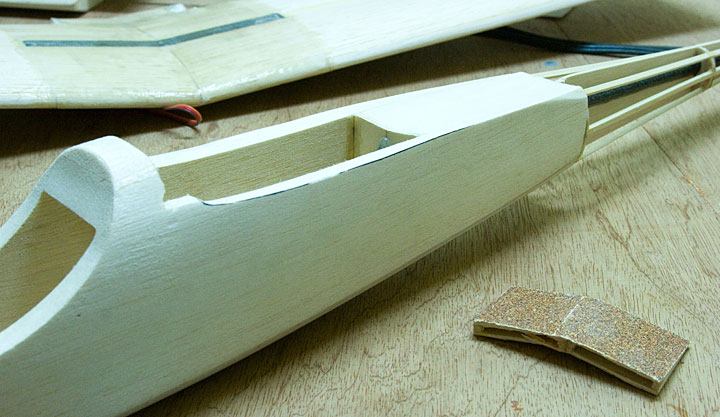
The saddle area still needs some fine tuning but that'll need to wait until I can sand this gooey fiberglass. The initial test fit looks pretty good though...
Next I sanded the wing saddle to my marks. The center of the wing has 14° of dihedral so I needed a way to carve out a V shape in the saddle. Turns out I already had the perfect tool sitting in my waste basket. Earlier I hacked off the center section trailing edge as I wanted to install something a little beefier in that area. I glued some sandpaper to the discarded part & presto, a custom sanding jig tailor made for the job...
The saddle area still needs some fine tuning but that'll need to wait until I can sand this gooey fiberglass. The initial test fit looks pretty good though...
04-17-2012, 04:24 PM
#41

Join Date: May 2009
Location: Palmdale,
CA
Posts: 64
Likes: 0
Received 0 Likes
on
0 Posts
Nodd,
This is a really slick design. Im very interested in this thread. Have you run the sim as a pure sailplane? Id be interested in the plans eitherin PDF, DWG, or DXF format if your so inclined....
This is a really slick design. Im very interested in this thread. Have you run the sim as a pure sailplane? Id be interested in the plans eitherin PDF, DWG, or DXF format if your so inclined....
04-17-2012, 06:42 PM
#42
Thread Starter
Join Date: Feb 2012
Location: Fairfield, CT
Posts: 416
Likes: 0
Received 0 Likes
on
0 Posts
Thanks guys. I did a little gliding with my X-Plane virtual version & she seemed to tool along just fine without power. My virtual model isn't really detailed enough to gather any useful data like sink rate or optimal airspeed etc. I wasn't able to program the SD 7023 airfoil into the sim plus I'm still guessing at the final weight. We'll have to wait for the maiden to find out more.
Plans are a distinct possibility but lets see if she flies first.
Plans are a distinct possibility but lets see if she flies first.
04-17-2012, 06:44 PM
#43
Thread Starter
Join Date: Feb 2012
Location: Fairfield, CT
Posts: 416
Likes: 0
Received 0 Likes
on
0 Posts
The evil epoxy-of-doom is dry. Woohoo!
Only took 48 hours for my 15 minute epoxy to cure. Nodd's new workshop rule...
Only took 48 hours for my 15 minute epoxy to cure. Nodd's new workshop rule...
- [*]5 minute epoxy - mix for one full minute[*]15 minute epoxy - mix for at least two minutes[/list]I probably mixed it for all of 30 seconds as I was in a bit of a rush. BIG MISTAKE. Well back to the build...
Bolts or Bands
Some of you folks are probably going to give me all sorts of grief over this decision but it is, what it is. I've used both wing mounting systems, nylon bolts & good old rubber bands. Both have their pros & cons. Bolts make for a slicker install but on a high aspect wing can be somewhat unforgiving during a cartwheel landing. Rubber bands look dorky but are more forgiving during those inevitable D'OH moments. I chose to go with the latter...
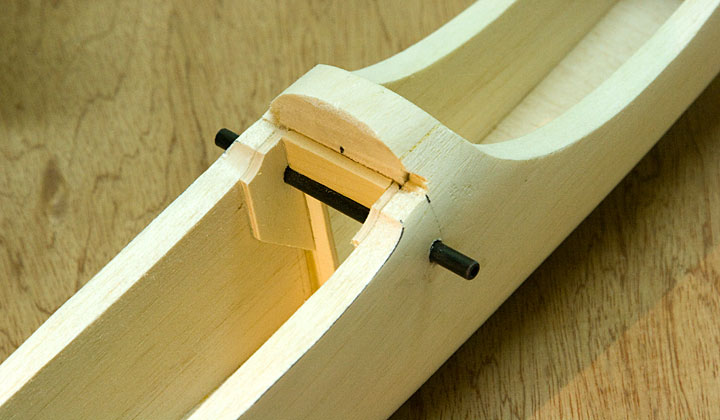
At least I used spiffy carbon fiber instead of dowel...
In an effort to redeem my tarnished sense of style, I next went about carving probably the most complex shape imaginable...
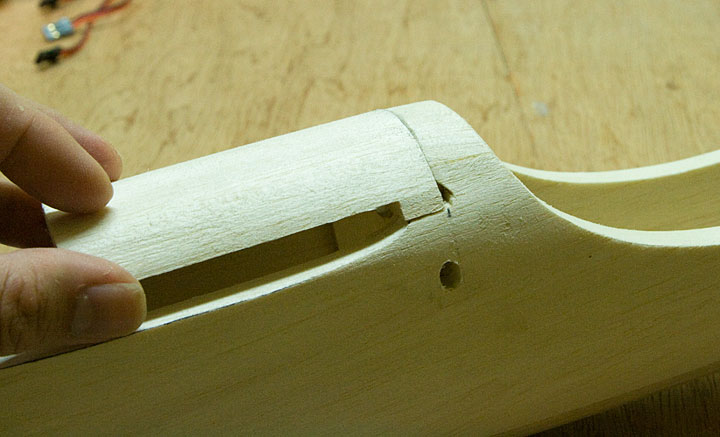
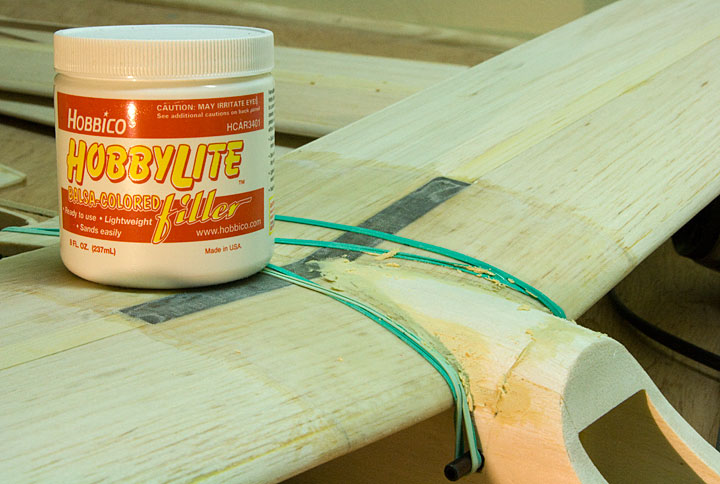
I have no idea what this part is called, a fairing of some sort. Anyway it goes on top of the wing to help blend things in with the fuselage...
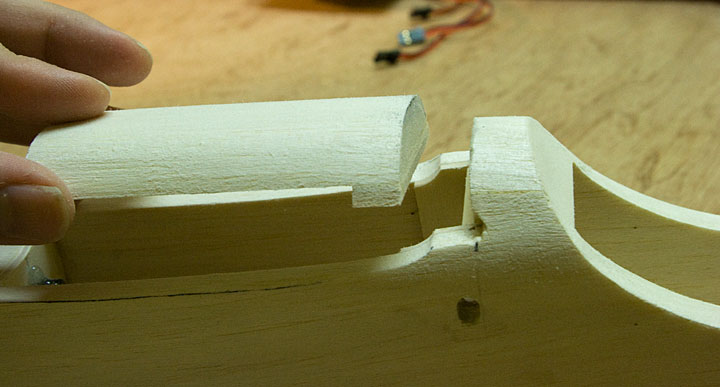
After much head scratching I figured out a neat way to carve the wing's shape into this fiddly little piece. I taped some sand paper to the wing & began rubbing. That's cheating I know...

A quick test fit (& no these wimpy little bands aren't for flying)...
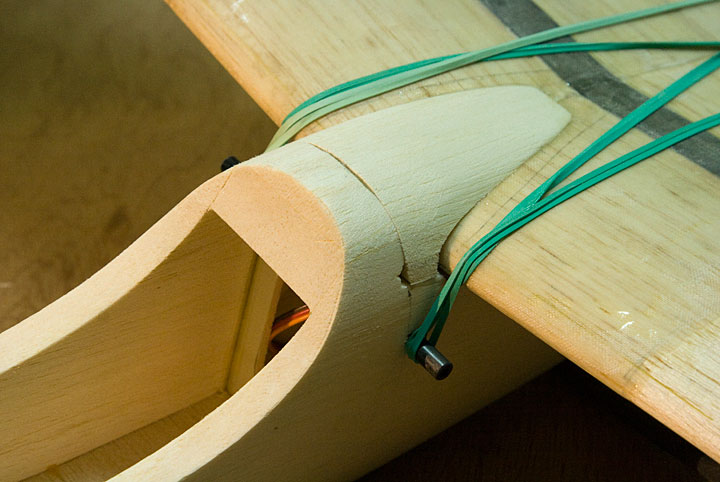
That fit is close enough. Filled the gaps with a little putty & I'm done for the night...
 04-18-2012, 04:27 PM
#45
Thread Starter
Join Date: Feb 2012
Location: Fairfield, CT
Posts: 416
Likes: 0
Received 0 Likes
on
0 Posts
ORIGINAL: FlyerInOKC
When it is in the air who is going to beable to see the rubber bands anyway?!
When it is in the air who is going to beable to see the rubber bands anyway?!
V-Tail Time!
With the wing & fuselage pretty much complete its time to turn my attention towards the tail. I mocked up an initial v-tail structure in my CAD software...
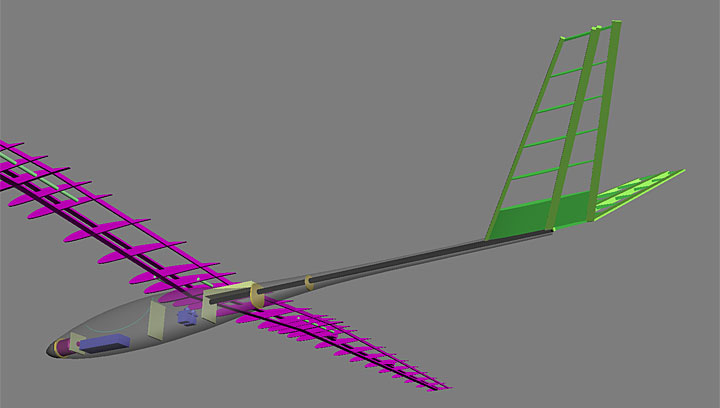
I've not decided if I'll go with a symmetrical airfoil for the tail or just be lazy & build a flat cross section & do some sanding to smooth/taper things out. Either way it'll likely look something like this.
Its movie night at my home theater so no building tonight (watching the new Mission Impossible flic on my monster sized 108" screen). Will pick this up again tomorrow. On the plus side, I get to sleep on the v-tail design which usually results in a better/improved design come morning anyway.
04-18-2012, 06:15 PM
#46


Join Date: Oct 2002
Location: Chilliwack, BC, CANADA
Posts: 12,425
Likes: 0
Received 22 Likes
on
19 Posts
Nodd, Nodd, Nodd...such dissapointment I sense in the Force. Rubber bands? It was looking so sleek with promise back in the wing on the fuselage teaser in post #39. And then I see DOWELS ! ? ! ? ! ?
It's not too late to ditch the dowels and install some bolt anchor blocks in the fuselage. Two nylon 10-32 bolts just immediately behind the spar and lined up to fit into blocks added to the fuselage pod sides and a single locator 6-32 screw at the trailing edge would do the trick nicely. The 10-32's will transfer the wing spar loads right to the fuselage and the alignment screw at the trailing edge simply holds things from skewing at all. You'll need to install anti crush vertical blocks that glue to the back face of the spars but you can do this with a small hole in the bottom sheeting.
It's not too late to ditch the dowels and install some bolt anchor blocks in the fuselage. Two nylon 10-32 bolts just immediately behind the spar and lined up to fit into blocks added to the fuselage pod sides and a single locator 6-32 screw at the trailing edge would do the trick nicely. The 10-32's will transfer the wing spar loads right to the fuselage and the alignment screw at the trailing edge simply holds things from skewing at all. You'll need to install anti crush vertical blocks that glue to the back face of the spars but you can do this with a small hole in the bottom sheeting.
04-19-2012, 12:03 AM
#47
Senior Member
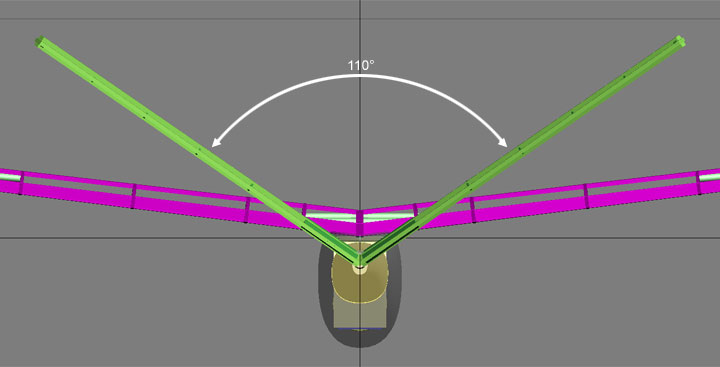
The V-Tail question..how many degrees are ya goiung to set it at..i flew alot of Vees and found 110 degrees to work well as elevator...but anyways.. with the way you build man you might want to check out motorgliders.. I love to thermal and slope and missed it so much that I went towards motorgliders and it really combines the best of both worlds..i like to cruise around and stay up as long as I can...Love your build man..I'll come back and check on the build..I'm curently flying a Fournier RF5 Cabrio sperber motorglider and just parked my Moni. lots of stuff out there..
04-19-2012, 08:20 PM
#48
Thread Starter
Join Date: Feb 2012
Location: Fairfield, CT
Posts: 416
Likes: 0
Received 0 Likes
on
0 Posts
ORIGINAL: guamflyer
The V-Tail question..how many degrees are ya goiung to set it at..i flew alot of Vees and found 110 degrees to work well as elevator...but anyways.. with the way you build man you might want to check out motorgliders.. I love to thermal and slope and missed it so much that I went towards motorgliders and it really combines the best of both worlds..i like to cruise around and stay up as long as I can...Love your build man..I'll come back and check on the build..I'm curently flying a Fournier RF5 Cabrio sperber motorglider and just parked my Moni. lots of stuff out there..
The V-Tail question..how many degrees are ya goiung to set it at..i flew alot of Vees and found 110 degrees to work well as elevator...but anyways.. with the way you build man you might want to check out motorgliders.. I love to thermal and slope and missed it so much that I went towards motorgliders and it really combines the best of both worlds..i like to cruise around and stay up as long as I can...Love your build man..I'll come back and check on the build..I'm curently flying a Fournier RF5 Cabrio sperber motorglider and just parked my Moni. lots of stuff out there..
A motor glider might be a possibility. The Fournier RF5 Cabrio looks like a slick ride, love that fuselage profile especially the nose. I have several other projects lined up after this one so will have to see.
04-19-2012, 08:43 PM
#49
Thread Starter
Join Date: Feb 2012
Location: Fairfield, CT
Posts: 416
Likes: 0
Received 0 Likes
on
0 Posts
ORIGINAL: BMatthews
Nodd, Nodd, Nodd...such dissapointment I sense in the Force. Rubber bands? It was looking so sleek with promise back in the wing on the fuselage teaser in post #39. And then I see DOWELS ! ? ! ? ! ?
It's not too late to ditch the dowels and install some bolt anchor blocks in the fuselage. Two nylon 10-32 bolts just immediately behind the spar and lined up to fit into blocks added to the fuselage pod sides and a single locator 6-32 screw at the trailing edge would do the trick nicely. The 10-32's will transfer the wing spar loads right to the fuselage and the alignment screw at the trailing edge simply holds things from skewing at all. You'll need to install anti crush vertical blocks that glue to the back face of the spars but you can do this with a small hole in the bottom sheeting.
As I explained above, I've used both systems, bolts & bands. For this plane I'm going with a wing mounting system that'll give some during botched landings, cartwheels etc. With the way I've been flying lately its the right call IMO. Thanks though for the alternate setup details.
Make the plane bendy I will. Through rubber bands the force it flows :-P
04-19-2012, 08:46 PM
#50
Thread Starter
Join Date: Feb 2012
Location: Fairfield, CT
Posts: 416
Likes: 0
Received 0 Likes
on
0 Posts
So I woke up today with this uber-sweet idea to make the v-tail even cooler. So I sat down at the 'puter & added fairings leading into the tail-feathers...
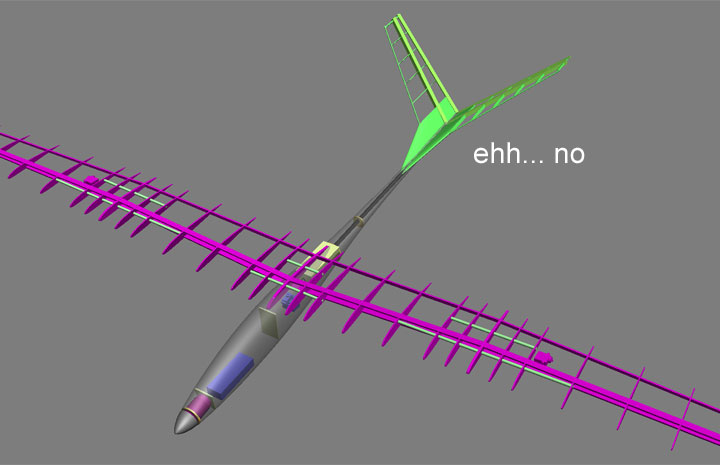
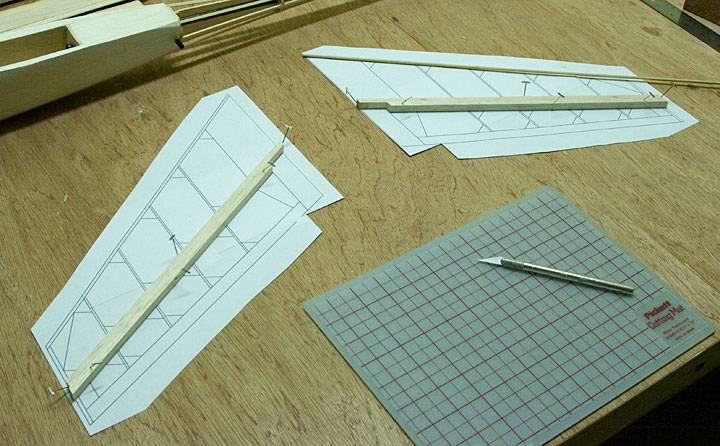
Yeah so much for sleeping on it. Will shelf that idea for another plane maybe. So anyway I went back to yesterday's v-tail design & added more detail to the structure. Then printed the design & started assembly...
Will have more to show soon.
Yeah so much for sleeping on it. Will shelf that idea for another plane maybe. So anyway I went back to yesterday's v-tail design & added more detail to the structure. Then printed the design & started assembly...
Will have more to show soon.