


Scratch Designed/Built Sailplane
 03-31-2012, 06:56 PM
#1

Thread Starter

Join Date: Feb 2012
Location: Fairfield, CT
Posts: 416
Likes: 0
Received 0 Likes
on
0 Posts
Hey everyone. This is build log for a scratch-built, scratch-designed, gull-winged, V-tailed, electric powered sailplane.
A friend gave me an electric glider balsa kit to build (thanks Ned). Not being one for leaving well enough alone I immediately started thinking of mods. A rounded fuselage would be nice, maybe a V-tail, a fancy high-performance airfoil & so on & so on. By the time I was done thinking up mods I realized I couldn't use the kit anymore & returned it. She'd be 100% scratch built, awesome!
So here's my initial design roughed out in CAD...
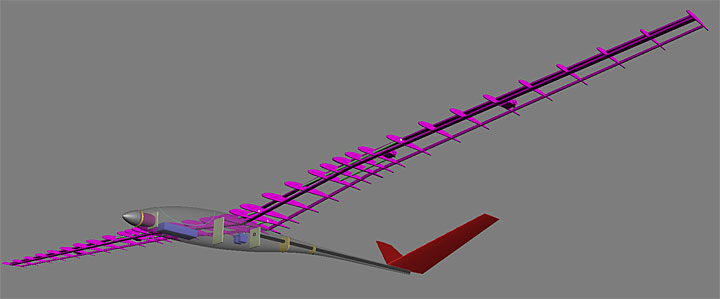
Wing Span: 108" (2750mm)
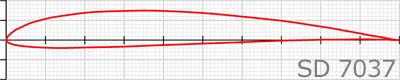
Airfoil: SD 7023
Motor: Turnigy G15
Propeller: APC 13" x 7" folding
Battery: 3S 1800-2200mAh LiPo
Channels: Aileron, Elevator, Rudder, Flaps, Throttle (with the crow, flaps down/aileron up thing)
Construction: Balsa, Spruce & some Carbon Fiber
I chose a subtle gull-winged design mainly because I love the classic look but also to help with ground clearance for the big flaps. For the same reasons a V-tail was also chosen. My main flying field is mowed grass but I like the idea of being able to take this "off-road" & land safely in weedy, long grass. If it was a foamy job I wouldn't worry but this bird being mainly balsa will be a tad fragile. Will be nice to have all the weaker bits up out of the way & let the fuselage take all the landing abuse. Besides gull-wings & V-tails are just plane cool.
Although the construction will be old-school built-up balsa I'll be using some modern tech as in carbon fiber here & there. For example the tail-boom will be a combination of old-school stick-balsa construction surrounding a CF tube. At least that's the plan.
Anyway enough babble, here's the build...
A friend gave me an electric glider balsa kit to build (thanks Ned). Not being one for leaving well enough alone I immediately started thinking of mods. A rounded fuselage would be nice, maybe a V-tail, a fancy high-performance airfoil & so on & so on. By the time I was done thinking up mods I realized I couldn't use the kit anymore & returned it. She'd be 100% scratch built, awesome!
So here's my initial design roughed out in CAD...
Wing Span: 108" (2750mm)
Airfoil: SD 7023
Motor: Turnigy G15
Propeller: APC 13" x 7" folding
Battery: 3S 1800-2200mAh LiPo
Channels: Aileron, Elevator, Rudder, Flaps, Throttle (with the crow, flaps down/aileron up thing)
Construction: Balsa, Spruce & some Carbon Fiber
I chose a subtle gull-winged design mainly because I love the classic look but also to help with ground clearance for the big flaps. For the same reasons a V-tail was also chosen. My main flying field is mowed grass but I like the idea of being able to take this "off-road" & land safely in weedy, long grass. If it was a foamy job I wouldn't worry but this bird being mainly balsa will be a tad fragile. Will be nice to have all the weaker bits up out of the way & let the fuselage take all the landing abuse. Besides gull-wings & V-tails are just plane cool.
Although the construction will be old-school built-up balsa I'll be using some modern tech as in carbon fiber here & there. For example the tail-boom will be a combination of old-school stick-balsa construction surrounding a CF tube. At least that's the plan.
Anyway enough babble, here's the build...
 03-31-2012, 06:57 PM
#2
Thread Starter
Join Date: Feb 2012
Location: Fairfield, CT
Posts: 416
Likes: 0
Received 0 Likes
on
0 Posts
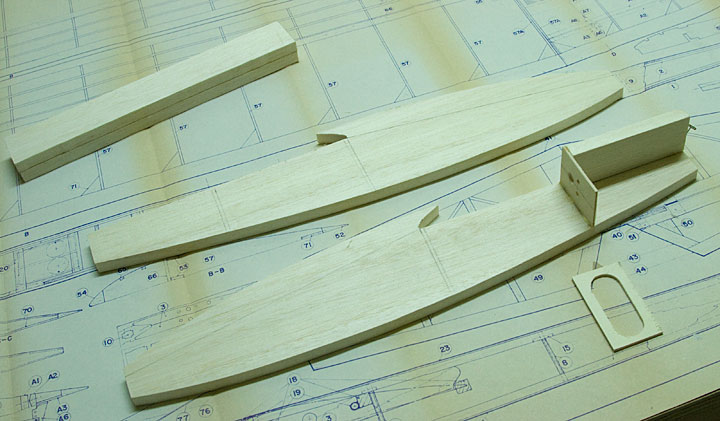
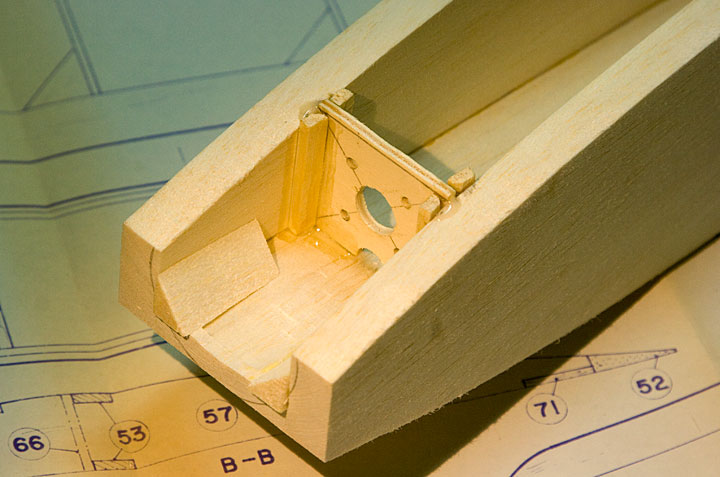
The fuselage "pod" is made from big chunky 1/2" balsa planks. Yeap, 1/2 inch...
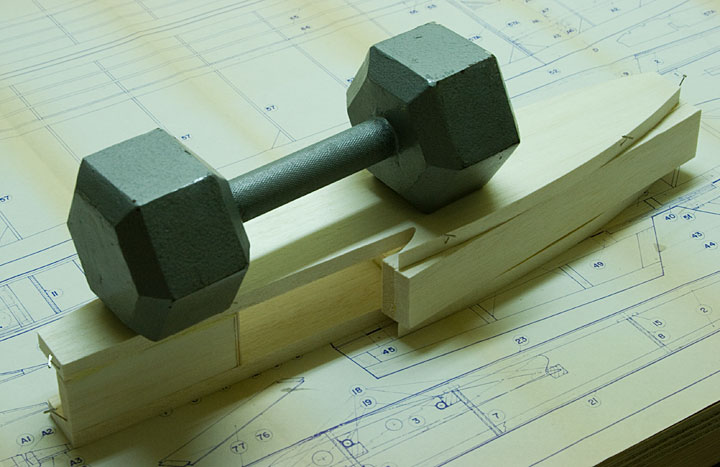
My dumbbell finally came in handy, can't remember the last time I exercised with it...
To get her to thermaling altitude I chose a Turnigy G15 motor turning a 13" x 7" folding propeller.
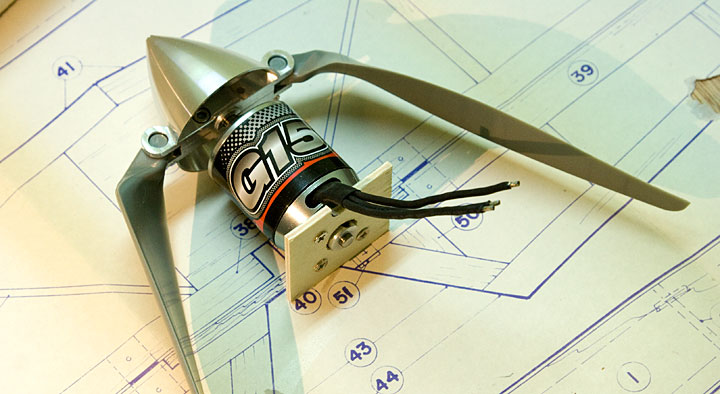
The motor mount is epoxied in position with 4° of down-thrust. As the nose is pretty narrow I chose not to add any side-thrust. If necessary I'll mix a little right rudder to the throttle channel...
My dumbbell finally came in handy, can't remember the last time I exercised with it...
To get her to thermaling altitude I chose a Turnigy G15 motor turning a 13" x 7" folding propeller.
The motor mount is epoxied in position with 4° of down-thrust. As the nose is pretty narrow I chose not to add any side-thrust. If necessary I'll mix a little right rudder to the throttle channel...
03-31-2012, 06:59 PM
#3
Thread Starter
Join Date: Feb 2012
Location: Fairfield, CT
Posts: 416
Likes: 0
Received 0 Likes
on
0 Posts
Sheeting is added to the bottom of the fuselage...
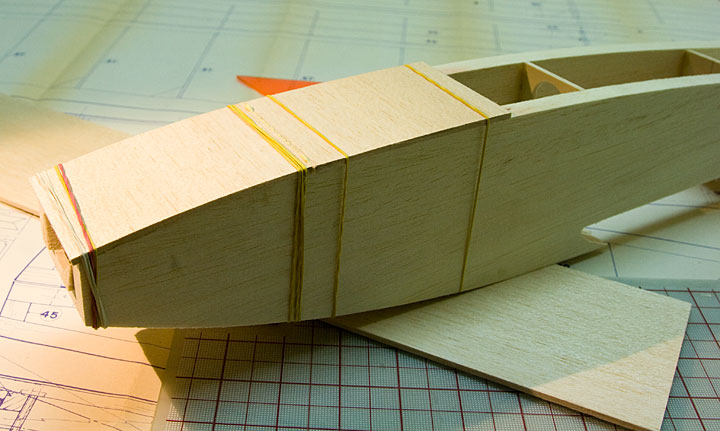
Before I close off access to the rear the carbon fiber tail boom is well glued into the structure...

With that done I complete the bottom sheeting...
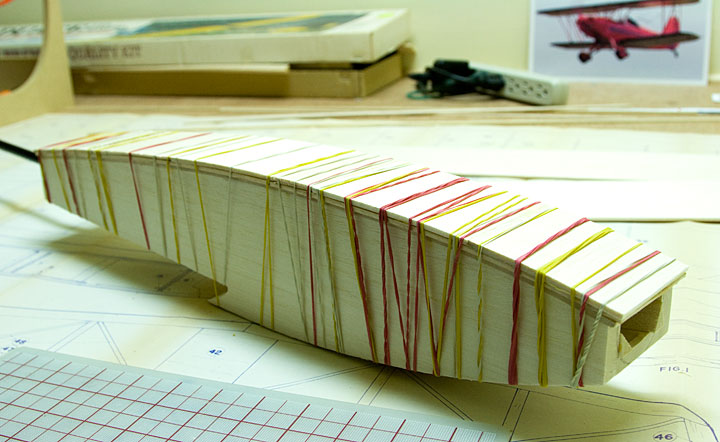
A total of four layers of 1/8" balsa were laminated together. Again that's a 1/2" thick!..
Before I close off access to the rear the carbon fiber tail boom is well glued into the structure...
With that done I complete the bottom sheeting...
A total of four layers of 1/8" balsa were laminated together. Again that's a 1/2" thick!..
03-31-2012, 07:00 PM
#4
Thread Starter
Join Date: Feb 2012
Location: Fairfield, CT
Posts: 416
Likes: 0
Received 0 Likes
on
0 Posts
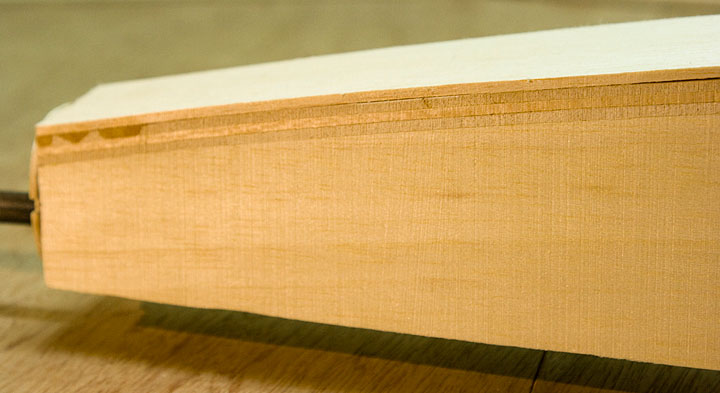
Some of you may be wondering what the heck is this guy doing using 1/2" balsa to make a glider fuselage? Well here's why I chose such thick lumber...
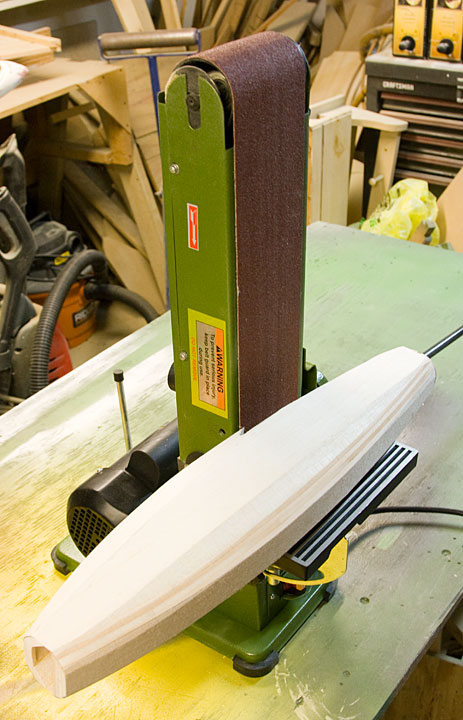
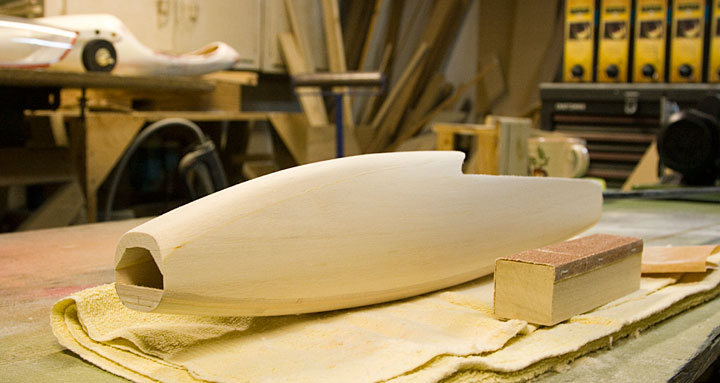
Most of the wood is sanded away to eventually produce a nice rounded cross-section...

This is why I love working with balsa, its a real joy to shape. (For those who might ask, that's a 4 meter Discus sailplane in the background but that's for another blog)...
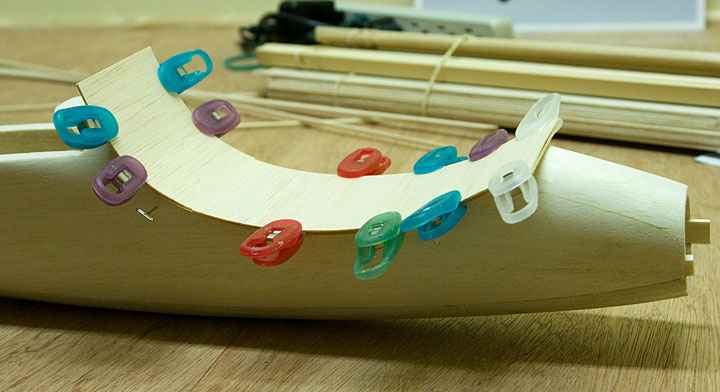
Time to make a canopy. After making a paper template I slip a two liter soda bottle over the nose & make it snug with some scrap wood...
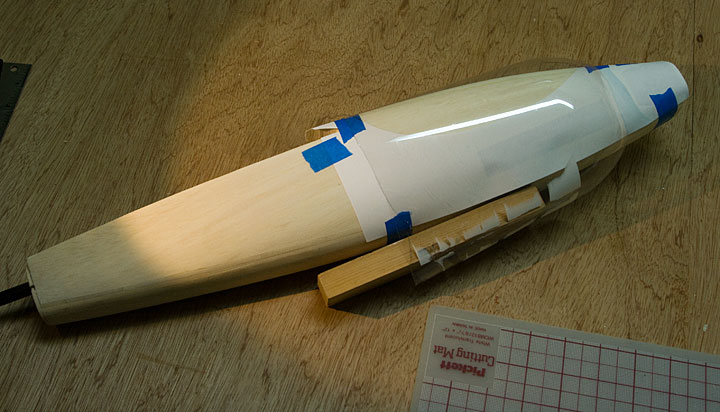
I love this part, a few passes with a heat-gun & the bottle shrink-wraps perfectly around the fuselage...

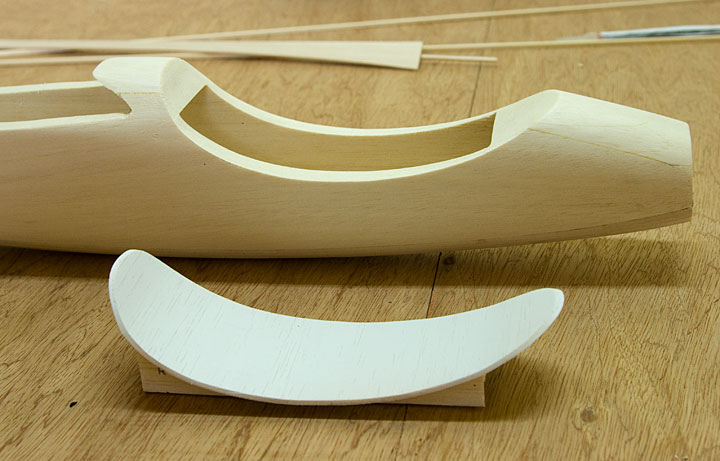
Next, using the paper template as a guide, I gut away the canopy area...
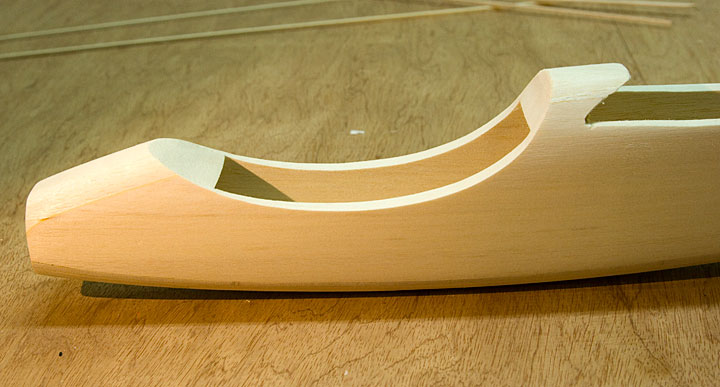
Now she's starting to look like a glider. I laminate two sheets of wood together to form the base for the canopy...
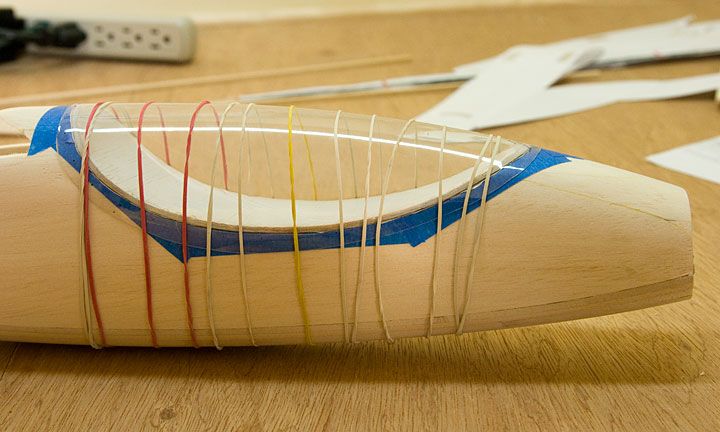
Trim to fit, a coat of paint & some scrap wood to help align the canopy in the fuselage...
Gluing the soda bottle canopy to its base...
Most of the wood is sanded away to eventually produce a nice rounded cross-section...
This is why I love working with balsa, its a real joy to shape. (For those who might ask, that's a 4 meter Discus sailplane in the background but that's for another blog)...
Time to make a canopy. After making a paper template I slip a two liter soda bottle over the nose & make it snug with some scrap wood...
I love this part, a few passes with a heat-gun & the bottle shrink-wraps perfectly around the fuselage...
Next, using the paper template as a guide, I gut away the canopy area...
Now she's starting to look like a glider. I laminate two sheets of wood together to form the base for the canopy...
Trim to fit, a coat of paint & some scrap wood to help align the canopy in the fuselage...
Gluing the soda bottle canopy to its base...
03-31-2012, 07:01 PM
#5
Thread Starter
Join Date: Feb 2012
Location: Fairfield, CT
Posts: 416
Likes: 0
Received 0 Likes
on
0 Posts
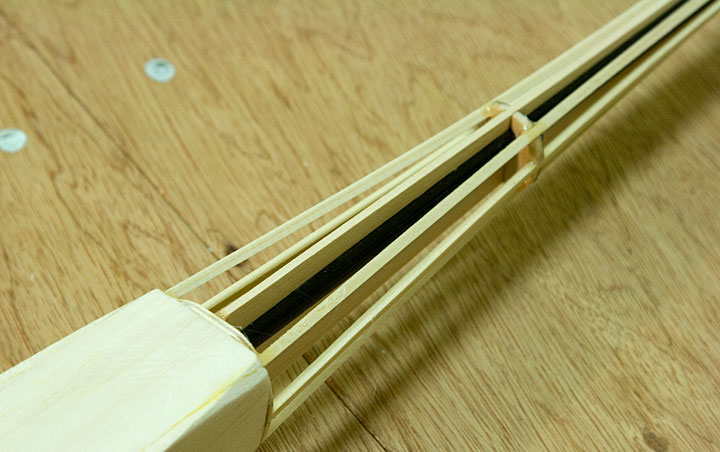
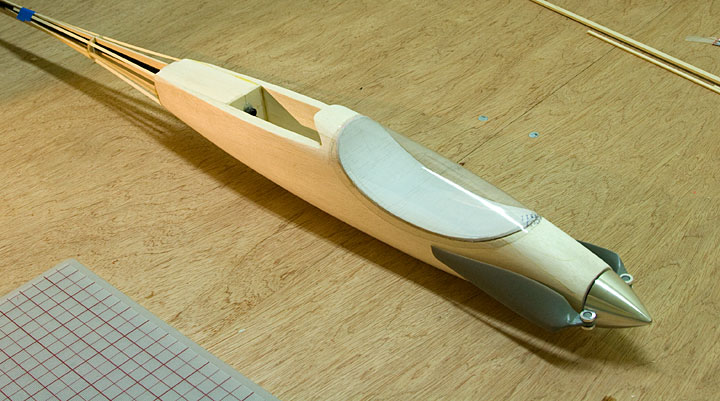
I wanted the fuselage to transition smoothly into the carbon fiber tail-boom. Falling back to my old-school stick-balsa fuselage days, I started working on the transition area...

Once covered this should look pretty good & who knows, might even add a little structural strength to the CF tail-boom...
Fuselage is more or less complete. It came out so-so lightish but I can always hollow out the inside more if I want to shed a few more grams. Love how that spinner is looking...
Once covered this should look pretty good & who knows, might even add a little structural strength to the CF tail-boom...
Fuselage is more or less complete. It came out so-so lightish but I can always hollow out the inside more if I want to shed a few more grams. Love how that spinner is looking...
03-31-2012, 07:05 PM
#6
Thread Starter
Join Date: Feb 2012
Location: Fairfield, CT
Posts: 416
Likes: 0
Received 0 Likes
on
0 Posts
Time to make some wings. I'm no expert when it comes to airfoils so I did some research online. Taking advice from several sailplane forums I ended up concluding this puppy was the ticket...
Using my CAD software I printed then contact-cemented the rib shapes onto my wood. I used a scroll-saw to rough cut each then went to the belt sander to finalize the shape...
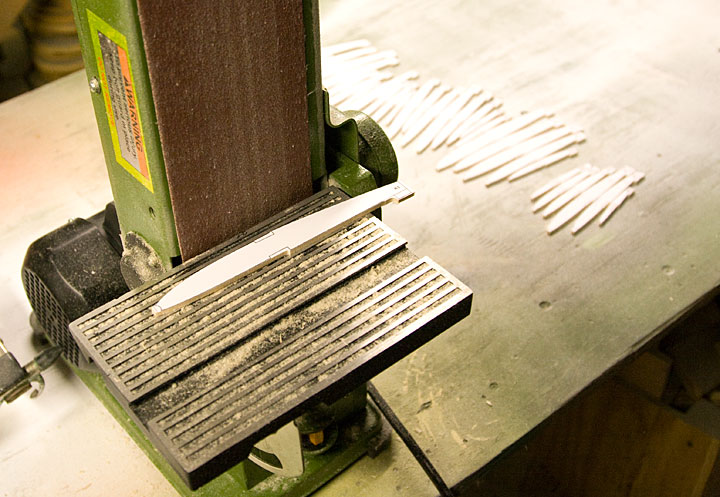
Next I printed up the wing center section plans & began assembly...
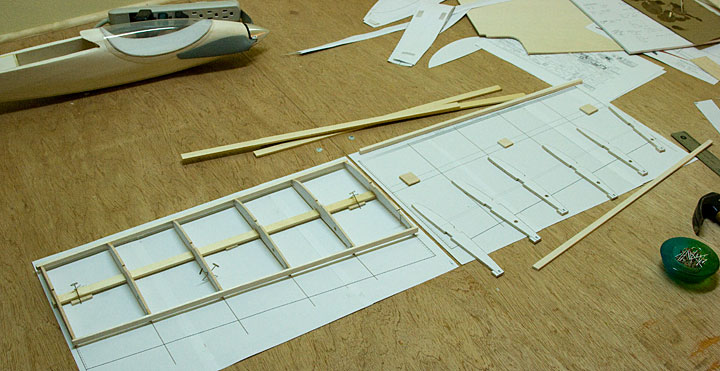
As this is not a flat bottomed airfoil I added tabs to the ribs to help keep them at the correct AOA. They will be sanded off once the basic frame-up is complete...
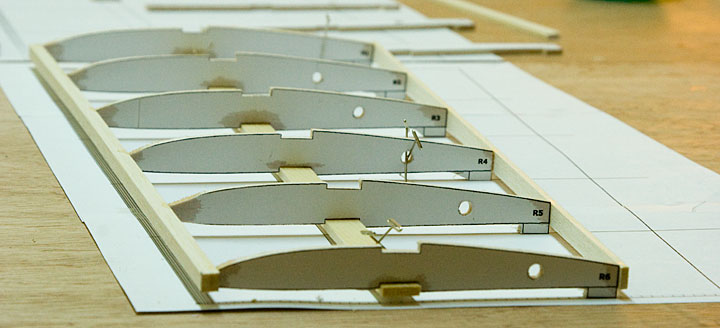
Seeing as I went to all the trouble of choosing a fancy airfoil I thought sheeting would be a good idea. Saggy covering can do terrible things to a wing's shape, especially on the top leading edge area...
As much as I like this SD 7023 airfoil, it is one thin SOB. There's not a lot of room in there for joinery so once again I opted for some CF reinforcement. I also made these end ribs from plywood to help support the CF rods...
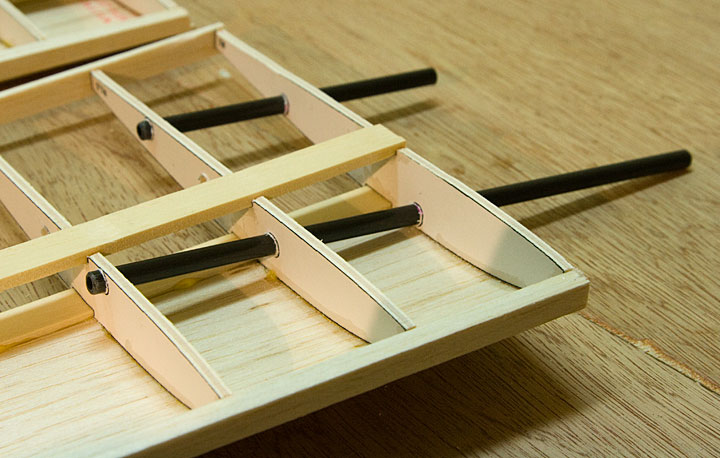
The two center sections of my gull-wing will be glued together. The outboard sections will be joined using CF rods indexing these brass tubes. Again with the thin airfoil thing, I was limited in how much dihedral could be built in & still use rods to connect the sections. Best I could do was 7° dihedral in the middle & 4° down where the outboard gull-wing sections join. As this will be an aileron ship so I'm not too worried about built-in roll stability or rudder only turns anyway...
Once again with the thinness issue I'm a little worried about structural strength. For the inboard sections at lease I chose to fully sheet the top. I'm debating whether the bottom could benefit from sheeting too. I don't want to end up building a flying brick either, weight is always concern...
The center sections are clamped & glued together, now we're getting somewhere!..
Servo wire is run for the ailerons & flaps...

Using my CAD software I printed then contact-cemented the rib shapes onto my wood. I used a scroll-saw to rough cut each then went to the belt sander to finalize the shape...
Next I printed up the wing center section plans & began assembly...
As this is not a flat bottomed airfoil I added tabs to the ribs to help keep them at the correct AOA. They will be sanded off once the basic frame-up is complete...
Seeing as I went to all the trouble of choosing a fancy airfoil I thought sheeting would be a good idea. Saggy covering can do terrible things to a wing's shape, especially on the top leading edge area...
As much as I like this SD 7023 airfoil, it is one thin SOB. There's not a lot of room in there for joinery so once again I opted for some CF reinforcement. I also made these end ribs from plywood to help support the CF rods...
The two center sections of my gull-wing will be glued together. The outboard sections will be joined using CF rods indexing these brass tubes. Again with the thin airfoil thing, I was limited in how much dihedral could be built in & still use rods to connect the sections. Best I could do was 7° dihedral in the middle & 4° down where the outboard gull-wing sections join. As this will be an aileron ship so I'm not too worried about built-in roll stability or rudder only turns anyway...
Once again with the thinness issue I'm a little worried about structural strength. For the inboard sections at lease I chose to fully sheet the top. I'm debating whether the bottom could benefit from sheeting too. I don't want to end up building a flying brick either, weight is always concern...
The center sections are clamped & glued together, now we're getting somewhere!..
Servo wire is run for the ailerons & flaps...
03-31-2012, 07:09 PM
#7
Thread Starter
Join Date: Feb 2012
Location: Fairfield, CT
Posts: 416
Likes: 0
Received 0 Likes
on
0 Posts
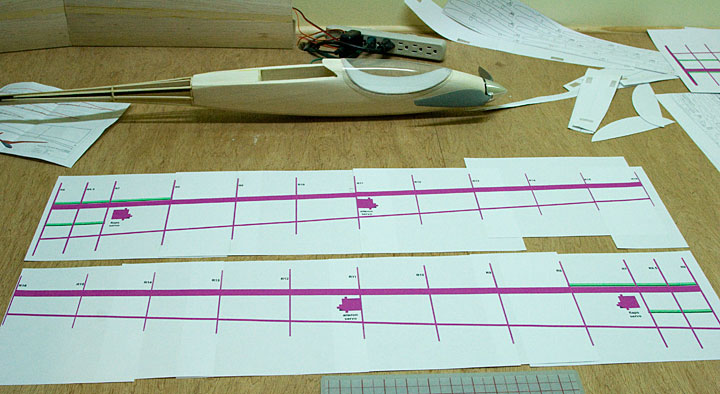
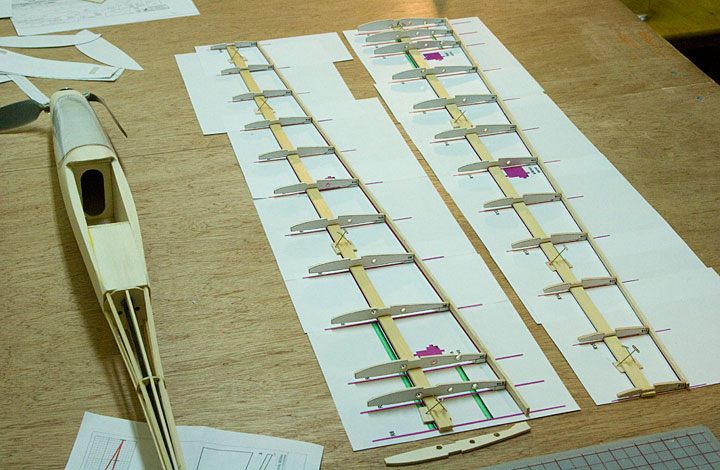
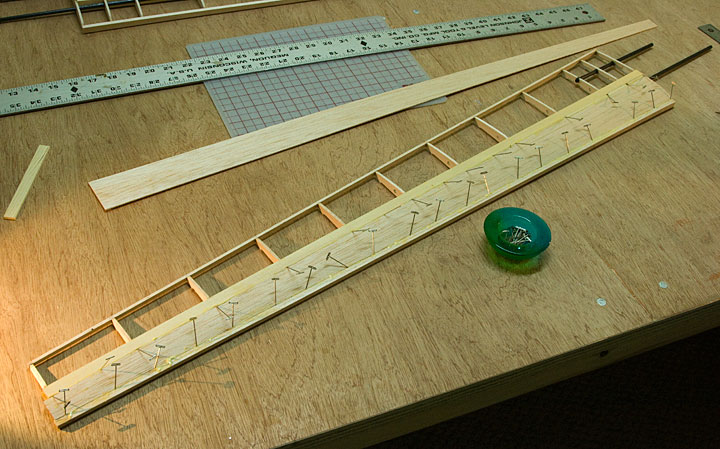
The outer wing panels. Again I printed plans from my CAD design, taped the 8½" x 11" pages together & started to lay things out (gotta love computers)...
Nothing too special here, more of the same, glue the ribs to the spruce main spars using their tabs to keep everything aligned...
Well that's all I have for now, will post more as I go. Comments & advice would be appreciated...
Nothing too special here, more of the same, glue the ribs to the spruce main spars using their tabs to keep everything aligned...
Well that's all I have for now, will post more as I go. Comments & advice would be appreciated...
04-01-2012, 09:27 AM
#9
Thread Starter
Join Date: Feb 2012
Location: Fairfield, CT
Posts: 416
Likes: 0
Received 0 Likes
on
0 Posts
Thank you. I've built a few scale planes over the years, never tried a scale scaleplane though. I already have two projects lined up after this one (a Spitfire & a bi-plane), maybe I need to think about a scale sailplane too. I do like some of the older wooden gliders, they'd lend themselves nicely to built up balsa construction. Anyway getting off topic here. Will post more progress on this electric glider soon.


 04-02-2012, 08:03 PM
#11
Thread Starter
Join Date: Feb 2012
Location: Fairfield, CT
Posts: 416
Likes: 0
Received 0 Likes
on
0 Posts
Yeah so much to do, so little time.
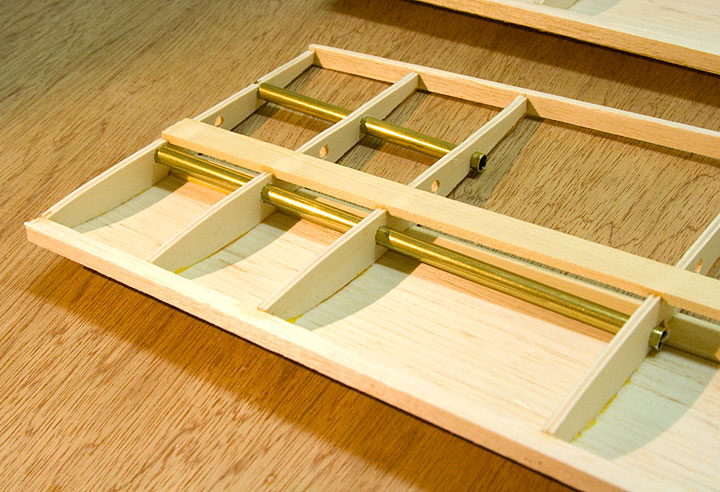
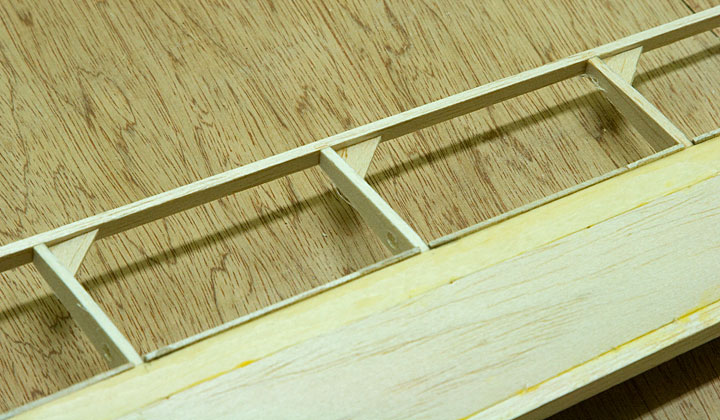
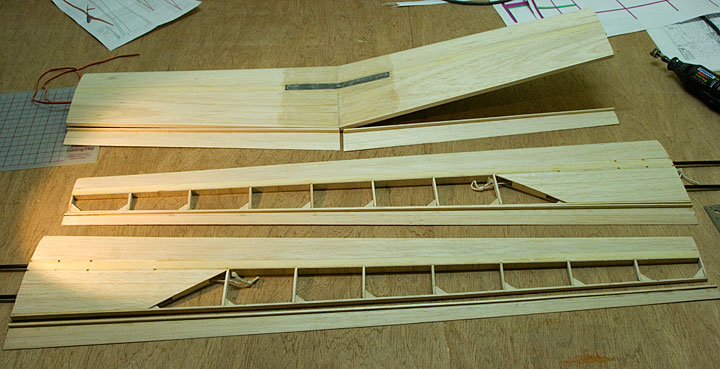
Someone in a mirror post on another forum expressed some concerns with my carbon fiber wing rods. Specifically he didn't like that they weren't mounted between the main spars. He felt my current setup that splits the wing loads between two CF rods then transfers that to the spars through multiple ribs, wouldn't work. He said he'd never seen that setup & that it'd likely fail. I'm not convinced this is the case but he had me sufficiently paranoid about wing failure that I opted to add some extra structure that'd tie at least one of the rods to the main spars directly. To do this I added spruce shear webbing to the front of the spars where the forward wing rod is, cut a slot in that to fit the rod then epoxy everything together. I'm pretty happy with this additional reinforcement & kinda glad this guy gave me some grief about it. Here's how that looks...

I also added spruce shear webbing around the center wing section wing rod tubes...
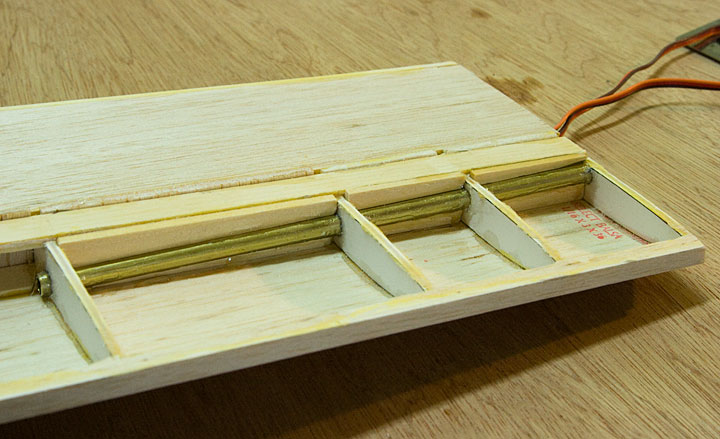
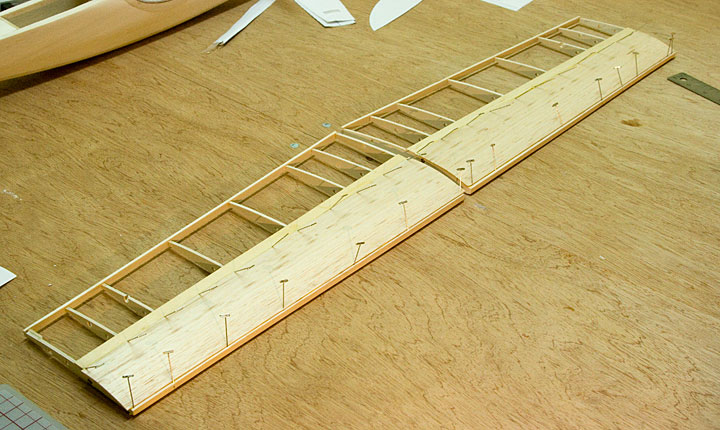
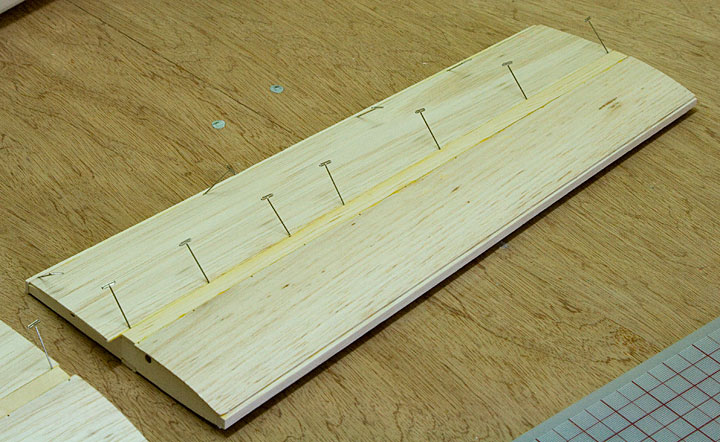
With the wing joints beefed-up I got back to building the wing. Here's the top D-tube sheeting on an outboard wing panel waiting for the glue to dry...
Will have more to show soon.
Someone in a mirror post on another forum expressed some concerns with my carbon fiber wing rods. Specifically he didn't like that they weren't mounted between the main spars. He felt my current setup that splits the wing loads between two CF rods then transfers that to the spars through multiple ribs, wouldn't work. He said he'd never seen that setup & that it'd likely fail. I'm not convinced this is the case but he had me sufficiently paranoid about wing failure that I opted to add some extra structure that'd tie at least one of the rods to the main spars directly. To do this I added spruce shear webbing to the front of the spars where the forward wing rod is, cut a slot in that to fit the rod then epoxy everything together. I'm pretty happy with this additional reinforcement & kinda glad this guy gave me some grief about it. Here's how that looks...
I also added spruce shear webbing around the center wing section wing rod tubes...
With the wing joints beefed-up I got back to building the wing. Here's the top D-tube sheeting on an outboard wing panel waiting for the glue to dry...
Will have more to show soon.
04-03-2012, 10:36 AM
#12
Thread Starter
Join Date: Feb 2012
Location: Fairfield, CT
Posts: 416
Likes: 0
Received 0 Likes
on
0 Posts
I just got an interesting comment from one of my mirror threads on another forum. A guy pointed out that it may have been a mistake to glue my carbon fiber wing rods into the wing. Instead he suggested I install brass tubing not on one but both sides of the wing joint, thus making the CF rod removable. That way if a wing rod ever needs replacing it won't require major surgery. A very good point & something to consider for my next build.
04-03-2012, 06:48 PM
#13
Thread Starter
Join Date: Feb 2012
Location: Fairfield, CT
Posts: 416
Likes: 0
Received 0 Likes
on
0 Posts
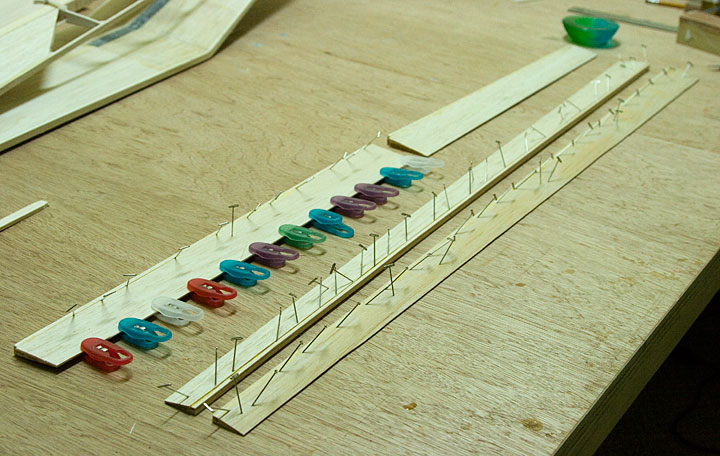
I put the three wing panels together today so I could admire the wing as one piece, looked pretty awesome. When I set her down on my workbench I noticed she tipped to one side. I kinda expected this, one wing panel is slightly heavier than the other. I still had some sheeting to do so I figured this was a good time to see if I could equal things up a little. I mixed & matched my balsa stock until I found a combo that was close in weight...
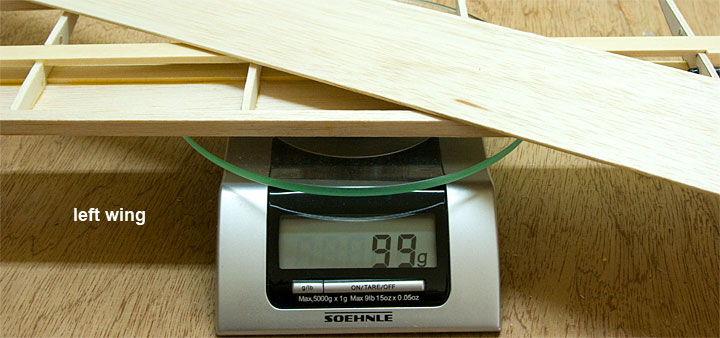
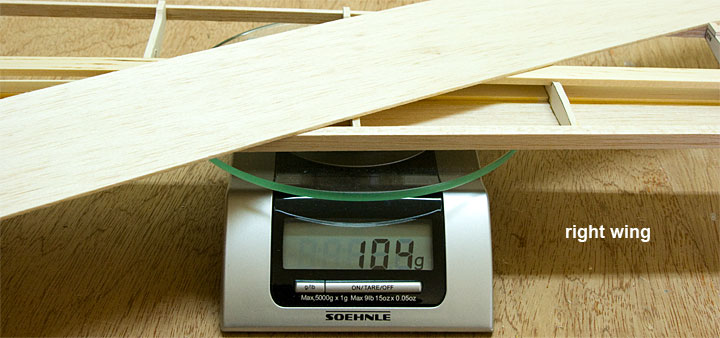
I could have just added weight to the lighter wing but using slightly lighter balsa on the heavy panel achieve the same result without adding additional weight. I'll likely need to do this again once everything is complete but at least the wing is fairly close for now, give or take a few grams.
More reinforcing, I added gussets to the rear of the ribs in the non sheeted areas...
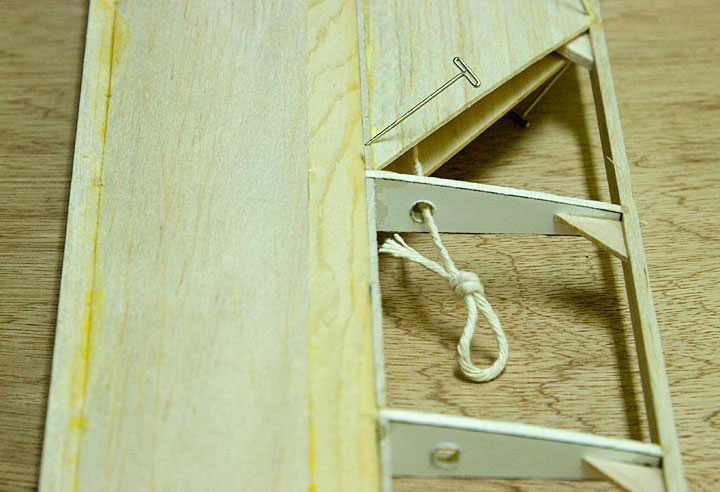
Just before the last of the sheeting went on I ran a length of string through the ribs so that I can later fish my servo wires though...
Outer panel sheeting is complete, woohoo!...

That's all for today, time now to watch some telly.
I could have just added weight to the lighter wing but using slightly lighter balsa on the heavy panel achieve the same result without adding additional weight. I'll likely need to do this again once everything is complete but at least the wing is fairly close for now, give or take a few grams.
More reinforcing, I added gussets to the rear of the ribs in the non sheeted areas...
Just before the last of the sheeting went on I ran a length of string through the ribs so that I can later fish my servo wires though...
Outer panel sheeting is complete, woohoo!...
That's all for today, time now to watch some telly.
04-04-2012, 09:38 AM
#15


Join Date: Oct 2002
Location: Chilliwack, BC, CANADA
Posts: 12,425
Likes: 0
Received 22 Likes
on
19 Posts
Nice thread! ! ! ! And a very sleek looking design as well.
I've got a couple of structural suggestions for you to consider.
[ul][*] Sheet the lower center section as well. Closing the structure will greatly stiffen the center section and thus support the tips from twisting to a good degree. The weight penalty of that much balsa is peanuts. If you were worried about weight you could have saved it by doing the whole fuselage with the planked idea instead of using all that 1/2 inch sheet.[*] It looks like you're depending on the carbon tubes for the center section dihedral bracing. Not a wise idea. The carbon rod that is close to the main spar is the only one which is really doing much. But at the same time it is up near the upper side of the wing where it's again not in the right spot to give the sort of support it should be doing. In flight a reasonably hard pull out will simply pull apart the relatively weak butt joint between the lower spars when the rather small carbon rods flex. And the ribs and sheet will flex enough that your rear one isn't really doing anything at all. But you can save the day by using a Dremel and a large diameter wood saw blade to cut some slots in the lower spar and join the two sides with "bicuits" of carbon fiber flat strip laid into the slots with epoxy. Otherwise the only thing holding them together is the butt joint. And under the sort of tensile loading you'll have it'll soon split. The slots should be cut spanwise into the spars and extend about 1 inch to either side of the middle joint. I'd go with two such slots and then glue in the carbon fiber strips to span the joint. [*] Before you sheet the bottom of the center section I'd double up the webbing by doing the front of the center section spars. Again because the tips pass all their loading to the center you can't go wrong by making the center section as strong as practical. When wings fail it's always in near the center so a few extra grams to aid in strengthening the center section is never bad.
[/ul]
04-05-2012, 06:09 PM
#16
Thread Starter
Join Date: Feb 2012
Location: Fairfield, CT
Posts: 416
Likes: 0
Received 0 Likes
on
0 Posts
Thanks for the excellent structural suggestions. LOL this is going to be one indestructible wing. I don't recall taking all these steps when I put my Gentle Lady together back in the '80s *smile*. A dinky plywood dihedral brace between the wings, some Elmer's & we were good to go. Strong is good though, we like strong.
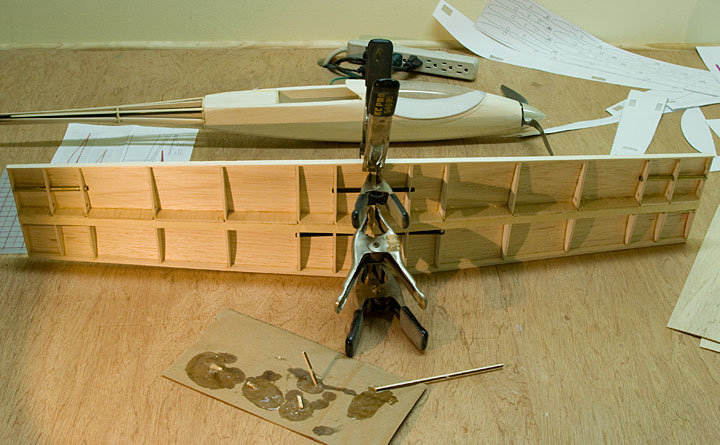
As suggested I have fully sheeted the entire center section. I'm adding CF to help tie the two wing halves together. I did double up the shear webbing before sheeting it too. So once again with your help, I'm pretty confident this wing will hold together & then some. Here's a few more build photos...
Epoxied CF striping to the main spars top & bottom...
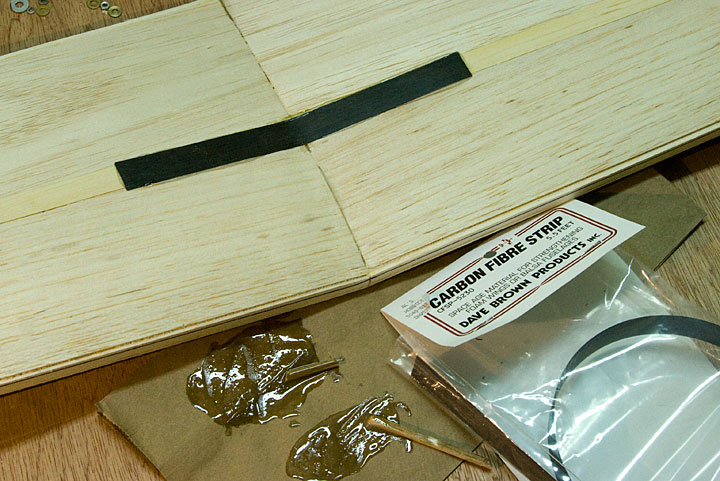
Fiber-glassing the center joint...

The two thin wires sticking through the bottom of the wing are attached to my servo wires so I can easily retrieve them once I'm done with the fiber-glassing. Hope to have more done tomorrow.
As suggested I have fully sheeted the entire center section. I'm adding CF to help tie the two wing halves together. I did double up the shear webbing before sheeting it too. So once again with your help, I'm pretty confident this wing will hold together & then some. Here's a few more build photos...
Epoxied CF striping to the main spars top & bottom...
Fiber-glassing the center joint...
The two thin wires sticking through the bottom of the wing are attached to my servo wires so I can easily retrieve them once I'm done with the fiber-glassing. Hope to have more done tomorrow.
04-06-2012, 09:03 AM
#17
Thread Starter
Join Date: Feb 2012
Location: Fairfield, CT
Posts: 416
Likes: 0
Received 0 Likes
on
0 Posts
A guy on another forum posted the following, here's my response:
Yeah I've always had a thing for gull wings. Back in the '80s I had plans for a big beautiful gull winged bird but never got around to building it. So 30 years later I'm finally getting around to making one. I used 3D Studio MAX for this plane's structural CAD work. For the aerodynamics I use X-Plane's Plane Maker feature. Here's a quote from X-Plane's website that sums it up well:
X-Plane is pretty cool & a lot of fun to tinker with. As far a modeling the structure of your aircraft 3D MAX is kinda overkill. There's free/cheaper CAD software out there like Google SketchUp, Blender, AC3D etc. Any of those should let you design & print your plans.
Note I'd prefer not turn this thread into a discussion about CAD software, that's been covered to death in other threads. Just thought you might be interested in what I'm using.
Nodd, very nice design and great build. Gull wings are cool. What CAD do you use ?
X-Plane is not a game, but an engineering tool that can be used to predict the flying qualities of fixed- and rotary-wing aircraft with incredible accuracy.
Note I'd prefer not turn this thread into a discussion about CAD software, that's been covered to death in other threads. Just thought you might be interested in what I'm using.
04-06-2012, 06:56 PM
#20
Thread Starter
Join Date: Feb 2012
Location: Fairfield, CT
Posts: 416
Likes: 0
Received 0 Likes
on
0 Posts
Sanding, sanding & yeap, more sanding...

Balsa dust is some nasty stuff, totally need a mask. Made up a simple sanding block then its lots of elbow-grease...
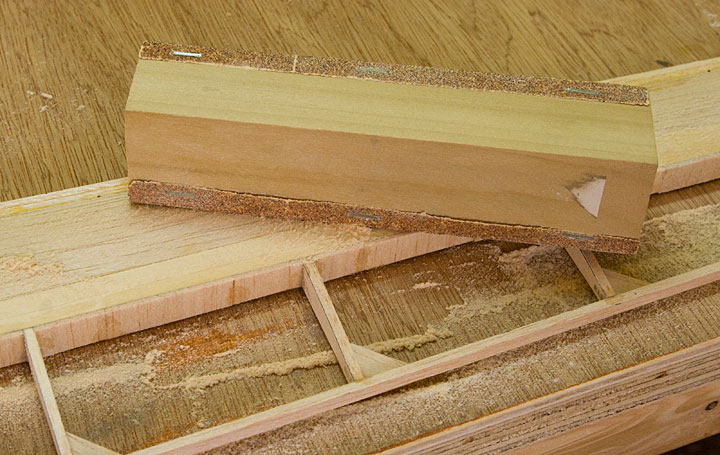
After a couple of hours I had the wing sanded. I was dreading doing the leading edge but it came out really good, very pleased with the shape. Next I started cutting out & assembling the the trailing edge control surfaces...
Everything was going great until I realized I was out of 1/16" sheeting, was planning to use that for the top of the trailing edge. Oh well, back to the hobby store tomorrow...

Balsa dust is some nasty stuff, totally need a mask. Made up a simple sanding block then its lots of elbow-grease...
After a couple of hours I had the wing sanded. I was dreading doing the leading edge but it came out really good, very pleased with the shape. Next I started cutting out & assembling the the trailing edge control surfaces...
Everything was going great until I realized I was out of 1/16" sheeting, was planning to use that for the top of the trailing edge. Oh well, back to the hobby store tomorrow...
04-06-2012, 08:10 PM
#21
Join Date: Oct 2002
Location: Chilliwack, BC, CANADA
Posts: 12,425
Likes: 0
Received 22 Likes
on
19 Posts
Sanding is the part which often gets done quickly and without the attention it needs. Yet it's typically the big difference between a model which looks like it was "organically grown" or was "born" vs a kludge that looks like a collection of warts. Your very right in not taking that part lightly or simply passing over it with less than due care.
I'm looking forward to following along with the rest of your build thread.
And by now you'll see that I've moved this thread over to Sailplanes. The folks here will better appreciate what you've done so far.
I'm looking forward to following along with the rest of your build thread.
And by now you'll see that I've moved this thread over to Sailplanes. The folks here will better appreciate what you've done so far.
04-07-2012, 09:14 PM
#23
Thread Starter
Join Date: Feb 2012
Location: Fairfield, CT
Posts: 416
Likes: 0
Received 0 Likes
on
0 Posts
Yes I can't say I enjoy sanding exactly but I do enjoy the results. I can see how some might be tempted to skip or rush this step but I agree, it is an important one. Thanks for moving this over to sailplanes.
Before proceeding any further I spent some time in X-Plane tweaking the wing's control surfaces. After some tinkering I settled on placement & length of both the flaps & ailerons. I made a quick YouTube video while test flying her in X-Plane, figured you folks might be interested in seeing her fly, even if it is just virtually for now...
http://www.youtube.com/watch?v=AahZzsCZlFI
04-08-2012, 07:32 PM
#24
Thread Starter
Join Date: Feb 2012
Location: Fairfield, CT
Posts: 416
Likes: 0
Received 0 Likes
on
0 Posts
Now that I have some idea what I'm doing with the wing's flaps & ailerons I got to work today putting those together. Mindful of weight I decided to make the TE hollow instead of carved from a solid plank. I added little ribletts here & there to support the top sheeting. I added a really wide rib where I expect to mount the control horn...

Here's the finished TE pieces, some still drying. One of the outboard TE sections started to curve on me after I applied the glue. As a fix I pinned it to the workbench then dabbed it with a damp sponge in hopes that'd make it behave. Will let that dry over night, fingers crossed its okay in the morning...
Nice to have the wing almost done. Onwards & upwards!