


Piper Cub Sailplane
 09-21-2012, 11:54 AM
#1

Thread Starter

Join Date: Feb 2012
Location: Fairfield, CT
Posts: 416
Likes: 0
Received 0 Likes
on
0 Posts
Before you close this thread because it doesn't appear to be about sailplanes, bare with me...
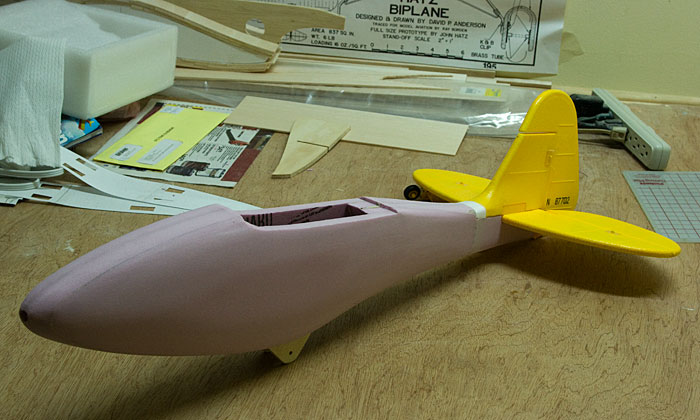
So I wreaked my foamy Cub the other day...
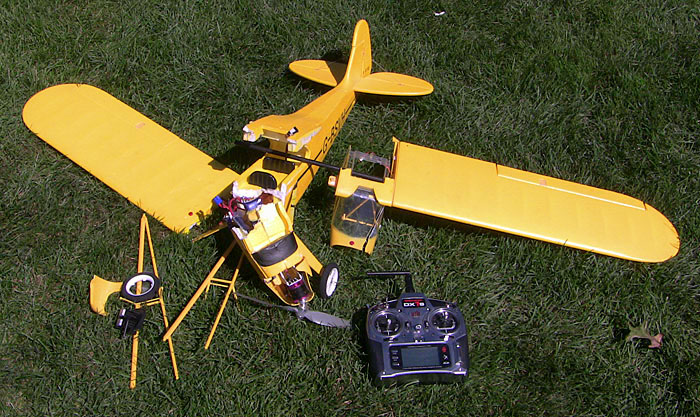
The only part of the airframe that survived was the wing & tail feathers...
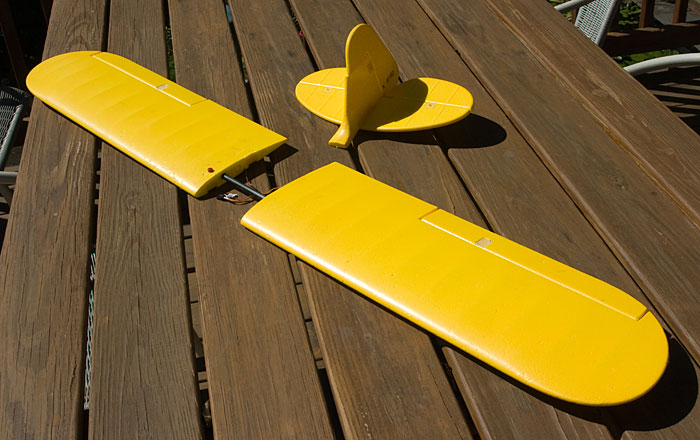
So I got to thinking what can I do with these? Then it hit me, what would it look like if the Piper Cub was a glider...
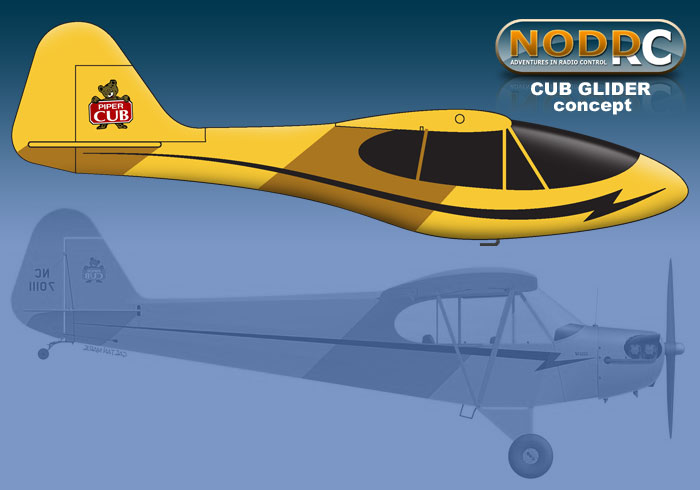
So although not an entirely serious project, I thought it might be fun to build a little glider out of my poor old Cub.
I'm thinking a tow hook for high-start/winching. An aerotow release for towing. Possibly add a center section to the wing to increase her span. Maybe add flaps. Primary construction will be foam which is new to me (usually work with balsa-wood). Anyway subscribe if you're interested.
So I wreaked my foamy Cub the other day...
The only part of the airframe that survived was the wing & tail feathers...
So I got to thinking what can I do with these? Then it hit me, what would it look like if the Piper Cub was a glider...
So although not an entirely serious project, I thought it might be fun to build a little glider out of my poor old Cub.
I'm thinking a tow hook for high-start/winching. An aerotow release for towing. Possibly add a center section to the wing to increase her span. Maybe add flaps. Primary construction will be foam which is new to me (usually work with balsa-wood). Anyway subscribe if you're interested.
 09-21-2012, 12:54 PM
#3
Senior Member
Join Date: Jan 2007
Location: Ladson, SC
Posts: 488
Likes: 0
Received 0 Likes
on
0 Posts
Try this one... TG-8 glider trainer for the glider pilots of CG 4A Waco days.
http://www.rcgroups.com/forums/showthread.php?t=1247116
Ray W.
http://www.rcgroups.com/forums/showthread.php?t=1247116
Ray W.
09-21-2012, 01:33 PM
#4
Thread Starter
Join Date: Feb 2012
Location: Fairfield, CT
Posts: 416
Likes: 0
Received 0 Likes
on
0 Posts
I was wondering how long it'd take for someone to point out that Piper did actually make a glider loosely based on the Cub. I think my design is cuter though :-P
 09-21-2012, 03:06 PM
#6
Junior Member
My Feedback: (5)
Join Date: Nov 2003
Location: Jackson,
MI
Posts: 22
Likes: 0
Received 0 Likes
on
0 Posts
I actually did this 25 years ago with the Debolt Champ. I added 3 inches to each wing panel and almost lost it in a thermal. It was out of sight for about 15 minutes. The only thing that saved the day was my radio went into failsafe mode out of range and it went into down elevator and left rudder. It became a spot and then I regained control, landed, went home and changes my shorts.
09-21-2012, 07:21 PM
#7
Thread Starter
Join Date: Feb 2012
Location: Fairfield, CT
Posts: 416
Likes: 0
Received 0 Likes
on
0 Posts
*smile* I know all about plane eating thermals, been there, done that. Good to hear this type of aircraft can thermal.
Construction Begins
I printed up some paper templates, cut a few holes here & there so I could tape them to some Home Depot foam board...
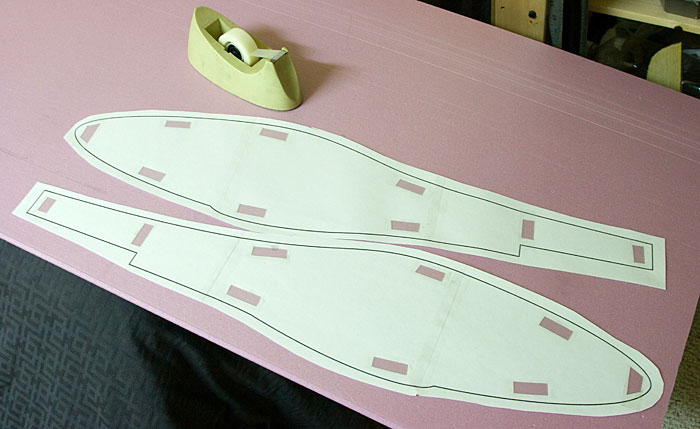
Cut the fuselage sides out using my scroll saw...
I then cut another two fuselage pieces, these with interior space for the radio gear. These I only rough cut, will sand them smooth once the fuselage is assembled...
Cut slots for the rudder & elevator push-rods...
I also cut a slot for a carbon fiber bar that'll run the length of the tail...

Test fitting the carbon fiber bar...
Glued the two interior halves together with the carbon fiber sandwiched inside...
Added some weight, time to take a break & let the glue dry...

Well that's a start. Will have more progress soon.
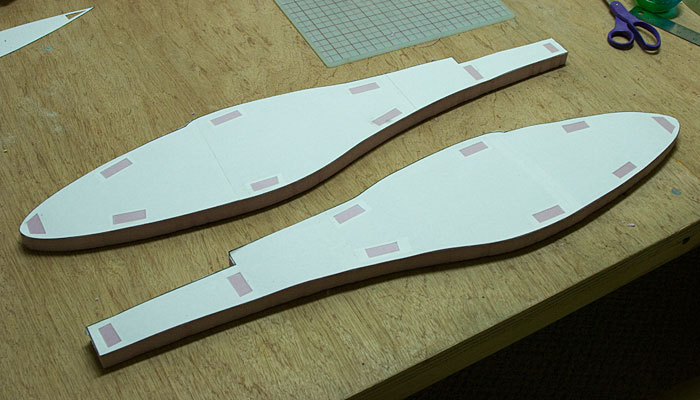
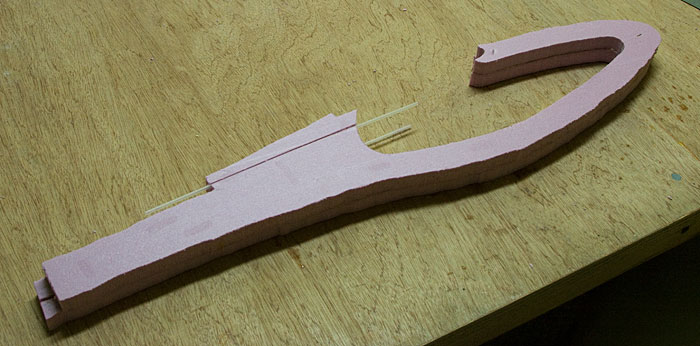
Construction Begins
I printed up some paper templates, cut a few holes here & there so I could tape them to some Home Depot foam board...
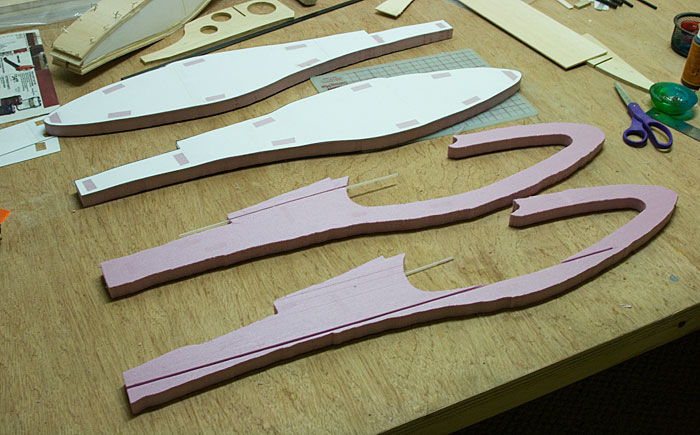
Cut the fuselage sides out using my scroll saw...
I then cut another two fuselage pieces, these with interior space for the radio gear. These I only rough cut, will sand them smooth once the fuselage is assembled...
Cut slots for the rudder & elevator push-rods...
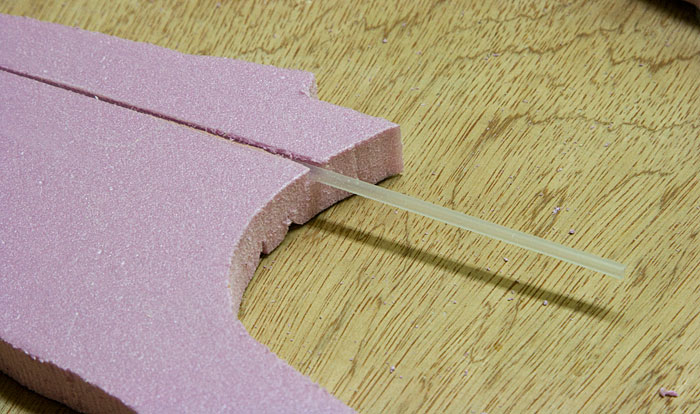
I also cut a slot for a carbon fiber bar that'll run the length of the tail...
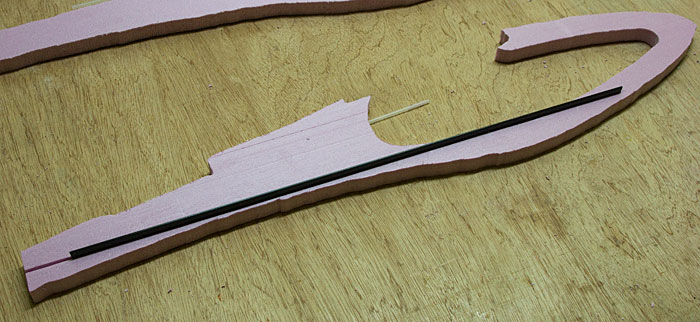
Test fitting the carbon fiber bar...
Glued the two interior halves together with the carbon fiber sandwiched inside...
Added some weight, time to take a break & let the glue dry...
Well that's a start. Will have more progress soon.
09-22-2012, 03:40 PM
#8
Thread Starter
Join Date: Feb 2012
Location: Fairfield, CT
Posts: 416
Likes: 0
Received 0 Likes
on
0 Posts
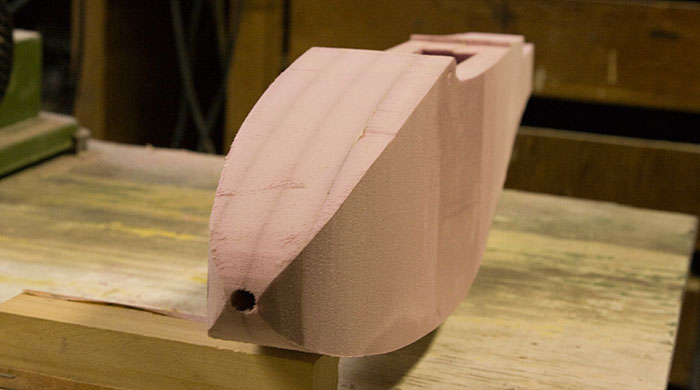
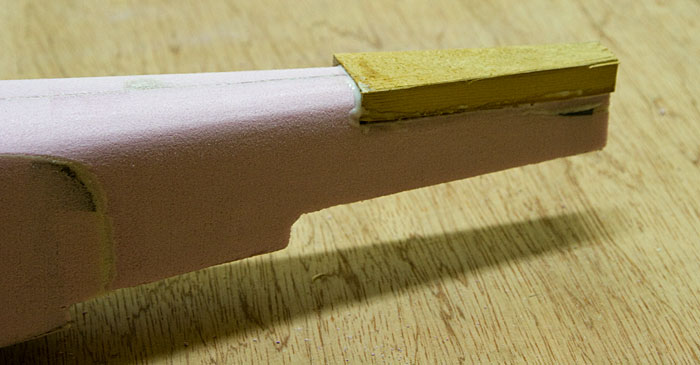
Aerotow Release
This'll be my third aerotow sailplane. My first has the release mounted way up under the nose, the other centered in the nose. I like the way the glider rides nice & high above the tow-plane using the under nose option but you have to flip the glider over on its back to insert the tow-loop. Where-as my other glider, with the release mounted in the nose, has much easier access. For that reason alone I prefer a nose mounted release...
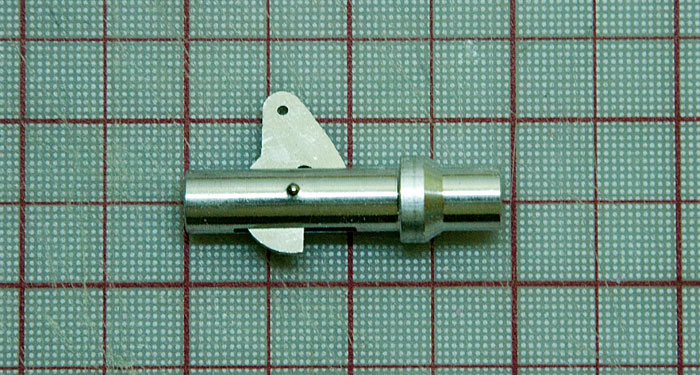
I'm used to mounting these in fiberglass or balsa, this is the first foam instillation I've attempted. Given the softness of the material I opted to place a washer in front of the release to help distribute the load some...
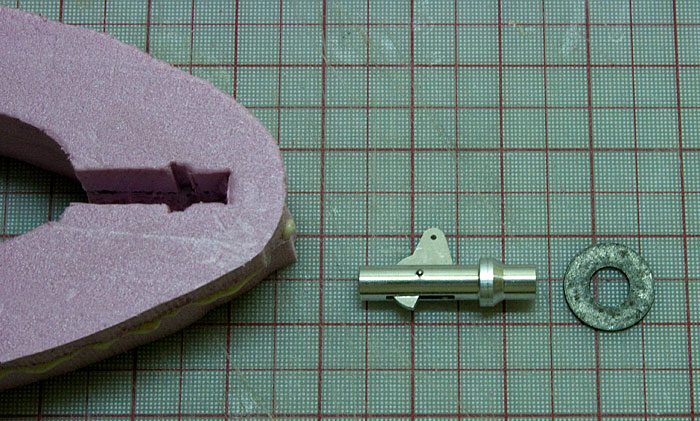
I should probably have installed this before gluing the foam together. That would have reduced the amount of surgery required. No biggy though, once I add the fuselage sides all this ugliness will be buried inside...
I'll likely add reinforcing either side of the release before I add the fuselage sides. Fingers crossed I never need to service the release as it'll be a nightmare to get at later on.
Well I'm going fishing for a few days, I'll get back to this later in the week.
This'll be my third aerotow sailplane. My first has the release mounted way up under the nose, the other centered in the nose. I like the way the glider rides nice & high above the tow-plane using the under nose option but you have to flip the glider over on its back to insert the tow-loop. Where-as my other glider, with the release mounted in the nose, has much easier access. For that reason alone I prefer a nose mounted release...
I'm used to mounting these in fiberglass or balsa, this is the first foam instillation I've attempted. Given the softness of the material I opted to place a washer in front of the release to help distribute the load some...
I should probably have installed this before gluing the foam together. That would have reduced the amount of surgery required. No biggy though, once I add the fuselage sides all this ugliness will be buried inside...
I'll likely add reinforcing either side of the release before I add the fuselage sides. Fingers crossed I never need to service the release as it'll be a nightmare to get at later on.
Well I'm going fishing for a few days, I'll get back to this later in the week.
09-25-2012, 06:29 PM
#9
Thread Starter
Join Date: Feb 2012
Location: Fairfield, CT
Posts: 416
Likes: 0
Received 0 Likes
on
0 Posts
Tundra Tires
As any fan of the Piper Cub knows, big fat tires for off field operation are where its at. I'd like to include a wheel, especially if I'm going to aerotow this puppy. Ideally I'd like a BIG honking wheel in there but I've run into a problem. The carbon fiber bar I ran down the inside of the fuselage is in the way. Here's a big three inch wheel where I'd like to put it...

That's not going to work though, the CF bar is in the way. This dinky two inch wheel fits though...
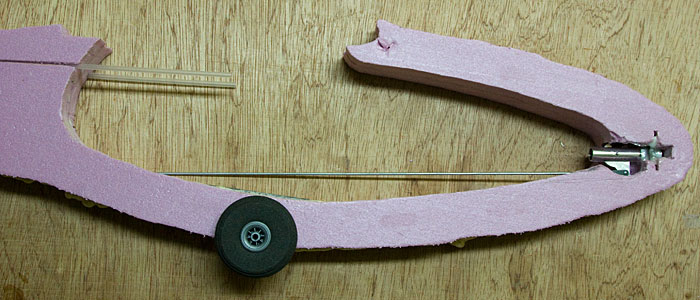
I have a couple of ideas how to get a big wheel in there without compromising my carbon fiber keel. Will post more on that soon.
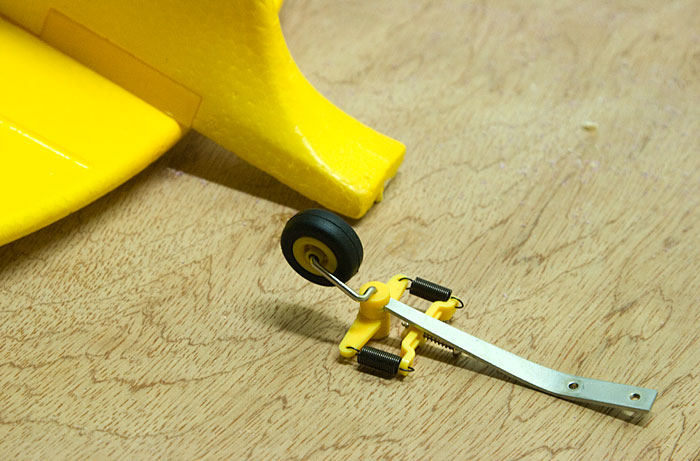
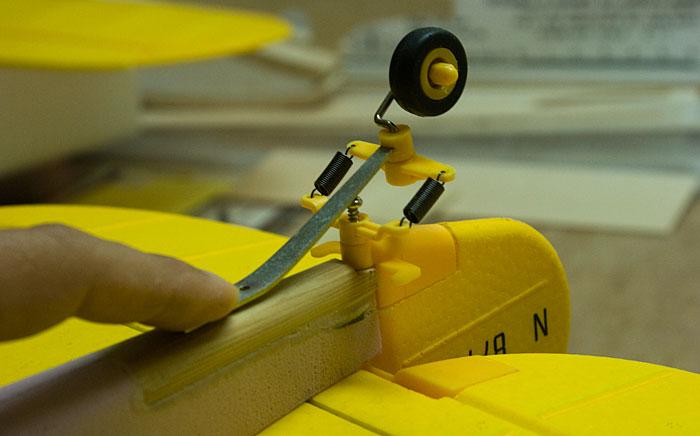
While we're on the subject of wheels, I suppose there's no reason why I shouldn't reuse the nifty scale tailwheel. I've never had a glider with steerable gear, fun fun...
I'm flying tomorrow so not sure how much I'll get done, will keep you posted.
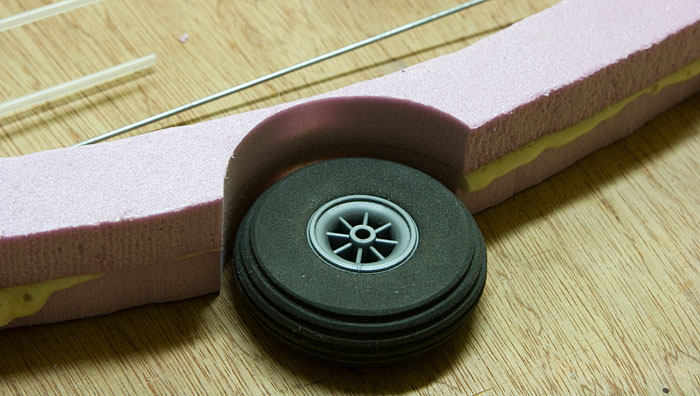
As any fan of the Piper Cub knows, big fat tires for off field operation are where its at. I'd like to include a wheel, especially if I'm going to aerotow this puppy. Ideally I'd like a BIG honking wheel in there but I've run into a problem. The carbon fiber bar I ran down the inside of the fuselage is in the way. Here's a big three inch wheel where I'd like to put it...
That's not going to work though, the CF bar is in the way. This dinky two inch wheel fits though...
I have a couple of ideas how to get a big wheel in there without compromising my carbon fiber keel. Will post more on that soon.
While we're on the subject of wheels, I suppose there's no reason why I shouldn't reuse the nifty scale tailwheel. I've never had a glider with steerable gear, fun fun...
I'm flying tomorrow so not sure how much I'll get done, will keep you posted.
09-26-2012, 06:09 PM
#11
Thread Starter
Join Date: Feb 2012
Location: Fairfield, CT
Posts: 416
Likes: 0
Received 0 Likes
on
0 Posts
Yeah I'm not too worried about performance here, this project is just for fun. If I decide I really like it I can always build a "proper" one.
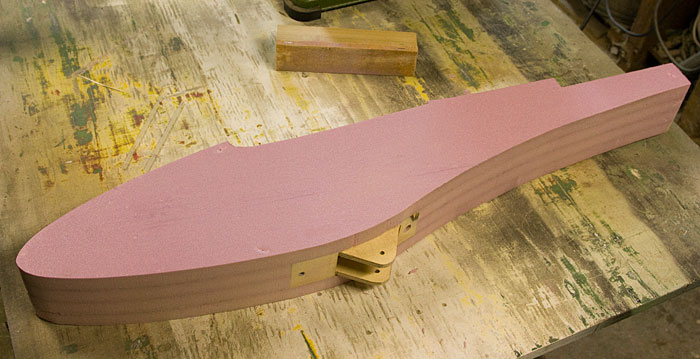
The Wheel
Okay well after sleeping on it I believe I have a solution for mounting a "tundra-sized" wheel in there. Best of all it doesn't involve me cutting into my carbon fiber reinforcing.
First thing was to carve out a wheel-well...
So here's what I came up with...
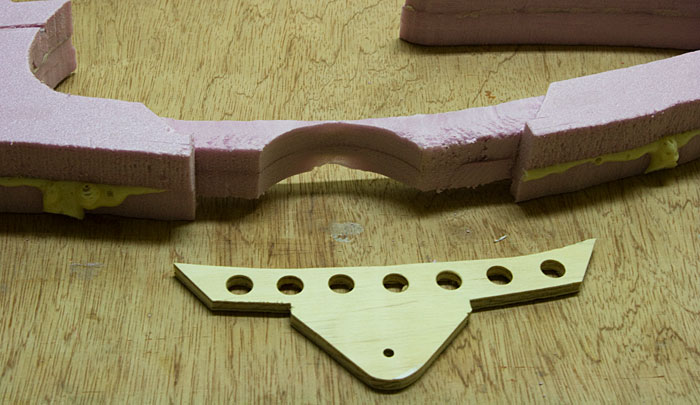
I made a wheel "cradle" from 1/4" plywood...
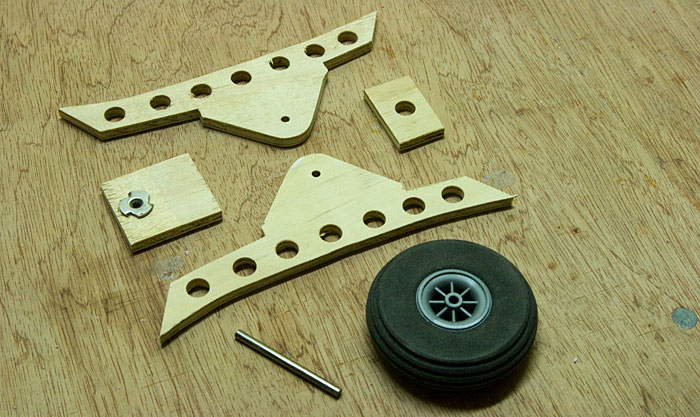
The blind-nut on the left will be where the tow-hook for winching will be screwed into (it'll be on the other side of the wood for final assembly)...

Test fitting everything...
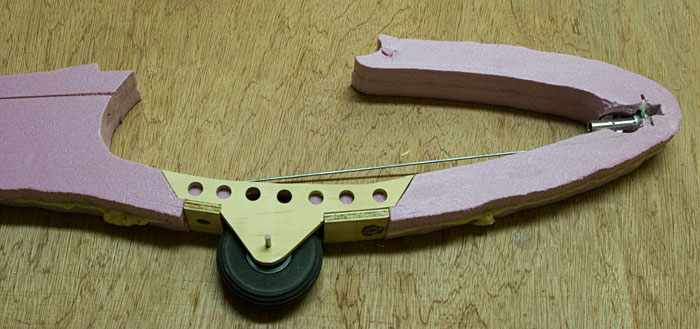
Well that looks plenty strong to me. It'll be even more so once the fuselage sides are glued in place. The winch tow-hook position is a tad forwards of ideal but I figure she should tow well enough.
Hope to get more done tomorrow.
The Wheel
Okay well after sleeping on it I believe I have a solution for mounting a "tundra-sized" wheel in there. Best of all it doesn't involve me cutting into my carbon fiber reinforcing.
First thing was to carve out a wheel-well...
So here's what I came up with...
I made a wheel "cradle" from 1/4" plywood...
The blind-nut on the left will be where the tow-hook for winching will be screwed into (it'll be on the other side of the wood for final assembly)...
Test fitting everything...
Well that looks plenty strong to me. It'll be even more so once the fuselage sides are glued in place. The winch tow-hook position is a tad forwards of ideal but I figure she should tow well enough.
Hope to get more done tomorrow.
09-27-2012, 04:54 PM
#13
Thread Starter
Join Date: Feb 2012
Location: Fairfield, CT
Posts: 416
Likes: 0
Received 0 Likes
on
0 Posts
LOL I think that wheel is plenty big, probably too big actually *smile* That's as tundra as she gets.
Guts-n-stuff
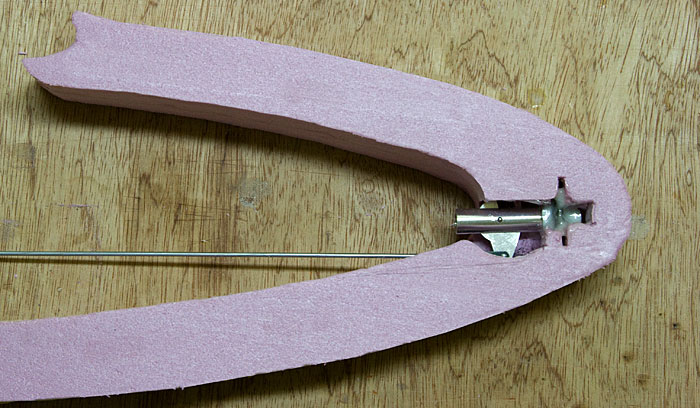
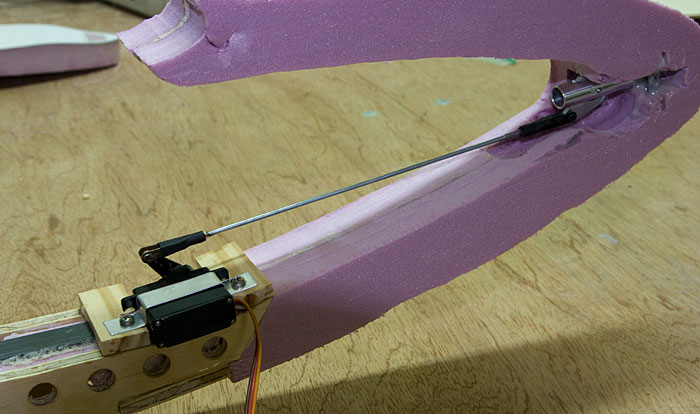
I figured now was a good time to get the aerotow mechanism hooked up while I still have easy access. I made some mounting hardware for the servo...
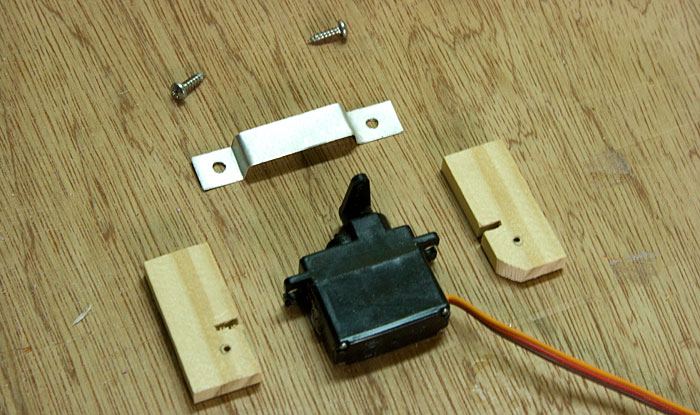
The aerotow servo is mounted slightly off center so that the control arm is somewhat centered. The butt of the servo will protrude out into the right side a tad but it should be plenty thick enough to accommodate it...
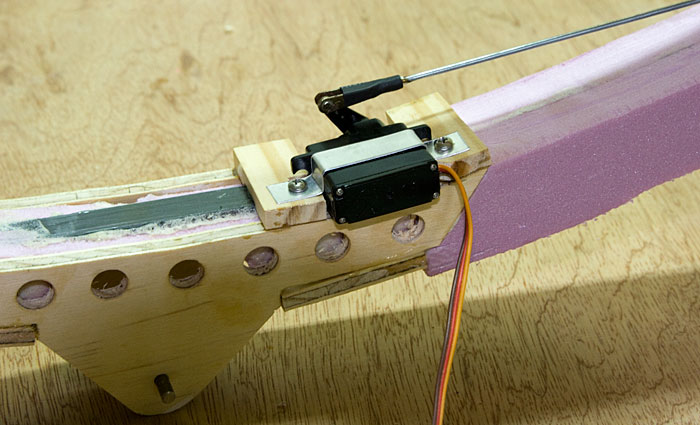
Hooked up, adjusted & working like a charm...
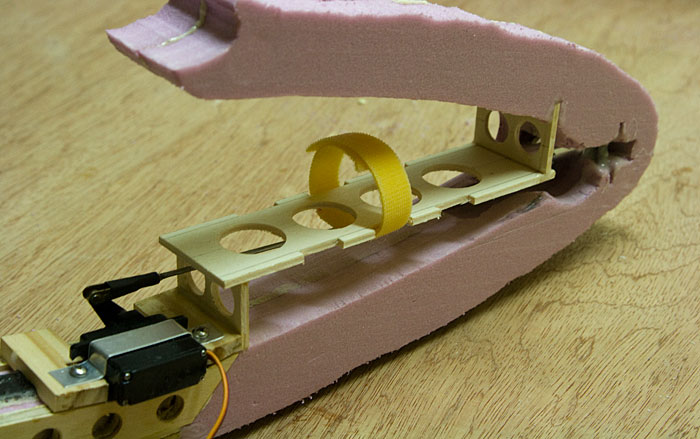
I plan to place the battery up in the nose but I don't want it interfering with the aerotow release pushrod. The solution was to add a battery tray. As I'm not sure where the CG will end up I added several notches for the battery tie-down Velcro...
Time to add the sides
The rest of the radio instillation will be attached to the fuselage sides. So before I can proceed the sides need to go on...
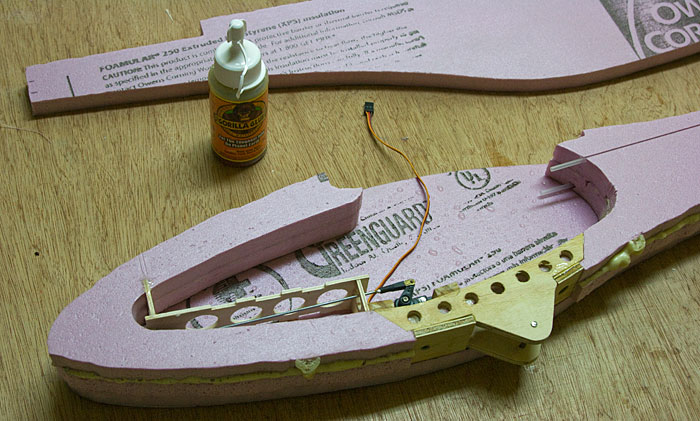
On goes the other side...

Added some weight, will let the Gorilla Glue do its thing for a while...
Guts-n-stuff
I figured now was a good time to get the aerotow mechanism hooked up while I still have easy access. I made some mounting hardware for the servo...
The aerotow servo is mounted slightly off center so that the control arm is somewhat centered. The butt of the servo will protrude out into the right side a tad but it should be plenty thick enough to accommodate it...
Hooked up, adjusted & working like a charm...
I plan to place the battery up in the nose but I don't want it interfering with the aerotow release pushrod. The solution was to add a battery tray. As I'm not sure where the CG will end up I added several notches for the battery tie-down Velcro...
Time to add the sides
The rest of the radio instillation will be attached to the fuselage sides. So before I can proceed the sides need to go on...
On goes the other side...
Added some weight, will let the Gorilla Glue do its thing for a while...
09-27-2012, 06:58 PM
#14
Thread Starter
Join Date: Feb 2012
Location: Fairfield, CT
Posts: 416
Likes: 0
Received 0 Likes
on
0 Posts
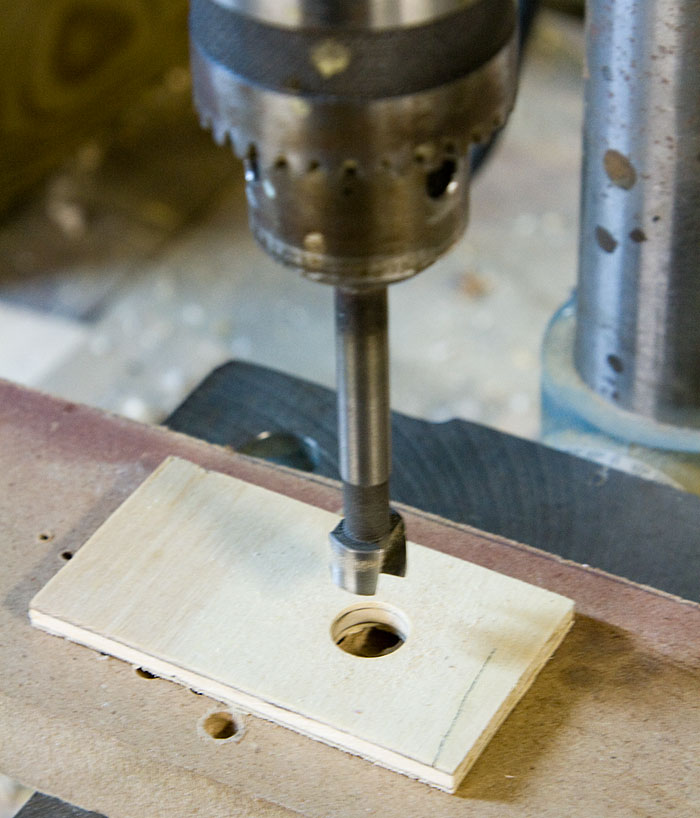
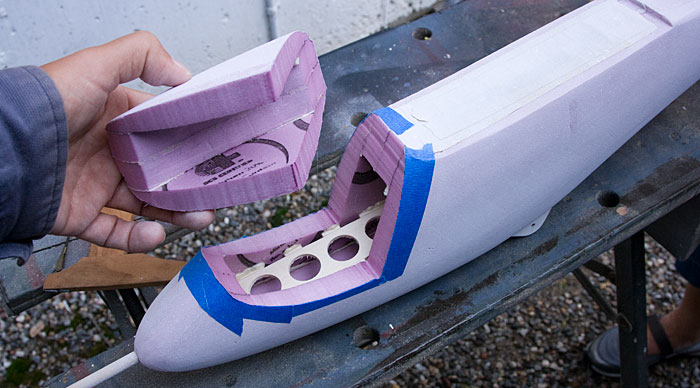
Lightening Holes
I've been asked how I'm cutting such nice neat lightening holes. I use a set of forstner bits, they don't chew up the wood like a large diameter drill bit...

Used with a drill-press they produce a nice clean hole (a hand drill will work too). Be sure to place a piece of scrap wood underneath what you're cutting. That greatly reduces splintering when the bit exits the other side of the wood...
I've been asked how I'm cutting such nice neat lightening holes. I use a set of forstner bits, they don't chew up the wood like a large diameter drill bit...
Used with a drill-press they produce a nice clean hole (a hand drill will work too). Be sure to place a piece of scrap wood underneath what you're cutting. That greatly reduces splintering when the bit exits the other side of the wood...
09-28-2012, 05:12 PM
#16
Thread Starter
Join Date: Feb 2012
Location: Fairfield, CT
Posts: 416
Likes: 0
Received 0 Likes
on
0 Posts
Cheers Tinkrer.
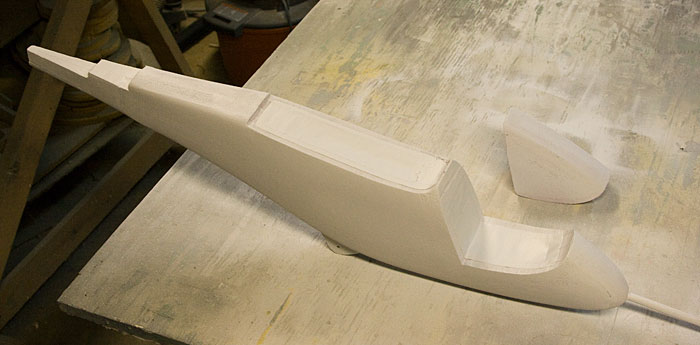
Sanding
Okay time to make this ugly pink box pretty. First I sanded the top & bottom even...
I printed up another set of templates, this time for the top-down profile...

Sanded to the lines...
Then the magic starts, time to round things off...
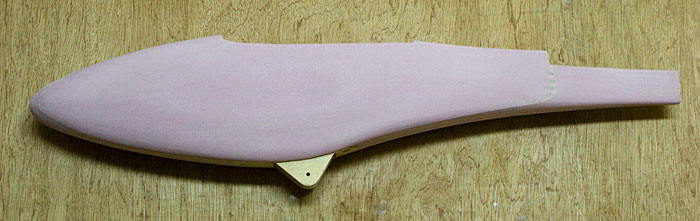
Remove just a little material at a time, eyeball, then repeat...

Test fitting the tail feathers...
Tail Wheel
I needed a solid area to mount the tail wheel so I notched out a spot for a piece of scrap hardwood...

Glued the block in place...
Shaped the block then test fit the wheel assembly...
Paint
This being my first attempt at foam construction I'm not sure exactly how best to finish her. I could glass the whole thing. I've heard about gluing strips of brown paper on there. I've also heard that its possible to use spray paint directly on the foam but there's always that worry the paint will turn all my hard work into a pile of goo. I said screw it, lets go with paint so I masked off certain areas & prepared to take the plunge...
After testing a can of Rustoleum primer on some scrap foam I was confident enough to lay down a first coat...

From what I've read, you can get away with spray painting foam as long as you apply just a dusting at a time. Everything was going great until I ran out of primer. So that's a wrap for today. Pretty pleased with how she's looking.
Sanding
Okay time to make this ugly pink box pretty. First I sanded the top & bottom even...
I printed up another set of templates, this time for the top-down profile...
Sanded to the lines...
Then the magic starts, time to round things off...
Remove just a little material at a time, eyeball, then repeat...
Test fitting the tail feathers...
Tail Wheel
I needed a solid area to mount the tail wheel so I notched out a spot for a piece of scrap hardwood...
Glued the block in place...
Shaped the block then test fit the wheel assembly...
Paint
This being my first attempt at foam construction I'm not sure exactly how best to finish her. I could glass the whole thing. I've heard about gluing strips of brown paper on there. I've also heard that its possible to use spray paint directly on the foam but there's always that worry the paint will turn all my hard work into a pile of goo. I said screw it, lets go with paint so I masked off certain areas & prepared to take the plunge...
After testing a can of Rustoleum primer on some scrap foam I was confident enough to lay down a first coat...
From what I've read, you can get away with spray painting foam as long as you apply just a dusting at a time. Everything was going great until I ran out of primer. So that's a wrap for today. Pretty pleased with how she's looking.
09-29-2012, 07:23 PM
#17
Thread Starter
Join Date: Feb 2012
Location: Fairfield, CT
Posts: 416
Likes: 0
Received 0 Likes
on
0 Posts
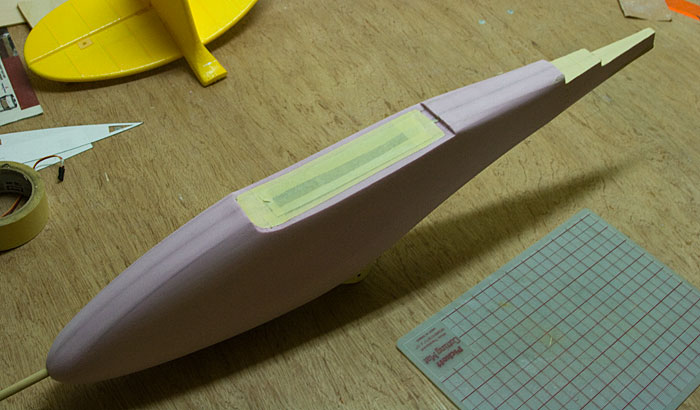
Are we forgetting something?
I was so eager to get her painted I plum forgot about the battery hatch. Its just as well I ran out of paint yesterday. My plan is to make the front canopy removable giving access to the battery tray. Using masking tape I outlined the hatch...
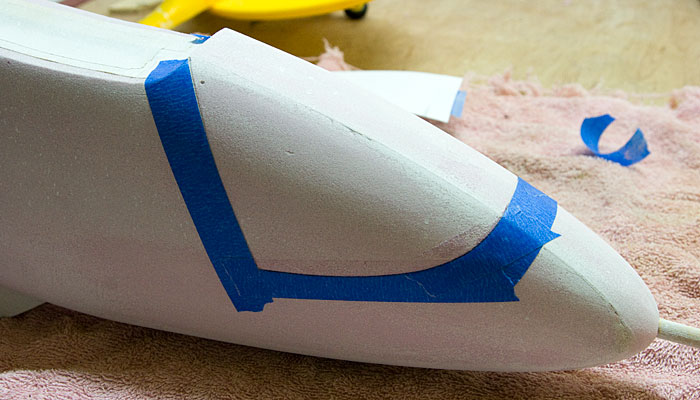
A buddy loaned me a hot-wire foam cutter. Using the tape as a guide I cut the hatch free...

That looks like plenty of access to the battery area...
Now I can get back to painting her...
That's enough primer, I'll let that dry overnight.
The Wing
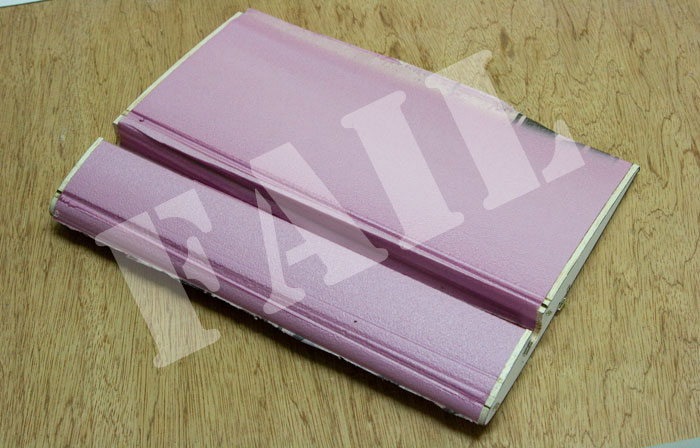
In the meantime I turned my attention to the wing. I'm planning to add a short center section to the span. First I need to glue two pieces of foam together to get sufficient thickness. Time to break out the Gorilla Glue again...
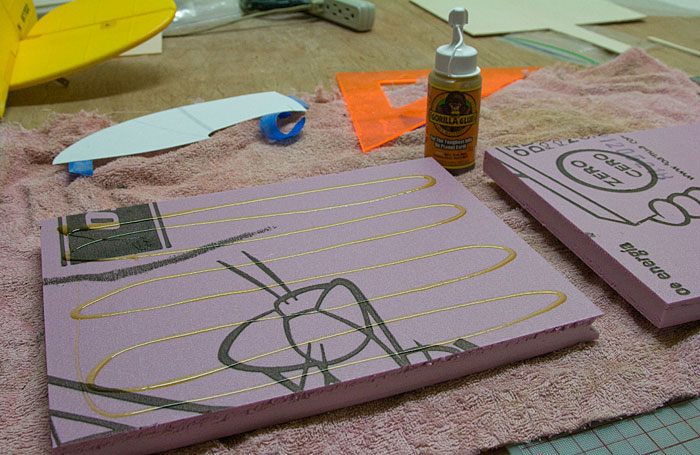
Spreading the glue evenly...
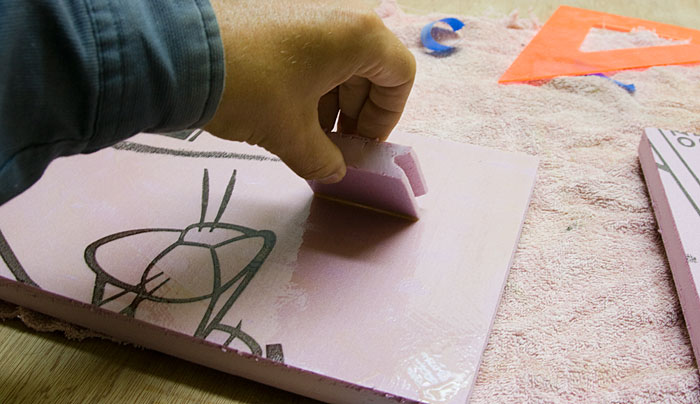
Adding water to the other piece...

Slap the two pieces together...
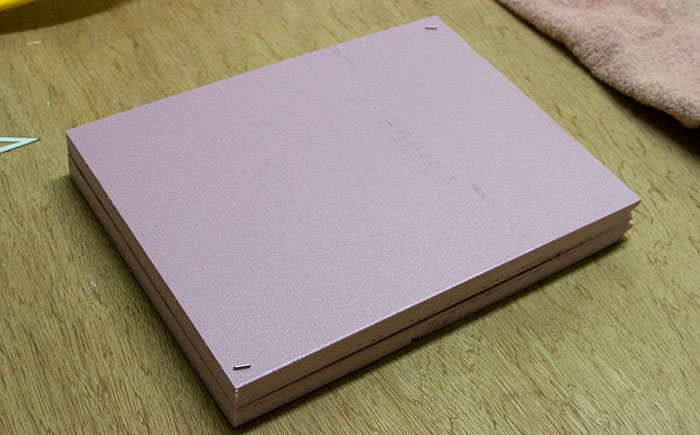
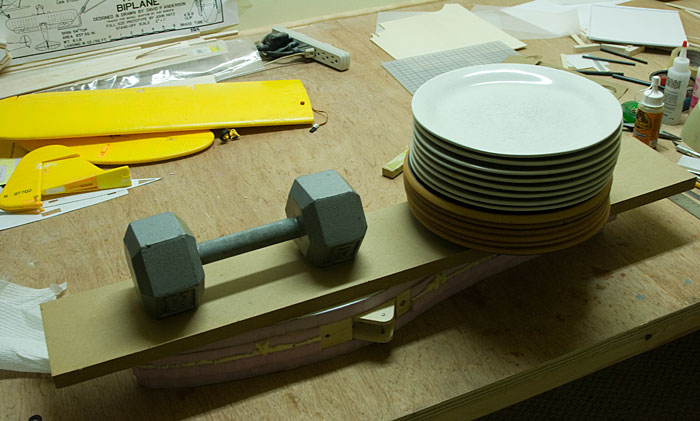
...and once again its dinner plate time...
While that dries I started work on the template ribs that'll be used to guide the hot-wire cutter...

Unfortunately my wood-shop is being used as a pint-booth for the fuselage, so now's not the best time to use the belt sander to shape these template ribs. So that's as far as I'm going today. Hoping to get the wing cut tomorrow.
I was so eager to get her painted I plum forgot about the battery hatch. Its just as well I ran out of paint yesterday. My plan is to make the front canopy removable giving access to the battery tray. Using masking tape I outlined the hatch...
A buddy loaned me a hot-wire foam cutter. Using the tape as a guide I cut the hatch free...
That looks like plenty of access to the battery area...
Now I can get back to painting her...
That's enough primer, I'll let that dry overnight.
The Wing
In the meantime I turned my attention to the wing. I'm planning to add a short center section to the span. First I need to glue two pieces of foam together to get sufficient thickness. Time to break out the Gorilla Glue again...
Spreading the glue evenly...
Adding water to the other piece...
Slap the two pieces together...
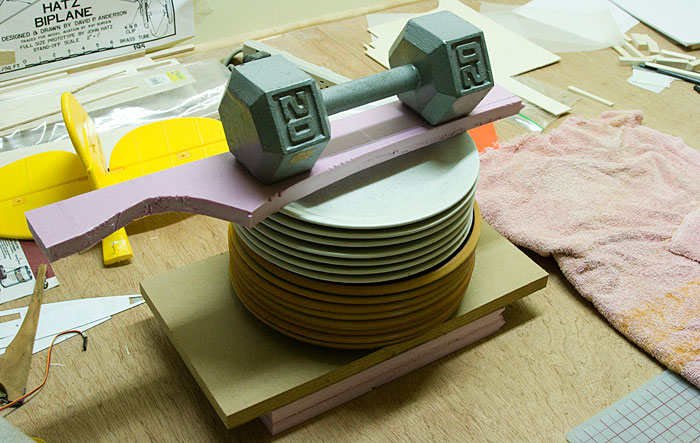
...and once again its dinner plate time...
While that dries I started work on the template ribs that'll be used to guide the hot-wire cutter...
Unfortunately my wood-shop is being used as a pint-booth for the fuselage, so now's not the best time to use the belt sander to shape these template ribs. So that's as far as I'm going today. Hoping to get the wing cut tomorrow.

 09-30-2012, 09:42 AM
#20

My Feedback: (98)

Join Date: Feb 2002
Location: The Villages, Florida NJ
Posts: 4,677
Likes: 0
Received 0 Likes
on
0 Posts
ORIGINAL: longsoar
Hey Nodd!
Nodd's wife love's when he builds, she know she's going out for dinner!Hey Nodd!
I wonder if you use dishes for anything else besides weights?! 
 09-30-2012, 03:45 PM
#21
Thread Starter
Join Date: Feb 2012
Location: Fairfield, CT
Posts: 416
Likes: 0
Received 0 Likes
on
0 Posts
Dishes, dumbbells, socks, kitchen sink... I've used it all *grin*
Plan A
Well after my success carving out the fuselage battery hatch I was looking forward to trying the hot-wire gizmo again. I pinned balsa template ribs to both ends of a block of foam...

You maybe wondering what the notch in the rib is all about. Well the Cub's wings use a carbon fiber tube as the main spar. I couldn't come up with an easy way to drill a hole span-wise down the wing piece I was about to make so I decided instead to just cut a slot. I'll use expanding foam or something to fill the slot later on...
So it was time to use the spiffy hot-wire cutter. This was the unfortunate result...
Apparently this isn't as easy as it looks. I'd love to play with this more, definitely want to master this process but in the interest of getting this bird done I switched to...
Plan B
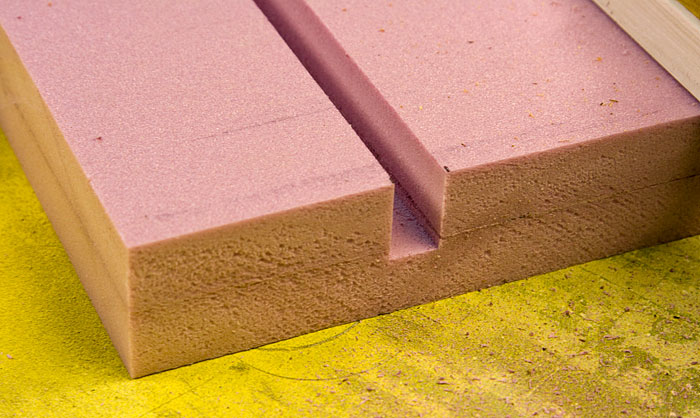
Starting with a new block of foam I broke out the router & cut a slot for the wing-rod...
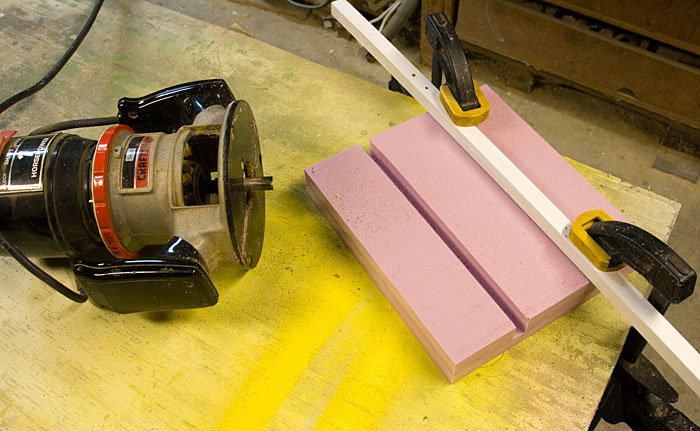
Now that's a nice clean slot, MUCH better...
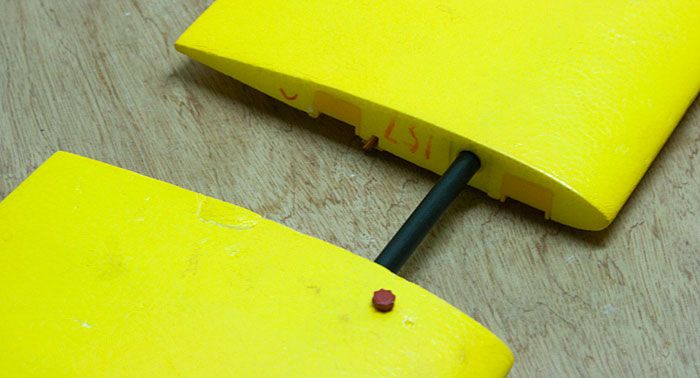
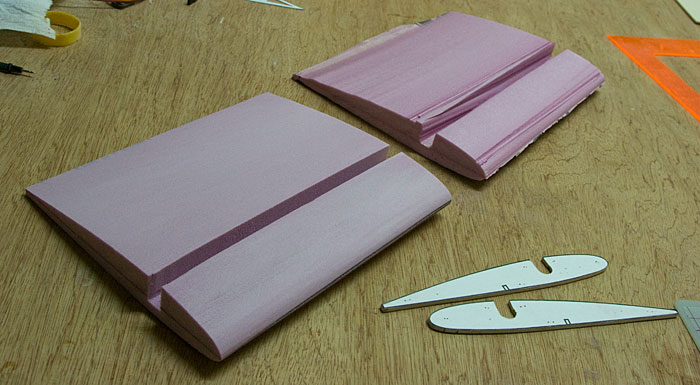
Then it was back to my trusty belt-sander to shape the airfoil...

Here's a comparison of the hot-wire wing on the right & the sanded wing on the left...
Don't get me wrong though, I have nothing against hot-wire foam cutting. I'm just not very good at it yet. There's lots of great threads on the subject, I'll read-up on it, practice some & hopefully next time will yield better results.
So here we are test fitting the sanded center section. Looks pretty good to me...

Yellow & Black
Meanwhile back in my wood-shop/paint-booth more progress was made...
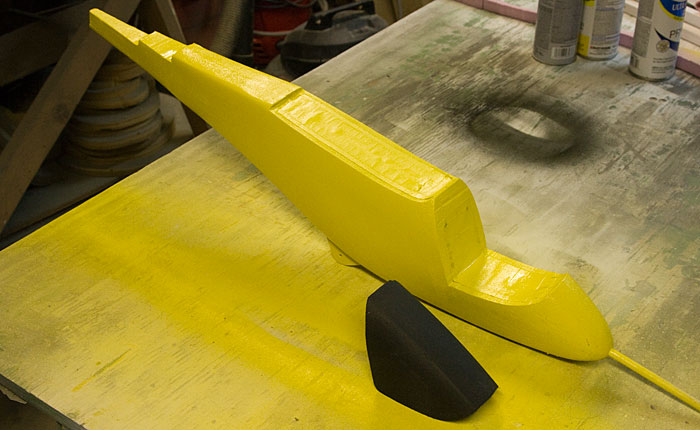
While the finish is far from perfect its about what I expected having painted directly on foam. Its certainly plenty good for this silly project...

I'm going to let this paint dry overnight then I'll mask out the rest of the windows & the lightning-bolt graphic & lay down a couple of coats of black.
Plan A
Well after my success carving out the fuselage battery hatch I was looking forward to trying the hot-wire gizmo again. I pinned balsa template ribs to both ends of a block of foam...
You maybe wondering what the notch in the rib is all about. Well the Cub's wings use a carbon fiber tube as the main spar. I couldn't come up with an easy way to drill a hole span-wise down the wing piece I was about to make so I decided instead to just cut a slot. I'll use expanding foam or something to fill the slot later on...
So it was time to use the spiffy hot-wire cutter. This was the unfortunate result...
Apparently this isn't as easy as it looks. I'd love to play with this more, definitely want to master this process but in the interest of getting this bird done I switched to...
Plan B
Starting with a new block of foam I broke out the router & cut a slot for the wing-rod...
Now that's a nice clean slot, MUCH better...
Then it was back to my trusty belt-sander to shape the airfoil...
Here's a comparison of the hot-wire wing on the right & the sanded wing on the left...
Don't get me wrong though, I have nothing against hot-wire foam cutting. I'm just not very good at it yet. There's lots of great threads on the subject, I'll read-up on it, practice some & hopefully next time will yield better results.
So here we are test fitting the sanded center section. Looks pretty good to me...
Yellow & Black
Meanwhile back in my wood-shop/paint-booth more progress was made...
While the finish is far from perfect its about what I expected having painted directly on foam. Its certainly plenty good for this silly project...
I'm going to let this paint dry overnight then I'll mask out the rest of the windows & the lightning-bolt graphic & lay down a couple of coats of black.
09-30-2012, 05:15 PM
#22
Senior Member

Join Date: May 2012
Location: Grand Junction,
CO
Posts: 131
Likes: 0
Received 0 Likes
on
0 Posts
That ought to be a good glider. I have a 1/4 scale cub, Landing it is a pain, the long wing and airfoil design make it not want to come down, it just glides. I must say, you are a great scratch builder.
09-30-2012, 05:16 PM
#23
Senior Member
Join Date: Apr 2010
Location: Fort St. John,
BC, CANADA
Posts: 122
Likes: 0
Received 1 Like
on
1 Post
Hi Nodd, that little feller is looking pretty good. I like it!!
About foam cutting, Ihave cut many foam wings in my day, right from small free flight (12 inch span) up to 60" span R/C stuff. Still not an expert at it!! Here is one thing I picked up on that may have been a small part of the problem.
In my experience balsa is way too soft to use as a foam cutting template. Light ply works much better. With the balsa, it is soft enough that the wire can dig into it a bit which causes the exact problem that you can see in your wing, nasty ridges. This is especially so when the wire is hot.
Ialso don't like to pin the templates to the foam, Ifind that there is too much possibility of movement because the pins can pretty easily "wobble" in hte foam. Iuse a LIGHT spray of 3M 77 aerosol contact cement on the foam and template, then stick them on. It does smell a bit more as the hot wire goes through the glue, but the template will not move.
The other thing I like to do which will help is use guide pins on the leading and trailing edge. Ipoke T pins in the leading edge and trailing edge, one at each end of the panel (4 pins total). Then, Iget the hot wire going, and start on the LE pins, pulling it along the pins until I get to the template and then follow the template. This is especially helpfull when you get to the trailing edge, you slide off the template and onto the pins to finish our cut. By doing this, you are actually "starting your cut" before you actually touch the foam and "finishing the cut" after you have left the foam. I find this makes much smoother starts and ends to the cut. (A simple drawing below how this is set up.
Spar slots, Inever use the hot wire to cut them, especially not at the same time as cutting the airfoil. Never had any success with that. I usually cut the wing "blanks" first, and the router or x-acto out the spar slot after.
Here are some pics....the drawing of my "start and finish" guide pins, and my latest foam cut project.
About foam cutting, Ihave cut many foam wings in my day, right from small free flight (12 inch span) up to 60" span R/C stuff. Still not an expert at it!! Here is one thing I picked up on that may have been a small part of the problem.
I pinned balsa template ribs to both ends of a block of foam...
Ialso don't like to pin the templates to the foam, Ifind that there is too much possibility of movement because the pins can pretty easily "wobble" in hte foam. Iuse a LIGHT spray of 3M 77 aerosol contact cement on the foam and template, then stick them on. It does smell a bit more as the hot wire goes through the glue, but the template will not move.
The other thing I like to do which will help is use guide pins on the leading and trailing edge. Ipoke T pins in the leading edge and trailing edge, one at each end of the panel (4 pins total). Then, Iget the hot wire going, and start on the LE pins, pulling it along the pins until I get to the template and then follow the template. This is especially helpfull when you get to the trailing edge, you slide off the template and onto the pins to finish our cut. By doing this, you are actually "starting your cut" before you actually touch the foam and "finishing the cut" after you have left the foam. I find this makes much smoother starts and ends to the cut. (A simple drawing below how this is set up.
Spar slots, Inever use the hot wire to cut them, especially not at the same time as cutting the airfoil. Never had any success with that. I usually cut the wing "blanks" first, and the router or x-acto out the spar slot after.
Here are some pics....the drawing of my "start and finish" guide pins, and my latest foam cut project.
09-30-2012, 06:18 PM
#24
Thread Starter
Join Date: Feb 2012
Location: Fairfield, CT
Posts: 416
Likes: 0
Received 0 Likes
on
0 Posts
ORIGINAL: Slope Pilot
That ought to be a good glider. I have a 1/4 scale cub, Landing it is a pain, the long wing and airfoil design make it not want to come down, it just glides. I must say, you are a great scratch builder.
That ought to be a good glider. I have a 1/4 scale cub, Landing it is a pain, the long wing and airfoil design make it not want to come down, it just glides. I must say, you are a great scratch builder.
ORIGINAL: rhall999
Hi Nodd, that little feller is looking pretty good. I like it!!
About foam cutting...
Hi Nodd, that little feller is looking pretty good. I like it!!
About foam cutting...
One question about your foamie project there. It looks like it has a nice red shinny finish to it. How did you achieve that?
09-30-2012, 07:42 PM
#25
Senior Member
Join Date: Apr 2010
Location: Fort St. John,
BC, CANADA
Posts: 122
Likes: 0
Received 1 Like
on
1 Post
Hi Nodd,didn't want to hijack your thread, just throwin a couple of tips at you For the most part, with those few tips, and a bunch of practice, foam cutting gets easier.
That red jobby is just painted with this stuff: (except in red, this was the first ink that came up on a google search)
http://www.walmart.com/ip/Krylon-12-...-of-6/21065879
Now, with this, Ididn't even prime before painting. The only reason.......the store was out of the primer for this paint and I didn't have time to wait for it to come in!!! In person, the paint is not quite as shiny as it looks in the pictures, but it is still pretty good. I suspect that with a bit more time and a coat of primer it would have come out even better. Heck, I didn't really even spend a lot of time sanding the foam smooth, justknocked teh lumps off with the 220 grit, smoothed'er out with some 400until it was decent and sprayed her with the redcolor coat.
See, here's the quick background to that glider. My Father-in-law also flies, and he phoned me one sunday afternoon and said him and the missus were coming for a visit to get a "grandkid fix" the following weekend (September Long). He said he was going to bring his glider so we could try out the new slope soaring site Ifound. Ididn't have a good slope glider, so I set out to have one built by the time he got here. That Monday, I brought a scrap chunk of foam home from work, and the following Saturday afternoon we flew it. So, you see, I didn't really spend any time making it pretty, just get'er in the air!!
It has a 64" span, aileron and elevator control. I did the wing in 2 chunks, each 32".
Now, back to the Cub.................
Ron
PS....Forgot to mention, the nice shiny red tail on the glider is because the balsa tail is covered in Monokote.
For the most part, with those few tips, and a bunch of practice, foam cutting gets easier.That red jobby is just painted with this stuff: (except in red, this was the first ink that came up on a google search)
http://www.walmart.com/ip/Krylon-12-...-of-6/21065879
Now, with this, Ididn't even prime before painting. The only reason.......the store was out of the primer for this paint and I didn't have time to wait for it to come in!!! In person, the paint is not quite as shiny as it looks in the pictures, but it is still pretty good. I suspect that with a bit more time and a coat of primer it would have come out even better. Heck, I didn't really even spend a lot of time sanding the foam smooth, justknocked teh lumps off with the 220 grit, smoothed'er out with some 400until it was decent and sprayed her with the redcolor coat.
See, here's the quick background to that glider. My Father-in-law also flies, and he phoned me one sunday afternoon and said him and the missus were coming for a visit to get a "grandkid fix" the following weekend (September Long). He said he was going to bring his glider so we could try out the new slope soaring site Ifound. Ididn't have a good slope glider, so I set out to have one built by the time he got here. That Monday, I brought a scrap chunk of foam home from work, and the following Saturday afternoon we flew it. So, you see, I didn't really spend any time making it pretty, just get'er in the air!!
It has a 64" span, aileron and elevator control. I did the wing in 2 chunks, each 32".
Now, back to the Cub.................
Ron
PS....Forgot to mention, the nice shiny red tail on the glider is because the balsa tail is covered in Monokote.


Contact Us - Archive - Advertising - Cookie Policy - Privacy Statement - Terms of Service -
Copyright © 2024 MH Sub I, LLC dba Internet Brands. All rights reserved. Use of this site indicates your consent to the Terms of Use.