


PST REVISION BUILD
 02-13-2011, 03:05 AM
#51

My Feedback: (5)

Join Date: Apr 2002
Location: Northamptonshire , UNITED KINGDOM
Posts: 4,994
Likes: 0
Received 18 Likes
on
17 Posts
When I ordered this model for my customer, I liked the look of the PST demo version with tip missiles. I added these to the order, but for some reason what I received was in fact Panther tip tanks. A quick email to PST and I was told that the missiles were not yet available, so they sent tip tanks instead [:@]
I am not a big fan of the square tips on the revision wing, so decided to give the tip tanks a go. First issue was that the tanks were supplied in a gel coat blue. While this makes sense for a Panther, I have to say it looked rather rubbish against the grey and orange Revision scheme. A quick trip to Halfords ( UK Automotive retailer) and believe it or not, a can of Ford Cardinal Red.. yep. I could have sworn it was orange A little bit of primer, and some satin black for the front resulted in something that I think is far more fitting.
I am not a big fan of the square tips on the revision wing, so decided to give the tip tanks a go. First issue was that the tanks were supplied in a gel coat blue. While this makes sense for a Panther, I have to say it looked rather rubbish against the grey and orange Revision scheme. A quick trip to Halfords ( UK Automotive retailer) and believe it or not, a can of Ford Cardinal Red.. yep. I could have sworn it was orange
A little bit of primer, and some satin black for the front resulted in something that I think is far more fitting.  02-13-2011, 03:15 AM
#52
My Feedback: (5)
Join Date: Apr 2002
Location: Northamptonshire , UNITED KINGDOM
Posts: 4,994
Likes: 0
Received 18 Likes
on
17 Posts
This build thread is now catching up with the work I have done to date. ( The only other thing I have done is bolt the nose to the main fuselage.... wow it gets allot bigger)
Sorry its taken so long to put it up online, but a interesting, and very time consuming project took over the workshop for pretty much all of last week. So the Revision had to be put to one side. Then to make matters worse, as soon as the TV project was done, and filming complete. Another turnkey build has come onto the bench ( in the form of a small Futura ) So it looks like this Revision build will have to go on hold for a week or two. Which is a shame, as I know it will only be a few more evenings work to have it ready to fly.
It really is a very quick build. I am pretty sure that the next one would be ready to fly from opening the box with around 4 days work ( Especially if I were to skip painting the inside)
I will leave you guys with a few photos of whats getting in the way of me finishing the Revision, as well as giving a good size comparison to the new 1.9m span Futura.
Regards Al
02-13-2011, 03:18 AM
#53

Thread Starter

Join Date: Mar 2002
Location: TWICKENHAM, UNITED KINGDOM
Posts: 401
Likes: 0
Received 1 Like
on
1 Post
Ali,
I like the tail pipe servo saver with the sheet . There is always another way of looking at things which is why a build thread is good.
I have been looking at options for the attaching of the servo clevises to the elevator horns. I will have to remove all this for transit and even with a few attachments whilst building this lot the epoxy plate holes are getting worn especially with the Sullivan Gold clevises.
I have settled so far on the use of the Sullivan metal horns with fixing plate top and bottom of the elevator ( it has a plastic hole guard to stop metal to metal contact). This will have to be twisted as the elevator is angled where it breaks in the middle. It would have given many more options in my opinion if this break was at right angles to the trailing edge and wider towards the middle i.e. inboard of the horn position. This would have allowed a horn either side with a captive link like a Du Bro with a small nut and bolt on each elevator panel. Its a fiddly job putting this together each time and the wear on the linkage will soon show if not sorted out now I suggest.
I have found my flaps did not close in the up position properly and this was due to the new rounded moulding which neatly covers the gap when the flaps are down. In the full up position it is too wide for the allotted space and grounds against the rear vertical rib joiner. I cut about 2 mm off with a Dremel wheel and smoothed it to fit. However the final part to catch is the inner corner near the wing root as it need chamfering re the 45' glue joint on the inside. Maybe mine is a one off in this respect.
"Another step along the way"as the saying goes.
egards
David

 02-13-2011, 03:43 AM
#55
My Feedback: (5)
Join Date: Apr 2002
Location: Northamptonshire , UNITED KINGDOM
Posts: 4,994
Likes: 0
Received 18 Likes
on
17 Posts
Thanks Alex.. Funny you should say that. I have two turnkey Habu 32's to do ( With another possible) I was thinking about doing these myself, but by the time they arrive I will probably be at the start of my "Busy" season, so away to often. So I guess they will have to be jobbed out and back to me for the finish and set up stages.
Agreed David.
I do like build threads where people share various ideas. As well as sharing the issues with a build, rather than just trying to promote the product or the supplier. My flaps worked perfectly, but thats worth keeping an eye on for other Revision owners.
Yep.. I am not a fan of the elevator control set up, in terms of ease of removal. Luckily for me, my customer will leave his on permenantly. But if it were my own model, I would go with the screwed on ball link ( but sill a chore to remove and attach each time)
Regards Al
02-13-2011, 05:49 PM
#57
Tail servos and heat, NO problem !
I used my old K type thermocouple from JPX days and made some measurements.
The ambient indicated was plus 33c and as its only 28c here today its an overead of 5 degrees c.
So with probe just below elevator servos but above the insulated tray I installed the temp at idle power, worst case, was still 33c, and it did not rise after shutdown. !
The probe was then placed in the lower area adjacent to the tailpipe, temp rose to and remained stable at 46 during a long idle, worst case, and fell slowly to almost ambient after shutdown. That temp alone is not going to do any damage to plugs or cables, the ambient here last week was 46 !
Highest gas temperature at idle at tailpipe was 340 degrees.
There clearly isn't a problem.
My jetpipe had the straps screwed to the outer pipe, production number 11.
Regards,
David.
02-13-2011, 11:56 PM
#59
My Feedback: (5)
Join Date: Apr 2002
Location: Northamptonshire , UNITED KINGDOM
Posts: 4,994
Likes: 0
Received 18 Likes
on
17 Posts
Thanks for sharing that Info David. Not sure what production number the one I have here is, but I am sure its allot later than yours as it was only delivered a few weeks ago. Strange that PST should omit those screws holding the turbine mounting lugs to the pipes, as production continued.
Regards Al
Regards Al
02-14-2011, 11:56 AM
#60
Thread Starter
Join Date: Mar 2002
Location: TWICKENHAM, UNITED KINGDOM
Posts: 401
Likes: 0
Received 1 Like
on
1 Post
Hi,
I have being trying to solve my removable elevator idea and have ended up after many twists and turns with the following. I cut a thick new horn from epoxy plate and sank and Hysoled it outboard of the existing horn. This used the stability and root of the existing one and I used miniature screws to attach it to the existing horn which whilst positioning it for gluing also gave even more strength. I have then use the Kavan style of horn in the pictures which then also kept the pushrod alignment from original. I have some more "Swanky " looking ball raced horns but these would scrape against the epoxy horn. Using those shown one can tighten the centre right up with a lock nut and not lose the smooth swivel of the horn ring.
Its all very tight and this is mainly due to the elevator being angled just at the wrong point for doing this stuff which is why I have ended up with this particular solution for me.
However what is a more worrying point is the hinge of the elevator at this point has been cracking due to resin which has been put over the cloth and instead of a surface crack leaving the cloth to hinge, it has cracked right through and is now floating at the corner and the other elevator is going in the same manner but not quite cracked through. I will have to be speaking to Ali re this as it wont last. Remember this is only in its building stage so it wont sustain a season of outings. Need to check the ailerons perhaps for similar problem. Hopefully no !
No I have not applied any severe pressure to do this. Whilst its not the neatest job at present it will clean an paint up ok in the end as at present its the result of R&D.
This set up will also require some repositioning of the pipe support at the exit point as well. Again very tight space to mess with.
It does seem a little odd that having made the "Reaction" with removable tailplane and fin that this should not have been the norm with the "Revision".
It sounds from Davids post it will all be worthwhile in the end as It flies well. Each of us has our own reasons for doing these mods ( or not ) and thats what is interesting about a thread like this and the hobby in general.
Regards
David
02-17-2011, 02:08 AM
#61
Thread Starter
Join Date: Mar 2002
Location: TWICKENHAM, UNITED KINGDOM
Posts: 401
Likes: 0
Received 1 Like
on
1 Post
Hi,
A couple more steps along the way with a cheater vent set into the top hatch which as you can see from the mesh pattern owes its origins to the kitchen sieve department with some silicone tube edging.
I also have have fixed the right wing tank (although mine came in silver,) but I split them in two at the join along the seams so as to put some supports inside and secure the lights and wiring which includes landing lights in front and wing tip lights just to the side and behind.
All of the model needs to have moulding seams sanded and filled and repainted to do it justice.
This tank was the the first one and some lessons learnt so the other side will be easier and neater when it has its turn. There then needs the filling/flatting and painting to bring it back to looking a complete job.
I also think these tanks are a good looking addition to a quite impressive looking plane.
Regards
David
02-17-2011, 02:32 AM
#62
My Feedback: (5)
Join Date: Apr 2002
Location: Northamptonshire , UNITED KINGDOM
Posts: 4,994
Likes: 0
Received 18 Likes
on
17 Posts
Hi David.
Your Revision is looking good. I especially like the lights in the tanks!
For your information... My hinges on the Stab are doing the same. I have emailed PST on the 15th explaining this, and the situation with your kit, and am still awaiting a response. I will keep you informed as I hear more.
FYI. My big Airworld Cougar has torn hinges on the inboard edges of the aileron controls, but this was a deliberate action by the factory to allow the surface to move freely and not bind. I cant see it being the same with the Revision mind, but lets see what PST have to say.
Regards Al
02-19-2011, 08:14 AM
#63
Thread Starter
Join Date: Mar 2002
Location: TWICKENHAM, UNITED KINGDOM
Posts: 401
Likes: 0
Received 1 Like
on
1 Post
Hi,
I have now located a pair of Sullivan hardened steel horns /handed lt/rt. These I think will be a better option than my epoxy plate horn and will lean over the required angle and not wear the hole with the clevis whilst continually mounting and dismounting the tailplane for transit( the whole reason for me considering doing this).
They also have the plastic metal /metal insert which stops metal/metal contact and they are readily available and cheap.
However these wont be going anywhere until I address the elevator hinge issue which is currently unresolved with the factory.
Regards
David
02-21-2011, 12:46 AM
#64
My Feedback: (5)
Join Date: Apr 2002
Location: Northamptonshire , UNITED KINGDOM
Posts: 4,994
Likes: 0
Received 18 Likes
on
17 Posts
It's been a busy few days for me. After finishing the Futura build off on Friday, and with Saturday looking to be unflyable weather, I decided to get the Revision back down onto the bench and see how much more I could get done before I went away.
A late Friday, and Saturday night saw the Revision all but ready to fly. I just need to get stickers made. I am disappointed that the kit does not come with them..
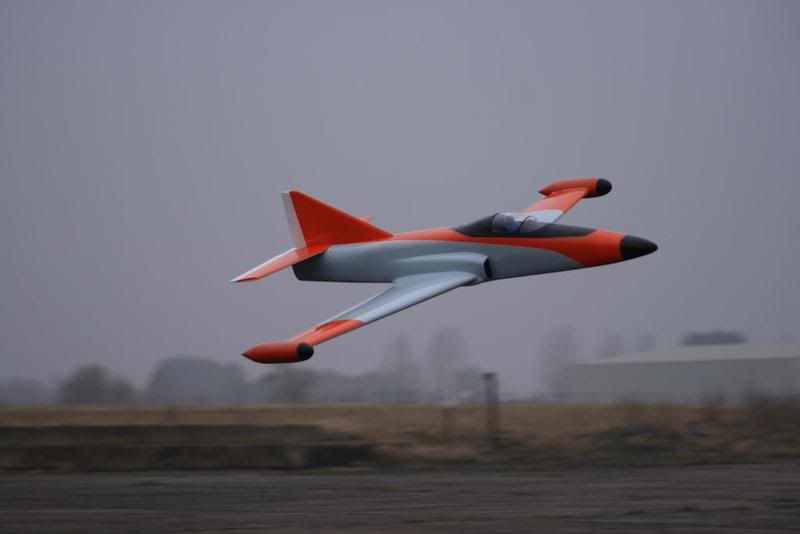
I will come back and finish off my build photos later today hopefully. I just wanted to put a photo of it flying, and say that the way this model flies, far outweighs any of the niggles in the build. More later.
Regards Al
P.S. David... Still no response from PST regards the hinge issue. I will re-email them again today, and let you know as soon as I hear anything. I had a good tug on the hinges of this reaction, and all seemed secure. I also built up a sustained period of full power, and aggressive ( Still not as aggressive as I flew my old Reaction) flying. After 3 flights, the hinges have not gotten any worse. I could really have used your tip tank lights yesterday.... The sky was so bad!
A late Friday, and Saturday night saw the Revision all but ready to fly. I just need to get stickers made. I am disappointed that the kit does not come with them..
I will come back and finish off my build photos later today hopefully. I just wanted to put a photo of it flying, and say that the way this model flies, far outweighs any of the niggles in the build. More later.
Regards Al
P.S. David... Still no response from PST regards the hinge issue. I will re-email them again today, and let you know as soon as I hear anything. I had a good tug on the hinges of this reaction, and all seemed secure. I also built up a sustained period of full power, and aggressive ( Still not as aggressive as I flew my old Reaction) flying. After 3 flights, the hinges have not gotten any worse. I could really have used your tip tank lights yesterday.... The sky was so bad!
02-21-2011, 02:27 AM
#65
Thread Starter
Join Date: Mar 2002
Location: TWICKENHAM, UNITED KINGDOM
Posts: 401
Likes: 0
Received 1 Like
on
1 Post
Ali,
you have certainly accelerated the build from last time and it does look worthy of the tip tanks without a doubt.
I have quite bit of work to do yet and am in no hurry anyway. We also flew at Chalgrove ( Electric day yesterday and agree the sky was ...) We got a lot of close flying in but we are all looking forward to Spring and clearer skies.
I will await the outcome of the hinge issue thank you and would ask that maybe a call re the wing bags etc would be useful soon before you depart for the Florida skies I suspect.
In respect of the lights they are certainly brighter than the previous models it appears and will be more than useful on our grey days for a pair of slightly tired eyes like mine.
Regards
David

 02-21-2011, 05:19 PM
#68
My Feedback: (5)
Join Date: Apr 2002
Location: Northamptonshire , UNITED KINGDOM
Posts: 4,994
Likes: 0
Received 18 Likes
on
17 Posts
I will pass on the compliments Bruce. Simon ( Cameraman) did especially well considering how bleak the sky was.
Full flight review will come in the next day or so .. when I finally get these other models done and dusted for Florida jets.
CDB-RAE. I can tell you that I loved flying my Reactions, but already know that the Revision raises the bar on flight performance.
David.. Yes. it was one last push on the build to get it done, as I figured that it would be a few weeks before I got any more time to get back onto it and finish it to fly. I also have two more builds coming into the workshop soon, so really needed this one put to bed, or close.
I think the tip tanks really suit the model. A bit larger would have been nice, but I much prefer them to the square tips. I will keep you posted on the hinge issue. Wing bags are in production already and should be done this week.
03-22-2011, 04:28 AM
#69
Thread Starter
Join Date: Mar 2002
Location: TWICKENHAM, UNITED KINGDOM
Posts: 401
Likes: 0
Received 1 Like
on
1 Post
Hi,
I have now received a new tail plane from PST Jets courtesy of Kumpol. Thank you for rectifying the fault with the tail plane hinge so promptly. Its nice to see when a manufacturer recognises a manufacturing defect and simply gets on with its replacement without argument.
I enclose my solution to the removable tailplane which is I am sure is just one of many others may have. I tried as previously posted enlarging and offsetting an epoxy hinge. However it always seems that when undoing and re mounting these things the required number of times to fly/travel it you seem to destroy a little more that tight clevis /rod combination we all strive to maintain. This is why I have gone for a Graupner clevis which is slightly softer to unclip and the Sullivan hard steel horn. This horn also has the plastic insert in the holes which if the clevis is inserted with the peg the right way round does not seem to get damaged at all or at least on previous usage.
I found the problem was the need to enlarge the exit hole in the fuselage and without destroying the pipe support frame and I added some carbon plate in the mix to help this happen. Then I found useful some long cable ties to feed thru the hole having attached them to the out/end clevises first.The pic shows these as well before the horns were attached to the elevators. These cable ties helped tremendously in assembly as you cannot stop the rods dropping and getting caught down by the pipe.
The pic shows a scuffed area around the underside horn mounting as I intend to cover this with some Aeropoxy just to add any further strength I can. The other shots shows my installation which has worked out quite well so far. Still lots to do including trying remove the seam lines on the fus and wing mouldings as for me these always help make the model become more complete.
04-25-2011, 06:39 AM
#70
Thread Starter
Join Date: Mar 2002
Location: TWICKENHAM, UNITED KINGDOM
Posts: 401
Likes: 0
Received 1 Like
on
1 Post
Hi,
Well suns out and finally finished as far as I can go. All that remains is to fly it !
This weekend all being equal if this weather holds.
Regards
David
Well suns out and finally finished as far as I can go. All that remains is to fly it !
This weekend all being equal if this weather holds.
Regards
David
04-25-2011, 05:50 PM
#71
I have flown my Revision another 6 flights at Wangaratta since the first tests, the more I fly it the more I like it. Everything, the PST 1300, bubble trap and gear and brakes as well as the Weatronics worked to perfection. The brake system is possibly the best I have used, allowing beautifully progressive braking and tyre wear was minimal even on a sharp surface runway. All settings as per instructions and this machine is extremely well mannered, particularly at the stall.
One problem:
I ran over a runway light cover and the entire nose cone separated from the fuselage, a clean break from the front former. After re-glueing flying continued. I suggested to PST that the 1/8 ply former should be much stronger, say 1/4 ply, and Kumpol replied that this has already been done.
There is a lot of stress on this former as the forward tray carries three batteries and a chunk of lead. As an interim, perhaps permanent, fix on mine I have glued a strip of 1/4 by 1/2 beech vertically behind the center of the main former, well secured with Hysol which improves the strength considerably.
Other than that (and sone heat insulation around the engine nozzle) I have changed virtually nothing from kit spec. and it performs to perfection.
Regards,
David.
04-25-2011, 11:08 PM
#72
Thread Starter
Join Date: Mar 2002
Location: TWICKENHAM, UNITED KINGDOM
Posts: 401
Likes: 0
Received 1 Like
on
1 Post
David,
I totally agree about the front former. I have also beefed it up as far as I can.
I have also Hysoled flat .5mm x 4 mmm strips of carbon plate along the blades of the ply supports sticking out from this front former and as you say they take a lot of weight and were easily twisted.
Given that even with the 4 x 4200 Li Poli which sit around these ply plates I needed around 300g of lead to balance this would allow an immense amount of original strengthening to be built in at the factory stage and solve the problem completely.
Regards
David
06-05-2011, 02:09 PM
#73
Thread Starter
Join Date: Mar 2002
Location: TWICKENHAM, UNITED KINGDOM
Posts: 401
Likes: 0
Received 1 Like
on
1 Post
Hi,
The day was today and it was in the capable hands of J.Palmer for the first flights. Take off was smooth some up elev trim applied and it climbed out well.
I would like to report the flight went well but there some worrying issues. I will list them for sake of simplicity.
Roll rate good.. Inverted flight 15% forward stick... Stall test benign.... bank and turn, no tuck in... straight and level seemed good.
Up to reversal and over the top fine BUT on the way down it wanted to "Tuck in" and gave a worrying and sometimes strong tendency to want to dive for the ground the more the speed built up.
It seemed when accelerating in a dive of any sort this tendency was a marked one. John flies always without expo on the elevator and he asked a couple of times if this was definitely so. There was no expo. The first 20 % or the elevator stick had a soft feel with a 60 % expo feel then it got hold. There is no slop in the system. There are two 20 KG servos for the elevator system.
2nd landing the nose fell off disconnecting all electrics to RX and turbine. A rush with the extinguisher to the model was not greeted with flame thank goodness and fortunately the whole battery pack of 4x 4200 cells could be quickly plugged back into the system to cool down and shutdown. 2x RX... 1x Turbine... 1x Lights
There is a small plastic packer on the rear elevator mounting section which contains the fixing bolts for the elevator. Is this an incidence packer and is it on all models?
Is this there to correct an incidence problem discovered in early manufacture? I am going to measure the incidence of the wing and tail plane and see if there is a large difference.
Anyhow this has the capability to fly well just like Ali's and Davids it just needs us to sort out why its different in this particular respect.
Regards
David
06-05-2011, 06:33 PM
#74
David, I am disappointed and surprised to hear that your test flight did not go smoothly. I built my Revision almost EXACTLY as supplied (no changes to anything which would affect the aerodynamics) and flies beautifully throughout the flight regime. I had another 5 perfect flights two weekends ago, and colleagues have commented on just how nicely it flies The more I fly it the more I like it.
Your Revision is showing some very odd tendencies which are certainly not present on mine and as they all come out of the same mould, something is wrong somehwere. ALL aeroplanes, model and fullsize, will pitch nose up with increased speed (ignoring Mach tuck which happens at M crit. and above, and which is pronounced when supersonic so probably won't bother us on the Revision !) so I suspect some airframe flexing (aeroelasticity) or control system problem.
I will be in London (actually Putney ) which is not far from Twickenham from next Friday so, if you wish, I can give the model a close examination, correct anything which needs it and then we can go and fly it again.
Mine was built from an early kit, (011) later kits have a much stronger nose former. I have also added some strengthening, 1/16 glass board although CF plate would be better, on the nose gear mounts which can break at the area at which they are opened out to accomodate the nose steering arms. I have also, as a precaution only, glued a 1/16 glass doubler over the area of the wing rib which is cut away for the main landing gear legs.
That said, my Revision is performing with total reliability and with Weatronics looking after the radio link I expect it and its Reaction brother to be around for hundreds of flights.
Regards,
David.
PS, points to check :
C of G exactly as per instructions.
Elevator travel on mine : up 2cm, down, 1.5 cm
Expo 10 % on all flight modes.
Elevator servos FIRMLY screwed to tailplane.
Stab securely bolted to fuse and locating pins and holes slop-free.
06-05-2011, 10:36 PM
#75
Thread Starter
Join Date: Mar 2002
Location: TWICKENHAM, UNITED KINGDOM
Posts: 401
Likes: 0
Received 1 Like
on
1 Post
David,
Thank you for your reply and comments.
I must say that I was very surprised with the outcome of this flight and having had so many flights with the Reaction which I had so enjoyed I really bought the Revision as a proper looking jet replacement. The weird thing is Ali has not had similar problems at least according to his posts. He did not post a full flight summary but I expect it is similar to yours. I shall try and speak to to him today or before Friday.
I would be very happy to welcome you home when you are here and I will private message details of contact etc.
All of the points you have noted are in place on mine too.
John Palmer is as you are aware one of the best and Chalgrove was cleared flight wise for the two flights. All present commented on the tendency to "Tuck" which was very evident. I will try and set up a meet with JP and ourselves to discuss a solution, which I am sure is there.
Paul Gray has gone away to scratch his head for me as well, Sadly D.W. was in Germany as his input would have been useful as well.
I will look forward to seeing you here in Twickenham soon.
regards
David
Tail plane checked by J.P .. Paul Gray .. Paul Leighton. 2x 20 Kg Savox servos for elev.. fin secured with safety bolt and clamp as yours.. CG. as designed.. 2nd flight lead from nose to move it back a touch.. elev system no slop ..elev movement 16 mm up down