


Galeb G2 - new jet made in Serbia
 10-01-2015, 12:48 AM
#251

Thread Starter
We are now on page 11 page, but today I made one more text. It is on the end of the page before...
Moving elevator parts of the bigger G2 are also made same like on smaller one...

On smaller Galeb I work on rudder. First, I glued on right balsa side leading and trailing edges with biggest and top ribs. When glue was dry, I put rudder on fuselage and all other parts glue there. That give me better opportunity for precision work.
Left balsa cover will be glued after rudder final bonding on fuselage.
In building process steps are very important.
Next was placement wing on the fuselage and work on holes for fixing it. After that, when wing can be wring, fuselage will be rotate and elevator will be glue. After that rudder...
OK, back to wing...
Before placing wing on fuselage I need to made leading edge.
Than sanding... Process start at afternoon and ended in the moonlight...

Sanding so huge parts are very dusty, so I always work that job outside from workshop...
Wing is on the fuselage. It need small sanding to made perfect hole for front wing joiner.
Before I made holes for screws I measure "100 times" to everything is on right distances. Than from drill 2mm little by little until final 5mm holes.
Wing, same all other parts, aligned super on fuselage...
Construction for "belly"... Front and rear ribs, due to good positioning are glued when wing was on fuselage. You need to put something to separate ribs from fuselage.
Between wing and fuselage is 0,6mm thick ply...

For now, this job is finish.
I turned fuselage because I want to bond elevator. Elevator can't be place without wing. You need both parts for measure and alignment.
Moving elevator parts of the bigger G2 are also made same like on smaller one...


On smaller Galeb I work on rudder. First, I glued on right balsa side leading and trailing edges with biggest and top ribs. When glue was dry, I put rudder on fuselage and all other parts glue there. That give me better opportunity for precision work.


Left balsa cover will be glued after rudder final bonding on fuselage.
In building process steps are very important.
Next was placement wing on the fuselage and work on holes for fixing it. After that, when wing can be wring, fuselage will be rotate and elevator will be glue. After that rudder...
OK, back to wing...
Before placing wing on fuselage I need to made leading edge.

Than sanding... Process start at afternoon and ended in the moonlight...


Sanding so huge parts are very dusty, so I always work that job outside from workshop...
Wing is on the fuselage. It need small sanding to made perfect hole for front wing joiner.

Before I made holes for screws I measure "100 times" to everything is on right distances. Than from drill 2mm little by little until final 5mm holes.

Wing, same all other parts, aligned super on fuselage...

Construction for "belly"... Front and rear ribs, due to good positioning are glued when wing was on fuselage. You need to put something to separate ribs from fuselage.


Between wing and fuselage is 0,6mm thick ply...


For now, this job is finish.
I turned fuselage because I want to bond elevator. Elevator can't be place without wing. You need both parts for measure and alignment.
Last edited by mirce; 10-01-2015 at 01:07 AM.
 10-01-2015, 01:19 AM
#252
Thread Starter
But, elevator wasn't ready. Ends must be made...

From drawings I made template.
Middle was made from ply, but that can be made from balsa also...

More and more templates are on the wall...
On ply middle part I bond 10mm balsa up and down. After sanding, that construction was cut on two parts.
First G2 I made two years ago, elevator building process was little different. Now I made shape on moving elevator parts, so very important now was to made perfect alignment. Maybe is building process, from first G2, better. Anyway, it can be made like this also...
Than sculptural artistry...


Control horns are made at the end...

All together...

From drawings I made template.

Middle was made from ply, but that can be made from balsa also...

More and more templates are on the wall...

On ply middle part I bond 10mm balsa up and down. After sanding, that construction was cut on two parts.
First G2 I made two years ago, elevator building process was little different. Now I made shape on moving elevator parts, so very important now was to made perfect alignment. Maybe is building process, from first G2, better. Anyway, it can be made like this also...


Than sculptural artistry...


Control horns are made at the end...


All together...
 10-01-2015, 01:40 AM
#253
Thread Starter
Fuselage is turn, elevator, first without glue, was set.
Distance from left and right side are measure, from wing tip to elevator end, left, right side and so on...
When I was sure that all is as it need to be - bonding...
Yesterday I bond rudder also, but that in coming issue...
As you can see, I wasn't work much on bigger G2.
Just few balsa strip was added to give fuselage a little strength, to can separate from workbench and made this pictures...

I wrote earlier that want to buy Wren turbine. In meantime I change my mind and decision was made.
In smaller (probably in bigger also, later) Galeb will come IQ Hammer turbine.
IQ Hammer 90+ will be great for 1/5 scale G2.
Few day ago I made few phone calls with IQ factory in Germany and must tell that owner made big impression on me. He is very kind, give me a lot information, I learned some new things...
For smaller G2 important is that turbine and thrust tube are not big. For example, Jet Cat P80, I used for first 1/5 scale G2, was 112mm n diameter. IQ 90 is 90mm... Thrust tube for Jet cat was 90mm, IQ - around 70mm...
Rear part of the G2 is narrow, so every millimeter is important for better cooling...
OK, that's all for today.
P.S. I'm little sad, no comments...
Distance from left and right side are measure, from wing tip to elevator end, left, right side and so on...

When I was sure that all is as it need to be - bonding...


Yesterday I bond rudder also, but that in coming issue...
As you can see, I wasn't work much on bigger G2.


Just few balsa strip was added to give fuselage a little strength, to can separate from workbench and made this pictures...


I wrote earlier that want to buy Wren turbine. In meantime I change my mind and decision was made.
In smaller (probably in bigger also, later) Galeb will come IQ Hammer turbine.
IQ Hammer 90+ will be great for 1/5 scale G2.
Few day ago I made few phone calls with IQ factory in Germany and must tell that owner made big impression on me. He is very kind, give me a lot information, I learned some new things...
For smaller G2 important is that turbine and thrust tube are not big. For example, Jet Cat P80, I used for first 1/5 scale G2, was 112mm n diameter. IQ 90 is 90mm... Thrust tube for Jet cat was 90mm, IQ - around 70mm...
Rear part of the G2 is narrow, so every millimeter is important for better cooling...
OK, that's all for today.
P.S. I'm little sad, no comments...
Last edited by mirce; 10-01-2015 at 01:58 AM.

 10-04-2015, 11:04 AM
#256
Thread Starter
Thanks...
Yes, my idea is to sell a kit of both G2 jets and to made Galeb jets for customers.
Because that, I made so much pictures, that can be manual for working.
It is not same when made one model for myself, or have plan to made kit...
Anyway, kit for smaller G2 will not be on market before first flights and that will be on spring next year.
Today I sold my F5J Pike Perfection sailplane, so money will be directed for turbine. Only turbine and thrust tube missing.
For bigger G2 - 1/4 scale, story is almost same, just I need little more time for turbine. All other is almost here and model will be finish for spring 2016.
I hope selling kits from smaller G2 will help me to buy turbine for bigger Galeb...
Best regards
Mirce
10-04-2015, 12:58 PM
#258
Thread Starter
Smaller G2 is 1/5 scale.
Wingspan is 2095mm with tip tanks 2320mm, fuselage is 2070mm long.
I think model I made now will be about 11 - 11,5kg.
I'll put IQ Hammer 90+ turbine
Bigger G2 is 1/4 scale, wingspan is 2620mm, with tip tanks 2905mm. Fuselage is 2585mm long.
Regards
Mirce
Wingspan is 2095mm with tip tanks 2320mm, fuselage is 2070mm long.
I think model I made now will be about 11 - 11,5kg.
I'll put IQ Hammer 90+ turbine
Bigger G2 is 1/4 scale, wingspan is 2620mm, with tip tanks 2905mm. Fuselage is 2585mm long.
Regards
Mirce
10-04-2015, 01:28 PM
#259
Smaller G2 is 1/5 scale.
Wingspan is 2095mm with tip tanks 2320mm, fuselage is 2070mm long.
I think model I made now will be about 11 - 11,5kg.
I'll put IQ Hammer 90+ turbine
Bigger G2 is 1/4 scale, wingspan is 2620mm, with tip tanks 2905mm. Fuselage is 2585mm long.
Regards
Mirce
Wingspan is 2095mm with tip tanks 2320mm, fuselage is 2070mm long.
I think model I made now will be about 11 - 11,5kg.
I'll put IQ Hammer 90+ turbine
Bigger G2 is 1/4 scale, wingspan is 2620mm, with tip tanks 2905mm. Fuselage is 2585mm long.
Regards
Mirce
Bob
10-05-2015, 12:16 AM
#260
Thread Starter
Great...
That is size I made first Galeb G2.
First model could fly, but I decided to build new, with changes (thinner ply, different fuselage ribs shape inside, panel lines will be made different without so much filler, refueling, addition air in tank, switchers will be now under cabin, not in "nose" of the fuselage, etc...).
Turbine will now be smaller in diameter, thrust tube also.
That is important, because fuselage on rear side is narrow and smaller parts in diameter in combination with thinner ribs will give better air flow around thrust tube and inside of the fuselage...
All changes give lighter model, easier handling, less heating...
On bigger G2 - 1/4 scale, non of this is not a problem. Fuselage is huge, so all equipment fit inside easily...
Bob, if you need more information, please send me e-mail: [email protected]
Best regards
Mirce
 10-08-2015, 02:22 PM
#262
Thread Starter
Thank you Steve.
I enjoy very much in building and working on my project is new "challenge" for me.
Right now I'm not in hurry, both models (1/5 & 1/4 scale) will be finish for spring next year.
Smaller will have maiden flight with first spring nice days...
Regards
Mirce
I enjoy very much in building and working on my project is new "challenge" for me.
Right now I'm not in hurry, both models (1/5 & 1/4 scale) will be finish for spring next year.
Smaller will have maiden flight with first spring nice days...
Regards
Mirce
10-23-2015, 01:37 PM
#263
Thread Starter
I work every day on my jets, as you know I build two Galeb G2 in same time, smaller 1/5 scale and bigger in 1/4 size...
Here are pictures from last few weeks.
On smaller G2 rudder is install on fuselage...
Parts again fits perfectly...

When all rudder parts was glued, last one was balsa for left side.
Next was construction between elevator moving parts...
Moving parts are in neutral position, so construction must be in the middle also.
Than, few final "touches" on rear fuselage side...

He, he... Check this...

When rear end was finish, I start working on cabin. As I told earlier, now cabin will take down for all service.
Of course front part of the fuselage will also be removable, but, main service area will be under cabin.
Here are pictures from last few weeks.
On smaller G2 rudder is install on fuselage...

Parts again fits perfectly...


When all rudder parts was glued, last one was balsa for left side.

Next was construction between elevator moving parts...


Moving parts are in neutral position, so construction must be in the middle also.
Than, few final "touches" on rear fuselage side...


He, he... Check this...

When rear end was finish, I start working on cabin. As I told earlier, now cabin will take down for all service.
Of course front part of the fuselage will also be removable, but, main service area will be under cabin.


 10-23-2015, 01:51 PM
#264
Thread Starter
I was working on bigger G2 also. Fuselage is almost finish, the surface are sanded...

When upper part was cover, I take fuselage from template, cut ribs surplus and cover bottom side...

Work on elevator was same like on elevator of the smaller model.
Finally, few days ago, I put it on fuselage and made first pictures with model in this building stage outside of the workshop...
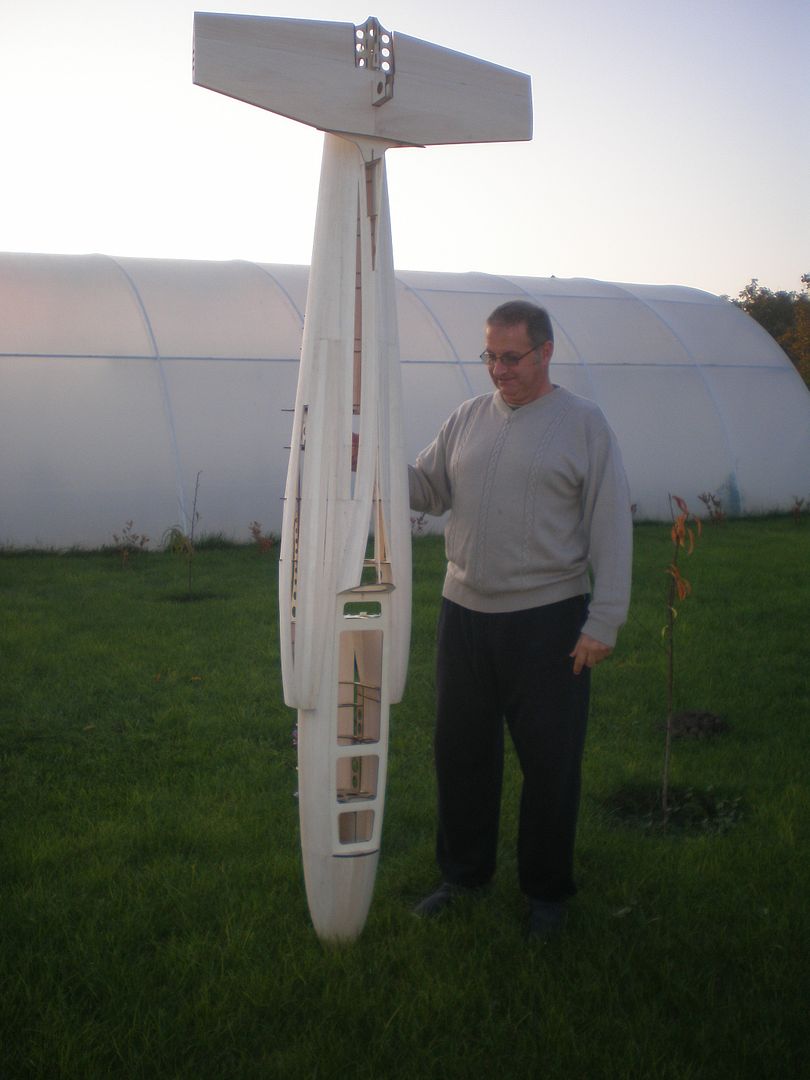
In meantime I cover complete fuselage surface, fix front removable parts, sand it together with fuselage, so tonight I made this pictures...
To be continued...


When upper part was cover, I take fuselage from template, cut ribs surplus and cover bottom side...


Work on elevator was same like on elevator of the smaller model.
Finally, few days ago, I put it on fuselage and made first pictures with model in this building stage outside of the workshop...

In meantime I cover complete fuselage surface, fix front removable parts, sand it together with fuselage, so tonight I made this pictures...


To be continued...
11-02-2015, 12:21 AM
#266
Junior Member
Join Date: Nov 2015
Posts: 1
Likes: 0
Received 0 Likes
on
0 Posts
Mirce,
I stumbled onto your post showing how you did the panel lines, rivets, and other details with the vinyl cutouts yesterday. I was impressed with the detailing and found your P-47 thread and I read the entire thread and saw the videos of the maiden. This in turn led me to your Zero thread where i again read all the way thru (sad to see unfinished - also sad to see the P-38 sold as well. I'm especially fond of this airplane). This led me to your first G2 thread which i read all the way thru, which led me to your second G2 thread, which i read also in its entirety. You commented you were sad not many comments, which encouraged me to post (see join date of today and my first post) I mainly read threads, I hardly post, and I view lots different forums as well. I look forward to seeing both the 1/4 & 1/5 G2 maidens along with the kits being produced. As a drafter/designer myself I see how much work has gone into the G2 design and I'm rooting for you - not that you need it. I particularly enjoy the steps youve taken in the design to make the model easier to assemble. A little effort on the front side can make such a big impact down the line. I look forward to see more of your progress.
I stumbled onto your post showing how you did the panel lines, rivets, and other details with the vinyl cutouts yesterday. I was impressed with the detailing and found your P-47 thread and I read the entire thread and saw the videos of the maiden. This in turn led me to your Zero thread where i again read all the way thru (sad to see unfinished - also sad to see the P-38 sold as well. I'm especially fond of this airplane). This led me to your first G2 thread which i read all the way thru, which led me to your second G2 thread, which i read also in its entirety. You commented you were sad not many comments, which encouraged me to post (see join date of today and my first post) I mainly read threads, I hardly post, and I view lots different forums as well. I look forward to seeing both the 1/4 & 1/5 G2 maidens along with the kits being produced. As a drafter/designer myself I see how much work has gone into the G2 design and I'm rooting for you - not that you need it. I particularly enjoy the steps youve taken in the design to make the model easier to assemble. A little effort on the front side can make such a big impact down the line. I look forward to see more of your progress.
Last edited by Luckystrike24; 11-02-2015 at 12:27 AM.
11-03-2015, 01:09 AM
#267
Thread Starter
Luckystrike, thank you for post here...
Here is what I was done in last few weeks.
Elevator for bigger G2 is finish also.
All was made copy - paste like on smaller Galeb.
Elevator was set on fuselage, but before final affix I must set center panel section of fuselage.

Few days ago was so nice afternoon, so I come in front of my work shop and sand leading edge and tips on outer panels...

Before final setting center panel on fuselage I must made leading edge on it also. To made that job right, I put outer panels on middle section...
Leading edge is 15 mm wide. First 10mm balsa, than sending and later 5mm basla plate...
On center panel was set small carbon tube, guide for screw for fixing rear end of the outer wing part.
Fuselage is 95% cover with balsa and it is sanded, ready now for acrylic filler.
Check this...

Here is what I was done in last few weeks.
Elevator for bigger G2 is finish also.


All was made copy - paste like on smaller Galeb.
Elevator was set on fuselage, but before final affix I must set center panel section of fuselage.


Few days ago was so nice afternoon, so I come in front of my work shop and sand leading edge and tips on outer panels...


Before final setting center panel on fuselage I must made leading edge on it also. To made that job right, I put outer panels on middle section...

Leading edge is 15 mm wide. First 10mm balsa, than sending and later 5mm basla plate...


On center panel was set small carbon tube, guide for screw for fixing rear end of the outer wing part.

Fuselage is 95% cover with balsa and it is sanded, ready now for acrylic filler.

Check this...


 11-03-2015, 01:16 AM
#268
Thread Starter
I write here earlier that retracts come from German firm Behotec.
The biggest front retract wasn't big enough for install wheel of 110 mm, scale for 1/4 model.
Retract was designed for maximum 90mm wheel.
So, my friend made new part.
I start working on front fuselage section, where wheel will come...

This area will be finish in next few days, and retract will be install...
On net I find this picture, one of the first G2 prototype. I think, that this will be color scheme for 1/4 scale Galeb...

Last weekend we were on our airfield and have opportunity to watch how our friend Dragan fly his Galeb G2.
Take off and landing...
https://www.youtube.com/watch?v=08R_bU4FV8Q
Stay tune, more news soon...
Best regards
Mrce
The biggest front retract wasn't big enough for install wheel of 110 mm, scale for 1/4 model.
Retract was designed for maximum 90mm wheel.
So, my friend made new part.


I start working on front fuselage section, where wheel will come...


This area will be finish in next few days, and retract will be install...
On net I find this picture, one of the first G2 prototype. I think, that this will be color scheme for 1/4 scale Galeb...

Last weekend we were on our airfield and have opportunity to watch how our friend Dragan fly his Galeb G2.
Take off and landing...
https://www.youtube.com/watch?v=08R_bU4FV8Q
Stay tune, more news soon...
Best regards
Mrce
Last edited by mirce; 11-03-2015 at 01:24 AM.
11-03-2015, 04:29 AM
#270
Thread Starter
Yes, wheels, tires and retracts are from Behotec. German top quality products...
Good thing here in my country is that working hour in any segment is much lower than in EU or in USA.
We have here top repairers (hope this is good word - google translator) and great machine workshops.
I told many times, projects like this, depend from many participants.
Martin made 3D drawing, Dragan cut parts on laser cut machine, I use two machine work shops for parts, Golub is professional painter, Beli have CNC machine, Sava made glass & epoxy parts, Dule is main engineer for advice, etc...
We all are team and without them I can't made products like this.
With Behotec I have great cooperation and in last two months I only have words of praise for German firm IQ Hammer.
I bought thrust tube from them last week and wait for them to arrive...
Regards
Mirce
 11-08-2015, 04:53 AM
#272
Thread Starter
Few more pictures...
On bigger Galeb G2 front retract is install.
I should have to made small set up, but, nothing big. Details on drawing for laser cut will be change, so in future no need to made that extra work...

Front retracts are now in both model...
Next step was to made construction in this fuselage area...

On smaller (1/5 scale) G2 that segment is finish...
On this models I'll not made doors here on front side of the fuselage, because I want to avoid any problems with pneumatic system.
Both models are still prototypes, so I don't want any unnecessary problems...
Anyway, few days ago I made leading edge on center panel section of the bigger G2.
Leading edge was last step before installation center panel on fuselage...
On bigger Galeb G2 front retract is install.
I should have to made small set up, but, nothing big. Details on drawing for laser cut will be change, so in future no need to made that extra work...


Front retracts are now in both model...


Next step was to made construction in this fuselage area...


On smaller (1/5 scale) G2 that segment is finish...


On this models I'll not made doors here on front side of the fuselage, because I want to avoid any problems with pneumatic system.
Both models are still prototypes, so I don't want any unnecessary problems...
Anyway, few days ago I made leading edge on center panel section of the bigger G2.


Leading edge was last step before installation center panel on fuselage...
11-08-2015, 05:02 AM
#273
Thread Starter
On center panel of the bigger G2 retracts plate are install also.
After thinking how to install flaps servo my decision was to made it on this way...

Complete servo will be in wing, just servo arm will be above of the surface...
Before bonding missing balsa plates I made construction around holes on retract plates...

My friend Beli work on cabine tool. He sent me a few pictures...

To be continued...

After thinking how to install flaps servo my decision was to made it on this way...


Complete servo will be in wing, just servo arm will be above of the surface...
Before bonding missing balsa plates I made construction around holes on retract plates...


My friend Beli work on cabine tool. He sent me a few pictures...


To be continued...