


JET LEGEND VIPER BUILD THREAD
 06-15-2014, 07:35 AM
#1126


Unusual airframe for you John!
I have one of the first batch that came to the Uk, you may have seen it at Jma meets, bronze/black.
I'm on record as saying that if I was starting out on jets again this would be my choice of airframe as it has a massive flight envelope and can be used from beginner to expert status.
Glad you enjoyed it!
Gary.
 06-15-2014, 08:01 AM
#1127
Join Date: Jul 2006
Location: Norfolk , UNITED KINGDOM
Posts: 1,409
Likes: 0
Received 0 Likes
on
0 Posts
john
06-15-2014, 08:32 AM
#1128
Join Date: Feb 2013
Location: RoystonHerts, UNITED KINGDOM
Posts: 42
Likes: 0
Received 0 Likes
on
0 Posts
Hi John
Glad you like it..... as you know i've had 2 now, Tim's got 1 and i hear Dave's bought 1 too....
Might have to sell mine now... there getting a bit common
Glad you like it..... as you know i've had 2 now, Tim's got 1 and i hear Dave's bought 1 too....
Might have to sell mine now... there getting a bit common
06-22-2014, 10:38 AM
#1129

My Feedback: (11)
I redid my Viper with 6 millimeter fuel line in an attempt to reduce all the pressure going into the tanks. it did help but the main tank still kind of balloons when being fueled. I also put in one of those in emcotec magnetic switches those are pretty sweet looking
06-22-2014, 11:45 AM
#1130
Senior Member
Join Date: Feb 2011
Location: london, UNITED KINGDOM
Posts: 864
Likes: 0
Received 0 Likes
on
0 Posts
Just got back from then flying field. I recently bought a second hand Viperjet that had only a handful of flights. Unfortunately the owner had cut the ducts out and my first task was to reinstall them. This is definitely not as easy as cutting them out! They were strengthened in places with fibreglass bandage and the joints were held in place with duct tape while I joined the inside of the Y shape where it was easy to get at with fibreglass tape. This left the outside of the Y where the had been cut. I joined with this Proskin. The Proskin held the parts nicely together and aligned.
I used the servos that were in the plane which were 20 Kg Hobbyking servos in the flaps and ailerons. The rudder was a Savox servo and a Hitech in the elevator.
The wing surfaces did feel a little 'spongy' but in the air seemed ok.
The engine is a very old Simjet that I bought some months ago that needed some TLC. I fitted new bearings and balanced it. It came with a modern Xicoy ECU but did not have a starter fitted. I soon fitted one and got the autostart working well. Tests at home seems fine.
After a little delay in tweaking the settings on the ECU we got the engine running and went for a takeoff. Dave Wilde was my pilot as usual. We flew off grass at Raydon and it was soon airborne. It immediately became apparent that this was one very clean airframe and even at low throttle settings was pretty quick. I am not quite sure of the power of the Simjet but reckon it is 20lbs or so. The plane weighs 23 lbs dry and it flew most of the time on 1/2 throttle. It seems that anything much more is severely overpowering the airframe. The maiden was spent checking pitch changes deploying flaps and trim min out. The send flight was a fuller routine and we were delighted with it. The great thing about using a old-timer engine is that they rev a bit lower and have less throughput so are a lot quieter. I was amazed at the fuel consumption on both flights we only used 2 litres in 7 minutes flying. Just goes to show how you can get performance by conserving energy in the airframe by not slowing too much in turns and nice smooth large manoeuvres. The second landing was nice and slow with no bounce. This is a great plane and everything that we hoped. It can be thoroughly recommended to everyone. This is a great thread with lots of info. I would only add that I would not cut out the intakes. The plane flies great on the stock tanks with Cg at 35mm behind the centre of the spar.
06-22-2014, 12:38 PM
#1131
Join Date: Jul 2006
Location: Norfolk , UNITED KINGDOM
Posts: 1,409
Likes: 0
Received 0 Likes
on
0 Posts
John
06-22-2014, 01:06 PM
#1132

I'm using a Jet Central Rabbit and using stock tanks. I'm getting solid 7min flights with around 1/2 to 1/3 fuel remaining in one of the tanks when I land which is plenty of reserve. I do not notice any cg change during the flight. Not using any crow, just normal takeoff and landing flap settings. This jet has a very wide cg range in my opinion.
06-23-2014, 05:14 AM
#1133
Senior Member
Join Date: Feb 2011
Location: london, UNITED KINGDOM
Posts: 864
Likes: 0
Received 0 Likes
on
0 Posts
[QUOTE=Jgwright;11827773]I found that there was very little pitch change between full tanks and part emptied. I thought that reinstating the ducts would make fly more efficiently. It is already a slippery airframe. We flew again today and with most of the flight at 50% throttle we only used 1.5 litres in 6 minutes with a 20lb thrust engine. The plane does not slow down easily and really needs the flaps and crow on ailerons to land reasonably slowly when in still conditions. There is no need to change the stock tank position but if you want a compromise use the 2 smoke tanks at the rear and one of the 2front tanks.
Yes mine is fitted with the smoke tanks and just one of the larger tanks. it is as yet due to work pressures unflown but was thinking to remove part of the duct and bring the main tank rearward but for the moment will leave it as is now. Thanks.
Yes mine is fitted with the smoke tanks and just one of the larger tanks. it is as yet due to work pressures unflown but was thinking to remove part of the duct and bring the main tank rearward but for the moment will leave it as is now. Thanks.
Last edited by jetster81; 06-23-2014 at 05:16 AM.
07-01-2014, 07:04 AM
#1134

Join Date: Sep 2007
Location: Beeton, Ontario, CANADA
Posts: 1,337
Likes: 0
Received 5 Likes
on
4 Posts
Hey guys.. as I mentioned earlier Im rebuilding a plane that had a bad landing and ripped all the gear out. The fues is in perfect condition but the formers took a beating and I think Im missing some pieces in the nose gear area.
This is all I got.. Are there other parts Im missing? I think F1 is missing and I presume the CF gear plate is gone. But anything else?
This is all I got.. Are there other parts Im missing? I think F1 is missing and I presume the CF gear plate is gone. But anything else?
Last edited by Vettster; 07-01-2014 at 10:50 AM.
07-02-2014, 01:21 AM
#1135

Hi all got my viper last Tuesday and just finished the balancing tonight. I got mine with the lighting system. Planning on running engine tomorrow. Have a Kingtech 100G in it. Just have to put wing tips on as they are detachable on latest version.


07-02-2014, 01:38 PM
#1139
My Feedback: (67)
That's a special order, please contact Jose or Mandy about the new sets of wings at [email protected]. My suggestion is that you might get a better deal by selling your used Viper and get a brand new one with detachable winglets. You know how factory charge on spare parts.
Mike
Mike
07-03-2014, 01:00 PM
#1143
Join Date: Sep 2007
Location: Beeton, Ontario, CANADA
Posts: 1,337
Likes: 0
Received 5 Likes
on
4 Posts
But what goes here....Look at red arrows in photos please. Or is that where the equipment tray your referring to goes?
Last edited by Vettster; 07-03-2014 at 01:06 PM.
07-03-2014, 02:44 PM
#1144
Hi Vettster,
Where your red arrows are is just cutout for cable ties. That is what i used mine for. I only got mine last week so it is fresh in my mind. That is where my batteries are mounted so no more formers there.
Jason
Where your red arrows are is just cutout for cable ties. That is what i used mine for. I only got mine last week so it is fresh in my mind. That is where my batteries are mounted so no more formers there.
Jason
 07-14-2014, 12:22 PM
#1146
My Feedback: (11)
Anyone had to do any wing repair yet? My brake line got caught in my tire and I lost air pressure after a few minutes, and my gear halfway deployed. When I belly landed one of the twisted and ripped a 3X3 area of sheeting off the bottom of the wing where the retract cylinder goes under.
It looks like foam or something (airex) in there, will normal fiberglass adere to that (after removing paint)?
It looks like foam or something (airex) in there, will normal fiberglass adere to that (after removing paint)?
07-19-2014, 08:48 PM
#1147
Senior Member

Join Date: Jul 2003
Location: Brisbane, AUSTRALIA
Posts: 486
Likes: 0
Received 0 Likes
on
0 Posts
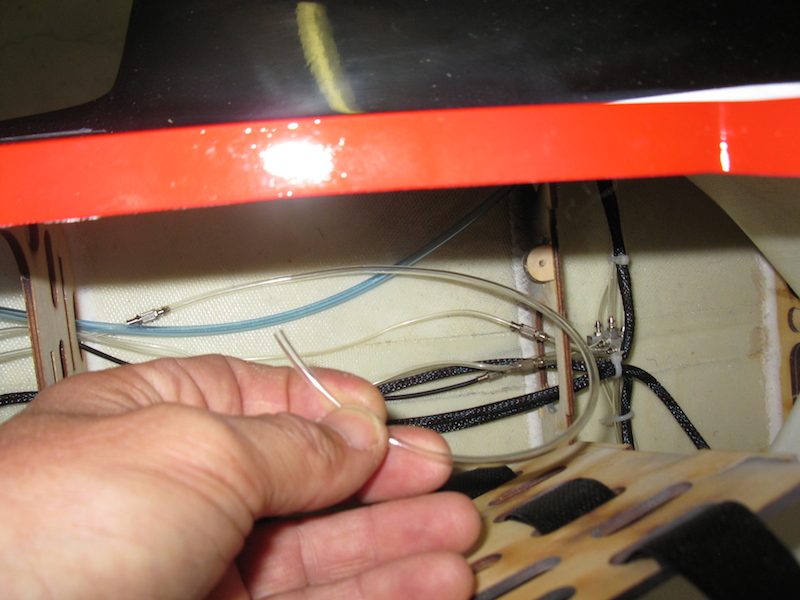
Hi guys, I have finally started my build after a long delay. Ok, just a basic question. That loose air hose (on the pic), I believe is for the air tank..right? There's also another one on top of the tray ..I think for pressurising. In the old days I used to use bicycle valve but it's been a long time since I dealt with retracts.. so what pressure valves are you guys using nowadays? Oh, I forgot to mention I have a pro-wired version with all cables, hoses and pneumatics installed.
Last edited by fredo; 07-19-2014 at 08:51 PM. Reason: adding words
07-20-2014, 01:08 AM
#1148
Yes the one you are holding goes to air tank, my tank is standing in the V of the intakes behind fuel tanks. The other is a fill hose to use valve already installed, this one seems to work fine but i will be changing to an Intairco fitting to have all my models the same. Mine is ready for test flight, it took 4 days to finish and i received the pro-wired version also. I will test fly mine at Maryborough jet meet in 2 weeks.
Jason
Jason
07-20-2014, 03:02 AM
#1149
Senior Member
Join Date: Jul 2003
Location: Brisbane, AUSTRALIA
Posts: 486
Likes: 0
Received 0 Likes
on
0 Posts
Thanks Jason, I feel really stupid..didn't even realise that piece of hose coming out of fitting next to the pressure gauge is actually fill valve. I thought it was just a straight through fitting. Anyway, it's my first jet, so I'm still learning. Have a good time in two weeks and best of luck with maiden.
07-20-2014, 05:00 AM
#1150
Join Date: Sep 2007
Location: Beeton, Ontario, CANADA
Posts: 1,337
Likes: 0
Received 5 Likes
on
4 Posts
The only stupid question, is the one not asked. Good luck with your first jet. Im building this one too and from what I have read so far, is that you will have no problems what so ever flying her.
Trev
Trev