


Skygate C-ARF L39 build thread and virtual manual

 06-14-2013, 02:29 PM
#52

Thread Starter
My Feedback: (34)

Join Date: Aug 2002
Location: Mississauga,
ON, CANADA
Posts: 812
Likes: 0
Received 0 Likes
on
0 Posts
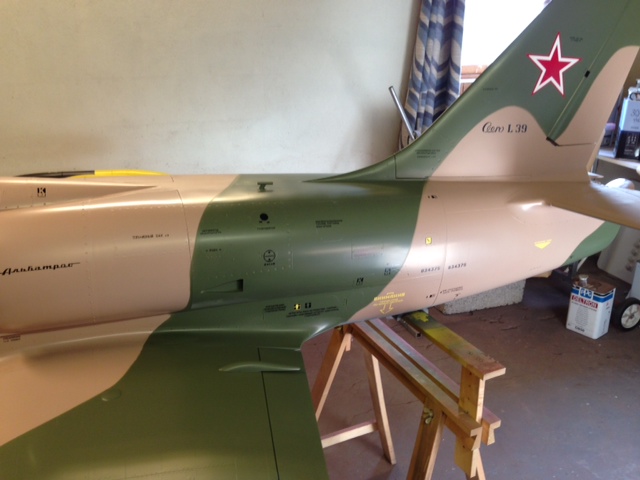
Test flew the L39 today. What a nice flying machine.
Rock solid in the air and slows down to a crawl without the use of air brakes even.
Flies very smooth and mine is overpowered but I am fine with that.
I particularly enjoyed the take off rotation because it is very precise with the elevator command, no lag, and the plane will do what you tell it to do exactly in the air.
Here are my final travel settings:
Elevator: +30/-30mm 30% expo
Ailerons: +25/-25mm 35% expo
Rudder: 60mm
Flaps: 70mm
5% UP elevator mix with full flaps
CG location: DO NOT REPEAT DO NOT follow CARF's recommendation for the CG, it is too far forward and requires a lot of weight. See picture attached where he CG should be and even at that location, I prefer it to go back 10~15mm but I am happy with this setting.
It is 44lbs dry, 52lbs wet, very low wing loading, you will enjoy landing the L39 for sure.
Pics attached, video coming soon.
06-14-2013, 08:06 PM
#53
Junior Member
Join Date: Jun 2013
Location: Firenze , ITALY
Posts: 8
Likes: 0
Received 0 Likes
on
0 Posts
Grazie, per i flaps, 70mm per decollo e atterraggio?
Vorrei terminare questo modello full scale, dove posso trovare accessori , pitot , scalette per i piloti, alette antenne etc
Esiste una modifica per il canopi della cokpit, attualmente e tutto di un pezzo , mi piacerebbe la apertura laterale come il vero
Purtroppo con la carf ( melani ) pare che questi accessori full scale non esistano, come posso fare
Grazie ciao
06-17-2013, 05:28 PM
#55
Thread Starter
My Feedback: (34)
Join Date: Aug 2002
Location: Mississauga,
ON, CANADA
Posts: 812
Likes: 0
Received 0 Likes
on
0 Posts
Below is a short video clip of the test flight. Just regular flying around no aerobatics or anyhthing special. Will get to wring it out in the coming weeks and hopefully get new clips as well.
Doug was not able to see the plane well on the LCD and decided to stay zoomed out. Thank you Doug for documenting the test flight.
http://youtu.be/jq-yI5m0cmw
Doug was not able to see the plane well on the LCD and decided to stay zoomed out. Thank you Doug for documenting the test flight.
http://youtu.be/jq-yI5m0cmw
02-25-2014, 05:59 AM
#56
Member

Join Date: Apr 2003
Location: Vestby, NORWAY
Posts: 62
Likes: 0
Received 0 Likes
on
0 Posts
Long time since someone was here I am almost ready with paint everything is painted with paintmask from Tailormade decals,engine will be AMT Olympus look forward to get this bird ready.


04-06-2014, 05:46 PM
#59
Thread Starter
My Feedback: (34)
Join Date: Aug 2002
Location: Mississauga,
ON, CANADA
Posts: 812
Likes: 0
Received 0 Likes
on
0 Posts
YUP leave it to Stephen Volger to design exceptional models.
His Viper, L39 and Hawk (all now being sold by C-ARF) are exceptional models with excellent flying characteristics.
Mind you he used to build them lighter than C-ARF but still, this has not impacted the performance.
Congrats.
His Viper, L39 and Hawk (all now being sold by C-ARF) are exceptional models with excellent flying characteristics.
Mind you he used to build them lighter than C-ARF but still, this has not impacted the performance.
Congrats.
01-03-2015, 07:59 AM
#61

My Feedback: (76)

Join Date: Aug 2004
Location: Baton Rouge, LA
Posts: 2,715
Likes: 0
Received 0 Likes
on
0 Posts
My cockpit should be here soon, can anyone post pics on how they set theres up and if any modifications need to be made? I got the pre-built cockpit that is already painted.
01-03-2015, 09:29 AM
#62

My Feedback: (36)

Join Date: Jan 2002
Location: Poland, Maine
Posts: 512
Likes: 0
Received 0 Likes
on
0 Posts
Discowings, no info with cockpit, I uses Velcro on the side panels minor trim work, floor just lays in,couple of small magnets hold it in, also seats in with Velcro . Sorry 39 hanging in garage for winter no pictures. Great flying plane
03-03-2015, 12:17 PM
#63
Had a painted L-39 in today, first one I have studied and I'm happy for the owner, its lovely!
Been around quite a few outside, but in doors its huge!


Been around quite a few outside, but in doors its huge!
Last edited by Dave Wilshere; 03-03-2015 at 12:20 PM.
 03-03-2015, 04:42 PM
#64
Behzad
04-09-2015, 08:32 AM
#66
This has been a team M&R build, 90% there-anyone have photos on the cockpit layout, I want my man to do the cockpit and he needs pictures!
We already found the supplied giant air tank fouls the cockpit sides, swapped to two large Behotec tanks.
Dw


We already found the supplied giant air tank fouls the cockpit sides, swapped to two large Behotec tanks.
Dw
04-09-2015, 10:25 AM
#67
Thread Starter
My Feedback: (34)
Join Date: Aug 2002
Location: Mississauga,
ON, CANADA
Posts: 812
Likes: 0
Received 0 Likes
on
0 Posts
Nice Dave you will love it.
I liked my first one so much, I just purchased another in the Navy scheme.
I also converted my first L39 to Jeti Radio and added GPS, Flow sensor and VSpeak ProjetECU parameter sensor all to be transmitted and displayed on the Jeti radio.
My old L39 will be my testing model for an all out Telemetry setup with my new Jeti radio.
10-26-2015, 10:53 PM
#69
Senior Member

Join Date: Feb 2010
Location: RobinaQLD, AUSTRALIA
Posts: 156
Likes: 0
Received 0 Likes
on
0 Posts
I've just ordered a CARF L-39, but (to follow on from a few comments on this thread) am a bit unsure about the CARF scale cockpit. Seems very expensive for what looks like a typical CARF ABS plastic cockpit painted with some instruments. Can anyone comment on their experience with it? Does it look the part? Reasonable value for money? Any close up installed photos would be very much appreciated.
Thanks,
Colin
Thanks,
Colin
10-27-2015, 05:55 AM
#70
Its Plastic, foam/glass sandwich and alike.
It is expensive, but making one from scratch would take a long time. It does look the part once finished, but no instructions are annoying for such high end product.
We did the yellow black L-39 shown, but I got a local "old school" modeller to do the cockpit as it does still require modelling skills and several evenings to install
Dave
10-27-2015, 06:28 AM
#71
I've just ordered a CARF L-39, but (to follow on from a few comments on this thread) am a bit unsure about the CARF scale cockpit. Seems very expensive for what looks like a typical CARF ABS plastic cockpit painted with some instruments. Can anyone comment on their experience with it? Does it look the part? Reasonable value for money? Any close up installed photos would be very much appreciated.
Thanks,
Colin
Thanks,
Colin
i have used the Carf cockpit for the hawk. To me it is well worth the money. I would have liked it to be a little sturdier but again it is very large so it could get too heavy. The first hawk crashed so I bought a second one with second cockpit. Here are a couple of pictures. Have in mind that you still have to assemble it together which in Hawk was a pain as it has to come a part every time we need access to the inside.
behzad
10-27-2015, 03:04 PM
#72
Senior Member
Join Date: Jul 2007
Location: London, UNITED KINGDOM
Posts: 149
Likes: 0
Received 0 Likes
on
0 Posts
This is what the carf cockpit looks like installed. If you use the engine access area for your switches, air, fuel etc you do not need to touch the cockpit once installed.
Last edited by simonmiller; 10-27-2015 at 03:09 PM.
11-11-2015, 03:51 PM
#75
Junior Member

Join Date: Jun 2006
Location: Birmingham, , UNITED KINGDOM
Posts: 21
Likes: 0
Received 0 Likes
on
0 Posts
Hi Guys
Contrary to what is said here most European kits are fat from being ARTF. The CARF L39 is no exception. It is incomplete for many reasons. Mine had airbrake supplied but not cut out in the fuselage. None of the air intakes were cut out and their parts supplied were not even painted. It would be much easier to cut and paint the parts at the factory.
There are still no instructions for the cockpit assembly after such a long time since the kit was produced. I had to introduce to fuselage formers to bolt the cockpit sides. See image. This is far better solution than the velcro temporary job. These formers hold the the equipment trays at base of the fuselage.
The tank tray had to be modified drastically to fit in place and to hold the tank properly. The canopy glazing should have been done at the factory for an ARTF kit costing so much. The canopy should have the front part fixed to the fuselage for such a scale kit.
The diameter of the thrust tube is too small to fit the engine cowling and too large to fit the rear tail fairings. No matter how much you cut or sand the fibreglass parts.
Again for a scale kit of this calibre the side nose door should open to give access to batteries and some equipment. This is my fourth European RC jet kit. They all exhibit serious shortfalls. Some on quality and mistakes. Other on lack of completeness. Please let us not knock the Chinese manufacturer as I see often on this forum. They supply far more complete kits and at good value.
Mssa
Last edited by MSSA; 11-11-2015 at 04:21 PM.