SM F9F Cougar build
 04-20-2013, 12:55 PM
#1

Thread Starter

Hi Guys
I'm starting one of these in a few weeks, has anyone got any tips or know much about this kit? I've done a search and only found the usual dealer marketing threads but nothing from any real people if you know what I mean.
Should start it in the first week of May and hope to have it ready for Pinnacle aviation to start on the weathering in early June.
Thanks for any help.
Cheers, Alex

 04-20-2013, 01:20 PM
#3

My Feedback: (49)
Join Date: Apr 2002
Location: SANTA ANA, CA
Posts: 2,182
Likes: 0
Received 0 Likes
on
0 Posts
Hi Alex,
I just finished mine a couple weeks ago. Put first flights on it at our Spring Fling event last week. Powered by a JetCentral Rhino KS. The jet flies AWESOME! Absolutely gorgeous presence in the air.
I used the cg and throws recommended in the manual. They work fine. The build is very straightforward, nothing complicated at all. Fitting the cockpit will be a pain, though!
You will have to relocate the attach points for the main gear door air rams further down, in order to gain mechanical advantage. My gear doors would not stay completely shut at speed.
David S
04-20-2013, 11:27 PM
#6
Thread Starter
Thanks David, great picture!
Thanks Sean, I'll have a look.
Locked down? Mind you it is controversial having a build thread on RCU...
Cheers
Thanks Sean, I'll have a look.
Locked down? Mind you it is controversial having a build thread on RCU...
Cheers
 05-03-2013, 11:08 AM
#9
Thread Starter
Hi Guys
An introduction to my latest build, I hope to have it finished for June. 720p
[youtube]http://www.youtube.com/watch?v=5INCZWTT5Ak[/youtube]
An introduction to my latest build, I hope to have it finished for June. 720p
[youtube]http://www.youtube.com/watch?v=5INCZWTT5Ak[/youtube]
05-03-2013, 01:44 PM
#10
Nice video Alex..
I just finished one up a couple months ago.
Skymaster might want to put a little more fiberglass on the seam lines as i had cracks along the side of the fuse and top/bottom of the nose cone. Looks great when it leaves the factory but by the time we receive it there is damage caused by shipping.
Also when your assembling the mid flaps, Do not use the hinges to mount the servo control horns to. There is no mechanical advantage at all, Flap flops around allot.. I recommend to Flip the servo over so the servo arm is at the top side of the model and install a horn in the middle of the flap. This worked great and still had over 3.5" of travel in the flap.
Just a suggestion.
05-03-2013, 01:51 PM
#11
Thread Starter
Hi
Nice build! Funny I was just looking at that flap and thinking it doesn't look very good. I'd love a photo of your mod if you get a chance.
Has yours flown yet? Where did you put the CG.
Many thanks
Alex
Nice build! Funny I was just looking at that flap and thinking it doesn't look very good. I'd love a photo of your mod if you get a chance.
Has yours flown yet? Where did you put the CG.
Many thanks
Alex
05-30-2013, 08:08 AM
#12
Thread Starter
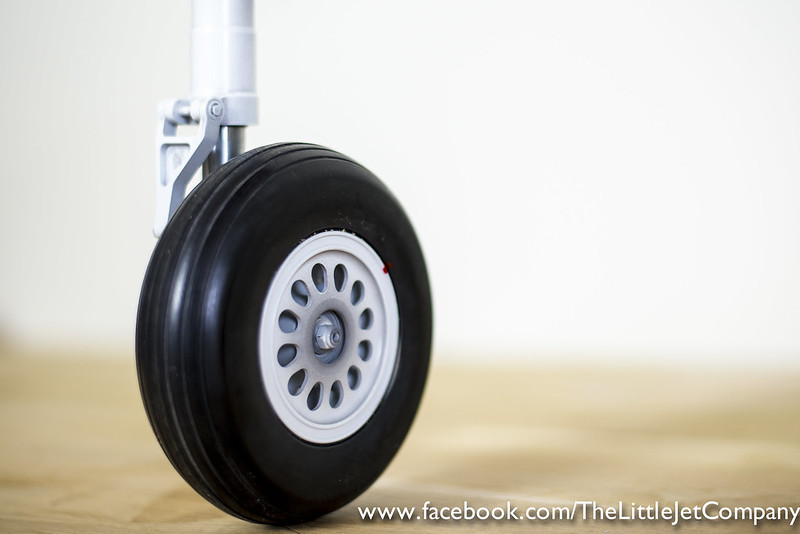
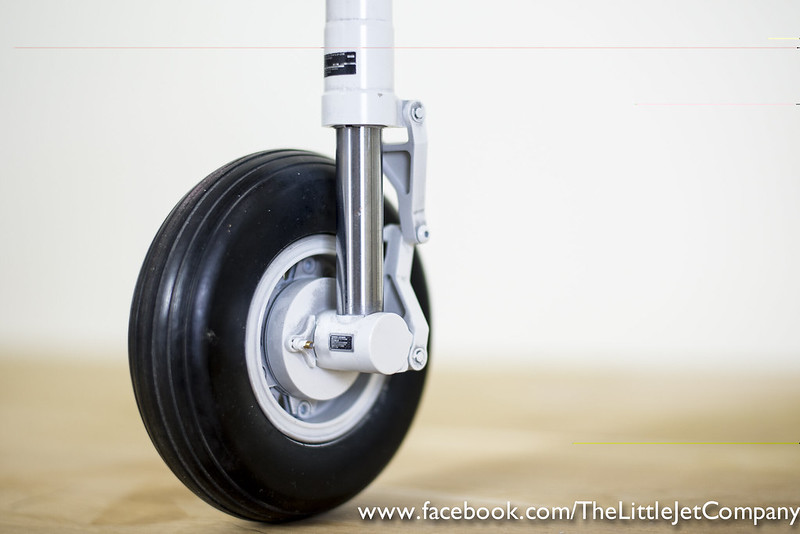
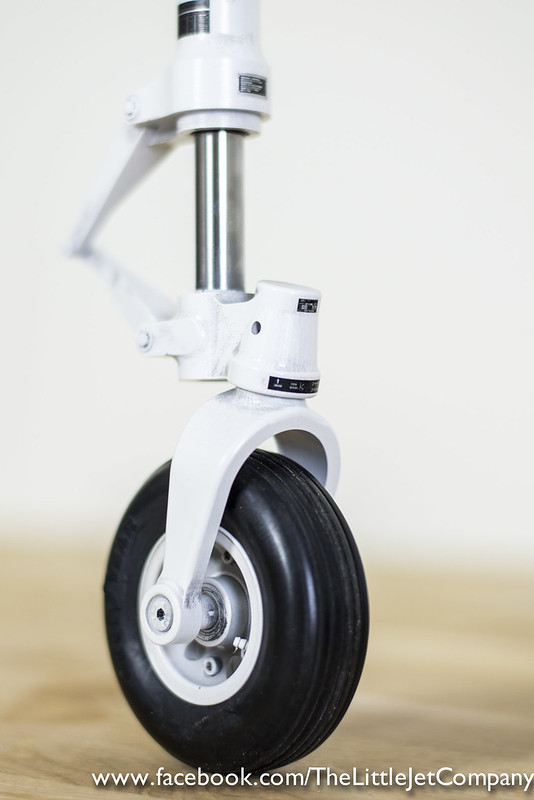
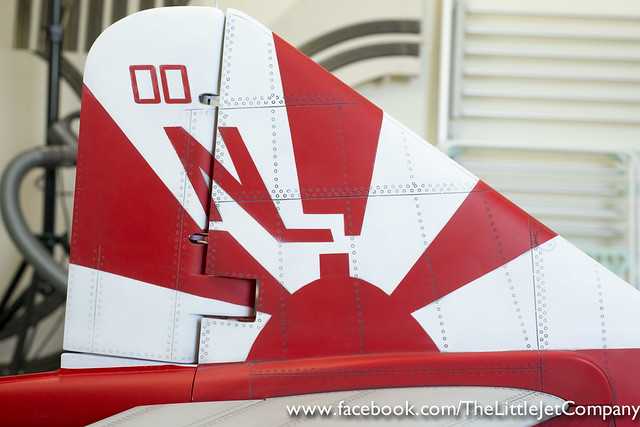
The Gear came pre painted white but unfortunately I had to repaint two of the struts as the original paint just flaked off. The brief from the client was that the weathering must be subtle so its there enough to take the newness off. Ive also added decals which I think always adds some interest.
 08-14-2013, 04:16 AM
#14
Thread Starter
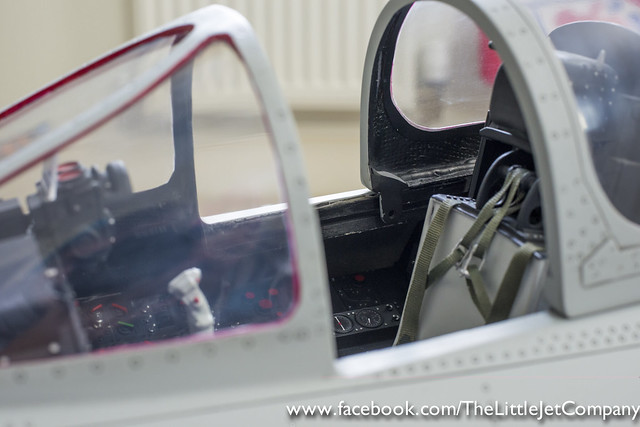
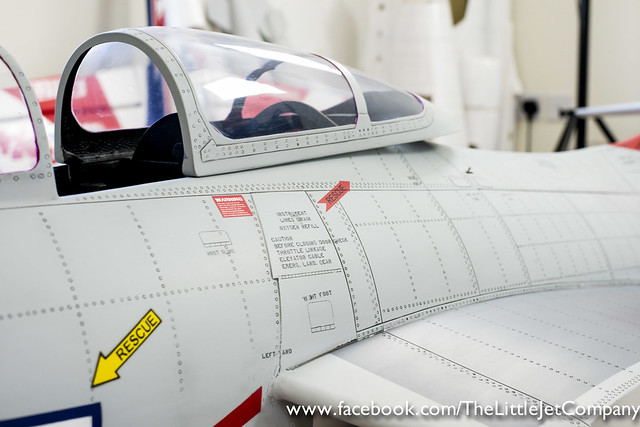
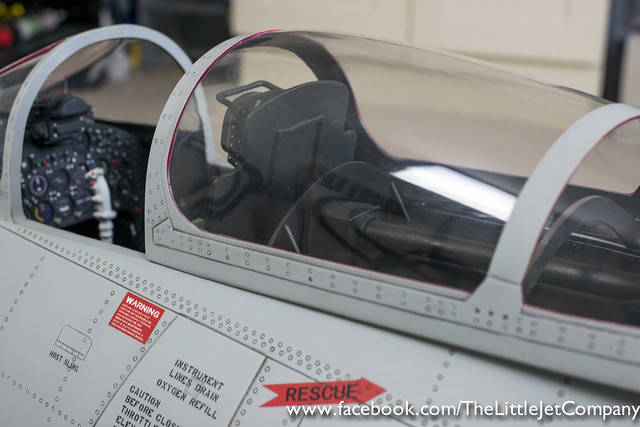
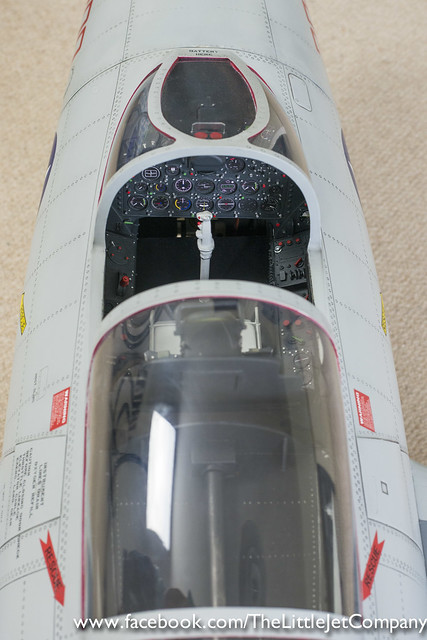
Ive added a fair bit of extra detail in the cockpit and under the canopy. The wash is relatively prominent as the brief was to make it look similar to Ali's old Airworld Cougar. I had to completely repaint the fin as Skymaster did it incorrectly and it wasn't picked up in the photos before it was shipped.
Cheers, Alex
Cheers, Alex
 08-16-2013, 09:50 AM
#17
Thread Starter
thanks mate...yeah its a bit odd isn't it, I suppose they're only as accurate as the documentation used to produce them. I'm going to do some ground runs soon so Steve's bring his AW version I'll take a few shots side by side.
08-16-2013, 11:05 AM
#18
AW one is not scale....Not looked at the SM one. DJ is very close.
Back of fuselage on the AW model is way out. Partly my fault as after the Panther I said It only a few mods to the fuse and new wings/tail....NOT When I went into the AW with view to JWM use, its way off
Dw
Back of fuselage on the AW model is way out. Partly my fault as after the Panther I said It only a few mods to the fuse and new wings/tail....NOT When I went into the AW with view to JWM use, its way off
Dw
08-16-2013, 12:38 PM
#19
Thread Starter
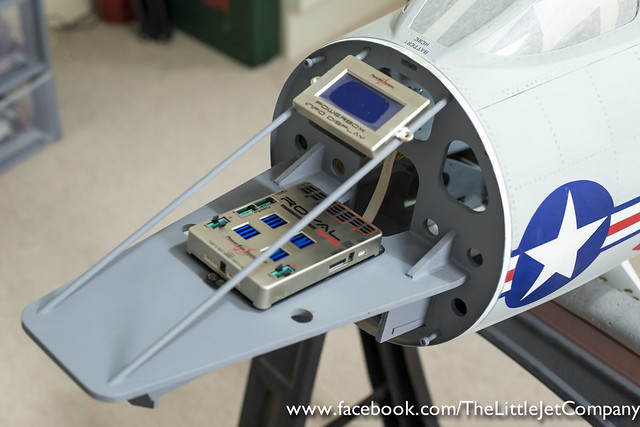
Interesting... I'd be love to know what you think of this one when you see it. I don't know anything about the full size Cougar.
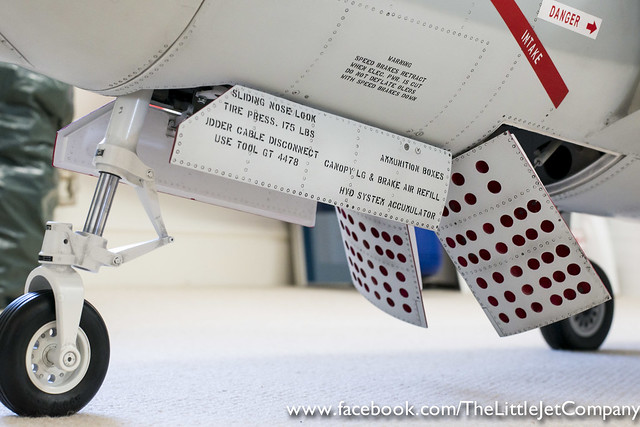
I've just taken the PowerBox Royal SRS out to send to PowerBox as Emmerich has told me that the DMSS update is available for it but I need to send it back. Hopefully it will arrive about the same time they re open.
A pic of the nose install.
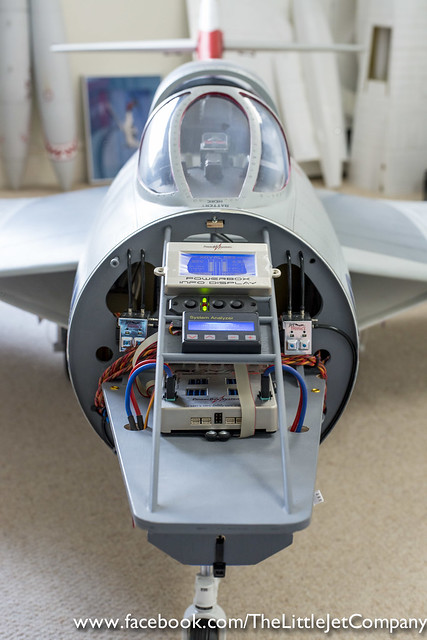
I've just taken the PowerBox Royal SRS out to send to PowerBox as Emmerich has told me that the DMSS update is available for it but I need to send it back. Hopefully it will arrive about the same time they re open.
A pic of the nose install.
08-16-2013, 01:04 PM
#20
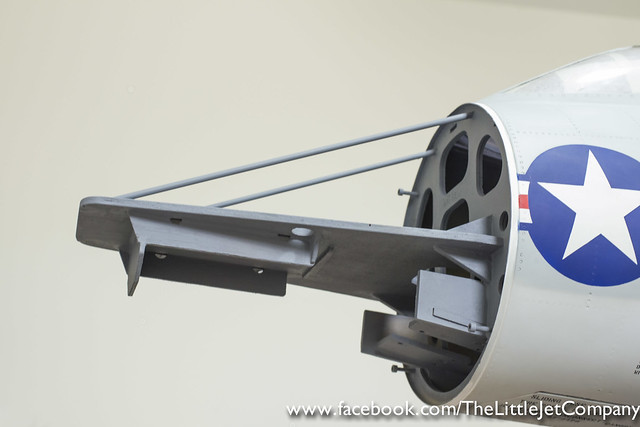
Horzion meet in Germany weekend.
Never really paid any attention to the SM version. Need a picture from the rear quarter, that's where many are wrong! the wing root extensions going back to the tail pipe should finish thick and square and the AW one tapers down to an edge (just one of many)
Dave
Never really paid any attention to the SM version. Need a picture from the rear quarter, that's where many are wrong! the wing root extensions going back to the tail pipe should finish thick and square and the AW one tapers down to an edge (just one of many)
Dave
08-16-2013, 01:28 PM
#21
My Feedback: (1)
Join Date: Jul 2002
Location: SevenoaksKent, UNITED KINGDOM
Posts: 5,193
Likes: 0
Received 0 Likes
on
0 Posts
Looks like SM got it right. The taper back to the tailpipe is about 1/2" thick instead of to a point as per AW. Being one of their newer models I'd imagine they've gone pretty scale and have intact got the fuselage length right?
 08-16-2013, 11:14 PM
#25
Thread Starter
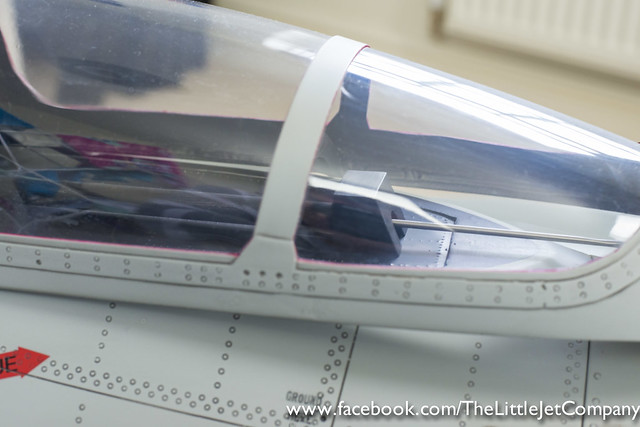
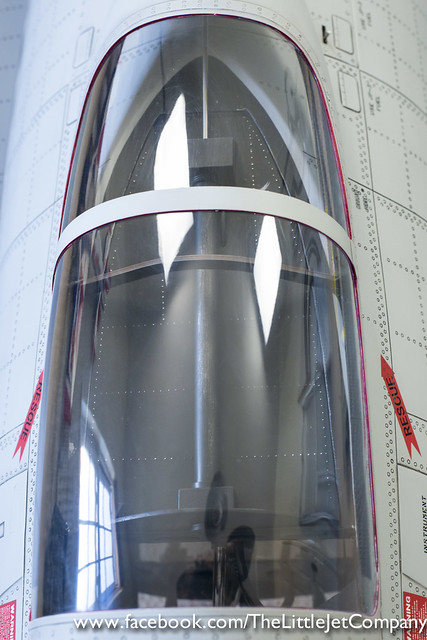
Some pics of the canopy mechanism. The ram has a clevis on the end and is attached to some glass board hysoled into the back of the canopy. The front end is attached with two M3 bolts running in slots.