


Ripmax Xcalibur Sports jet

 07-20-2014, 02:43 PM
#802
Junior Member
Join Date: Jul 2014
Posts: 1
Likes: 0
Received 0 Likes
on
0 Posts
Just a quick "Hi" from another Xcalibur owner. Got mine from Dave at Motors and rotors. My first turbine model. Great advice has lead to me being completely smitten by jets. Booted all my glow stuff out. Got a couple of petrol warbirds and 3d machines but I need more jets! From my point of view the Xcalibur is such an easy aircraft to fly. Ok, on the maiden I was shaking like a leaf!!. Now I've got 10 flights under the belt I love it. Trouble is I only have a small patch to fly from but want more jets! Looking at scale stuff from the early jet age. Things like the Vampire, Sea Hawk and the Supermarine Attacker.
Andy
Andy
07-20-2014, 11:23 PM
#803
Member

Join Date: Feb 2014
Location: Devon, England
Posts: 75
Likes: 0
Received 0 Likes
on
0 Posts
For some reason I haven't been able to log on to here for a few days, but here's a quick update of how my build is going.
I managed to get another half day in over the weekend and so I started by putting in the fuel system. I used all the extra bits supplied by Motors and Rotors in their package; genuine Tygon tube, high flow clunk and of course with soldered on barbs and safety wired for peace of mind. A leak check showed everything was air tight so the tank then went in, taking great care to ensure the tubing could not move anywhere near the steering cables (they use wire to cut cheese so I'm sure it would do just as good a job on fuel tubing!)


Next I made up some mounts for the fuel tap and filter. No fancy alloy mounts here! The fuel tap is tucked down beside the tank and is on the suction side of the pump.


After making up battery and ECU data cables for the turbine, I was able to put the equipment trays in and finally finish everything up front. The first pic shows the 'quick release' tray containing the turbine equipment taken out.


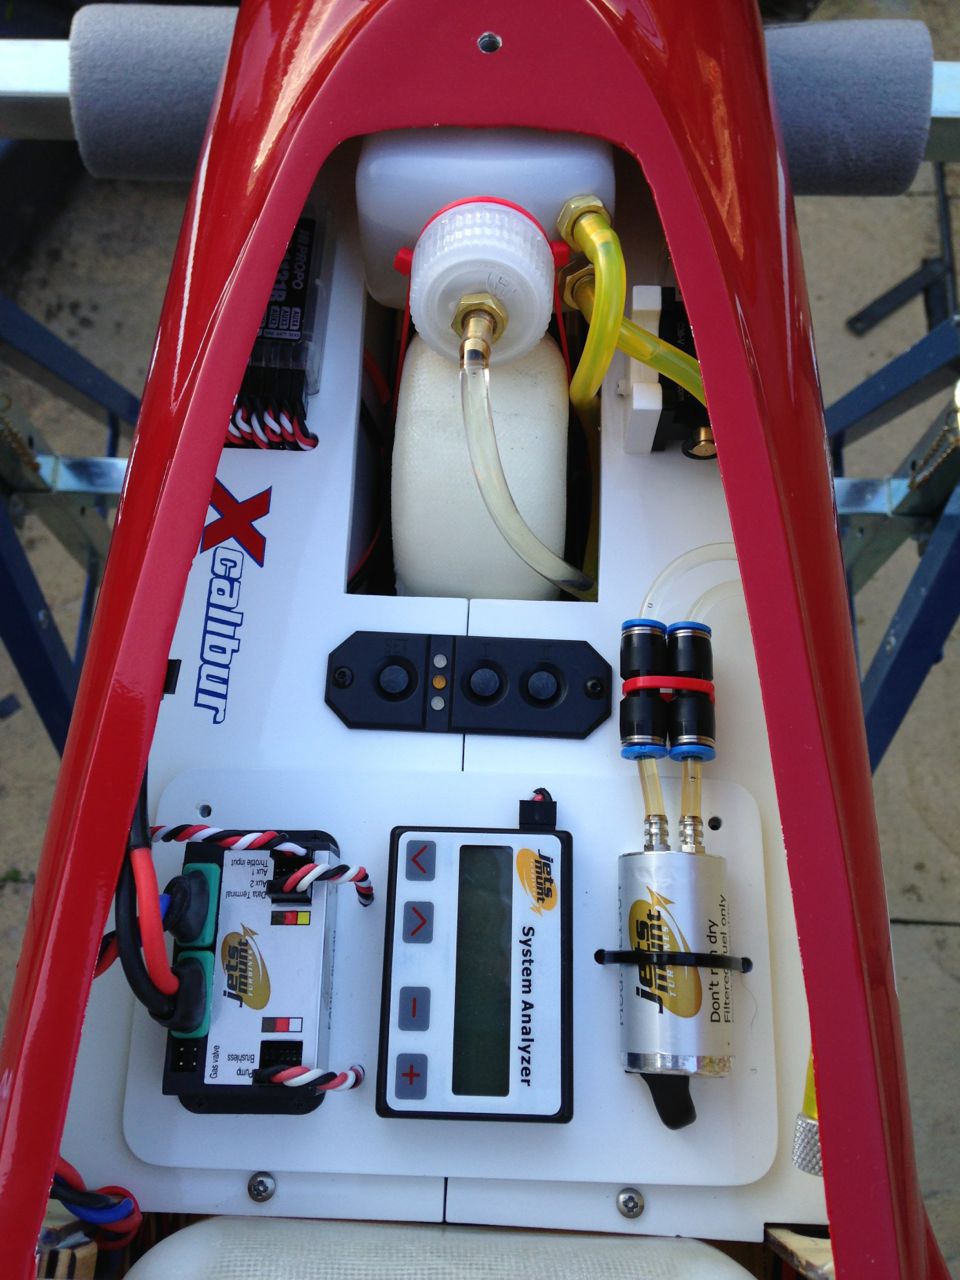

Finally, I got to sort out the hot end! The fuel filter is tucked down to the right of the turbine cable tied to another plywood mount. The Merlin 100 needed both of the supplied packing pieces to centre it. I shaved away a little bit of the intake to get the turbine a bit further forward but the limiting factor is the very short nozzle on the Merlin, which needs to stay outside the fuselage for obvious reasons.


The engine has now been test run and everything looks OK. Just a couple of servo extensions, set up throws and balance and she will be good to go. The aim is to maiden on Wednesday...
I managed to get another half day in over the weekend and so I started by putting in the fuel system. I used all the extra bits supplied by Motors and Rotors in their package; genuine Tygon tube, high flow clunk and of course with soldered on barbs and safety wired for peace of mind. A leak check showed everything was air tight so the tank then went in, taking great care to ensure the tubing could not move anywhere near the steering cables (they use wire to cut cheese so I'm sure it would do just as good a job on fuel tubing!)
Next I made up some mounts for the fuel tap and filter. No fancy alloy mounts here! The fuel tap is tucked down beside the tank and is on the suction side of the pump.
After making up battery and ECU data cables for the turbine, I was able to put the equipment trays in and finally finish everything up front. The first pic shows the 'quick release' tray containing the turbine equipment taken out.
Finally, I got to sort out the hot end! The fuel filter is tucked down to the right of the turbine cable tied to another plywood mount. The Merlin 100 needed both of the supplied packing pieces to centre it. I shaved away a little bit of the intake to get the turbine a bit further forward but the limiting factor is the very short nozzle on the Merlin, which needs to stay outside the fuselage for obvious reasons.
The engine has now been test run and everything looks OK. Just a couple of servo extensions, set up throws and balance and she will be good to go. The aim is to maiden on Wednesday...
Last edited by Beachy1968; 07-20-2014 at 11:27 PM.
07-21-2014, 01:27 AM
#805

Thread Starter
Mark
You need to take your tank out again...
You cut the overflow pipe at exactly the same angle as the tank top! Look at you installed shot its nicely sealing against the tank top, it will suck shut and you will get a flame out. I always cut the top as a ^ (roof top) so it can't do that
Dave
You need to take your tank out again...
You cut the overflow pipe at exactly the same angle as the tank top! Look at you installed shot its nicely sealing against the tank top, it will suck shut and you will get a flame out. I always cut the top as a ^ (roof top) so it can't do that
Dave
07-21-2014, 01:53 AM
#806
Member
Join Date: Feb 2014
Location: Devon, England
Posts: 75
Likes: 0
Received 0 Likes
on
0 Posts
Hi Dave
That did occur to me but I didn't think it could form a proper seal, but as ever I'm glad of your advice so I will change it. Everything is so easy to get at in the Xcalibur that it will only be a five minute job!
Edit: I exaggerated; including draining the fuel it took 8 minutes! So nice to have a jet with such a simple fuel system...
Last edited by Beachy1968; 07-21-2014 at 01:11 PM.
07-21-2014, 02:09 PM
#808
Member
Join Date: Jan 2014
Posts: 39
Likes: 0
Received 0 Likes
on
0 Posts
Does anyone have a picture of their tail rudder servo installation ? Seams to be a pretty big gap side to side for the servo, wanted to see how people are mounting them or curing this issue.
07-22-2014, 06:45 AM
#810
Member
Join Date: Jan 2014
Posts: 39
Likes: 0
Received 0 Likes
on
0 Posts
 looks great..
07-24-2014, 06:47 AM
looks great..
07-24-2014, 06:47 AM
#811

Join Date: Feb 2004
Location: Guernsey, UNITED KINGDOM
Posts: 4
Likes: 0
Received 0 Likes
on
0 Posts
Hi all!
This is my first post on RCU, and I just wanted to share some pictures of my Excalibur. I've been following this forum since the beginning and have taken on board what different people have said. This has been invaluable and I've carried out the additional work people have suggested.
In putting the bubble trap upfront and full of fuel when setting up the centre of gravity at 165mm, I needed 96 grams of weight - which is equivalent to a 4.8 volt battery. So after the test flights I think I will use this battery for landing lights, meaning that in the nose I will have the ECU battery, 2 receiver batteries and also the spare 4.8 battery. This means I won't need any additional weight.
All that remains now is for Dave W to check out the model and test fly for me (as this is my first jet I feel it is worth letting an experienced jet pilot fly it first!)


Shane
This is my first post on RCU, and I just wanted to share some pictures of my Excalibur. I've been following this forum since the beginning and have taken on board what different people have said. This has been invaluable and I've carried out the additional work people have suggested.
In putting the bubble trap upfront and full of fuel when setting up the centre of gravity at 165mm, I needed 96 grams of weight - which is equivalent to a 4.8 volt battery. So after the test flights I think I will use this battery for landing lights, meaning that in the nose I will have the ECU battery, 2 receiver batteries and also the spare 4.8 battery. This means I won't need any additional weight.
All that remains now is for Dave W to check out the model and test fly for me (as this is my first jet I feel it is worth letting an experienced jet pilot fly it first!)
Shane
07-24-2014, 11:53 AM
#813

Join Date: Nov 2008
Location: ABZ, Scotland
Posts: 85
Likes: 0
Received 0 Likes
on
0 Posts
Dave
Got the engine I think thanks as I have not seen it yet as am stuck out here with fog. How’s my boom coming along?
I see some are using diesel would you recommend this for the P100 and p80se.
Got the engine I think thanks as I have not seen it yet as am stuck out here with fog. How’s my boom coming along?
I see some are using diesel would you recommend this for the P100 and p80se.
07-24-2014, 02:17 PM
#815
Hi Shane, that's a very neat installation that you have done on your jet! I especially like the colour matching air tanks. You mention landing lights and was wondering what you were thinking of using, and where you may mount them? In my previous post, I have installed lights on my jet and am very happy with the brightness in full sun light, which we get a lot of over here! Good luck on your maiden and your very lucky to have someone like Dave W to do it for you! Just make sure you record the event, because studying the video later can sometimes be invaluable help.
Last edited by Aussie1; 07-24-2014 at 02:21 PM.
07-24-2014, 02:46 PM
#816
Member
Join Date: Feb 2014
Location: Devon, England
Posts: 75
Likes: 0
Received 0 Likes
on
0 Posts
My Xcalibur had it's maiden flight yesterday. I'm still getting the feel for it but it I can already tell it's going to be a lot of fun. CG was bang on 170mm with no extra weight needed at all and the only trimming needed was to increase the down elevator with flap. Landing is very straightforward. I'm looking forward to putting many gallons of kero through the Xcalibur over the summer. 
Anyway, here are some pictures of the finished model.


Anyway, here are some pictures of the finished model.
07-24-2014, 10:51 PM
#817
Thread Starter
Mark
Congratulations, looks fabulous-certainly the "bling" install so far :-) (though I too like Shane's painted tanks!!)
The scheme looks great, just needs some of your stickers to busy it up.
Dave
Congratulations, looks fabulous-certainly the "bling" install so far :-) (though I too like Shane's painted tanks!!)
The scheme looks great, just needs some of your stickers to busy it up.
Dave
07-24-2014, 11:26 PM
#818
Member
Join Date: Feb 2014
Location: Devon, England
Posts: 75
Likes: 0
Received 0 Likes
on
0 Posts
Cheers, Dave. Whilst I like to make an installation look clean and tidy I try to avoid unnecessary complication or weight so I was pleased that it balanced without any need for lead anywhere (I followed your example of going for a big ECU battery up front). I'm very pleased with how it flies; capable but very friendly. I just need to reduce the expo to sharpen it up a little to how I like it. Personally, I think I prefer it without the supplied roundel stickers as it's already quite a busy scheme. So yes, it looks great, flies great but the best bit.......it fits with 20l of kero and a folding chair (an essential airfield accessory) in a tiny Renault Twingo!
07-25-2014, 01:30 AM
#819
Join Date: Feb 2004
Location: Guernsey, UNITED KINGDOM
Posts: 4
Likes: 0
Received 0 Likes
on
0 Posts
Hi Aussie1,
Since I'm carrying a 4.8 battery at the front I thought I would put it to good use. Seeing your earlier post about your landing lights gave me the initial idea to use them. I have a kit here already from SM Services and I will be able to control the lights from the transmitter. As the booms are staying on I will be putting the lights in the same place you have them.
I'm very glad Dave is able to help me out with its maiden flight! Our flying site is surrounded on 3 sides by sea water and on the other side there is an oil quarry! It's like landing on an aircraft carrier, so both me and the model have to be 100%!
Mark, congrats on your maiden flight and your very tidy build! I was wondering what vinyl plotter/cutter you used to do your graphics? I've been waiting 6 weeks to have my graphics done at a local shop (maybe they don't want my business!) and I'm thinking it may be easier to do it myself in future.
Thanks,
Shane
07-25-2014, 05:42 AM
#820
Member
Join Date: Feb 2014
Location: Devon, England
Posts: 75
Likes: 0
Received 0 Likes
on
0 Posts
Bistodude, my plotter is a Graphtec Silhouette Cameo. I've never used it to do vinyl graphics (i.e. stickers) because I just use it to create paint masks, but I believe it can cut any vinyl. Thanks also for the complimentary words on my build/installation. Seeing as I am officially unemployed as of today, if anyone wants someone to build a jet for them then I have plenty of times on my hands!
Here is a quick video of my Xcalibur which was taken yesterday evening. I warn you, however, that it's not the most interesting RC jet video you will have ever seen! As a result of my wife putting her fingers in front of the lens a couple of times, the iPad running out of space half way through and the very difficult light which meant I couldn't see the model, its a bit rubbish!
https://www.youtube.com/watch?v=Wm10K6k1f-w
07-25-2014, 09:07 AM
#821

Mark,
Be happy your wife was there to put a finger in front of the lens a few times and video'd for you. The alternative could have been her poking you in the chest asking where you have been for the last 5 hrs when you got home from a fun day at the field....
Very clean build and good flight!!
Regards,
Dirk
07-25-2014, 10:46 PM
#823
Member
Join Date: Feb 2014
Location: Devon, England
Posts: 75
Likes: 0
Received 0 Likes
on
0 Posts
LOL. I assure you I am very grateful that she was happy to video the flight. In fact it was she who was most disappointed about how it turned out but we both laughed about it. My 9 year old boy insisted on also trying to video a flight with my phone which turned out to be mostly clouds but with a nice jet turbine sound track!
Anyway, I'm on holiday now so no Xcalibur action for me for a while. I'll have to be content with pylon racing between the tents and caravans with my UMX Habu :-)
Anyway, I'm on holiday now so no Xcalibur action for me for a while. I'll have to be content with pylon racing between the tents and caravans with my UMX Habu :-)
07-27-2014, 09:57 AM
#825
My Feedback: (10)

Join Date: Apr 2002
Location: Tustin,
CA
Posts: 415
Likes: 0
Received 0 Likes
on
0 Posts
I had my maiden flight yesterday with my Excalibur and was very happy. It took off very gentle, nice and level and literally flew straight and level, hands off the transmitter, without any trim changes! It has a JetCat P-70 in it and I had to add 4oz (about 113g) of nose weight to get it to balance at about 165mm. Plenty of power as I was at about 3000 ft of altitude and near 100F degrees in temperature. Flew exactly where I pointed it and showed no bad habits at all. I did add more down elevator with full flap that the manual called for (12%) and lowered some of the throws a bit, but other than that, it flew great out of the box. Kept the nose slightly down on landing approach and added a touch of up elevator a couple of inches off the ground for a very smooth landing. The other pilots at the field couldn't believe it was the maiden flight as it was so smooth
I would like to see more airflow around the turbine case, as it got pretty warm, even with some BVM heatproof paint inside the motor area. Also, the brakes are VERY good. I have a separate air tank and limit it's pressure to 50lbs, otherwise the brakes will lock up. I am looking forward to many more fights on the aircraft.
I would like to see more airflow around the turbine case, as it got pretty warm, even with some BVM heatproof paint inside the motor area. Also, the brakes are VERY good. I have a separate air tank and limit it's pressure to 50lbs, otherwise the brakes will lock up. I am looking forward to many more fights on the aircraft.
Last edited by rslstft; 08-01-2014 at 01:29 PM.