


Jeti-duplex-ds-16-2.4-ghz
 04-05-2015, 03:44 AM
#1651

The percentage reading would mean that in some ways your Tx will have to know or you would have to input it yourself, what your battery mAH capacity is. Granted this is just a programming windows that the Tx would have for every model.
Not sure if this has been said before but I use a voice alarm that does not tell me the mAh but tells me: "Warning land soon" and then one with a warning Horn Star Trek style for land now. The same could be used for the percentage, just have for example 3 alarms one that says 50%, an other 60 % and one 70% or what ever you want.
I still have one switch that reads me mAh consumed but I rarely ever use it anymore.
I find that any number being read to me when I don't "actively" listen becomes a: what was that? Having the alarms at critical points in my view is better then just a percentage reading or any number being called out.
The repeat thrice that was introduced lately helps but why not just have a sound that you readily recognize as such for all of your planes, helicopters etc...Information overload just becomes that. Just my 2 cents
 04-05-2015, 09:11 PM
#1653

Hope that helps...
David
04-06-2015, 01:11 AM
#1654
Member
Join Date: Aug 2005
Location: WinkelZH, SWITZERLAND
Posts: 64
Likes: 0
Received 0 Likes
on
0 Posts
Important when you use a CB200 with satellites: Disable failsave of the satellites, only enable failsave in the CB200.
Regards, Walter
Last edited by Walo; 04-06-2015 at 01:17 AM.
04-08-2015, 10:07 AM
#1655
Senior Member
Join Date: Jun 2013
Location: , FL
Posts: 423
Likes: 0
Received 0 Likes
on
0 Posts
http://www.espritmodel.com/jeti-elec...y-dsm-esc.aspx
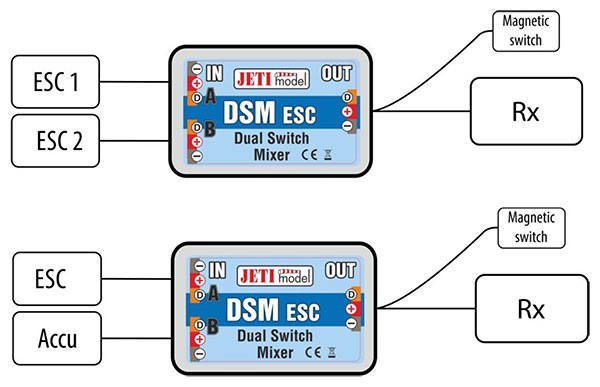
The DSM ESC from Jeti is dual input redundant electronic switch designed to operate with included magnetic key. The advantage of an electronic switch is that it offers a virtual unlimited ON/OFF cycles, unlike mechanically operated switches.
The redundant DSM ESC switch automatically monitors and switches between two power supplies (Two Rx Batteries, Rx Battery & ESC or Two ESCs) keeping your system operational. In a case of using two ESCs the throttle signal from the receiver is supplied to both controllers simultaneously.
Final solution in redundancy and reliability from Jeti is here. The DSM ESC is designed for two independent 5-13V inputs (Battery & ESC or 2x ESCs) and supports up to 10A continuous current or 20A burst current for your connected devices. This unit is most suitable for today's high-voltage servos, which you might be operating directly from a two-cell LiFe battery or similar Li-Poly battery pack. Please note that DSM ESC does not include a regulator, output voltage is equal to input voltage.
[TR]
[TD="width: 210"] [/TD]
[/TD]
[TD]The redundant DSM ESC switch automatically monitors and switches between two power supplies (Two Rx Batteries, Rx Battery & ESC or Two ESCs) keeping your system operational.
In a case of using two ESCs the throttle signal from the receiver is supplied to both controllers simultaneously. [/TD]
[/TR]
[/TABLE]
The DSM ESC from Jeti is dual input redundant electronic switch designed to operate with included magnetic key. The advantage of an electronic switch is that it offers a virtual unlimited ON/OFF cycles, unlike mechanically operated switches.
The redundant DSM ESC switch automatically monitors and switches between two power supplies (Two Rx Batteries, Rx Battery & ESC or Two ESCs) keeping your system operational. In a case of using two ESCs the throttle signal from the receiver is supplied to both controllers simultaneously.
Final solution in redundancy and reliability from Jeti is here. The DSM ESC is designed for two independent 5-13V inputs (Battery & ESC or 2x ESCs) and supports up to 10A continuous current or 20A burst current for your connected devices. This unit is most suitable for today's high-voltage servos, which you might be operating directly from a two-cell LiFe battery or similar Li-Poly battery pack. Please note that DSM ESC does not include a regulator, output voltage is equal to input voltage.
Jeti Electronic Switch Dual Redundant with Power Backup and Magnetic Key!!!
[TABLE="width: 100%"][TR]
[TD="width: 210"]
[/TD][TD]The redundant DSM ESC switch automatically monitors and switches between two power supplies (Two Rx Batteries, Rx Battery & ESC or Two ESCs) keeping your system operational.
In a case of using two ESCs the throttle signal from the receiver is supplied to both controllers simultaneously. [/TD]
[/TR]
[/TABLE]
04-10-2015, 07:30 PM
#1656
Senior Member

Join Date: Feb 2010
Location: RobinaQLD, AUSTRALIA
Posts: 156
Likes: 0
Received 0 Likes
on
0 Posts
Has anyone successfully used a Powerbox iGyro connected to a Jeti receiver via an EX Expander?
If I plug the iGyro into the EXT port of the receiver it works perfectly. To use telemetry as well I need to use an EX Expander, however when I plug the iGyro into the EX Expander it is not recognised at all (The Jetibox entry for that port on the EX Expander just shows as blank). I've got the latest firmware in everything, including the iGyro.
Help!!
04-10-2015, 08:07 PM
#1657

My Feedback: (1)
Join Date: Jun 2005
Location: Hong Kong
Posts: 167
Likes: 0
Received 0 Likes
on
0 Posts
Hi Colin,
I haven't tried with an IGyro. Your best bet is to go to the Powerbox Systems Forums.
Richard there is extremely fast in sorting any powerbox related issues. Good luck
Kind regards,
Morten
I haven't tried with an IGyro. Your best bet is to go to the Powerbox Systems Forums.
Richard there is extremely fast in sorting any powerbox related issues. Good luck
Kind regards,
Morten
04-10-2015, 11:29 PM
#1658
Senior Member
Join Date: Feb 2010
Location: RobinaQLD, AUSTRALIA
Posts: 156
Likes: 0
Received 0 Likes
on
0 Posts
Thanks Morten... I had also emailed Richard for his opinion, so I'll see what he comes back with. Interestingly, the iGyro will ONLY work in EX mode to a Jeti receiver (even though it has a menu option of selecting PPM... I haven't tested UDI). I have also tested it with a Powerbox Royal SRS, which ONLY offers PPM interface, and it works perfectly with that. No EX Expander necessary then as the ECU telemetry can then plug into the EXT port.
Cheers,
Colin
Cheers,
Colin
04-11-2015, 12:23 AM
#1659

My Feedback: (1)
Join Date: Feb 2002
Location: private, UNITED KINGDOM
Posts: 3,672
Likes: 0
Received 26 Likes
on
16 Posts
Despite their EX label, the E4 expander is not EX Bus. In fact almost all the sensors labelled EX are not EX Bus at all. If it turns up in device explorer it is EX bus, if it doesn't then it isn't! Look in the devices folder to see what device explorer will recognise, hardly anything. All other devices are EX compatible but they aren't EX Bus. So the bus is blocked by the E4 expander. If you plug in a genuine bus device like MBAR to the rx it shows in device explorer but if you plug it in via an expander it disappears from explorer because the expander can't handle the bus.
04-11-2015, 04:30 AM
#1660

Has anyone successfully used a Powerbox iGyro connected to a Jeti receiver via an EX Expander?
If I plug the iGyro into the EXT port of the receiver it works perfectly. To use telemetry as well I need to use an EX Expander, however when I plug the iGyro into the EX Expander it is not recognised at all (The Jetibox entry for that port on the EX Expander just shows as blank). I've got the latest firmware in everything, including the iGyro.
Help!!
If I plug the iGyro into the EXT port of the receiver it works perfectly. To use telemetry as well I need to use an EX Expander, however when I plug the iGyro into the EX Expander it is not recognised at all (The Jetibox entry for that port on the EX Expander just shows as blank). I've got the latest firmware in everything, including the iGyro.
Help!!
Wayne
 04-11-2015, 08:16 AM
#1662

Has anyone successfully used a Powerbox iGyro connected to a Jeti receiver via an EX Expander?
If I plug the iGyro into the EXT port of the receiver it works perfectly. To use telemetry as well I need to use an EX Expander, however when I plug the iGyro into the EX Expander it is not recognised at all (The Jetibox entry for that port on the EX Expander just shows as blank). I've got the latest firmware in everything, including the iGyro.
Help!!
If I plug the iGyro into the EXT port of the receiver it works perfectly. To use telemetry as well I need to use an EX Expander, however when I plug the iGyro into the EX Expander it is not recognised at all (The Jetibox entry for that port on the EX Expander just shows as blank). I've got the latest firmware in everything, including the iGyro.
Help!!
you are right, the Jeti expanders don't work (most likely also not the built-in one in the Mbar), but if you set the SAT output port of your receiver to UDI protocol, you free up the EXT port and can connect your telemetry there.
Thomas
04-11-2015, 01:41 PM
#1663
Senior Member
Join Date: Feb 2010
Location: RobinaQLD, AUSTRALIA
Posts: 156
Likes: 0
Received 0 Likes
on
0 Posts
Thanks for all the inputs guys.
Harry... that explains everything. Not sure why they label it "EX Expander" - it's not what it does from my perhaps simplistic reading of the product name and description. Richard (from Powerbox) confirmed forget about the Expander and use an extra RSat2 for telemetry.
Dancy... thanks for the suggestion, although what Thomas has said would likely mean it wouldn't work either. I haven't tried an Mbar before, but will check it out eventually (I'm brand new to Jeti).
Wayne... that is exactly the conclusion I came to in the end. I set it up last night and it works well. Not good where you want to use dual path for full receiver redundancy though, but on this particular model I have a single R9 doing all the gear, brakes, flaps etc, with EX into the iGyro which handles ail/elev/rudder. Then a seperate RSat2 for ECU telemetry via its EX port.
Thomas... UDI is only 12 ports, which is generally not enough for my jets. Richard from Powerbox told me Jeti are about to release 16ch UDI, which would solve everything for iGyros.
Quite a learning curve going from Futaba (18MZ) to Jeti, but definitely worth it. Very impressed so far.
Cheers,
Colin
04-11-2015, 09:26 PM
#1664

HI all, several questions already.
1:where do you register the DS16 for updates, the link in the manual is for DS14, no option to apply DS16
2: binding is not clear on 2 receivers, do you bind both at the same time
3: I get no servo movement, device shows 1 receiver
everything else looks prity straight forward
Rcpete
1:where do you register the DS16 for updates, the link in the manual is for DS14, no option to apply DS16
2: binding is not clear on 2 receivers, do you bind both at the same time
3: I get no servo movement, device shows 1 receiver
everything else looks prity straight forward
Rcpete
04-12-2015, 01:36 AM
#1665
Join Date: Jul 2008
Location: NewentGloucestershire, UNITED KINGDOM
Posts: 66
Likes: 0
Received 0 Likes
on
0 Posts
Is the link in the manual for the upgrades for the DS14 for which you can buy upgrades, i.e. increase the number of channels from 8 to 14 etc etc.. The latest firmware for the DS16 (which comes fully featured) is on Jeti's website, pretty much like Multiplex you don't have to register for updates just download them.
04-12-2015, 03:24 AM
#1666
HI all, several questions already.
1:where do you register the DS16 for updates, the link in the manual is for DS14, no option to apply DS16
2: binding is not clear on 2 receivers, do you bind both at the same time
3: I get no servo movement, device shows 1 receiver
everything else looks prity straight forward
Rcpete
1:where do you register the DS16 for updates, the link in the manual is for DS14, no option to apply DS16
2: binding is not clear on 2 receivers, do you bind both at the same time
3: I get no servo movement, device shows 1 receiver
everything else looks prity straight forward
Rcpete
No need to register the DS16 for updates, simply download them from either the Esprit site or directly from Jeti. Since the DS16 already has all the features fully activated there is no need to license any of the individual features like the DS14 does if you want more channels, etc.
When binding for dual path you DO NOT want to bind them at the same time.
1) Power up the transmitter and go to Advanced, Wireless/Trainer and select dual path.
2) Install a bind plug into the primary receiver. There should be no other connections to the primary receiver at this time.
3) Attach a battery to any port of the primary receiver and then select Pair primary receiver to tx from the Wireless/Trainer menu. Once the primary receiver is bound, remove the bind plug and disconnect the battery, in that order.
Leaving the primary receiver disconnected and powered off, repeat steps 2 and 3 for the secondary receiver, substituting "secondary" for "primary" where needed.
Both receivers should now be bound, connect them in their desired configuration and power them both up. Use Device Explorer to set the options for each receiver. If you are connecting all of your servos to the primary receiver and connecting the secondary receiver to the primary via a PPM link, etc, make sure you have fail-safe in the secondary receiver "DISABLED".
That's the basics. If you have any questions about specific receiver configs, etc, let us know..
Hope this helps.
Wayne
Last edited by wfield0455; 04-12-2015 at 03:31 AM.
04-12-2015, 03:47 AM
#1667
Hey Pete, good to see you at toledo.. welcome to the family.. the learning curve is fast, you will get it.. For experienced users like yourself, it is just really figuring out what menu to use to get what you want..
Remember the throws are full vs the JR, so in general, 80% throw on the Jeti = 100% on the JR/Spek/Fut, and you may need to add just a bit of expo to get the same feel because the stick is more sensitive around the mid point.. I recommend 10-15% more expo on the initial flights. I also recommend people lengthen the sticks at first until they find the magic combo for themselves.. I didn't think that would help me, but I ended up changing my entire setup over time..
The last thing is you can rotate the angle of each stick pot inside the radio. I didn't think I would like it but I did.. I have about 5 degree angle in each stick, and it makes the radio comfortable..
As far as switches on the DS16.. several turbine guys stopped by at Toledo.. good to see you all.. the question I got the most is what cutoff / kill setup do I use?
on my radio, I removed the top left (Sa) switch, and placed a locking switch there. Since I flew JR, I also swapped the long two position and three position switches, so that the "flap switch", and "aux2" switches were the same as the DX18.. I thought the transition would be easier.. I also swapped the trim banks to a cross trim setup, and finally I use the throttle trim to trim the Nose Wheel instead of the throttle.. I find the throttle trim too hard to find quickly. I use the Sb switch for auto trim, but could also use the spring loaded switch on the right. for the Kill Gyro function, I use the "aux 2" switch (Se) It has a -100% gyro to gyro mix.. it's set up to zero out the cortex. finally, for me, I use a High rate and Low rate function for nose wheel steering.. Its on the spring loaded switch on the top right.. IT requires two mixes, but high is for taxi, and defaults to low for takeoff.. If you de couple the nose wheel trim from the rudder trim, you can trim the rudder without affecting the nose wheel, but it still works on the stick.. Its the coolest system..
My setup: for turbines, glow, electric, everything.. the Locking switch engages the throttle kill function.. It will kill or lockout every model's power system. I found it very easy to find in the heat of the battle, but very safe since it locks. so with the switch down, I get the "throttle off" position on the GSU. Up gives me "Idle" Each turbine will require some tweaking for what values to use, and that info is back in this thread.. If someone wants to use the TURBINE ECU failsafe as well, you will have to use a larger value on the RX failsafe.. it takes a little experimenting to get it. The neat part is using the servo monitor page 2 you can see the actual values.. Jim, David, and I experimented with most of the turbines last year, so the info is buried in here in this thread.. Once you get a model the way you want it, copy it to another backup, and you will probably use it over and over as a starting point.
Last edited by gooseF22; 04-12-2015 at 04:10 AM.
04-13-2015, 03:55 PM
#1668
HI all, still trying to set up the receivers/cb200, I think I have done everything correct, but in Device explorer, when I high lite the second R3, it says ( minimum version is 3.30 ), does that mean , these new receivers need to be updated, can I just switch it out and hope , one of the other 2 R3's I have, are updated. I think you have to buy a cord for the updates, which I am told are not in stock.
Rcpete
Also is their a video to show how to update, is their a link.
Rcpete
Also is their a video to show how to update, is their a link.
 04-13-2015, 05:14 PM
#1671
Senior Member
Join Date: Jun 2013
Location: , FL
Posts: 423
Likes: 0
Received 0 Likes
on
0 Posts
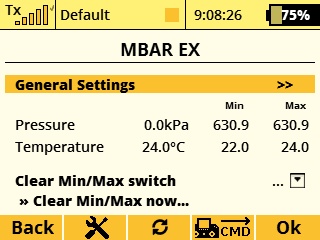
Also check how to make screen shoots, no need to take photos of the screen. Simply flip the switch and system will create instant screenshot that you can download from the radio.
Zb/Jeti USA
 04-13-2015, 05:42 PM
#1673
Senior Member
Join Date: Jun 2013
Location: , FL
Posts: 423
Likes: 0
Received 0 Likes
on
0 Posts
Did you connect CB200 to the R3s via EXT ports to SAT 1 and SAT 2?
Also try logging onto the CB200, you should be able to see telemetry and pin assignment.
Here is video how to setup the CB200
https://www.youtube.com/watch?v=V7_YU3ePL-I
Zb
Also try logging onto the CB200, you should be able to see telemetry and pin assignment.
Here is video how to setup the CB200
https://www.youtube.com/watch?v=V7_YU3ePL-I
Zb
Last edited by Jeti USA; 04-13-2015 at 05:46 PM.
04-13-2015, 10:07 PM
#1674
for the CB200, you must put power into one of big multiplex ports for it to work properly, or it won't talk to the servos correctly.. Once you get the receivers updated, set the CB200 to accept the ex in.. you are almost there pete..
Make sure the failsafe is off on the receivers, and on in the CB200.. keep tinkering with it, you will get it.. it takes a little learning at first..
Make sure the failsafe is off on the receivers, and on in the CB200.. keep tinkering with it, you will get it.. it takes a little learning at first..
04-13-2015, 10:11 PM
#1675
HI all, still trying to set up the receivers/cb200, I think I have done everything correct, but in Device explorer, when I high lite the second R3, it says ( minimum version is 3.30 ), does that mean , these new receivers need to be updated, can I just switch it out and hope , one of the other 2 R3's I have, are updated. I think you have to buy a cord for the updates, which I am told are not in stock.
Rcpete
Also is their a video to show how to update, is their a link.
Rcpete
Also is their a video to show how to update, is their a link.