


Sebart Avanti S Build Thread w/KT 180

 05-27-2014, 11:55 PM
#252

My Feedback: (6)
Join Date: Mar 2002
Location: Las Vegas,
NV
Posts: 206
Likes: 0
Received 0 Likes
on
0 Posts
Your tank install and the canopy looks great Kevin! Any chance you might be ready for the maiden this weekend? If so, good luck!
Also, we have a ton of photos and some video from Joe Nall to post after we have chance to go through everything, but in the meantime you guys can see some of Seba's demo from the last Saturday in this video (Avanti footage starts at 10:00 and lots of hovering starts around 11:20):
http://www.youtube.com/watch?v=G_gBGN22rvg And the good news is that the demo model did make it to our warehouse safely today and should be flying at some west coast events soon!
Jason
 05-28-2014, 05:38 PM
#255
Senior Member
My Feedback: (1)
Join Date: Feb 2008
Location: Surrey, BC, CANADA
Posts: 427
Likes: 0
Received 0 Likes
on
0 Posts
Sorry Jason have been dealing with health issues with my wife in and out of hospital all week. It's very close got the smoke pump today from Duralite (power box) no flying for me for a bit yet. I can't wait though.
06-02-2014, 08:08 PM
#258

Hey guys, just wanted to share a video from the weekend. I have 7 flights on my Avanti now and really enjoy flying it. Its a great flying airplane, very stable and solid at all points during the flight even in knife edge and through low speed turns etc. Any aerobatics are no problem, just restricted to your imagination and setup  It does have a slight bit of roll mixing, and very little pitch mixing in order to fly straight knife edge, but it doesn't detract from the flight performance in any way.
I am using the Kingtech 140 in mine, and performance is very good, not unlimited vertical, but I am at 3500' asl so I probably have some loss of thrust due to the altitude, and I have not yet flown it at sea level. With full flaps on for landing the approaches are very stable and controllable right to touchdown. Slowing down is not an issue, when you pull the power off with the flaps down it really slows down quickly and you can keep the rollout short.
Anyways here is a video of it flying!
http://www.youtube.com/watch?v=lbVSQyA3wr4&list=UUiP0hiWEkhdi-8OzbffGSwA&feature=share
It does have a slight bit of roll mixing, and very little pitch mixing in order to fly straight knife edge, but it doesn't detract from the flight performance in any way.I am using the Kingtech 140 in mine, and performance is very good, not unlimited vertical, but I am at 3500' asl so I probably have some loss of thrust due to the altitude, and I have not yet flown it at sea level. With full flaps on for landing the approaches are very stable and controllable right to touchdown. Slowing down is not an issue, when you pull the power off with the flaps down it really slows down quickly and you can keep the rollout short.
Anyways here is a video of it flying!
http://www.youtube.com/watch?v=lbVSQyA3wr4&list=UUiP0hiWEkhdi-8OzbffGSwA&feature=share
06-08-2014, 07:41 AM
#259
Hello everyone,
Here is my 18mz program for my Avanti in case anyone wants to compare. I have the KE mixing pretty close now for my setup, and the throws feel pretty good.
You have to change the file extension from .pdf back to .mdl so it can load into you Tx (can't upload a .mdl file). Don't try to load it into a 14z as sometimes 18z programs can brick 14 transmitters if loaded.
Chad
06-08-2014, 07:50 AM
#260

Hello everyone,
Here is my 18mz program for my Avanti in case anyone wants to compare. I have the KE mixing pretty close now for my setup, and the throws feel pretty good.
You have to change the file extension from .pdf back to .mdl so it can load into you Tx (can't upload a .mdl file). Don't try to load it into a 14z as sometimes 18z programs can brick 14 transmitters if loaded.
Chad
Here is my 18mz program for my Avanti in case anyone wants to compare. I have the KE mixing pretty close now for my setup, and the throws feel pretty good.
You have to change the file extension from .pdf back to .mdl so it can load into you Tx (can't upload a .mdl file). Don't try to load it into a 14z as sometimes 18z programs can brick 14 transmitters if loaded.
Chad
Thanks!
06-08-2014, 10:02 AM
#261
Hi Zeeb,
I use a 7008 Rx, and here is how it is connected up!
Aileron - BLS 174SV
Elevator - BLS 171SV
Rudder - BLS 175SV
Flaps - BLS 451's
Nose Gear Door - BLS 153
Steering - BLS 551
Elevators/Rudder - This was one S.Bus group, I made my own 20g extension (single cable at Rx end and then split into three females)
Ailerons - Second S.Bus group again homemade extension
Flaps/Throttle - I used a S.Bus decoder (http://www3.towerhobbies.com/cgi-bin...&I=LXZKA6&P=ML) to bring the non-sbus flap servos and throttle channel on to S.Bus.
The above servos covered channels 1-8 in the radio, you need 1 terminal block to plug the three S.Bus extensions into and then a single cable from the terminal block to the S.Bus port on Rx.
I use a 7008SB Rx, and set it to the channel 9-15 mode, so that the remainder plug into the Rx channel ports which were:
Nose gear door
Steering
Gear air valve
Brake air valve
Smoke
Hope that helps,
Chad
06-08-2014, 02:28 PM
#262

Gary, start watching the youtube videos on the SRS by the little jet company. I think his name is Alex? He does awesome set up videos on the gyro and the SRS. Otherwise, it is not fun to set it up.
Did you buy the power bus boxes? I have three of them for my corsair, haven't fired it up yet.
Did you buy the power bus boxes? I have three of them for my corsair, haven't fired it up yet.
06-08-2014, 03:21 PM
#263
This is is very similar to the way I set up my Tucano. To join all the sbus cables I made up cables to each major location (elevators, wings, etc) and then ran them all to a PC project board with -+s traces across the various leads and built up the +/- traces with extra solder which was then connected with 16 ga cable to my power system. This is the only downside of the s-bus system is the distribution of the s-bus signals all collecting at one point.
Worked really well, just did not use a hub for the throttle and plugged it into one of the 9-16 channels. Sure is nice to be able to assign any function to any channel in the 18MZ.
PaulD
Worked really well, just did not use a hub for the throttle and plugged it into one of the 9-16 channels. Sure is nice to be able to assign any function to any channel in the 18MZ.
PaulD
Hi Zeeb,
I use a 7008 Rx, and here is how it is connected up!
Aileron - BLS 174SV
Elevator - BLS 171SV
Rudder - BLS 175SV
Flaps - BLS 451's
Nose Gear Door - BLS 153
Steering - BLS 551
Elevators/Rudder - This was one S.Bus group, I made my own 20g extension (single cable at Rx end and then split into three females)
Ailerons - Second S.Bus group again homemade extension
Flaps/Throttle - I used a S.Bus decoder (http://www3.towerhobbies.com/cgi-bin...&I=LXZKA6&P=ML) to bring the non-sbus flap servos and throttle channel on to S.Bus.
The above servos covered channels 1-8 in the radio, you need 1 terminal block to plug the three S.Bus extensions into and then a single cable from the terminal block to the S.Bus port on Rx.
I use a 7008SB Rx, and set it to the channel 9-15 mode, so that the remainder plug into the Rx channel ports which were:
Nose gear door
Steering
Gear air valve
Brake air valve
Smoke
Hope that helps,
Chad
I use a 7008 Rx, and here is how it is connected up!
Aileron - BLS 174SV
Elevator - BLS 171SV
Rudder - BLS 175SV
Flaps - BLS 451's
Nose Gear Door - BLS 153
Steering - BLS 551
Elevators/Rudder - This was one S.Bus group, I made my own 20g extension (single cable at Rx end and then split into three females)
Ailerons - Second S.Bus group again homemade extension
Flaps/Throttle - I used a S.Bus decoder (http://www3.towerhobbies.com/cgi-bin...&I=LXZKA6&P=ML) to bring the non-sbus flap servos and throttle channel on to S.Bus.
The above servos covered channels 1-8 in the radio, you need 1 terminal block to plug the three S.Bus extensions into and then a single cable from the terminal block to the S.Bus port on Rx.
I use a 7008SB Rx, and set it to the channel 9-15 mode, so that the remainder plug into the Rx channel ports which were:
Nose gear door
Steering
Gear air valve
Brake air valve
Smoke
Hope that helps,
Chad
06-09-2014, 12:27 PM
#264

Been working on my Avanti S for a couple weeks now. my setup is:
Evo Jet 180 (220 series)
Evo Jet smoke pump
Jeti Central Box 200 w/(2) R3 RX
MKS HBL 950 (aileron, elevator, thrust vector)
MKS HV 777 (rudder, flap)
MKS HV 1230 (nose wheel steering)
MKS HV 747 (nose gear door
barvarianDEMON Cortex (x2, one for flight surfaces, on for thrust vector)
I'll post some build pics later.
06-09-2014, 06:49 PM
#265
My Feedback: (1)
Question for anyone using a JC 120 or 140rx.
I set my pipe at the rear exit of the fuse even with the end of the fuse. When I set my 140 rx so that I have 3/4" to 7/8" from where the bellmouth attaches to the pipe to the end of the exhaust nozzle of the 140rx the starter motor takes out the crossbeam.
I can replace the xbeam with a new one further forward.
What did 140rx or 120 users choose to do with this situation?
I am going to have to use a 1/8 packing to center the engine on the exhaust tube.Is this what JC 140rx guys have found?
Would like to know how others have worked it out.
Stan
06-09-2014, 08:46 PM
#266
Senior Member
My Feedback: (1)
Join Date: Feb 2008
Location: Surrey, BC, CANADA
Posts: 427
Likes: 0
Received 0 Likes
on
0 Posts
Hi Stan.
Depends on he pipe you got I got the 140-180 pipe with the pipe pretty much even with the rear of fuse my 140 fits fine. You measure from the seam of the belmouth and pipe ...... To get your 3/4-7/8 " I did need some shimming on mine as well to centre it too. Does that make sense ?
Depends on he pipe you got I got the 140-180 pipe with the pipe pretty much even with the rear of fuse my 140 fits fine. You measure from the seam of the belmouth and pipe ...... To get your 3/4-7/8 " I did need some shimming on mine as well to centre it too. Does that make sense ?
06-09-2014, 10:03 PM
#267
My Feedback: (1)
Hi Stan.
Depends on he pipe you got I got the 140-180 pipe with the pipe pretty much even with the rear of fuse my 140 fits fine. You measure from the seam of the belmouth and pipe ...... To get your 3/4-7/8 " I did need some shimming on mine as well to centre it too. Does that make sense ?
Depends on he pipe you got I got the 140-180 pipe with the pipe pretty much even with the rear of fuse my 140 fits fine. You measure from the seam of the belmouth and pipe ...... To get your 3/4-7/8 " I did need some shimming on mine as well to centre it too. Does that make sense ?
I believe mine is the smaller pipe. Jason told me that is what they are using for the 140 size turbines with the newer kits. I am measuring from the seam of the Belmouth and pipe.
This puts my starter motor over the top of the cross beam. Your pipe must be shorter. I will call Jason in the morning. 1/8 packing just about centers the turbine.
Stan
06-10-2014, 04:30 AM
#268
Senior Member
My Feedback: (1)
Join Date: Feb 2008
Location: Surrey, BC, CANADA
Posts: 427
Likes: 0
Received 0 Likes
on
0 Posts
My pipe is approx 28" long I know it is a diff length than the one Chad has. I have a 160 as well so I got the 140-180 pipe in case I wanted to switch it out.
06-10-2014, 11:43 AM
#270
Gary, start watching the youtube videos on the SRS by the little jet company. I think his name is Alex? He does awesome set up videos on the gyro and the SRS. Otherwise, it is not fun to set it up.
Did you buy the power bus boxes? I have three of them for my corsair, haven't fired it up yet.
Did you buy the power bus boxes? I have three of them for my corsair, haven't fired it up yet.
I bought the PowerBox Royal SRS PE. I wanted the Igyro and I was a bit leery of going Sbus for the first time with a new jet. So I kind of slipped back to my IMAC experience and went with the PE which has the Igyro built in and two rx inputs. I think that will be pretty easy to setup, the gyro will be a challenge. With the PE I get two buss voltage power outputs from the PE one of which will have to go to the PowerBox smoke pump as it will not take three cell LiPO voltage and it's got two power inputs for the 2S2P 2200mah A123 packs I got built from Wrongway RC. The Behotec has to have a three cell LiPO pack so that changed my plans a bit. All of the servos are Sbuss compatible except for the two thrust vector servos, those are JR 8717 heli swashplate servos. Futaba didn't have anything close on speed, I doubt anyone makes a servo with a tighter deadband than JR and Futaba won't even say what their servos are using for deadband.
06-10-2014, 12:16 PM
#271
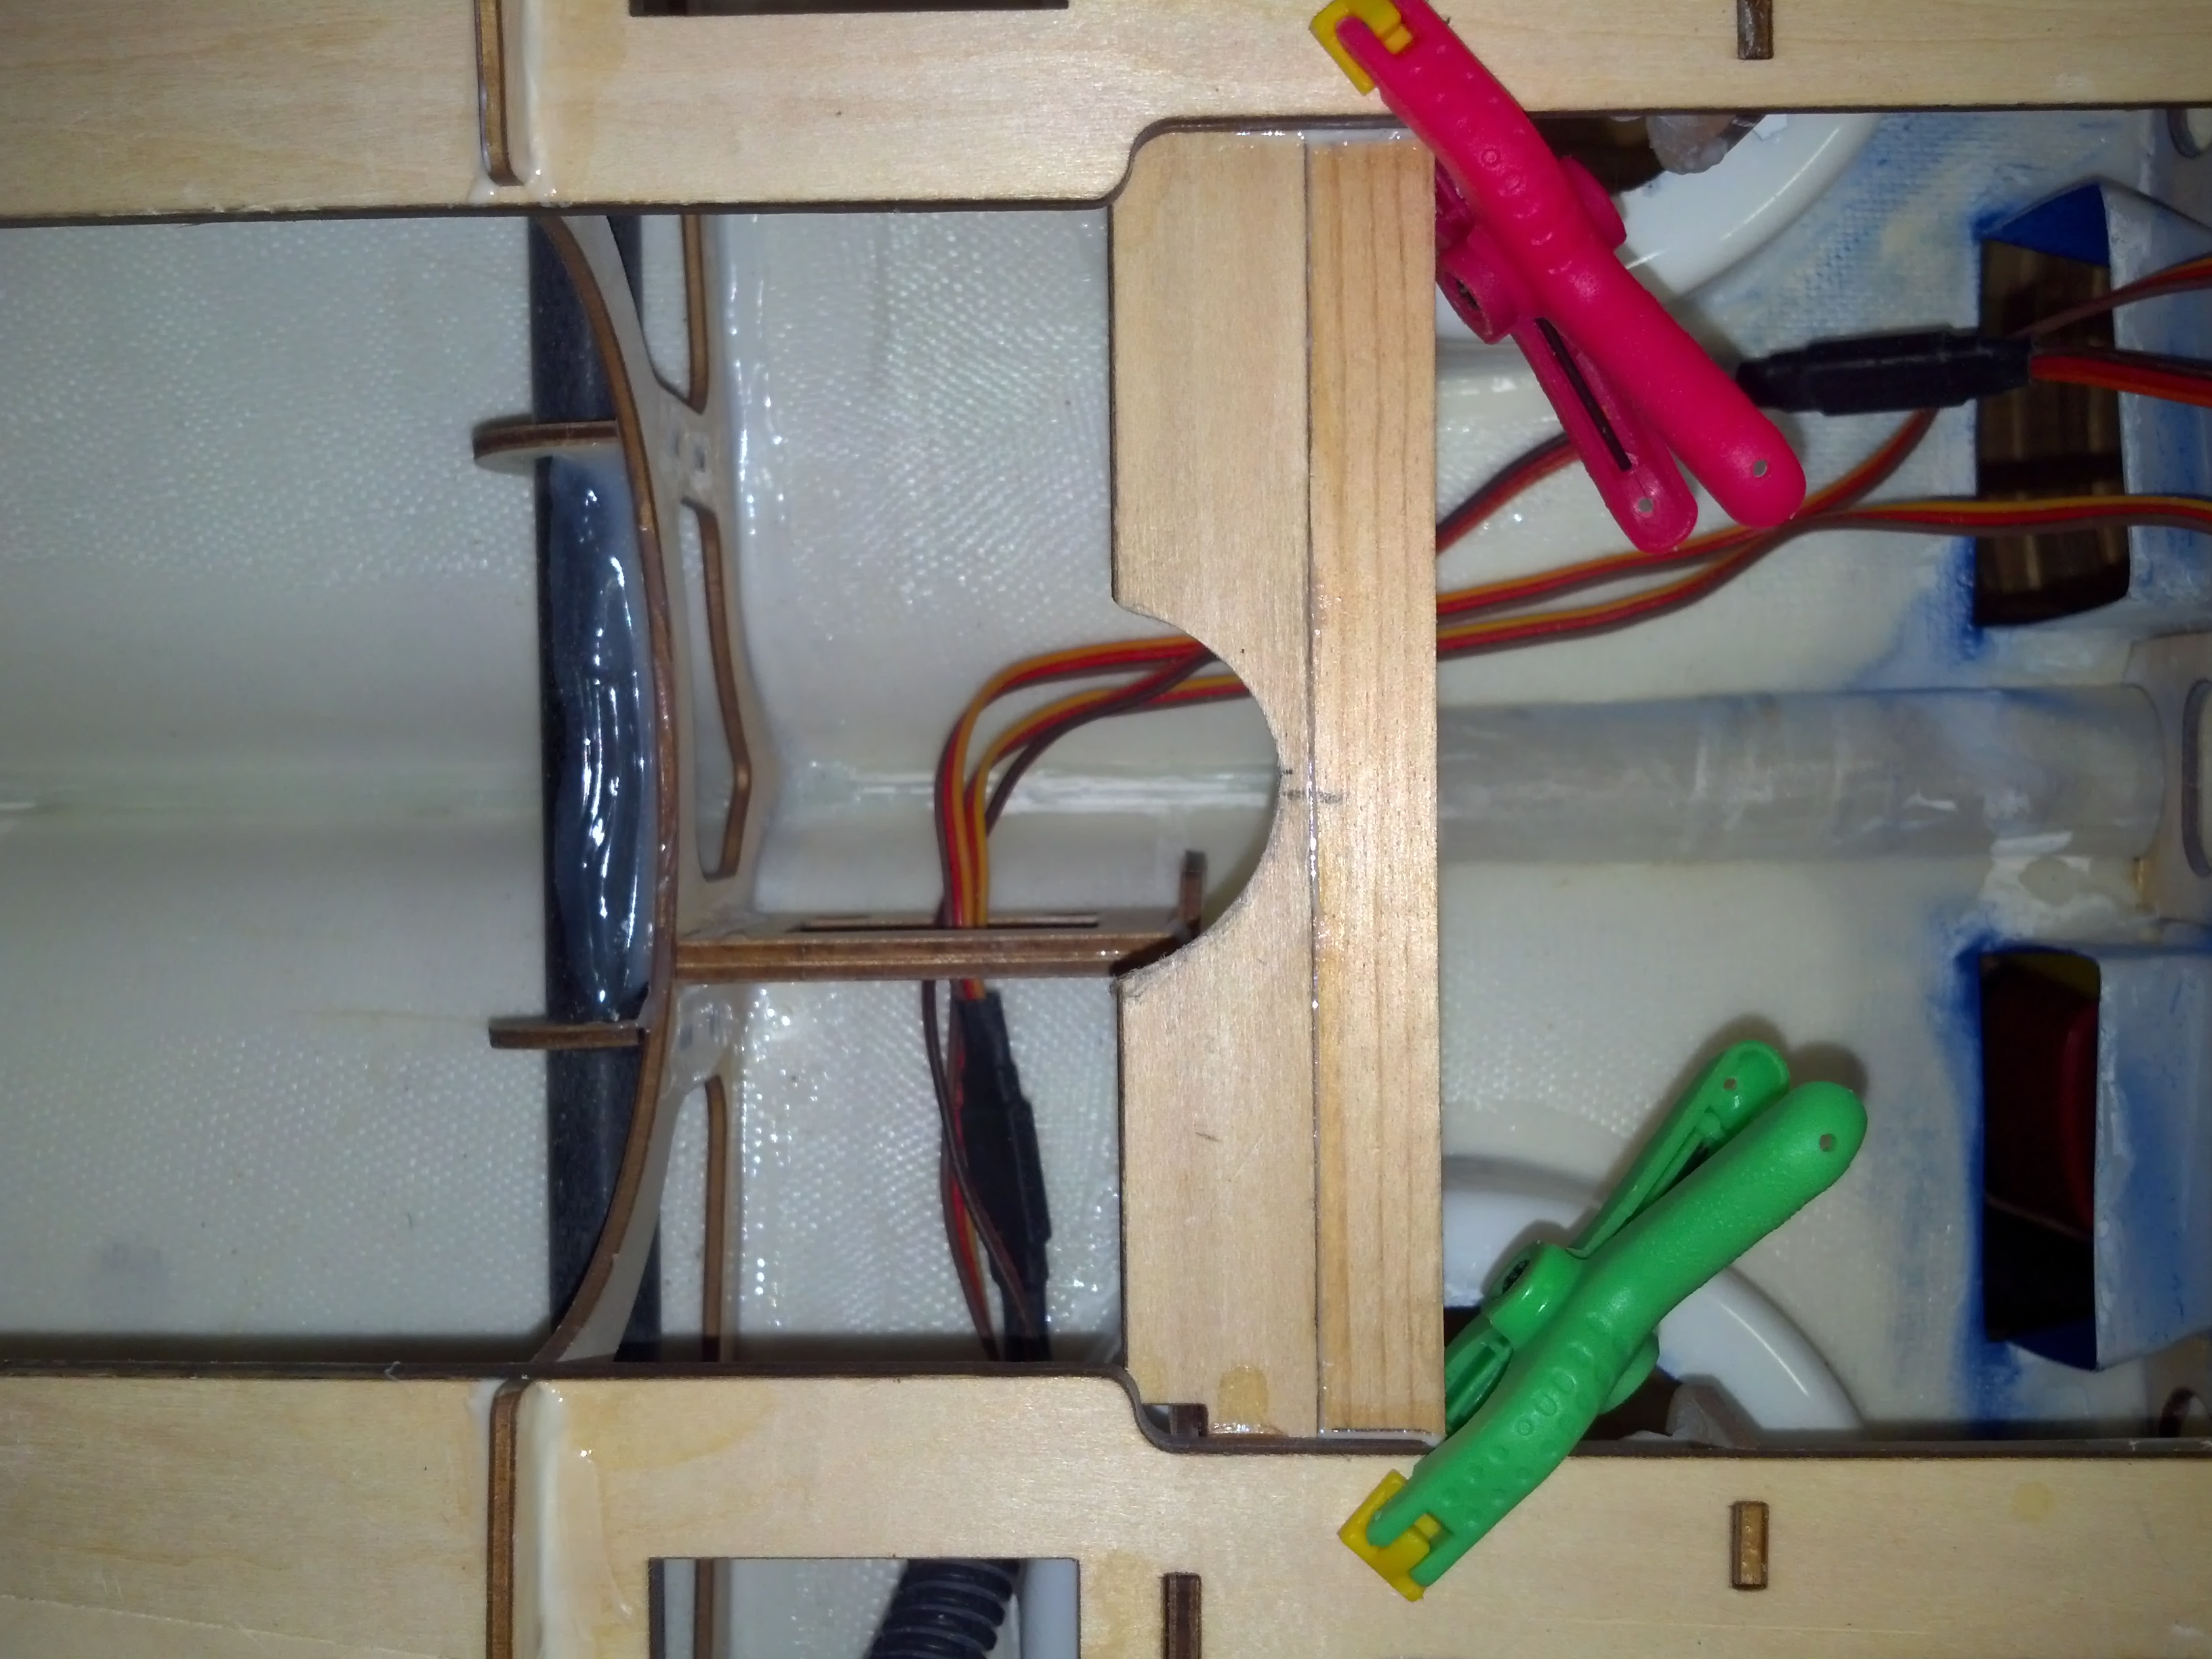
Definately no need to be leery of going S.Bus! This was my first S.Bus install and I have to say it works flawlessly, and will be using is on all my models in the future. Really cuts down on wiring and makes it impossible to plug anything in incorrectly. I was initially concerned about the long cable to the tail, and powering three servos back there, but I did a simple test by stalling out two of them and measuring the voltage at the connectors in the tail and at the Rx, and the drop was only around 0.2-0.3V with two fully stalled servos. So its a complete non-issue to drive three servos down a single power lead IMO.
I attached a pic of my install, I think its pretty clean. I ran two 2s lipo's through a PB Sensor switch, and run the Powerbox smoke pump directly plugged into one of the lipo's when I want to use it. A normal flight uses about 250-300 mAh total, and 400mAh when I run the smoke pump.
Since I am not using TV, I have no gyro which reduces a couple of inputs.
Chad
06-11-2014, 06:06 AM
#272
My Feedback: (1)
For those of you who will be using a JC 140 RX with the smaller pipe which they are now recommending for this size engine, You will have to take out the cross member in order to get the 3/4" clearance between the bellmouth intersection with the pipe and the exhaust nozzle of the turbine.
In my case because it does support the fuel tank this is how I fixed mine.
I did find that the supporting formers for the engine mount were actually loose at the point of contact with the engine mount. If they appeared to be glued I used a slight side to side pressure and the glue joint broke. I repaired all with Hysol. I don't know if this is a problem only related to my model, but I would certainly check yours if you haven't already done it. The glue they have used appears to be brittle.
Stan

