


FEJ A-7 Build
 06-15-2014, 02:32 PM
#1

Thread Starter
My Feedback: (112)
Join Date: Jan 2002
Location: VICTORVILLE,
CA
Posts: 325
Likes: 0
Received 0 Likes
on
0 Posts
FEJ A-7
I ordered this kit more than a year a half ago and even though it took 6 months from placing the order to the aircraft ready for shipping, it was a year before she actually shipped. Thank you to James and FEJ for allowing her to sit while I worked out some personal issues. With that said, this will most likely be the last kit I purchase from FEJ. When I ordered the kit, I requested specific changes from the stock aircraft, such as plywood/carbon spars and internal structure for the wings, tails and the bulkheads that supported the wings and tails. Prior to placing the order, I was assured that the aircraft would be built to my specifications. Upon arrival, the initial inspection looked good, the vertical has two plywood spars, and the fuselage has ply formers and carbon as needed. However, the wings have a plywood base rib but honeycomb internal ribs and the main spar has honeycomb spars which are not safe or structurally sound. Initially it appeared that the main spar was sandwiched between two honeycomb spars and filled with an epoxy mixture thus making it more structural than my initial impression. That is not the case; the main wing spar is not secure enough to be air worthy. This is not a case of if it will fail; it is a matter of how soon will it be when the wing failure occurs. Ironically, the forward sub-spar is bolted to and supported by plywood plates within the wing, and although it could have benefited from additional epoxy/filler or some sort of vertical structure between the spar and the wing skins, it is significantly better than the main spar installation. The wings are also destined to fail due to flutter caused by the poor installation of the flaps and ailerons. The hinge line is far from the wing trailing edge and there is anywhere from �” to 5/8” of unsupported hinge which over time will weaken and flex as a result of flight loads. This flexing will result in flutter and severe wing structure damage
Now why will this most likely be the last FEJ aircraft I buy?? Not because of the issues in the wing, because this is all repairable although time consuming. I reached the limit of my tolerance when they (James) agreed to my request and only after I received the aircraft and spoke to James about the wings as received, did he say “we can’t change the way we build for one customer”, if this was said in the beginning, I would have had the option of agreeing or rejecting the deal with no hard feelings. That didn’t happen. So now I understand where I stand with James and FEJ and they will continue on with one less customer. No I will not bash them but I will inform anyone that ask how they lost this customer.
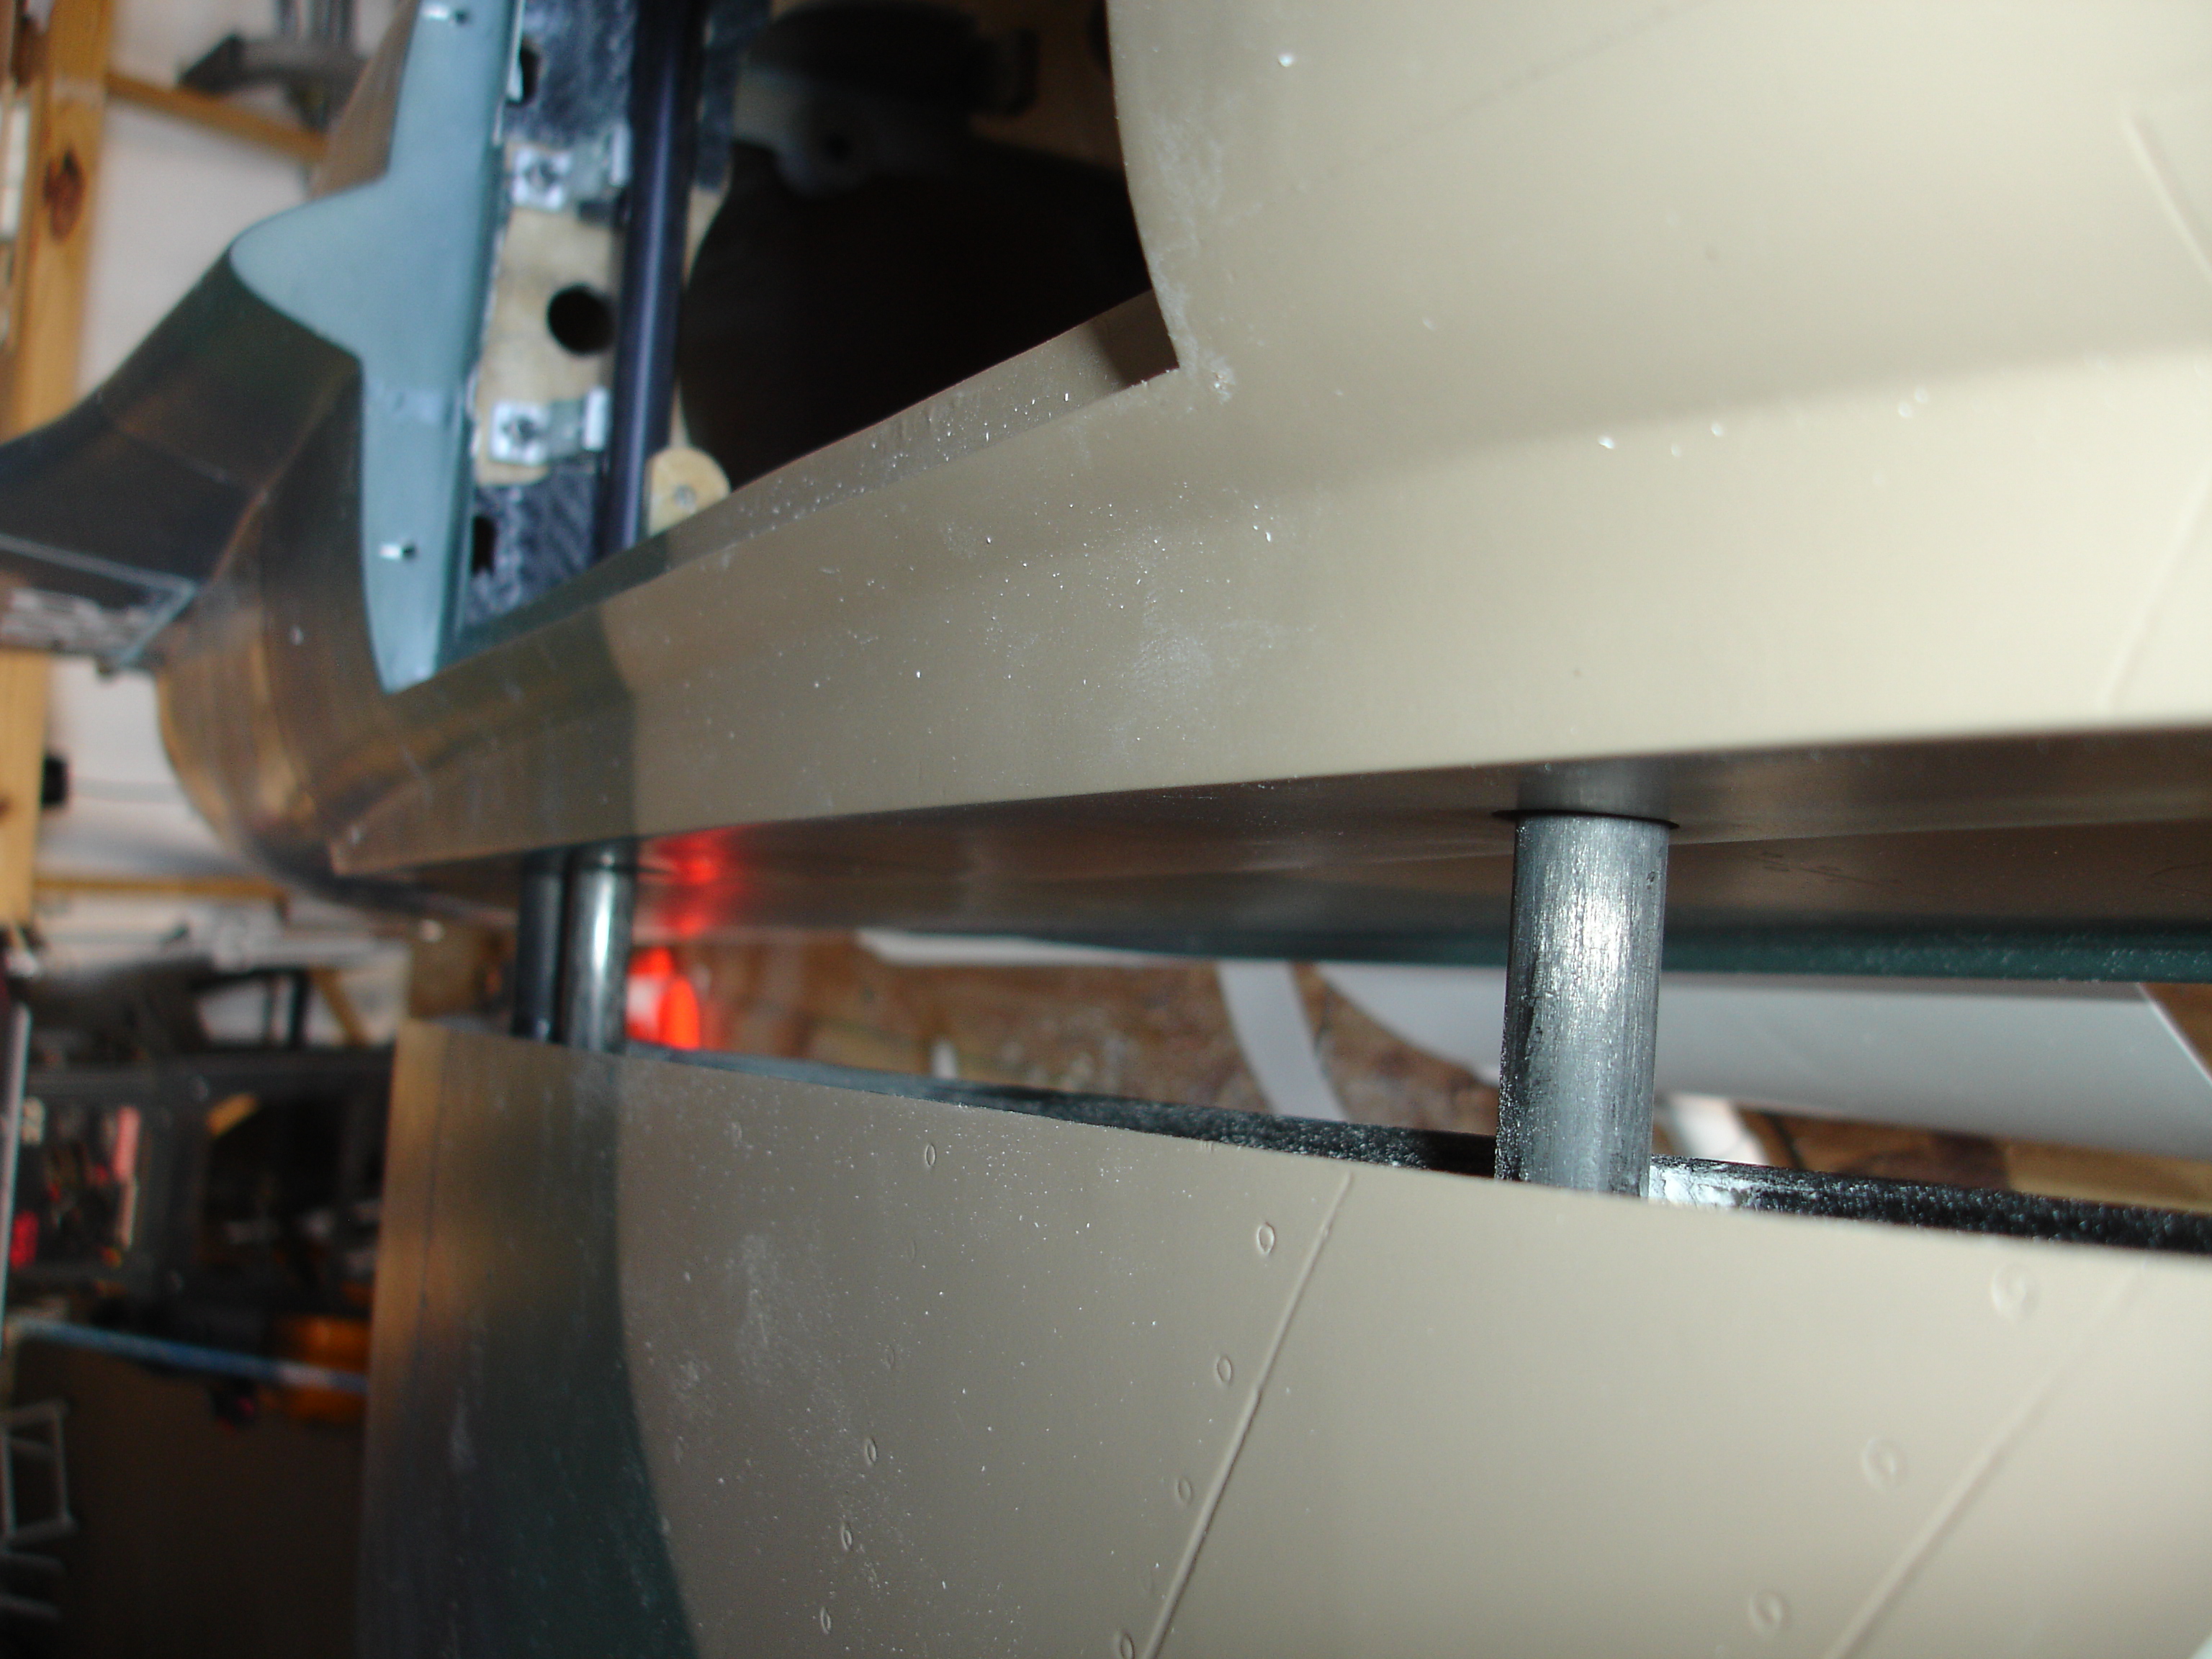
About the A-7, I love the size of the aircraft and the build of the fuselage and vertical. I will open the tails as I am certain that they have balsa supporting the pivot rods and I will most likely shave out the honeycomb wing spars and replace them with plywood and carbon. The leading edge flaps are overbuilt and on the heavy side. The gear looks nice and robust but I have not checked for leaks yet. The photos below are of the 1[SUP]st[/SUP] day’s work/dissection.


I ordered this kit more than a year a half ago and even though it took 6 months from placing the order to the aircraft ready for shipping, it was a year before she actually shipped. Thank you to James and FEJ for allowing her to sit while I worked out some personal issues. With that said, this will most likely be the last kit I purchase from FEJ. When I ordered the kit, I requested specific changes from the stock aircraft, such as plywood/carbon spars and internal structure for the wings, tails and the bulkheads that supported the wings and tails. Prior to placing the order, I was assured that the aircraft would be built to my specifications. Upon arrival, the initial inspection looked good, the vertical has two plywood spars, and the fuselage has ply formers and carbon as needed. However, the wings have a plywood base rib but honeycomb internal ribs and the main spar has honeycomb spars which are not safe or structurally sound. Initially it appeared that the main spar was sandwiched between two honeycomb spars and filled with an epoxy mixture thus making it more structural than my initial impression. That is not the case; the main wing spar is not secure enough to be air worthy. This is not a case of if it will fail; it is a matter of how soon will it be when the wing failure occurs. Ironically, the forward sub-spar is bolted to and supported by plywood plates within the wing, and although it could have benefited from additional epoxy/filler or some sort of vertical structure between the spar and the wing skins, it is significantly better than the main spar installation. The wings are also destined to fail due to flutter caused by the poor installation of the flaps and ailerons. The hinge line is far from the wing trailing edge and there is anywhere from �” to 5/8” of unsupported hinge which over time will weaken and flex as a result of flight loads. This flexing will result in flutter and severe wing structure damage
Now why will this most likely be the last FEJ aircraft I buy?? Not because of the issues in the wing, because this is all repairable although time consuming. I reached the limit of my tolerance when they (James) agreed to my request and only after I received the aircraft and spoke to James about the wings as received, did he say “we can’t change the way we build for one customer”, if this was said in the beginning, I would have had the option of agreeing or rejecting the deal with no hard feelings. That didn’t happen. So now I understand where I stand with James and FEJ and they will continue on with one less customer. No I will not bash them but I will inform anyone that ask how they lost this customer.
About the A-7, I love the size of the aircraft and the build of the fuselage and vertical. I will open the tails as I am certain that they have balsa supporting the pivot rods and I will most likely shave out the honeycomb wing spars and replace them with plywood and carbon. The leading edge flaps are overbuilt and on the heavy side. The gear looks nice and robust but I have not checked for leaks yet. The photos below are of the 1[SUP]st[/SUP] day’s work/dissection.
Last edited by foster4u; 06-15-2014 at 02:42 PM.


 06-15-2014, 06:24 PM
#4
Thread Starter
My Feedback: (112)
Join Date: Jan 2002
Location: VICTORVILLE,
CA
Posts: 325
Likes: 0
Received 0 Likes
on
0 Posts
Lol, they are not beyond saving, but it would be a big mistake to use the wings and tails as delivered.
Last edited by foster4u; 06-15-2014 at 06:44 PM.
 06-15-2014, 11:27 PM
#6
I agree with the post from invertmast... use them as a plug.. FEJ told me to go away after my hawk crash as I am no one to them... just as I was about to push the button on the vampire as Ali told me it was a massive improvement on there shizzz before....
My hawk lost a elevator half could not save it... just over 6hours of flight time... Cocks... I am going to china soon too!!!!!
My hawk lost a elevator half could not save it... just over 6hours of flight time... Cocks... I am going to china soon too!!!!!
 06-16-2014, 03:13 PM
#8
http://www.rcuniverse.com/forum/rc-j...l#post11768615
Fortunately, I am more than capable of inspecting the entire airframe for unauthorized use of honeycomb or defects that might be an issue. I am also intellegent enough to know what is not structurally sound and how to rectify the issue.
While the many (FEJ) aircraft lost due to manufacturing defects, which should not have existed,bother me, I do not intend to allow peer pressure or bulling stop me from perusing my hobby in the fashion that I choose. As it has been stated many times, “buyers beware and I am. I have no problem working with this manufacturer to correct what I find unacceptable, and as long as they continue to support my request as they have in the past, our relationship shall continue.
I believe that the negative attitudes displayed by some of you will do far more harm to this hobby than FEJ’s poor quality could ever do. It is a fact that over time the airframes that continue to fail will perish and those that hold up will thrive. It would be far more beneficial to the hobby if all of this negative energy were utilized to improve the quality. If you have given up on FEJ then give up B!TCH*IG about FEJ…and if you have no idea of what is structurally sound stick to the proven designs with step by step instructions, so that you don’t end up crying when your 10K smacks the ground. At some point, you must accept the fact that you as the builder and final QA, have an equal obligation to determine the airworthiness and limitations of the aircraft. Just because someone else said it is good to go does not mean you are no longer responsible.
I wish you luck with your project, but I sincerely hope that there were no inexperienced buyers who were influenced to buy one of these aircraft because of your "anti-negative" comments in support of FEJ.
Bob
Last edited by rhklenke; 06-16-2014 at 03:15 PM.
06-16-2014, 03:50 PM
#9
Thread Starter
My Feedback: (112)
Join Date: Jan 2002
Location: VICTORVILLE,
CA
Posts: 325
Likes: 0
Received 0 Likes
on
0 Posts
Bob,
First, let me say that I do not intend to let this thread go beyond the build of this aircraft and information that serves that purpose.
I am well aware of FEJ’s reputation and their issues so that was not a surprise. I am posting this build to help the next person who chooses to exercise his right to build what he likes, and end up with an FEJ (or any other ARF for that matter), and assume that they can install a few parts and fly away without taking time to fully inspect the airframe. My “anti-negative” comments are true and are my perspective and I sincerely hope you can respect them, even if you do not agree with them. I would be the first to recommend other aircraft to new and unsuspecting pilots but if someone chose to go this route, I would not cast stones at them; I would make them aware of the pitfalls and help to make their venture as successful as possible.
As you noted, I’ve decided not to purchase from them again for my own reasons and I have posted this so that anyone new or old can have this extra information whether they choose to use it or not. Now I will continue with the build as time permits and I hope we are past this discussion.
Last edited by foster4u; 06-16-2014 at 04:02 PM.
07-08-2014, 03:04 PM
#10
Thread Starter
My Feedback: (112)
Join Date: Jan 2002
Location: VICTORVILLE,
CA
Posts: 325
Likes: 0
Received 0 Likes
on
0 Posts
A-7 Update:
1. Still waiting on James to return my calls,regarding assembly data for the A-7…
2. Plan to add a 3[SUP]rd[/SUP] spar ~1” forward of the main spar. There is plenty of room and no restrictions
3. I am pleased to say that none of the gear or other cylinders leaked.
4. I submerged and operated every cylinder andthere were no leaks.
5. Every single screw on the aircraft was loose.The gear, the spar mounts, the vertical tail supports, even the screws securing the cockpit latch were all loose.
6. I removed gobs of excessive glue.
7. The hysol sorounding the horizontal tail bushings was full of voids
8. There were several spots where the honeycomb was not properly bonded to the glass cloth. However, the skin is more than thick enough so removed the loose honeycomb.
9. The nose gear plates were capped with carbon fiber but it was barely attached. Once removed, it revealed voids between the gear plates and the formers
10. Mocked up two new tanks to relocate the fuel, closer to the C/G
11. Removed the refuel boom from the fuselage, (a preference)
12. Opened the bottom of the rudder to add a torque-rod for internal linkage (a preference)
13. Made the tail hook functional
14. The airlines are all installed
15. Locating the pylons
Last edited by foster4u; 07-08-2014 at 07:34 PM.
07-08-2014, 03:21 PM
#11
My Feedback: (49)
Join Date: Apr 2002
Location: SANTA ANA, CA
Posts: 2,182
Likes: 0
Received 0 Likes
on
0 Posts
William,
Quite a project. Best of luck with it! If anyone can make it flyable, you can.
If you don't hear from James, check with Lewis Patton or Lowell Wexler. They both had/have A-7's completed. Maybe they have copies of the build manual.
David S
Quite a project. Best of luck with it! If anyone can make it flyable, you can.
If you don't hear from James, check with Lewis Patton or Lowell Wexler. They both had/have A-7's completed. Maybe they have copies of the build manual.
David S
07-10-2014, 08:23 AM
#14
Thread Starter
My Feedback: (112)
Join Date: Jan 2002
Location: VICTORVILLE,
CA
Posts: 325
Likes: 0
Received 0 Likes
on
0 Posts
A-7 Update:
Today I received the assembly data/photos and C/G information for the A-7. Most of the build is very basic but there are a few parts that needed explaining.
Today I received the assembly data/photos and C/G information for the A-7. Most of the build is very basic but there are a few parts that needed explaining.
 07-10-2014, 02:29 PM
#17
Thread Starter
My Feedback: (112)
Join Date: Jan 2002
Location: VICTORVILLE,
CA
Posts: 325
Likes: 0
Received 0 Likes
on
0 Posts
No, the two main doors are cylinder operated. The slim doors outboard of the main struts have drag-links, and the two aft doors are spring loaded. I plan to replace the spring-loaded doors with drag-links.

Last edited by foster4u; 07-10-2014 at 02:32 PM.
07-29-2014, 08:52 AM
#18
Thread Starter
My Feedback: (112)
Join Date: Jan 2002
Location: VICTORVILLE,
CA
Posts: 325
Likes: 0
Received 0 Likes
on
0 Posts
A-7 update:
Added a 3[SUP]rd[/SUP] wing spar
Scaled down the gun port on the left side of the nose
Removed the refuel probe on the right side of the nose, I plan to add the refueling receptacle above the wing.
Molded a set of fuel tanks to fit my configuration
Removed the fuselage joiner line
Permanently joined the cockpit section, I did not like that seam.
Permanently bonded the vertical assembly, removed the seam, and installed the rudder servo & linkage.
Last edited by foster4u; 07-29-2014 at 08:55 AM.
07-29-2014, 11:20 AM
#21

My Feedback: (1)
A few observations:
Are you sure the extra wing tube will be enough to compensate for the other two "less than adequate" wing spars?
I would be concerned that if the front spar gave out the wing would still fail catastrophically.
The main fuel tank you built looks pretty good, but with the hump in the middle of the bottom floor won't you end up with a fair amount of unusable fuel settling on the opposite side from where the clunk does?
The cut-outs to accommodate the main gear retracts in that former are quite large (very little wood remains above the retracts). I suspect that same former also carries the loads for the rear wing spar, which means that the landing gear brackets will effectively be carrying some of the flight loads (through the mounting bolts). Do you think it is adequate for that?
07-29-2014, 12:02 PM
#22
Thread Starter
My Feedback: (112)
Join Date: Jan 2002
Location: VICTORVILLE,
CA
Posts: 325
Likes: 0
Received 0 Likes
on
0 Posts
Are you sure the extra wing tube will be enough tocompensate for the other two "less than adequate" wing spars? Yes, this is a �”solid carbon strand rod and is not intended to replace the other two carbonspars, only augment them, and allow near zero deflection at the areas that Iconsider somewhat compromised.
I would be concerned that if the front spar gave out thewing would still fail catastrophically. The total wing loading will be distributed across the threespars and the fuselage. The front sparis more than enough to hold its own and my real concern was with the holedrilled in the main spar.
The main fuel tank you built looks pretty good, but with thehump in the middle of the bottom floor won't you end up with a fair amount ofunusable fuel settling on the opposite side from where the clunk does? Good question, but theplan is to add a line at the bottom to static balance the two sides.
The cut-outs to accommodate the main gear retracts in thatformer are quite large (very little wood remains above the retracts). I suspect that same former also carries theloads for the rear wing spar, which means that the landing gear brackets willeffectively be carrying some of the flight loads (through the mounting bolts). Do you think it is adequate for that? This former is quitesubstantial and the main landing gear assembly is well built. There is more than enough area in this formerto transfer the expected loads. As a benefit,the 3[SUP]rd[/SUP] spar will be supported by a partial former (not installedyet) which will transfer these loads between the wing half’s.
07-29-2014, 12:22 PM
#23
My Feedback: (1)
Yes, this is a �”solid carbon strand rod and is not intended to replace the other two carbonspars, only augment them, and allow near zero deflection at the areas that Iconsider somewhat compromised.
The total wing loading will be distributed across the threespars and the fuselage. The front sparis more than enough to hold its own and my real concern was with the holedrilled in the main spar.
I agree about the hole in the main spar, my fear would be that it would split under high G's and allow the wing to twist and fold back under aerodynamic loads. Hopefully your third spar will keep things stiff enough.
Good question, but theplan is to add a line at the bottom to static balance the two sides. Brilliant!
This former is quitesubstantial and the main landing gear assembly is well built. There is more than enough area in this formerto transfer the expected loads. As a benefit,the 3[SUP]rd[/SUP] spar will be supported by a partial former (not installedyet) which will transfer these loads between the wing half’s.
I figured that was the case, but those thin little bits of wood above the retracts were a bit concerning without being able to see the rest of the structure.
It sounds like you have thought through the "fixes" pretty well.
Hopefully you will end up with a safe and semi-original (You don't see very many A-7's at jet events) airplane when it is done.
07-30-2014, 06:27 AM
#25
Thread Starter
My Feedback: (112)
Join Date: Jan 2002
Location: VICTORVILLE,
CA
Posts: 325
Likes: 0
Received 0 Likes
on
0 Posts
Lol that was my plan from the start. I am not much for following the instructions, and FEJ is not known for providing instructions lol.
The main tank had to be modified to clear the main gear. Not everything works as planned but plans are made to change J


The main tank had to be modified to clear the main gear. Not everything works as planned but plans are made to change J
Last edited by foster4u; 07-30-2014 at 06:30 AM.

