


2.6m F-117 NightHawk, Twin SimJet 2300 - Build form scratch.


 11-24-2015, 01:46 AM
#52
Member
Thread Starter

Join Date: Sep 2005
Location: Perth, AUSTRALIA
Posts: 55
Likes: 0
Received 0 Likes
on
0 Posts
Thank you for your reply, it was a challenge to get all the angles but I'm doing my best to make it as close to the real thing as possible.
More pics will come this weekend ..
Cheers
Moatasem
11-24-2015, 01:48 AM
#53
Member
Thread Starter
Join Date: Sep 2005
Location: Perth, AUSTRALIA
Posts: 55
Likes: 0
Received 0 Likes
on
0 Posts
11-25-2015, 05:05 AM
#55

Moatasem,
Looking good, just had a few concerns. I'm afraid the composite bellmouth will cook very quickly in the event of a wet start, and will cook slowly during normal operation. Both ways it will cook. The EGT of a turbine can exceed 700C. That's a lot more than resin can handle.
Second concern is the rectangular cross section of the tailpipe....although you've done magnificent work, I'm afraid that the rectangular cross section will lead to uneven heat distribution = will cook too, there may be an easy fix for that. Use the rectangular pipe as the "outter" shield, and just use a cylindrical pipe inside of it, at least at the first 10-12" (hottest section). The air cools down significantly downstream as it expands beyond that point.
In any case, I think the issues I pointed out will not be a problem initially, but they will impact the longevity of the project.
Awesome project.
Best regards,
David
11-27-2015, 07:28 AM
#56
Member
Thread Starter
Join Date: Sep 2005
Location: Perth, AUSTRALIA
Posts: 55
Likes: 0
Received 0 Likes
on
0 Posts
Moatasem,
Looking good, just had a few concerns. I'm afraid the composite bellmouth will cook very quickly in the event of a wet start, and will cook slowly during normal operation. Both ways it will cook. The EGT of a turbine can exceed 700C. That's a lot more than resin can handle.
Second concern is the rectangular cross section of the tailpipe....although you've done magnificent work, I'm afraid that the rectangular cross section will lead to uneven heat distribution = will cook too, there may be an easy fix for that. Use the rectangular pipe as the "outter" shield, and just use a cylindrical pipe inside of it, at least at the first 10-12" (hottest section). The air cools down significantly downstream as it expands beyond that point.
In any case, I think the issues I pointed out will not be a problem initially, but they will impact the longevity of the project.
Awesome project.
Best regards,
David
Looking good, just had a few concerns. I'm afraid the composite bellmouth will cook very quickly in the event of a wet start, and will cook slowly during normal operation. Both ways it will cook. The EGT of a turbine can exceed 700C. That's a lot more than resin can handle.
Second concern is the rectangular cross section of the tailpipe....although you've done magnificent work, I'm afraid that the rectangular cross section will lead to uneven heat distribution = will cook too, there may be an easy fix for that. Use the rectangular pipe as the "outter" shield, and just use a cylindrical pipe inside of it, at least at the first 10-12" (hottest section). The air cools down significantly downstream as it expands beyond that point.
In any case, I think the issues I pointed out will not be a problem initially, but they will impact the longevity of the project.
Awesome project.
Best regards,
David
Thank you for your comments,
For the bell mouth I don't think there will be any problems, I had other carbon fibre bell mouths on other jets with over 100 flights and never had any issues, I did install and run the engines on ideal (maximum EGT temp of around 650c) for around 3 minutes to check the heat distribution and the bell mouths before I start the sheeting and I didn't have any issues at all, the results were much better than I thought.
In-flight the EGT temp will be less and the air flow around the pipes will be a lot more effective.
This weekend I'll rerun the engines again to check the pipes after I've sheeted around them and to check the fuel tanks and the plumbing as well.
I'll post some pics soon and the results of the test.
regards
Moatasem
11-27-2015, 07:30 AM
#57
Member
Thread Starter
Join Date: Sep 2005
Location: Perth, AUSTRALIA
Posts: 55
Likes: 0
Received 0 Likes
on
0 Posts
yes it is a flying prop and it is very big, I'll reduce the size of it as it is not performing good.
It is 26x12, the top size for this engine, MVVS 80cc.
I think 24x10 should be good.
Cheers
Moatasem
11-29-2015, 07:48 PM
#58
Member
Thread Starter
Join Date: Sep 2005
Location: Perth, AUSTRALIA
Posts: 55
Likes: 0
Received 0 Likes
on
0 Posts
Hi Guys
Some pics from the weekend.
I've done anther engines run and everything when as expected, temp around the pipes were very good, the skin around the pipes was just a little worm.
Very happy with it till now.
Regards
Moatasem


Some pics from the weekend.
I've done anther engines run and everything when as expected, temp around the pipes were very good, the skin around the pipes was just a little worm.
Very happy with it till now.
Regards
Moatasem
03-25-2016, 07:11 PM
#59

My Feedback: (14)
I saw Bob Fiorenze fly the twin OS .91 powered Yellow Aircraft F-117 at Jets over Deland years ago. Still to this day nothing has compared to how that thing looked in the air. It stole the show! I don't think Yellow ever actually introduced it. Again another missed opportunity by a great company. Wonder what ever happened to the molds? It was a decent size best I can remember. Deland...How many of you guys remember that?
This is type of engineering allowed the fully ducted twin OS .91 plane to weigh in at 24 pounds RTF! It would make a great single turbine application today.
03-27-2016, 03:15 PM
#60
Member
Thread Starter
Join Date: Sep 2005
Location: Perth, AUSTRALIA
Posts: 55
Likes: 0
Received 0 Likes
on
0 Posts
Hi Guys
It have been a while since my last post, very busy with life and work.
However there is a big progress on the F-117.
I didn't take much pictures of the progress but I've some which will show where we are at now.
At the moment we put this plane on hold for couple of months to finish some other smaller projects and refresh before we get the final stages of the build.
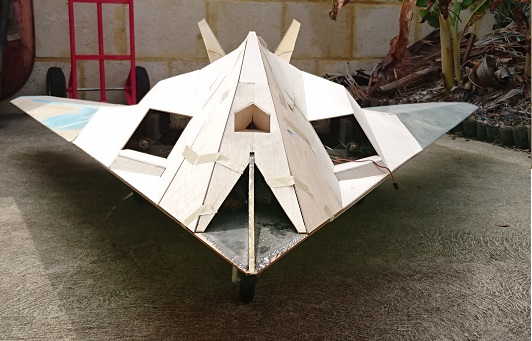
These pictures are not up to date, we did progress a bit more since I took them. I did some filling and sanding on the fuselage, all the hatch covers are finished, a 3D printed canopy is in progress and the Elevons are removed from both wings and both will be rebuild.
The weight is much higher than expected because of the nose weight. It needed 5kg of weight in the nose to get the CoG right which made the total dry weight is 25kg with out the glassing and paint which I'm allowing 2kg for them.
The heavy model inspector did look the plane at couple of times and he is very happy with the building till now.
That is all for now, so have a look at the pictures and till what do you think.
Cheers
Moatasem


It have been a while since my last post, very busy with life and work.
However there is a big progress on the F-117.
I didn't take much pictures of the progress but I've some which will show where we are at now.
At the moment we put this plane on hold for couple of months to finish some other smaller projects and refresh before we get the final stages of the build.
These pictures are not up to date, we did progress a bit more since I took them. I did some filling and sanding on the fuselage, all the hatch covers are finished, a 3D printed canopy is in progress and the Elevons are removed from both wings and both will be rebuild.
The weight is much higher than expected because of the nose weight. It needed 5kg of weight in the nose to get the CoG right which made the total dry weight is 25kg with out the glassing and paint which I'm allowing 2kg for them.
The heavy model inspector did look the plane at couple of times and he is very happy with the building till now.
That is all for now, so have a look at the pictures and till what do you think.
Cheers
Moatasem
10-02-2016, 07:05 PM
#61
Member
Thread Starter
Join Date: Sep 2005
Location: Perth, AUSTRALIA
Posts: 55
Likes: 0
Received 0 Likes
on
0 Posts
Hi all
It have been very long time since my last post.
I was very busy with the build lately but I did stop for few weeks to finish building my CNC router and a 100cc Hanger 9 Beast.


But now the F-117 Nighthawk is almost ready, I still to need to recheck the CoG and total weight, hopefully that will be completed over the next few days then I’ll post the final figures and settings.
Now I leave you guys with some pictures, tell me what you think.


Cheers
Moatasem
It have been very long time since my last post.
I was very busy with the build lately but I did stop for few weeks to finish building my CNC router and a 100cc Hanger 9 Beast.
But now the F-117 Nighthawk is almost ready, I still to need to recheck the CoG and total weight, hopefully that will be completed over the next few days then I’ll post the final figures and settings.
Now I leave you guys with some pictures, tell me what you think.
Cheers
Moatasem


 10-06-2016, 08:59 AM
#69


Join Date: Aug 2010
Location: , , UNITED KINGDOM
Posts: 305
Likes: 0
Received 0 Likes
on
0 Posts
Amazing looking. Would it be worth adding some very bright contrasting vinyl trim for the maiden (something which can be removed). That thing is going to be a pain to keep your orientation on, even on a good day when you are relaxed.
Amazing looking CNC router. Was it built from a kit?
Simon
Amazing looking CNC router. Was it built from a kit?
Simon
10-06-2016, 03:38 PM
#70
Member
Thread Starter
Join Date: Sep 2005
Location: Perth, AUSTRALIA
Posts: 55
Likes: 0
Received 0 Likes
on
0 Posts
Amazing looking. Would it be worth adding some very bright contrasting vinyl trim for the maiden (something which can be removed). That thing is going to be a pain to keep your orientation on, even on a good day when you are relaxed.
Amazing looking CNC router. Was it built from a kit?
Simon
Amazing looking CNC router. Was it built from a kit?
Simon
There are big bright orange strips on the bottom for orientation. I lost a small foamie of the same model because of orientation.
The CNC router is my own design not a kit.
Cheers
Moatasem
10-06-2016, 04:15 PM
#71
Member

Join Date: Aug 2016
Location: Stuart, Fl.
Posts: 78
Likes: 0
Received 0 Likes
on
0 Posts
I lost a foamy of this plane once due to orientation. After I repaired it, I learned that if orientation became difficult, I would rock the wings a little from side to side and instantly regain my orientation. It really helped me since its always a black delta shaped dot in the sky, and the verticals are hard to see sometimes.
10-06-2016, 04:27 PM
#73
Member
Thread Starter
Join Date: Sep 2005
Location: Perth, AUSTRALIA
Posts: 55
Likes: 0
Received 0 Likes
on
0 Posts
11-07-2016, 04:32 PM
#74
Member
Thread Starter
Join Date: Sep 2005
Location: Perth, AUSTRALIA
Posts: 55
Likes: 0
Received 0 Likes
on
0 Posts
Hi Guys
The final dry weight is 30kg including 6kg of nose led weight.
I did 2 taxi tests.
First one showed that the undercarriage is not strong enough, the nose wheel can't carry the weight and the magnetic brake doesn't do much, so new more strong struts, a stiffer nose wheel and an Air brake installed.
Then the second taxi test went fine but still the brake doesn't do much so I have to install a drag chute.
Some pics from the taxi test.

