


Sabre XLT – A large scratch built flying wing sport jet
 02-04-2016, 07:04 PM
#151

Thread Starter
My Feedback: (20)
Sabre XLT Yellow and White Painting
JAN 2015


Paint booth setup and ready to spray
Laying down yellow KlassKote epoxy paint, color was labeled “cub yellow” but looked like lemon yellow
Small parts after two coats
Painting bottom of fuse corners
After one coat the yellow is not hiding the grey primer


Bottom of wing leading edge painted
Wings after two coats
Fuse and small parts painted and out of yellow paint. Grey primer still not covered.
Inside of fuse painted white while waiting for more yellow KlassKote to arrive


Fuse masked, papered, and scuffed for final coats of yellow
All yellow paint completed, this time it looked like “cub yellow”
JAN 2015
Paint booth setup and ready to spray
Laying down yellow KlassKote epoxy paint, color was labeled “cub yellow” but looked like lemon yellow
Small parts after two coats
Painting bottom of fuse corners
After one coat the yellow is not hiding the grey primer
Bottom of wing leading edge painted
Wings after two coats
Fuse and small parts painted and out of yellow paint. Grey primer still not covered.
Inside of fuse painted white while waiting for more yellow KlassKote to arrive
Fuse masked, papered, and scuffed for final coats of yellow
All yellow paint completed, this time it looked like “cub yellow”
Last edited by Viper1GJ; 02-04-2016 at 07:11 PM.
 02-04-2016, 07:14 PM
#152
02-04-2016, 07:17 PM
#153
Thread Starter
My Feedback: (20)
Sabre XLT Cockpit, Exhaust, Canopy
JAN 2015

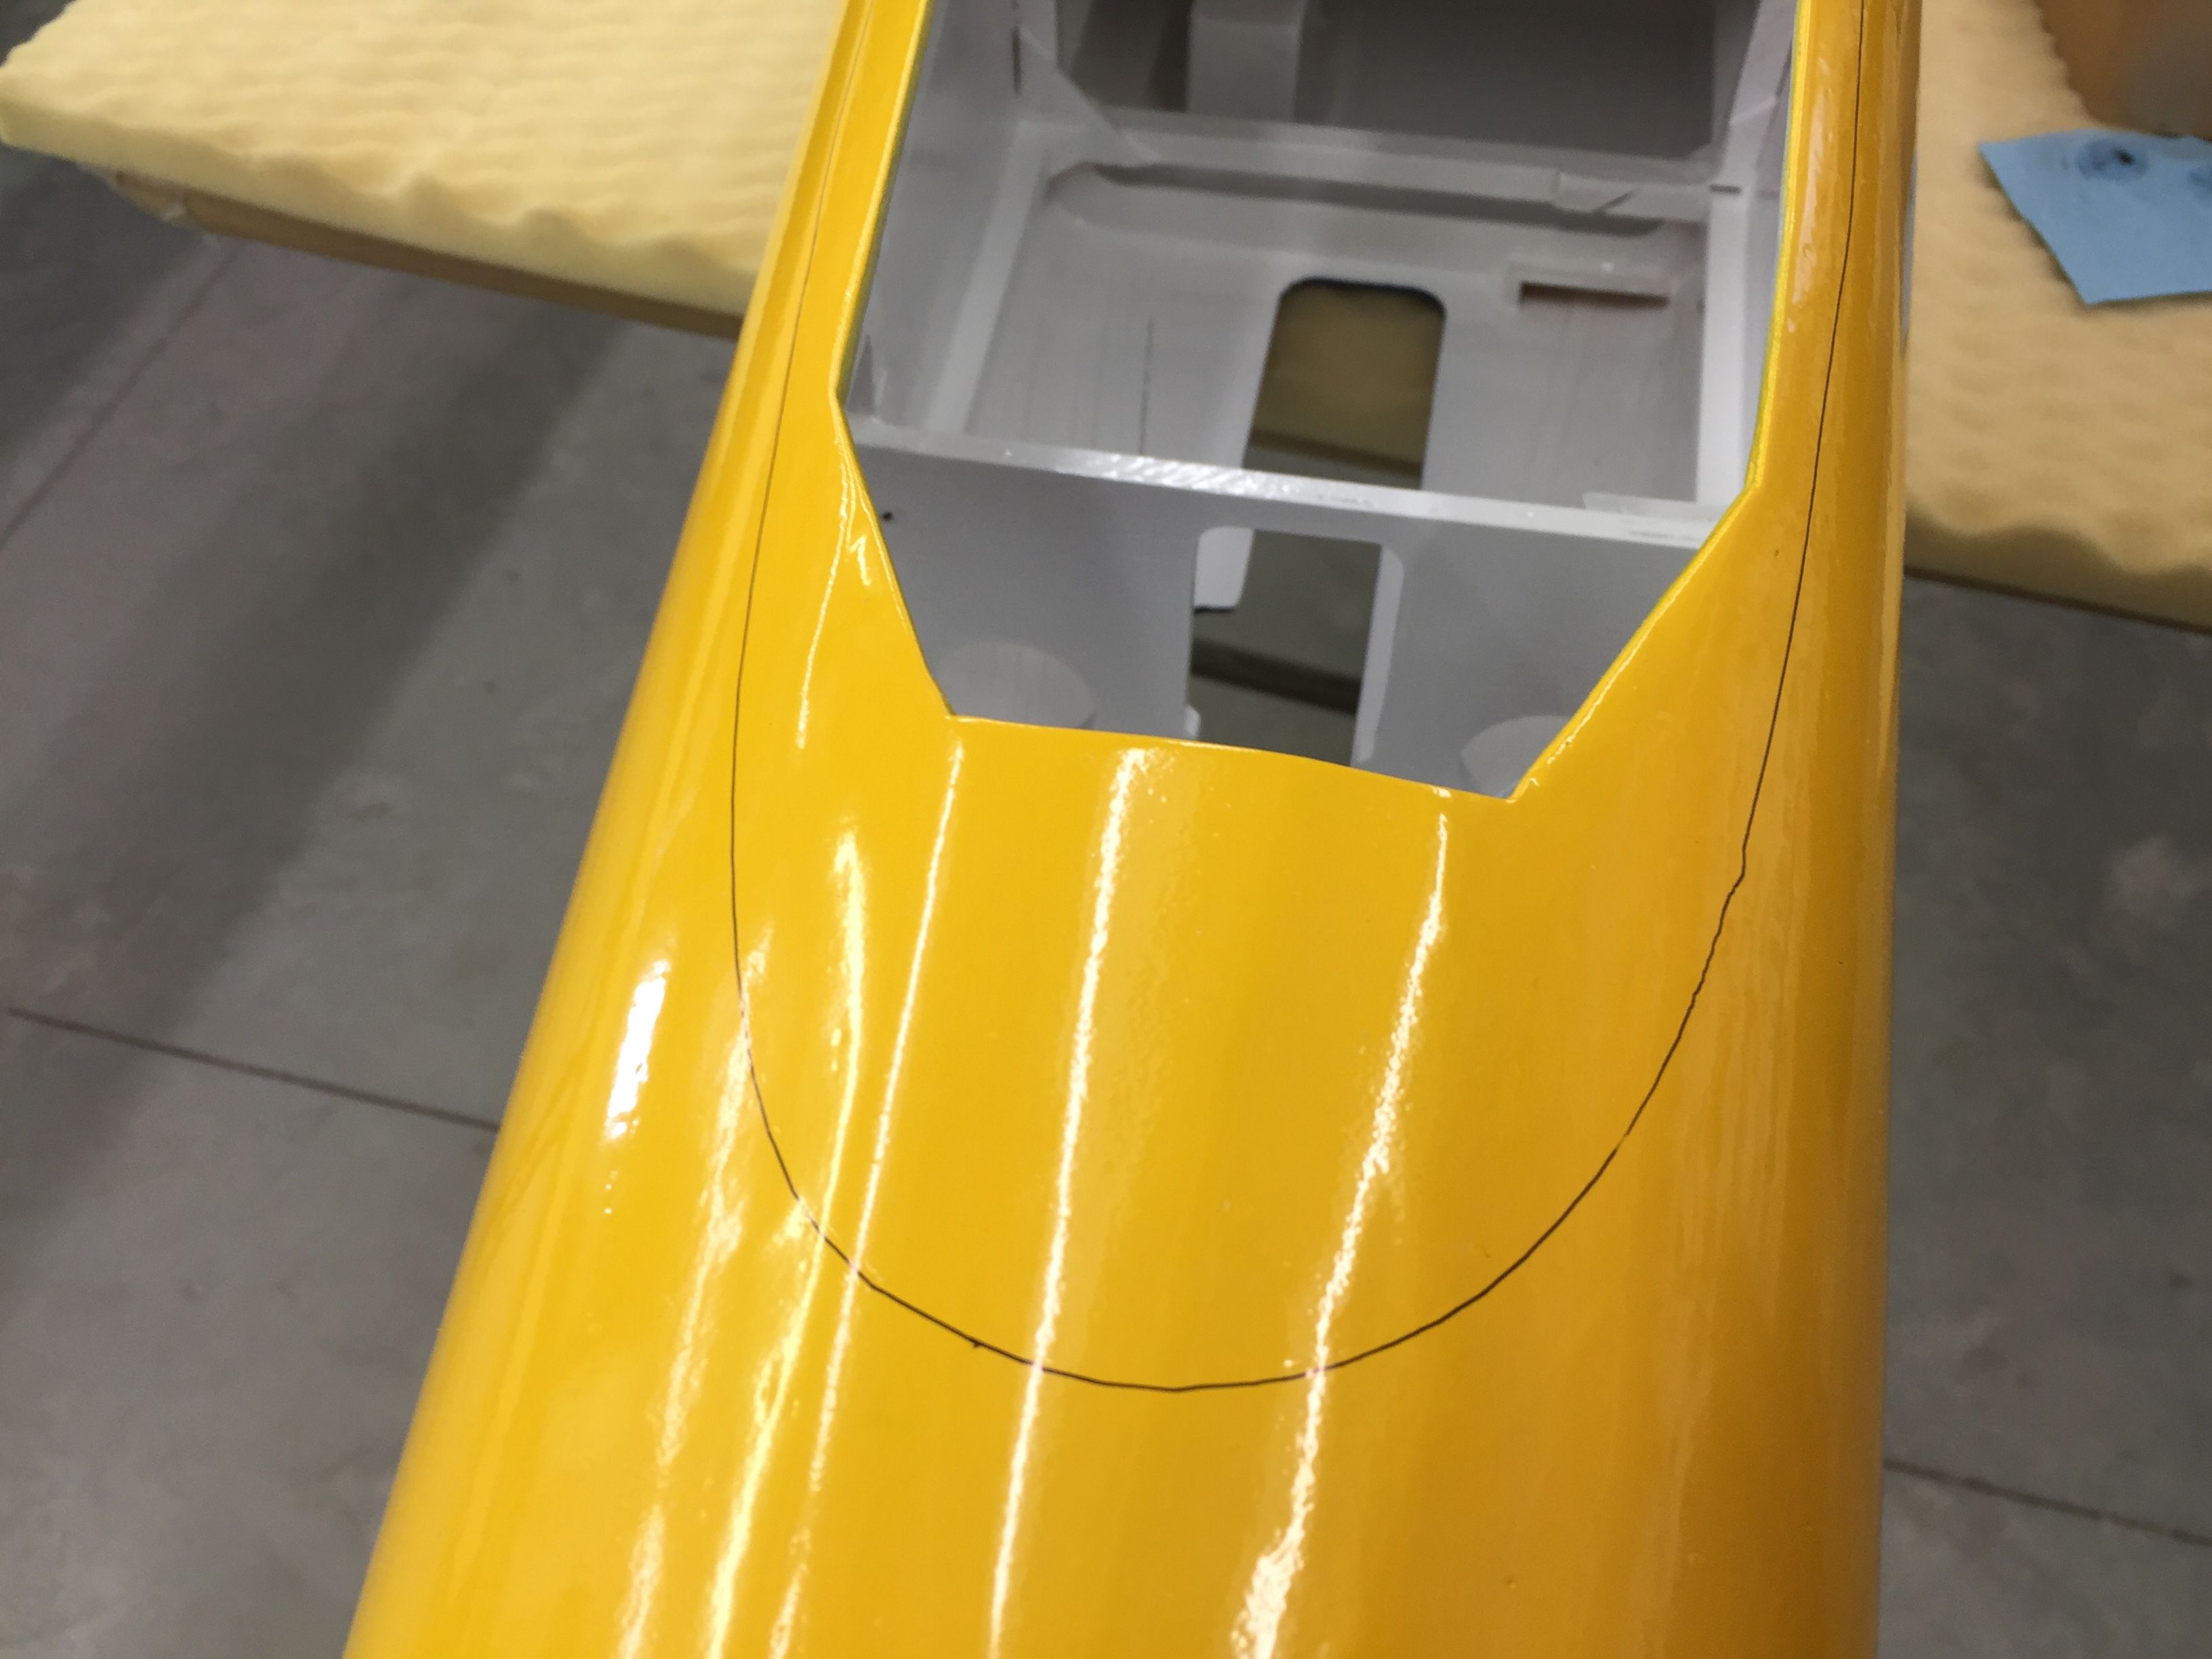


Canopy outline traced on front hatch
Canopy outline taped with 3M 1/8” vinyl tape
Fuse covered with paper for spraying exhaust nozzle.
Nozzle paint was rattle can “oil rubbed bronze”


Under canopy area and inside front hatch sprayed flat black with rattle can paint
Exhaust nozzle paint complete
Cleaning dry overspray dust from paint booth filters before storing paint booth
Canopy taped in place after canopy glue applied to bottom edges
RC 56 canopy glue used
JAN 2015
Canopy outline traced on front hatch
Canopy outline taped with 3M 1/8” vinyl tape
Fuse covered with paper for spraying exhaust nozzle.
Nozzle paint was rattle can “oil rubbed bronze”
Under canopy area and inside front hatch sprayed flat black with rattle can paint
Exhaust nozzle paint complete
Cleaning dry overspray dust from paint booth filters before storing paint booth
Canopy taped in place after canopy glue applied to bottom edges
RC 56 canopy glue used
Last edited by Viper1GJ; 02-04-2016 at 07:46 PM.
02-04-2016, 07:25 PM
#154
Thread Starter
My Feedback: (20)
Sabre XLT Flight Control Servos
JAN 2015


Elevon servos and control horns installed and connected with Prolink pushrods
Servos arms are SWB and metal control horns are from Aeroworks
Rudder servo installed and connected. Servo cover is thin G10 fiberglass plate
Smoke oil injector tubes installed on turbine mounting strap


Thrust vector pushrods built and ready to install
Turbine and thrust vector nozzle installed and connected
Smoke oil injector tubes behind turbine exhaust viewed from rear
Elevon servos labeled to assist in wiring and programming radio
JAN 2015
Elevon servos and control horns installed and connected with Prolink pushrods
Servos arms are SWB and metal control horns are from Aeroworks
Rudder servo installed and connected. Servo cover is thin G10 fiberglass plate
Smoke oil injector tubes installed on turbine mounting strap
Thrust vector pushrods built and ready to install
Turbine and thrust vector nozzle installed and connected
Smoke oil injector tubes behind turbine exhaust viewed from rear
Elevon servos labeled to assist in wiring and programming radio
Last edited by Viper1GJ; 02-04-2016 at 07:47 PM.
02-04-2016, 07:29 PM
#155
Thread Starter
My Feedback: (20)
Sabre XLT Assembled for Radio Programming
JAN 2015


Airframe set on table and assembled to program radio
This is a first look assembled after painting and canopy install
JAN 2015
Airframe set on table and assembled to program radio
This is a first look assembled after painting and canopy install
Last edited by Viper1GJ; 02-04-2016 at 07:35 PM.
02-04-2016, 07:38 PM
#156
Thread Starter
My Feedback: (20)
Sabre XLT Equipment Install
FEB 2015


Equipment layout planned to keep weight in front to help reduce nose ballast
Fuel and smoke tanks over CG. Old CAT header tank is for smoke. Air tanks in rear
Canard linkage and velcro pad for RX mounting
Turbine fuel pump, MAP header tank, ECU, and smoke pump layout
Air control panel for retract and brake valves


Battery tray in nose cone carries RX batteries, ECU battery, and any nose ballast forward of batteries
Futaba R6014 mounted on Smart Fly board connected to Cortex 3 axis gyro
Air tanks connected and EDR One-Clik Multi-Connex elevon servo connectors
Brake and retract air service panel
RX battery power connected by two EC3 jumper plugs…no switches


Air quick disconnects to main landing gear and brakes in wings
Air pumped into retract system to 100 psi for first test…No Leaks!!! Yea!!!
First retract tests…Down
UP…
Down…all worked well the first time…Yea!
FEB 2015
Equipment layout planned to keep weight in front to help reduce nose ballast
Fuel and smoke tanks over CG. Old CAT header tank is for smoke. Air tanks in rear
Canard linkage and velcro pad for RX mounting
Turbine fuel pump, MAP header tank, ECU, and smoke pump layout
Air control panel for retract and brake valves
Battery tray in nose cone carries RX batteries, ECU battery, and any nose ballast forward of batteries
Futaba R6014 mounted on Smart Fly board connected to Cortex 3 axis gyro
Air tanks connected and EDR One-Clik Multi-Connex elevon servo connectors
Brake and retract air service panel
RX battery power connected by two EC3 jumper plugs…no switches
Air quick disconnects to main landing gear and brakes in wings
Air pumped into retract system to 100 psi for first test…No Leaks!!! Yea!!!
First retract tests…Down
UP…
Down…all worked well the first time…Yea!
Last edited by Viper1GJ; 02-04-2016 at 07:48 PM.

 02-16-2016, 07:03 PM
#159
Thread Starter
My Feedback: (20)
Sabre XLT Fin, Canards, Cockpit, Graphics
FEB 2015


Fin is finally epoxied to fuse with West Systems Six-10 epoxy
Reused Skymaster 1/6 F-16 cockpit tub installed under canopy.
Vinyl canopy graphics installed to cover glue seam
Canards installed and programed to operate with pitch and independent as canard "flaps"


Fuse completed and wing tips installed
Wing panel graphics applied
Fuse and wing USAF stars and bars applied
FEB 2015
Fin is finally epoxied to fuse with West Systems Six-10 epoxy
Reused Skymaster 1/6 F-16 cockpit tub installed under canopy.
Vinyl canopy graphics installed to cover glue seam
Canards installed and programed to operate with pitch and independent as canard "flaps"
Fuse completed and wing tips installed
Wing panel graphics applied
Fuse and wing USAF stars and bars applied
Last edited by Viper1GJ; 02-16-2016 at 07:10 PM.
02-16-2016, 07:19 PM
#160
Thread Starter
My Feedback: (20)
Sabre XLT Final Assembly, Weight and Balance
FEB 2015


Wing tubes inserted through fuse
Wings attached, servos connected, air lines connected
Sabre transfered to table for final programming and weight and balance
Tail heavy as expected


Lead bags on nose to get nose gear on table
Plane jacked up on blocks to get weights from each gear with postal scale
Plastic cup taped to nose to slowly add ballast weight to get CG correct. Data input to spread sheet to calculate CG location forward of main gear axles.
FEB 2015
Wing tubes inserted through fuse
Wings attached, servos connected, air lines connected
Sabre transfered to table for final programming and weight and balance
Tail heavy as expected
Lead bags on nose to get nose gear on table
Plane jacked up on blocks to get weights from each gear with postal scale
Plastic cup taped to nose to slowly add ballast weight to get CG correct. Data input to spread sheet to calculate CG location forward of main gear axles.
02-16-2016, 07:31 PM
#161
Thread Starter
My Feedback: (20)
Sabre XLT Fuel, Smoke, and Engine Tests
FEB 2015


Happy snaps after first sitting on floor. Until tried picking it up and then looking down at it, I did realize how really BIG this thing was!
The garage door in the background is 12' wide


More happy snaps prior to cold fuel, engine, and smoke tests.
All systems go and ready for hot fuel, engine, and smoke tests.
Kingtech 180G started on first attempt with no delay
Smoke on at idle thrust
Full thrust tests good and thrust vector nozzle tests all good. My neighbors are used to this now.
All systems go and ready for range and taxi tests in yard next. Waiting for warmer and dry weather later this week.
FEB 2015
Happy snaps after first sitting on floor. Until tried picking it up and then looking down at it, I did realize how really BIG this thing was!
The garage door in the background is 12' wide
More happy snaps prior to cold fuel, engine, and smoke tests.
All systems go and ready for hot fuel, engine, and smoke tests.
Kingtech 180G started on first attempt with no delay
Smoke on at idle thrust
Full thrust tests good and thrust vector nozzle tests all good. My neighbors are used to this now.
All systems go and ready for range and taxi tests in yard next. Waiting for warmer and dry weather later this week.
02-16-2016, 07:36 PM
#162
Thread Starter
My Feedback: (20)
Sabre XLT Vinyl Graphics
FEB 2015
Today is Feb 16. Its a big day. The Sabre XLT is finally finished. The last vinyl graphics were applied today.
The only remaining tasks are to range check and taxi test prior to flying.
It's been over 3 1/2 years since the project was started. Many life events occurred during that time including the loss of both of my parents, retirement from airline flying, and another grand child for a total of 4. Today is also my birthday.
This will be the last post of the build thread. I will post results of test flights when we can get good weather and time at the field.
Hopefully someone has enjoyed the thread and maybe learned from it. It was all a great learning experience for me and a first for many of the building tasks.
Most of all thanks to Mike Oser for his constant advice and support during the entire project.
Thanks to all,
Gary


Vinyl graphics applied and project is complete.
Flying next!
FEB 2015
Today is Feb 16. Its a big day. The Sabre XLT is finally finished. The last vinyl graphics were applied today.
The only remaining tasks are to range check and taxi test prior to flying.
It's been over 3 1/2 years since the project was started. Many life events occurred during that time including the loss of both of my parents, retirement from airline flying, and another grand child for a total of 4. Today is also my birthday.
This will be the last post of the build thread. I will post results of test flights when we can get good weather and time at the field.
Hopefully someone has enjoyed the thread and maybe learned from it. It was all a great learning experience for me and a first for many of the building tasks.
Most of all thanks to Mike Oser for his constant advice and support during the entire project.
Thanks to all,
Gary
Vinyl graphics applied and project is complete.
Flying next!
Last edited by Viper1GJ; 02-16-2016 at 07:47 PM.
02-17-2016, 07:41 PM
#166

Really Nice work Gary, I have been following your thread off an on. Nice to see a start to finish scratch build. Thanks for sharing it here... No doubt a very satisfying project.. Good luck with the maiden.(The point in time that concentrates all that work.)
By the way, yellows are a B**ch to paint.. They are always semi opaque.. I find it best to put a white coat down first..
Roger
By the way, yellows are a B**ch to paint.. They are always semi opaque.. I find it best to put a white coat down first..
Roger
02-18-2016, 07:03 PM
#167
Thread Starter
My Feedback: (20)
Hi Roger,
Yes, as a spray paint beginner novice I found out about painting yellow the hard way. I would use white primer if I had a do over. Coverage is not very even viewed from up close but from 15 ft it is yellow. Live and learn.
Many of the processes I used were a first for me and I learned a lot. RCU forum research and advice were a great help from beginning to end. At least its done.
Still working to get CG set according to Mike Oser's calculations. I had to add more nose weight than I wanted but I think it is there now. Hope to get a test flight done in the next two weeks. I am an event CD the last weekend in Feb so it will have to be early next week or after the event.
Hopefully will have a video to post of the flight.
Gary
03-01-2016, 08:04 PM
#169
Thread Starter
My Feedback: (20)
Sabre XLT Test Flight
27 FEB 2015
The big day arrived. The Kingtech 180 was removed and replaced by a Kingtech 210 for extra thrust due the aircraft weight. The day was perfect weather and lots of encouragement. All systems tested good so it was time to fly. The take off and flight were great. The Sabre XLT flew very well and felt light even though it weighed 65 lbs at takeoff and flew under AMA LTMA1 rules.
The landing gear as expected was the weak link at that weight and failed on a hard touchdown after a ballooned flare and drop in. Not a scratch on the jet except for busted landing gear. The search is on for stronger main landing gear now.
Flight photos and video link below.
Video: https://www.youtube.com/watch?v=Y-L_2Y1vfI4


Next flight will have low rate elevon for landing, no pitch input on canards for landing, correctly working speed brake linkage, and stronger landing gear.
Gary
27 FEB 2015
The big day arrived. The Kingtech 180 was removed and replaced by a Kingtech 210 for extra thrust due the aircraft weight. The day was perfect weather and lots of encouragement. All systems tested good so it was time to fly. The take off and flight were great. The Sabre XLT flew very well and felt light even though it weighed 65 lbs at takeoff and flew under AMA LTMA1 rules.
The landing gear as expected was the weak link at that weight and failed on a hard touchdown after a ballooned flare and drop in. Not a scratch on the jet except for busted landing gear. The search is on for stronger main landing gear now.
Flight photos and video link below.
Video: https://www.youtube.com/watch?v=Y-L_2Y1vfI4
Next flight will have low rate elevon for landing, no pitch input on canards for landing, correctly working speed brake linkage, and stronger landing gear.
Gary
Last edited by Viper1GJ; 03-01-2016 at 08:17 PM.
03-02-2016, 01:20 AM
#171
Join Date: Jul 2006
Location: Norfolk , UNITED KINGDOM
Posts: 1,409
Likes: 0
Received 0 Likes
on
0 Posts
Gary
Well done, very satisfying to do an own design scratch built and have a sucessful maiden.
On my models of this weight I use Behotec C50 retracts. They are very tough. The oleo leg has very thick pins that are hard as supplied so if the landing is very heavy the pin will snap. Personally I prefer the pin to have some give in it and I let mine down to blue temper. The body of the units is solid machined from one piece of hight quality alumnium. I have never bent or broken a unit yet.
John
03-02-2016, 06:08 PM
#173
Thread Starter
My Feedback: (20)
John, Steve
Thanks for the compliments. It feels good to have it all done. The jet flew much better than I expected at the weight. Im looking forward to getting it going again and having fun with it.
I removed the main main gear today and aside from the damaged gear mounts in the wings there is not a scratch anywhere else on the jet. The main gear struts did not fail but the rereact units were destroyed. The aluminum sides were bent and were torn apart along with the gear mounts in the bottom of the wings.
I have the Behotec C50s in my Super Scorpion. They are the best gears I have ever used. I considered them but would like a larger main tire. I was looking for the C60s but can not find any info on them. Not sure they are available yet. What heavy jets are you using the C50s in?
I also was looking at the Jet Model Products MK 30 used on the Hustler and Firebird. I know Lance Campbell uses them in his SR-71 with 66 lbs empty and 80 lbs takeoff weights.
Any other ideas would be appreciated. I may start a thread looking for stronger main gears.
Gary
03-03-2016, 01:05 AM
#175
Join Date: Jul 2006
Location: Norfolk , UNITED KINGDOM
Posts: 1,409
Likes: 0
Received 0 Likes
on
0 Posts
Gary
I have had C 50 units in 3 planes.
The Horten had them with 6 " nose wheel and 4 " mains. The plane weighed 19 kg dry. It had plenty of flights and the retracts worked well.
The Boulton Paul P111 used them and had 4" nose and 5" mains. The doors on the mains require a lot of pressure to close and it had been difficult to get them to go up reliably. I am converting the C50 units to hydraulic to overcome the problem. The plane weighs 24 kg and has flown off grass and tarmac.
the Arado 555 weighs 34 kg and has 4 wheel 4" bogies for the mains. I could get them work on the bench but would not pull up in the air as the door is very large. i made some large retracts with much larger cylinders but even these would not pull the mains up. Clearly these need converting to hydraulic. The units themselves were strong enough and survived a bouncy first landing.
All wheel hubs and brakes were made by me as light as possible using the tough Dubro foam tyres.
I used Behotec oleos as they are very strong.
John