


The new Fei Bao Jets “Dolphin S” build thread by RCISFUN
 08-10-2016, 08:28 PM
#176

My Feedback: (15)
Join Date: Jun 2008
Location: Moncks Corner,
SC
Posts: 53
Likes: 0
Received 0 Likes
on
0 Posts
I didn't make the flap hinge mod. Thanks for the crow settings. As I didn't make the flap mod, it may take more crow, but this does give me a good starting point.
 08-15-2016, 12:08 PM
#178
My Feedback: (15)
Join Date: Jun 2008
Location: Moncks Corner,
SC
Posts: 53
Likes: 0
Received 0 Likes
on
0 Posts
I posted a YouTube video at https://youtu.be/qgrQCZfmD4s on a small modification that I did to the electric brakes on my Dolphin S. I noticed that one of the brakes were dragging during my post maiden flight inspection. I found that the anti-rotation plate, that bolts to the wheel hub, was cocked, causing the magnet to drag. FB Jets doesn't have a fix, so the video shows what I did.
Last edited by sewergod; 08-15-2016 at 12:34 PM.
02-18-2017, 06:08 PM
#181

Last edited by pcskyhi; 02-18-2017 at 06:13 PM.
02-19-2017, 07:15 AM
#182
All battery box parts are keyed to fit together, the front of the box is also keyed to fit the end plate.
The back of the box has smooth face as it is the opening where the battery slides in, the side rails of the box have drilled holes for a retention dowel to hold the battery in, there is also a former that will slide over the box creating a mounting flange.
Let me know if you need additional instructions...
02-19-2017, 08:48 AM
#183
Please make reference to your post #116. These are the only parts my friend received. We have the saddle tank mounts and the battery tray figured out but still having trouble with the center tank tray. The battery box stuff I thought was the old way, were we supposed to get that? We only received what you put in post #116 which only uses battery trays not boxes. Just need help now with assembly of the new design of the center tank tray. Thanks for responding so quickly. I attached the PDF for reference from post #116 for center tray.
02-19-2017, 10:14 AM
#184
My Feedback: (3)
Has anyone done an assembly using the new mounts and battery tray? If so, could you puts some pics up please. they show you the new parts in the addendum but no clue how they go together. I am helping a friend but we both seem to be baffled right now. I guess it is like a jigsaw puzzle, give it time and eventually we will figure it out but we would not mind a cheat sheet right about now.
Tim
Last edited by Custmachr; 02-19-2017 at 10:21 AM.
02-19-2017, 11:46 AM
#185
Thanks, that helped us affirm what we believed to be the case. Now we are guessing the last 4 pieces that we don't see in your photos is for shelving that will attach to the fuselage walls. Would you agree? Are you currently building? Thanks again. Just trying to make sure it is done correctly.
Just trying to make sure it is done correctly.
02-19-2017, 12:40 PM
#187
My Feedback: (3)
Thanks, that helped us affirm what we believed to be the case. Now we are guessing the last 4 pieces that we don't see in your photos is for shelving that will attach to the fuselage walls. Would you agree? Are you currently building? Thanks again. Just trying to make sure it is done correctly.
Just trying to make sure it is done correctly.Last edited by Custmachr; 02-19-2017 at 02:06 PM.
06-06-2017, 06:40 PM
#190
My Feedback: (15)
Join Date: Jun 2008
Location: Moncks Corner,
SC
Posts: 53
Likes: 0
Received 0 Likes
on
0 Posts
Does anyone have a fix for the electric brakes on the Dolphin, as I have one brake that does not seem to work very well. I cleaned (electronic contact cleaner), sanded both the magnet and disk, increased the gain, still no change. Replaced the controller, no difference. I also had another magnet that I tried, no improvement there either. Even bypassed the servo leads going to the brake, nothing.... any suggestions or help would be appreciated.
06-07-2017, 06:47 AM
#191

My Feedback: (10)
Join Date: Jan 2002
Location: North Port,
FL
Posts: 1,109
Likes: 0
Received 0 Likes
on
0 Posts
Does anyone have a fix for the electric brakes on the Dolphin, as I have one brake that does not seem to work very well. I cleaned (electronic contact cleaner), sanded both the magnet and disk, increased the gain, still no change. Replaced the controller, no difference. I also had another magnet that I tried, no improvement there either. Even bypassed the servo leads going to the brake, nothing.... any suggestions or help would be appreciated.
From your post, I assume you received the new controller I ordered for you when we talked at FIF. That being the case.. ,my guess is the wiring. . .possibly the extension or from the unit itself. When you increase the gain, do you see that increase on your vm? Give me a call when you have a few so we can work through the issue. The new retract/brake control unit was tested prior to shipping. I will also email FBJ tonite for their assistance. Please keep in touch.
I am requesting a new brake unit be sent today (China Thursday).
Eric
FB Jets USA
A & E Jets USA
Last edited by BluFox; 06-07-2017 at 07:06 AM. Reason: add picture
06-07-2017, 07:57 AM
#192
My Feedback: (15)
Join Date: Jun 2008
Location: Moncks Corner,
SC
Posts: 53
Likes: 0
Received 0 Likes
on
0 Posts
Thanks Eric. I received the controller installed it and had the same issue. I also bypassed the servo leads that run through the airframe and got the same results. Next will be to perform a Ohms check on each brake coil to see if they are the same. Thanks again.
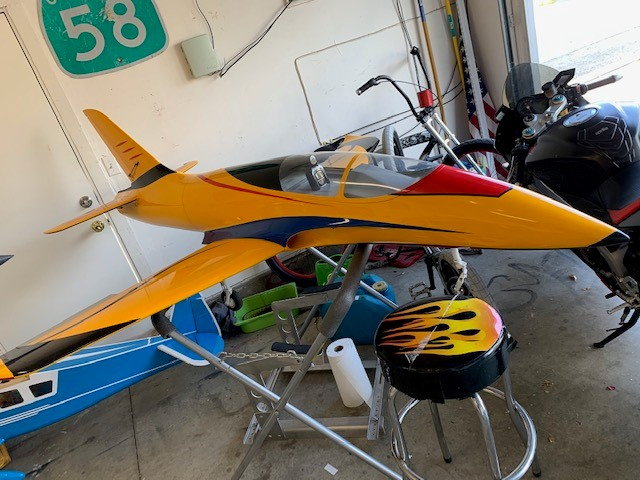
09-23-2020, 01:22 PM
#196
My Feedback: (11)
Hey all,
I picked up a gently used Dolphin S recently. I found this thread, great pics & info! I flew it a few times and then decided to overhaul/reconstruct the intakes. Here are a few pics:
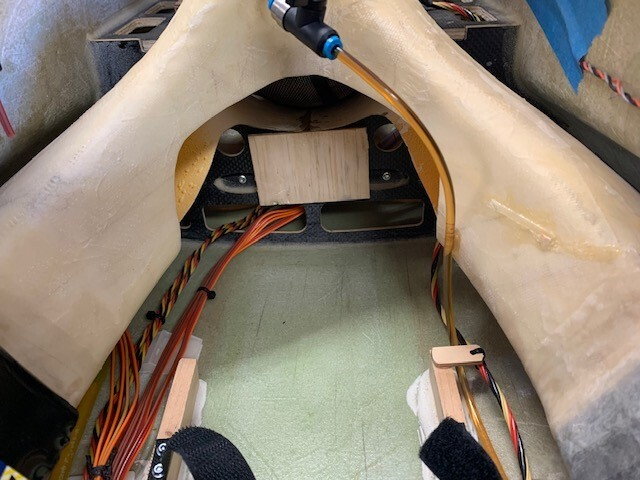
The previous owner cut into the intake to install a Boomerang main tank.

This is the newly fiberglassed intake & stock tanks
I picked up a gently used Dolphin S recently. I found this thread, great pics & info! I flew it a few times and then decided to overhaul/reconstruct the intakes. Here are a few pics:
The previous owner cut into the intake to install a Boomerang main tank.
This is the newly fiberglassed intake & stock tanks

The following users liked this post:
gixxerjack (09-23-2020)