


Skymaster 1/5 Scale F16 Build Thread
 06-23-2016, 04:59 PM
#301

My Feedback: (20)
Finally returned to the canopy fit issue today. Just to vent my frustration, I really think Skymaster should remold the rear canopy bow to fit. I scratch build so it's not like I can't make it work. I'm used to making my own ill fitting parts work, but it It should not be this hard on an $8K ARF to glue on the canopy. Anyway...


I found using a bright light that the triangle tabs on the bottom of the rear canopy bow were lifting the whole assemble off the fuse back making the bow too high. I trimmed off the tabs and sanded some of the bottom off for a better fit. Also found the fake rivets on the left and right sides (more on the left) were interfering with the rear canopy fit so I sanded them smooth. Will have to repaint flat black again.


Next I had to sand the top 2/3 of the rear canopy bow on a disc sander to make the gap parallel and have the front canopy clear the rear when opening. Next I had to bevel the top 2/3 of the front canopy bow approx. 45� to clear the rear canopy bow when opening. All this left me with about a 3mm gap opening and closing works OK now. The the lower edges of the front and rear canopy bows are still not flush with each other. The bottom of the aft canopy slightly wider than the front. Not very good looking but would require more work than I will give it for an everyday flying ARF.


Painted the nose trays and fitted to front of fuse. Fitted nose cone and pitot tube. Passes the 10' test.
Gary
I found using a bright light that the triangle tabs on the bottom of the rear canopy bow were lifting the whole assemble off the fuse back making the bow too high. I trimmed off the tabs and sanded some of the bottom off for a better fit. Also found the fake rivets on the left and right sides (more on the left) were interfering with the rear canopy fit so I sanded them smooth. Will have to repaint flat black again.
Next I had to sand the top 2/3 of the rear canopy bow on a disc sander to make the gap parallel and have the front canopy clear the rear when opening. Next I had to bevel the top 2/3 of the front canopy bow approx. 45� to clear the rear canopy bow when opening. All this left me with about a 3mm gap opening and closing works OK now. The the lower edges of the front and rear canopy bows are still not flush with each other. The bottom of the aft canopy slightly wider than the front. Not very good looking but would require more work than I will give it for an everyday flying ARF.
Painted the nose trays and fitted to front of fuse. Fitted nose cone and pitot tube. Passes the 10' test.
Gary
 06-23-2016, 05:20 PM
#302
My Feedback: (20)
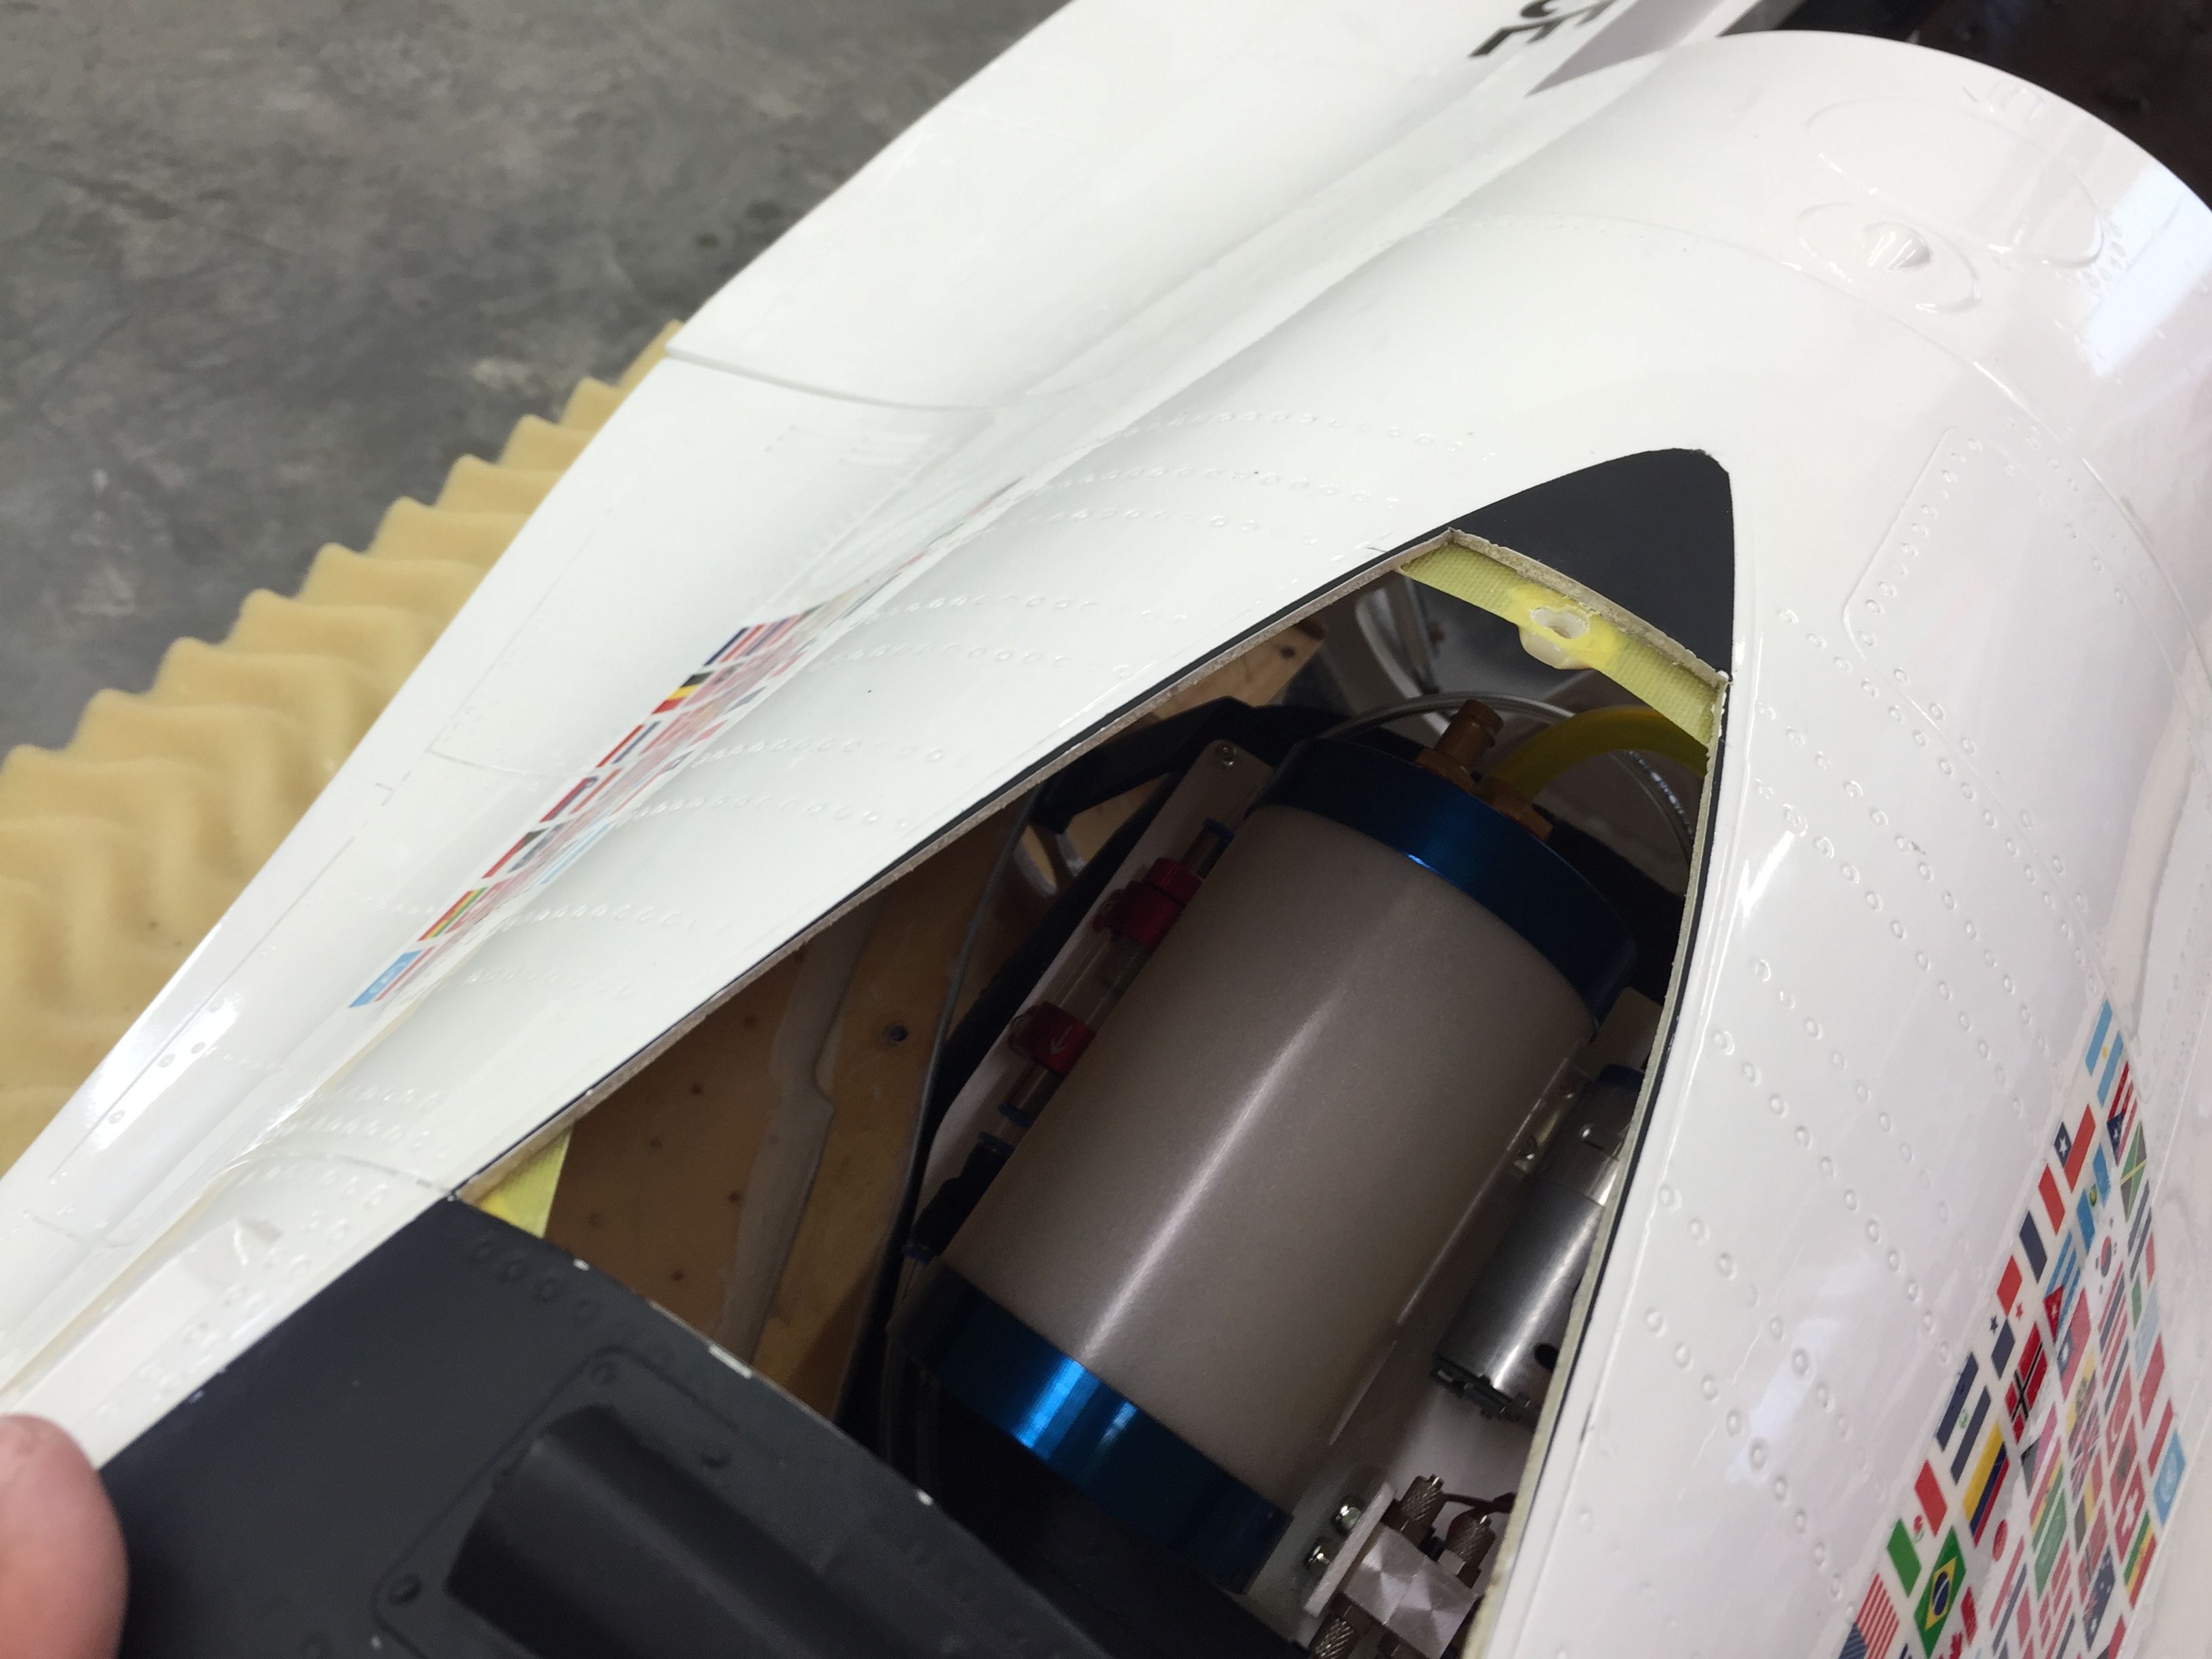
My 1/4" ID Ultra High Flow fuel system parts arrived today from Ultimate Jets. These are high quality purpose built fuel system parts for ultra high flow UAV fuel systems.
After reading Oli's thread (ultra high flow fuel products) I inquired about single nipple screw in fittings for the tanks. In about a week Oli sent me CAD drawings of the parts. A week later he had them in production and listed on the Ultimate Jets website. Custom parts designed and built in two weeks. Now that is first class customer service!
Since this is my first time working with more than a 200N turbine, Oli has been very helpful with setting up the fuel system using the new UHF parts. Thanks Oli, Woody, and Ultimate Jets for all the help.


Threaded ring OD traced on center tank. Tank hole enlarged and parts dry fit and ready for hysol epoxy to the tank.
Gary
After reading Oli's thread (ultra high flow fuel products) I inquired about single nipple screw in fittings for the tanks. In about a week Oli sent me CAD drawings of the parts. A week later he had them in production and listed on the Ultimate Jets website. Custom parts designed and built in two weeks. Now that is first class customer service!
Since this is my first time working with more than a 200N turbine, Oli has been very helpful with setting up the fuel system using the new UHF parts. Thanks Oli, Woody, and Ultimate Jets for all the help.
Threaded ring OD traced on center tank. Tank hole enlarged and parts dry fit and ready for hysol epoxy to the tank.
Gary
06-29-2016, 05:30 PM
#304
My Feedback: (20)
Heraldo
Check out the Ultimate Jets website. Oli and Woody have been very helpful.
http://www.ultimate-jets.net/collections/fuel-hardware
Read this blog by Oli under the "Blog and News" section if you have not. It was very educational for me when setting up my first 300N turbine.
http://www.ultimate-jets.net/blogs/f...considerations
Hope this helps,
Gary
P.S. Did you ever get your nose gear door to stay shut?
07-06-2016, 06:43 AM
#305
hello guys, trying to finalise few things before the maiden, one issue we are encountering is steering, not much movement to the right, i was wondering if any of you had similar issue and what was the procedure for the fix. thank you
 07-06-2016, 04:10 PM
#307

My Feedback: (86)
I'd check it with weight and movement and see how it works before doing anything else.
Rex
07-06-2016, 04:51 PM
#308
My Feedback: (20)
Be sure to tighten and use thread locker on all the landing gear set screws, especially the ones on the MLG over center locks. I saw a new jet at FIF that lost one of these these parts because the set screws came loose and allowed the pivot pins to fall out. Fortunately it was found and repaired using a 3mm bolt.
I checked mine today and found them all loose from the factory. I will post some photos tomorrow.
07-07-2016, 05:23 PM
#309
My Feedback: (20)
The main landing gear over center locks have 4 set screws each. The center part was what was lost on the jet at FIF because both set screws let the pins fall out and the part fell off.
I checked mine today and found that none of the set screws were very tight. 3 of 8 were loose enough that the pins moved and one had the threads stripped in the aluminum part.

In this photo the 2nd and 3rd set screws from the left were loose and the 3rd one has the threads stripped in the aluminum part. Not sure how to fix that yet.
I plan to tighten each one with blue locktite before flying.
Hope this helps.
Gary
I checked mine today and found that none of the set screws were very tight. 3 of 8 were loose enough that the pins moved and one had the threads stripped in the aluminum part.
In this photo the 2nd and 3rd set screws from the left were loose and the 3rd one has the threads stripped in the aluminum part. Not sure how to fix that yet.
I plan to tighten each one with blue locktite before flying.
Hope this helps.
Gary
07-08-2016, 01:53 AM
#310
Do my eyes deceive me or is one side of that piston detached? It seems as if there's a spring inside and it came out, or something?
The main landing gear over center locks have 4 set screws each. The center part was what was lost on the jet at FIF because both set screws let the pins fall out and the part fell off.
I checked mine today and found that none of the set screws were very tight. 3 of 8 were loose enough that the pins moved and one had the threads stripped in the aluminum part.
In this photo the 2nd and 3rd set screws from the left were loose and the 3rd one has the threads stripped in the aluminum part. Not sure how to fix that yet.
I plan to tighten each one with blue locktite before flying.
Hope this helps.
Gary
07-08-2016, 04:45 PM
#313
My Feedback: (20)
Fixed all the loose main landing gear set screws today.
I removed set screws and then the pivot pins. I ground a small notch in the center of each pin to engage the set screw. I then replaced the set screws with blue locktite. This way the pin can not come out with out the set screw backing way out. This does not require much torque on the set screw, just enough to set it against the notch and goes easy on the aluminum threads in landing gear parts. There were enough threads left on the stripped hole to hold the set screw and the locktite should keep it from working loose. I feel a lot better with this modification after seeing the jet at FIF loose this part on the taxiway.


Installed the Ultimate Jets screw in 1/4" ID tank stopper threaded receivers and vent tubes in tanks with hysol. Smoke tank uses a standard size screw in stopper.

I removed set screws and then the pivot pins. I ground a small notch in the center of each pin to engage the set screw. I then replaced the set screws with blue locktite. This way the pin can not come out with out the set screw backing way out. This does not require much torque on the set screw, just enough to set it against the notch and goes easy on the aluminum threads in landing gear parts. There were enough threads left on the stripped hole to hold the set screw and the locktite should keep it from working loose. I feel a lot better with this modification after seeing the jet at FIF loose this part on the taxiway.
Installed the Ultimate Jets screw in 1/4" ID tank stopper threaded receivers and vent tubes in tanks with hysol. Smoke tank uses a standard size screw in stopper.
07-12-2016, 04:27 PM
#314
My Feedback: (20)
Main landing gear reinstalled after painting inside gear well. Flat washers are now installed under socket head bolts against the wood formers on front and rear.
Nose gear reinstalled after painting inside the gear well. Nose gear steering system epoxied to bottom of intake.
Airframe assembled with all "fixed location" parts installed and weight and balance computed. The current weight is 51 lbs and current CG is at 350mm from LE. The spread sheet predicts I can now install all the rest of the stuff, Rx, batteries, ECU, smoke pump, air systems, etc. in forward fuse and get to the target CG of 280-290mm. I am aiming for 54 lbs with B300F, 300N large pipe, and all 4 tanks. We shall see.
Gary
07-19-2016, 02:55 PM
#315
My Feedback: (20)
After more fussing with the fit of the rear canopy this weekend I went off the reservation today made the decision to modify my rear canopy to provide an inspection hatch. The hatch will to enable easy post flight of the JMP air trap tank after each flight and will also allow easy removal of the forward canopy and cockpit tub for maintenance and adjustments if needed.


Cut hatch out with razor saw, corners reinforced with G-10, dowels and nylon bolt to hold down.


Plywood corners to rear canopy, plywood mount tabs with 4-40 blind nuts epoxied into slots in fuse top.


Epoxy putty behind the plywood mounts is fared into fuse top, taping for repainting and canopy mounted. Countersunk 4-40 bolt heads will be painted white later.
Now to figure out how to fill in the gap between the forward canopy and rear canopy.
Rex did you apply the silicon with the forward canopy attached or did you remove it to apply and trim the silicon to fit after drying?
Cut hatch out with razor saw, corners reinforced with G-10, dowels and nylon bolt to hold down.
Plywood corners to rear canopy, plywood mount tabs with 4-40 blind nuts epoxied into slots in fuse top.
Epoxy putty behind the plywood mounts is fared into fuse top, taping for repainting and canopy mounted. Countersunk 4-40 bolt heads will be painted white later.
Now to figure out how to fill in the gap between the forward canopy and rear canopy.
Rex did you apply the silicon with the forward canopy attached or did you remove it to apply and trim the silicon to fit after drying?
Last edited by Viper1GJ; 07-19-2016 at 03:13 PM.
07-20-2016, 06:23 AM
#316
My Feedback: (86)
Gary,
Great work man! Just back form KY Jets...tons of flights on my F-16. Really strong!
I removed the forward canopy section when adding the silicon to the rear section for the gap. I then just did some "fitting" once the silicone fully dried, trimming as I went until the fit was good...then painted the silicone black (my scheme color there).
Rex
07-20-2016, 02:14 PM
#317
My Feedback: (20)
Thanks Rex, glad your jet worked well at KY Jets. It looks great in photos.
Earlier talking about how you filled the canopy gap, you stated that you "added some "skins" of flexible G10 to give me some "attachment" for the silicone bead."
I'm still a little un clear how you added the silicon to the leading edge of the rear canopy. I have several sizes of G-10 here. Not sure how you did the mod with the G-10. Was the objective to make the front edge thicker or to allow the G-10 to extend under the leading edge to make a small "shelf" to lay the silicon bead on?
Also what kind of tape did you use on the outside top of the rear canopy to make the silicon bead flush with the surface. I don't want to silicon to stick to the tape and tear when removing the tape.
I am considering using a servo to open and close the canopy. Are you using the air cylinder to open the canopy? If so does it "slam" up and "slam" down or is it a soft open and close? The full scale uses an electric motor on a gear drive and it moves some what slowly.
Thanks,
Gary
07-21-2016, 05:11 AM
#318
My Feedback: (86)
Gary,
I actually used the G-10 on the inside of the rear frame so it would "hold" the silicone in place as it cured. I used the more bendable grade of G-10 for this, cutting small sections that would give me some "hold" on the frame side and enough material on the outer side so I could come back trim it down after it cured. The G-10 just gave me surface to hold the silicone.
Once this is painted, you will not be able to see the small G-10 pieces or even detect the silicone...at least mine is invisible because my canopy area is black.
I am using the air cylinder, adding some bulk to the arm inside the fuse (I CA'd some thicker G-10 to each side just above the eyelet hole for the clevis)...not that it really needed it but just for precaution. Mine doesn't slam up or down at all, a little fast on the up, but the down looks pretty doggone good! As a practice, I secure the canopy BEFORE I take to the runway, personally checking the lockdown on it BEFORE I head out! It looks great taxiing to that point open, then I close it, check it...send it on out. On landing, after it is fully stopped, I pop it open and taxi back that way...nice feature!
A servo would probably be a great way to run it...the only concern I'd have is the pressure a servo pull would have on the mechanical parts that came with my bird. Yours looks more beefed up than mine. I do like the locking system though...very strong. I ran my canopy air and locks on separate air systems, using the sequencer feature in my DX-18 created a mix to operate on timing and function through the transmitter...really cool!
Hope this helps.
Rb
07-30-2016, 04:04 PM
#319
My Feedback: (20)
Canopy finished except for filling the gap. Work started on air system and servo wiring.


Hatch under rear canopy painted, rear canopy installed with screws painted. Air bottles installed with sticky back velcro.


Air lines for speed brakes installed in aft fuse using Ultimate Jets PYCABS air line clips. Nylon cable sleeve over air lines and servo wires attached to fuse with One Wrap and 87-S hook and loop.
Hatch under rear canopy painted, rear canopy installed with screws painted. Air bottles installed with sticky back velcro.
Air lines for speed brakes installed in aft fuse using Ultimate Jets PYCABS air line clips. Nylon cable sleeve over air lines and servo wires attached to fuse with One Wrap and 87-S hook and loop.
07-30-2016, 06:07 PM
#320

Viper why not use some thin flexible ply like they use to mold the turtle deck area on airplanes? Add it along the inside like a gear door has around the edge of the open for the gear door to lay on when closed.
07-31-2016, 04:12 PM
#321
My Feedback: (20)
Keith,
That was my first idea. Problem is that the rear canopy leading edge is not the same size and shape as the front canopy trailing edge. That why earlier I was fussing about Skymaster not making the parts to fit. The bottom of the rear canopy leading edge is wider than the front and if you squeeze it together to fit flush at the bottom it pushes the top of the rear higher. So an inside lip like you suggested would actually contact the front side somewhere on the side and interfere with the opening of the front canopy.
When I mounted the rear canopy I tried to "average" the difference. Thats why I was asking Rex about how he filled the gap with flexible silicon. The G-10 would be applied similar to how you suggested using the thin plywood and make a "shelf" to support the silicon filler. Still thinking about how to do it and not have to try and trim the "wobbly" edge of silicon.
Thinking of possibly using an epoxy paste in the gap with a vaseline release smeared on the trailing edge of the front canopy, then I could sand to fit and paint it.
Gary
07-31-2016, 04:16 PM
#322
Well That stinks, always something even with SM, well I hope you get it all sorted. One good thing is once its done you have a real nice flying jet on your hands, they are very impressive in the air.
07-31-2016, 06:21 PM
#324
Im planning on it, I get back from the National Training Center at Fort Irwin California around the 15th of September as long as the wife doesnt have an issue with it. I will be out there for a month in the desert playing GI Joe but still planning to go since its a shorter event. Im fixing a couple issues on the F-14 now so hopefully I will have it, if anything I will have the Viper Jet and my Rebel.
08-01-2016, 11:04 AM
#325
My Feedback: (1)
Join Date: May 2003
Location: Piney Flats, TN
Posts: 40
Likes: 0
Received 0 Likes
on
0 Posts
Guys, Some great building ideas. Super photos and upgrades that make a overall well produced kit much better. I have installed all of my servos without the use of this blog and managed to make the installation the same as Viper1G and others. This is a great blog, I would have saved a lot of hours if I had checked it out earlier. I will show my photos as my assembly/build continues.