


Habu 32X Turbine
 04-05-2015, 01:22 PM
#1

Thread Starter
Thought I'd start a new thread since the other one went mainly EDF.
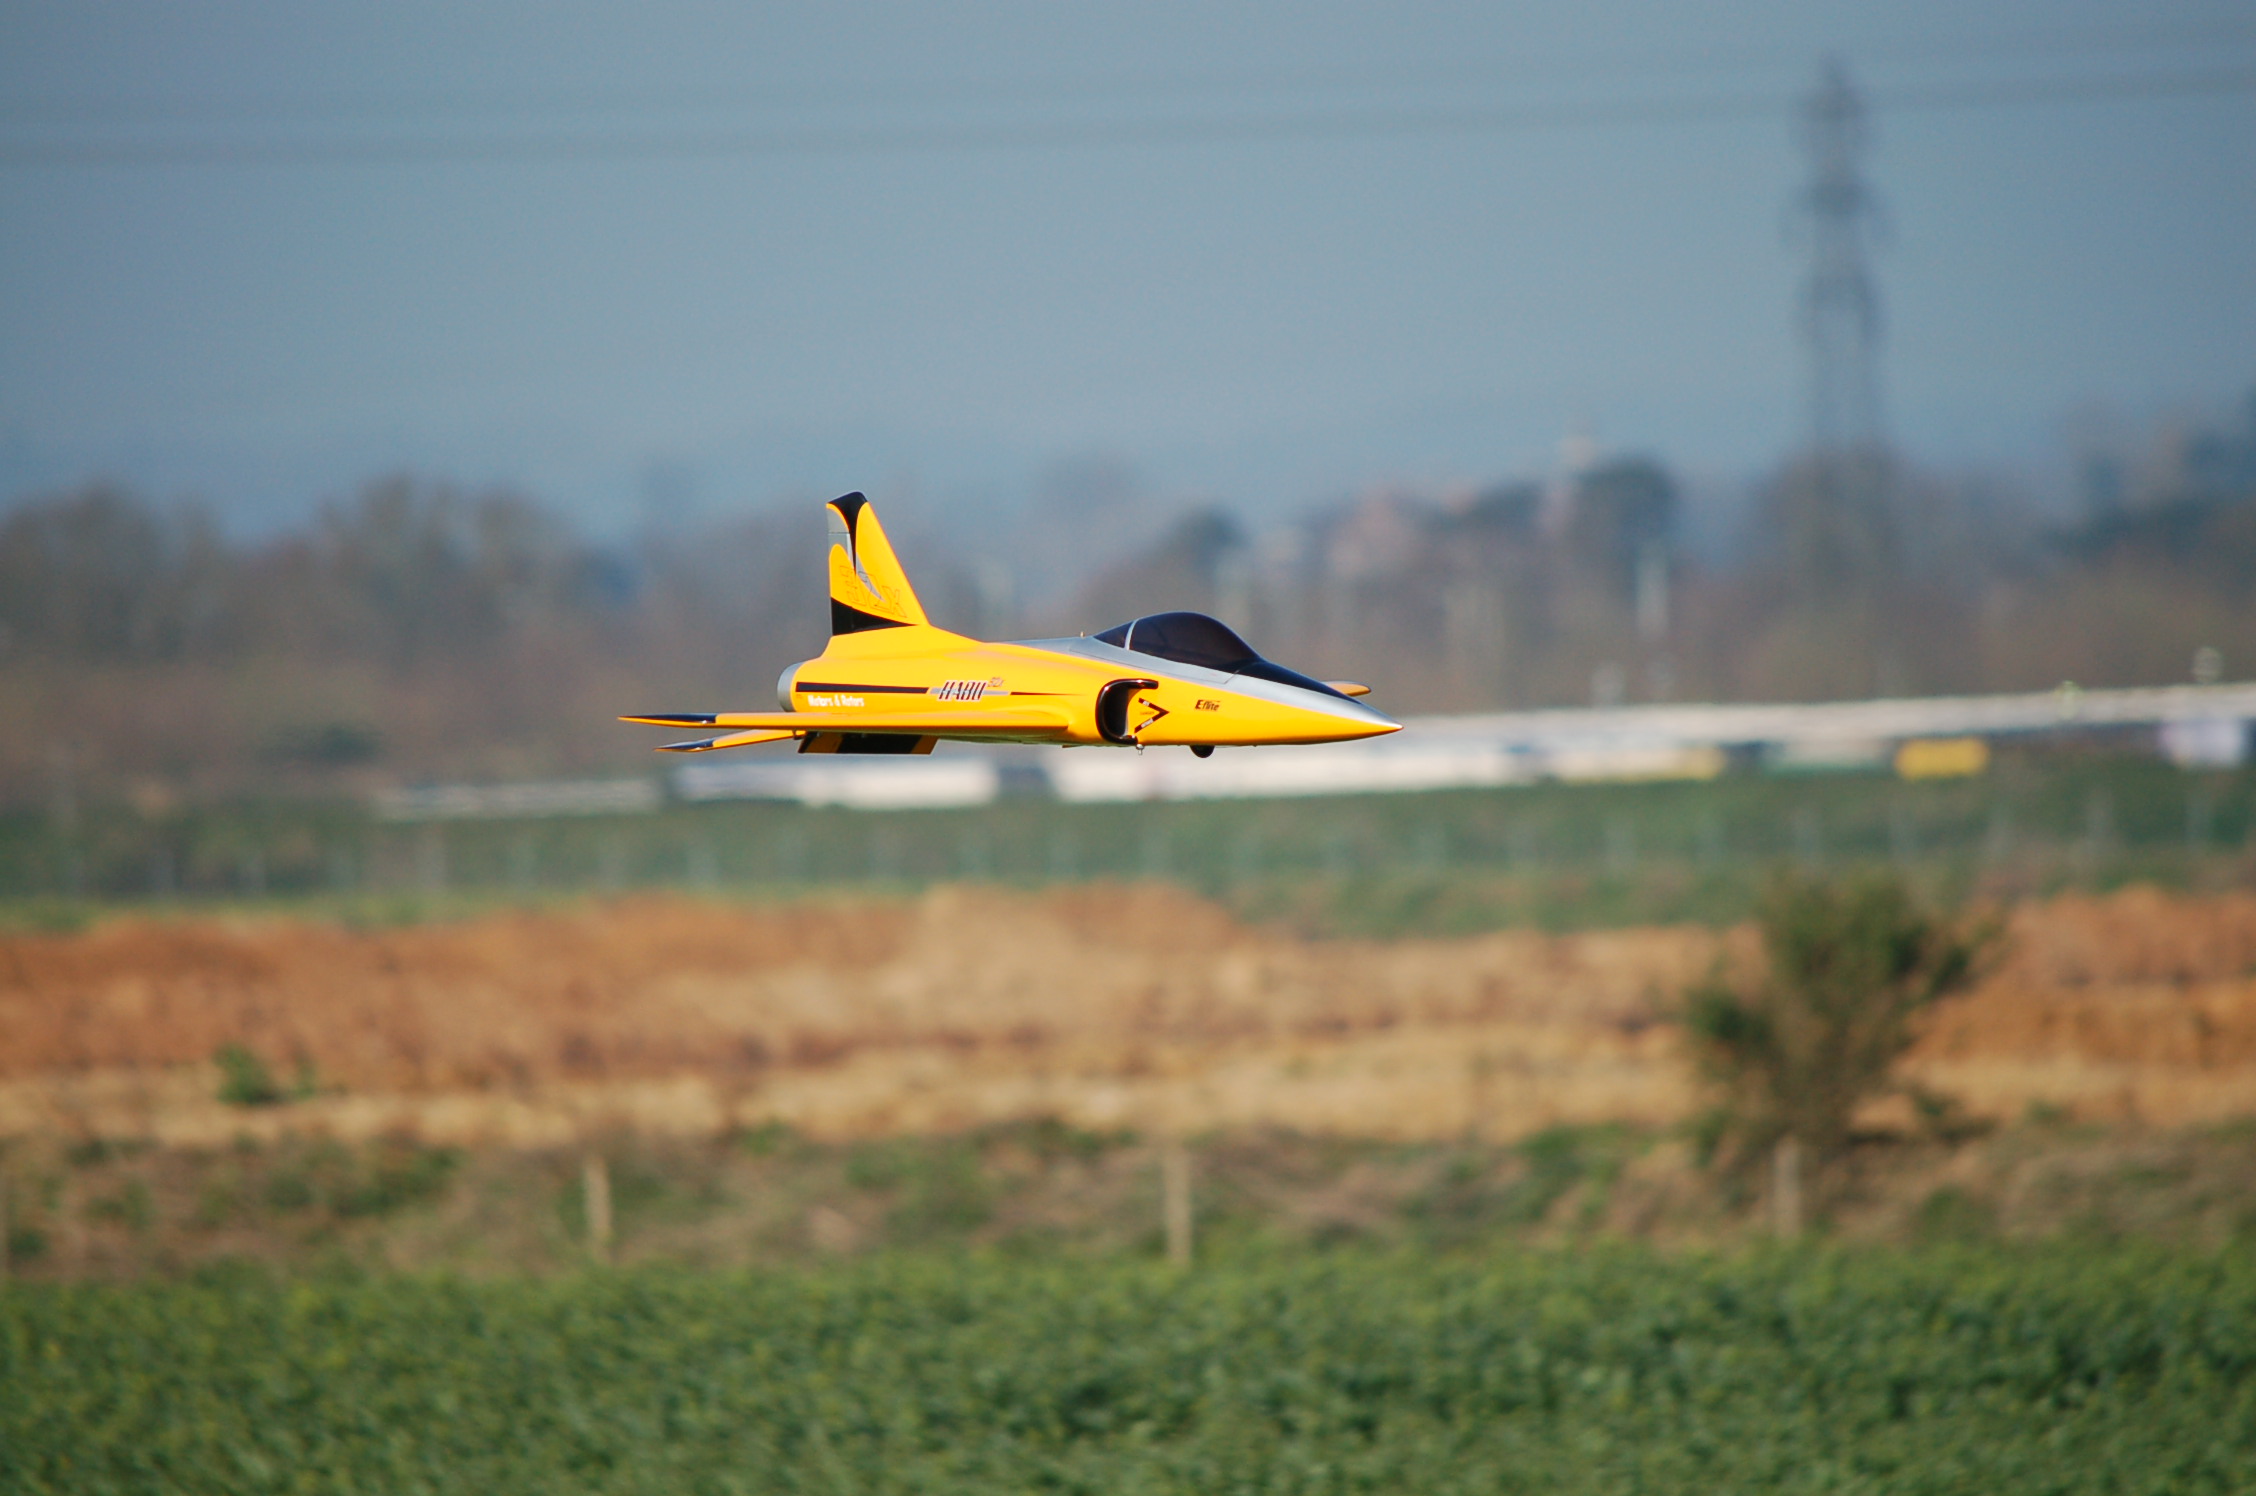
Four months later I finally found time over this weekend to finish the Habu 32X turbine-hope to fly it tomorrow.
The conversion is my std set up, Kavan tank-but this time a 700cc size with an MAP (Canada) Mini Bubble trap. I used JR 362, JR 331 and Savox 255 servos. Powerbox Digi switch with a 2s 1600mAh Rx Li-Po. Turbine is an original P-20SE on gas start, 2s 2200 Li-Po for the turbine in the nose. JR XG-11 and a 1131B DMSS Rx. No nose weight, just over 7lb ready to go.
Gear and legs are stock Eflite, but with wider 45mm wheels (bigger foot print on the ground for grass flying)
Augmenter is rolled from an old inlet duct, spaced from the 48mm tube with 6mm hardwood blocks. Ply former holds this in the tail. The back of the fuselage and front ring around the turbine tail pipe area is BVM heatshield painted.
Pictures hopefully fill in some questions that might come. Interestingly the EDF rails were at the wrong angle for a straight out tailpipe line, so the tailpipe support rails are angled. Will see how the thrust line is.
Dw
Last edited by Dave Wilshere; 04-07-2015 at 08:50 AM.

 04-06-2015, 12:00 PM
#3
Thread Starter
So, three flights today, busy with other models, but this is great! Nicer flying machine than the original Habu 32. Balance where ever it is is spot on! No trim, I increased the landing flap after this first flight and its a blast. Hold KE easier with lighter weight and balance pushed back further. Faster than I remember the original , slow solid landings and easy to see. MAP hopper after first flight 5.5mins. Nose wheel is playing peak aboo as I fitted the nose cover this morning and it needs trimming...
Its a winner though!!
Best of all it goes in the back of our family run about VW UP! wings on :-)
Dave


Its a winner though!!
Best of all it goes in the back of our family run about VW UP! wings on :-)
Dave


 04-07-2015, 07:12 AM
#9
Senior Member
Join Date: Dec 2013
Posts: 540
Likes: 0
Received 0 Likes
on
0 Posts
Wow, that is incredible. I may go with a Habu 32x myself. Been making a decision between a plane that I can still get replacement parts for if need be. I've been looking at a plane someone is selling but can't get replacement parts for it anymore. That's no good. I may go with a Habu 32x now and buy two just to have a full complete set of everything as spare parts.
That Turbine Habu 32x is awesome. Bet it can go out of sight in very little time. Thanks for posting the pix.
That Turbine Habu 32x is awesome. Bet it can go out of sight in very little time. Thanks for posting the pix.
04-07-2015, 08:43 AM
#11
Thread Starter
Guys, its cool...cooler actually :-)
Info is there ;-) 7.02lb with header full. I only found the nose cover the morning of the test flight and silly me did not check the gear after fitting...expecting it to clear-the spring catches the opening as it goes in. All clear now with a Dremel and 20 secs!
Will get a video next time out, either Beardy at club field or Dom at Essential Rc.
Dave
04-08-2015, 07:55 AM
#12
Senior Member
Join Date: Dec 2013
Posts: 540
Likes: 0
Received 0 Likes
on
0 Posts
Yeah I noticed that nose wheel slightly sticking out/not retracted all the way into the fuse, but I figured it was the result of the modification, as in so much equipment has been installed to accommodate the turbine power plant that the wheel didn't have room to be fully retracted into the fuse. Awesome bird regardless.
BTW, how much flap is being used during the full flap landing? On mine, I set it to manual specs. but full flaps according to the recommendation in the manual doesn't look as much as what you're using. Mine is the EDF version (Habu 32) and with batteries and ready to rock & roll is right about 8lbs.
BTW, how much flap is being used during the full flap landing? On mine, I set it to manual specs. but full flaps according to the recommendation in the manual doesn't look as much as what you're using. Mine is the EDF version (Habu 32) and with batteries and ready to rock & roll is right about 8lbs.
Last edited by SushiHunter; 04-08-2015 at 08:03 AM.
04-08-2015, 11:35 AM
#13
Thread Starter
The nose wheel does go completely flush-I did bend a small trail on the nose leg to make it steer better, to counter that I put the nose retract on a 3mm packer. All these shots were on the first flight, so I did not get a chance to sort it and we were having too much fun that day to think about more shots.
I forgot wing build was in the first Habu 32X thread I started, I always modify the horn arrangement to allow more flap angle and better resistance against blow back-the designed horns give a terrible geometry (flap) as there will be no leverage at 90 degrees (bottom hinged flap) I have angled them forward around 5 degrees.
I increased the amount of flap after this first flight as it did not slow as much as I wanted,I guess another 3-4 degrees. Can measure and give you figures. I have 3mm CROW set too.
Have no idea what the manual states as I couldn't find it as I set it up. Guessed the balance too, but it worked out perfectly.
Dave
Last edited by Dave Wilshere; 04-08-2015 at 11:38 AM.
04-08-2015, 12:28 PM
#14
Senior Member
Join Date: Dec 2013
Posts: 540
Likes: 0
Received 0 Likes
on
0 Posts
The nose wheel does go completely flush-I did bend a small trail on the nose leg to make it steer better, to counter that I put the nose retract on a 3mm packer. All these shots were on the first flight, so I did not get a chance to sort it and we were having too much fun that day to think about more shots.
I forgot wing build was in the first Habu 32X thread I started, I always modify the horn arrangement to allow more flap angle and better resistance against blow back-the designed horns give a terrible geometry (flap) as there will be no leverage at 90 degrees (bottom hinged flap) I have angled them forward around 5 degrees.
I increased the amount of flap after this first flight as it did not slow as much as I wanted,I guess another 3-4 degrees. Can measure and give you figures. I have 3mm CROW set too.
Have no idea what the manual states as I couldn't find it as I set it up. Guessed the balance too, but it worked out perfectly.
Dave
Also wanted to get your opinion on toggle programming for high/low rates. I set mine up on just one toggle switch to where I have high rates when the flaps are deployed both during half and full setting but set to low rates when the flaps are completely retracted for regular flight. From your experience, would setting it up this way be an unwise and/or not suggested way of programming the high/low rates on the same toggle as the flaps?
Could you take a pic or two of the ailerons in the "crow" position while the bird is just sitting on the ground? I'd like to see what 3mm of crow looks like.
Last edited by SushiHunter; 04-08-2015 at 01:36 PM.
04-08-2015, 02:27 PM
#15
Thread Starter
I fly one rate for everything, don't find the need to switch movements during flight, but everyone is different and there is no right or wrong. The Habu is unbalanced in that the ailerons are sharp and powerful and the elevator soft and less powerful. So I set with expo 50% on ailerons and 15% on elevator.
Movements are as judged by my experience and not based on manual (again still not found it-4 month builds are bad for keeping stuff together!)
But if you combine I feel you restrict yourself, I like two switches, (rudder always maxed) ail and ele set in three amounts to allow "tuning" sometimes you find like with no Habu experience that the elevator needed all you had and ailerons needed taming. This is much the same on the Habu 32. So I automatically set this the same and I was right.
Everyone's thumbs are different.
Dave
04-08-2015, 10:50 PM
#16
Thread Starter
OK, here is take off flap and landing flap, also the elevator compensation I set.
Also the wheel when I had the over off and the trail kink in the nose leg.
Dave


Also the wheel when I had the over off and the trail kink in the nose leg.
Dave
 04-09-2015, 09:08 AM
#19
Senior Member
Join Date: Dec 2013
Posts: 540
Likes: 0
Received 0 Likes
on
0 Posts
Thanks for posting the pix. Wow! That's a lot of full flap, more like a speed brake. Yeah, I think I'll remove the high/low rate settings from the flap toggle switch. I have always been good flying without utilizing low rates. But I also don't care for expo on anything except the nose wheel steering. I did set up expo before but after so many years of not having such a setting incorporated into any of the models, I don't seem to care for how the feel is during flight.
04-16-2015, 10:01 AM
#20
Thread Starter
Had a free evening so from the office went to my local site with minimal equipment, fully assembled and fuelled model in a VW UP!
Two flights and I'm back in the office in a little over 45 mins! Brilliant
Dw


Two flights and I'm back in the office in a little over 45 mins! Brilliant
Dw
04-16-2015, 10:16 AM
#21
Senior Member
Join Date: Dec 2013
Posts: 540
Likes: 0
Received 0 Likes
on
0 Posts
Brilliant is right! If I tried to get that much in over a 45 minute period of time with my EDF, I'd probably end up crashing.
04-16-2015, 10:55 AM
#23
Senior Member
Join Date: Dec 2013
Posts: 540
Likes: 0
Received 0 Likes
on
0 Posts
That's what I like about nitro, I can refuel and go again. But still, 45 minutes to get to the filed, set it all up, fly it twice and pack it up, that's way too much stuff for me to do in that little time. Matter of fact, I prefer to get to the field and relax for a good hour or so watching everyone else fly before I get started. In the past I've rushed the process, but seems to always end in a crash or mishap when doing it at that pace.
Last edited by SushiHunter; 04-16-2015 at 10:59 AM.
04-16-2015, 02:54 PM
#24
My Feedback: (1)

Join Date: Dec 2001
Location: Fort Wayne, IN
Posts: 3,759
Likes: 0
Received 0 Likes
on
0 Posts
Ha Ha, It takes me 15 to 20 min. just to put my KIngCat together. Plus fuel, smoke fluid and air. (It wont fit in my Montana all together, I gotta take the booms and stab off, too .
04-17-2015, 07:28 AM
#25
Senior Member
Join Date: Dec 2013
Posts: 540
Likes: 0
Received 0 Likes
on
0 Posts

