


US NAVY SeaDart F2Y (Flying boat) Build
 11-08-2015, 03:06 PM
#101

My Feedback: (6)
[QUOTE=Alex48;12123750]Hi Bob, would you be able to PM your email address? I'm currently involved in building a RC 1/6th scale Pogo and was wondering if you could shed some light on a few photos we have. 
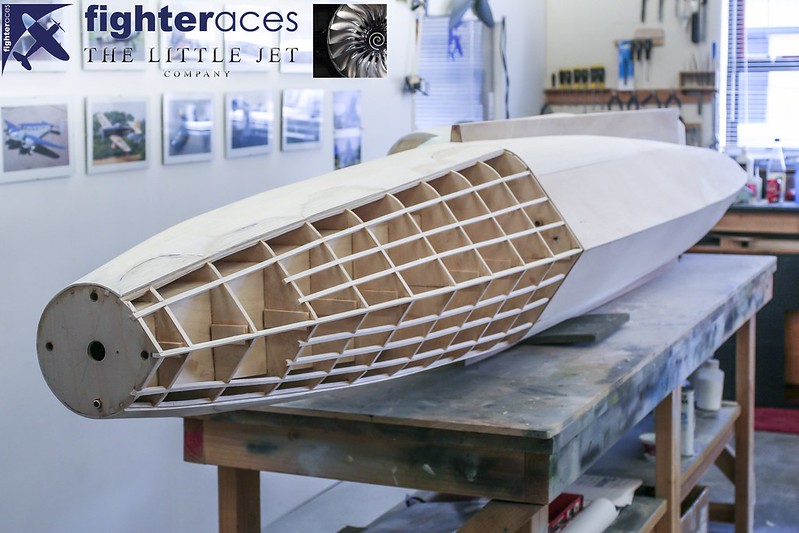
As per the wings, the fuselage has been glassed in heavy 4oz cloth to give a rock solid base to the pattern.......the whole upper rear fuselage being done in 1 piece (good game, good game!!!)
Alex
PM sent, but I have not been getting notifications from RCU
Cheers Bob T
As per the wings, the fuselage has been glassed in heavy 4oz cloth to give a rock solid base to the pattern.......the whole upper rear fuselage being done in 1 piece (good game, good game!!!)
Alex
PM sent, but I have not been getting notifications from RCU
Cheers Bob T
 11-10-2015, 05:24 AM
#102

Thread Starter

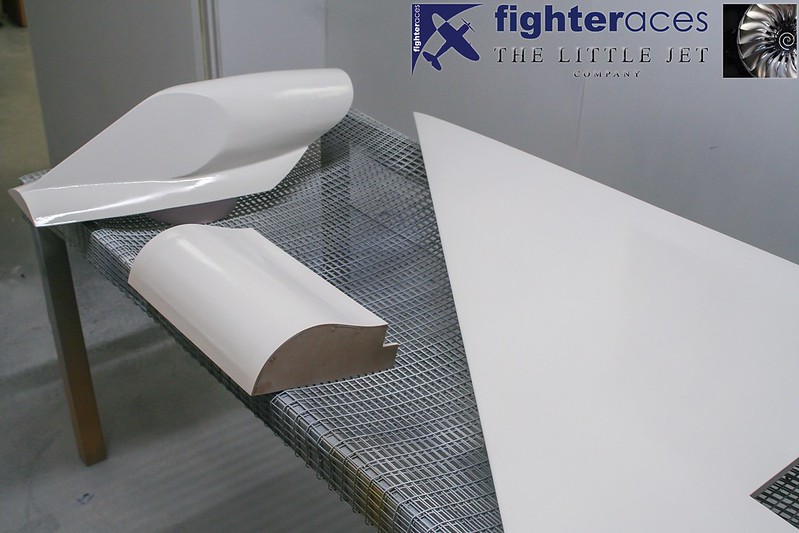
A few of the different parts to the SeaDart Pattern having the first coat of re-face applied.
 <script async src="//embedr.flickr.com/assets/client-code.js" charset="utf-8"></script>
 <script async src="//embedr.flickr.com/assets/client-code.js" charset="utf-8"></script>
The parts having been rubbed down and in various stages of primer. Next is another coat of primer to achieve a perfect glass like finish ready for surface detailing.
 <script async src="//embedr.flickr.com/assets/client-code.js" charset="utf-8"></script>
<script async src="//embedr.flickr.com/assets/client-code.js" charset="utf-8"></script><script async src="//embedr.flickr.com/assets/client-code.js" charset="utf-8"></script>The parts having been rubbed down and in various stages of primer. Next is another coat of primer to achieve a perfect glass like finish ready for surface detailing.
<script async src="//embedr.flickr.com/assets/client-code.js" charset="utf-8"></script>
11-11-2015, 06:00 AM
#103
Thread Starter
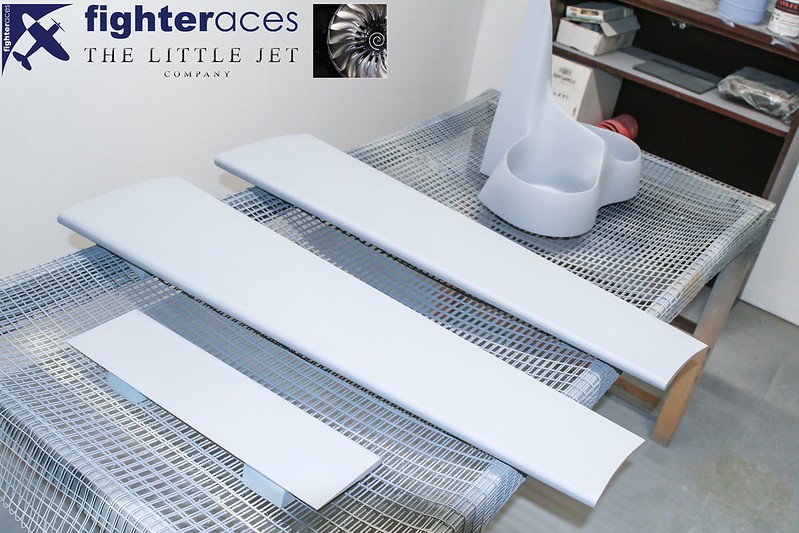
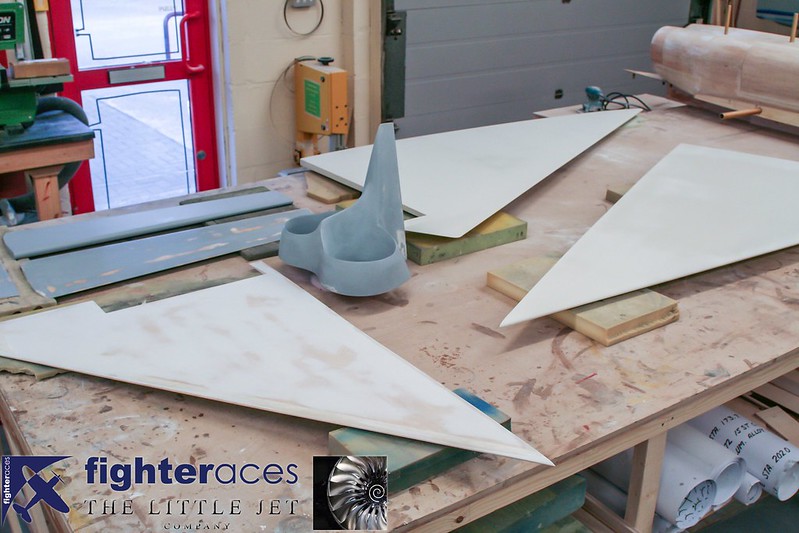
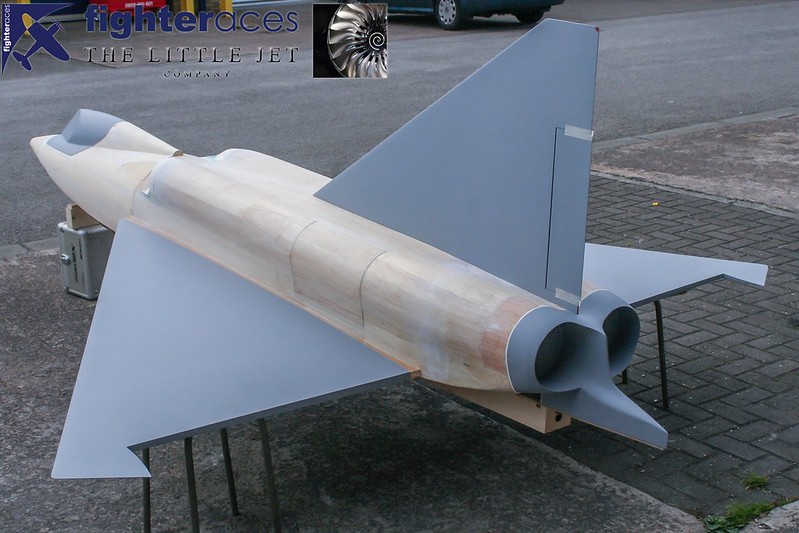
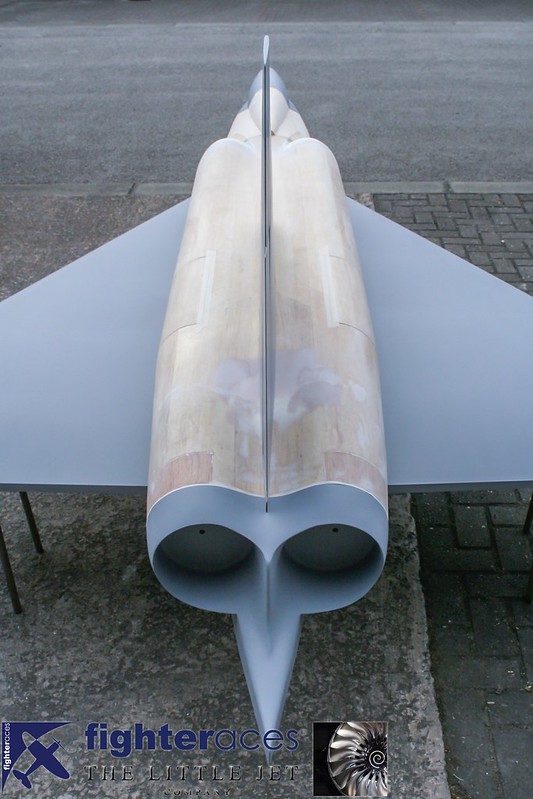
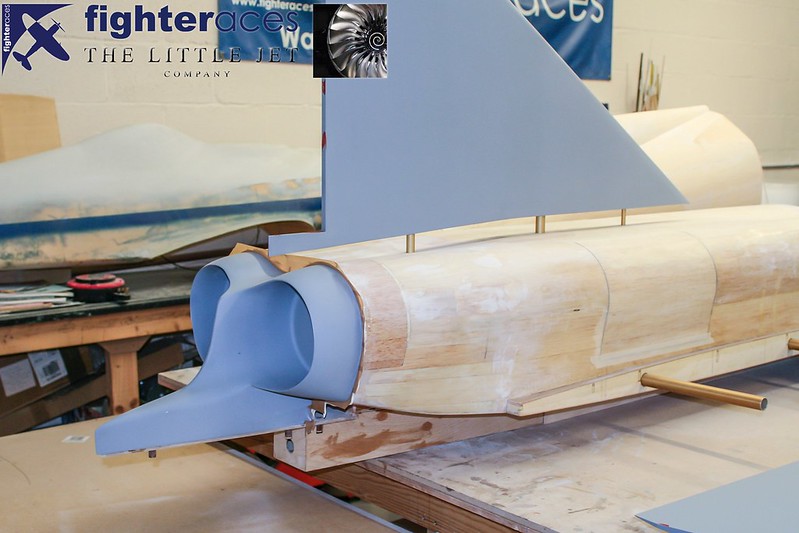
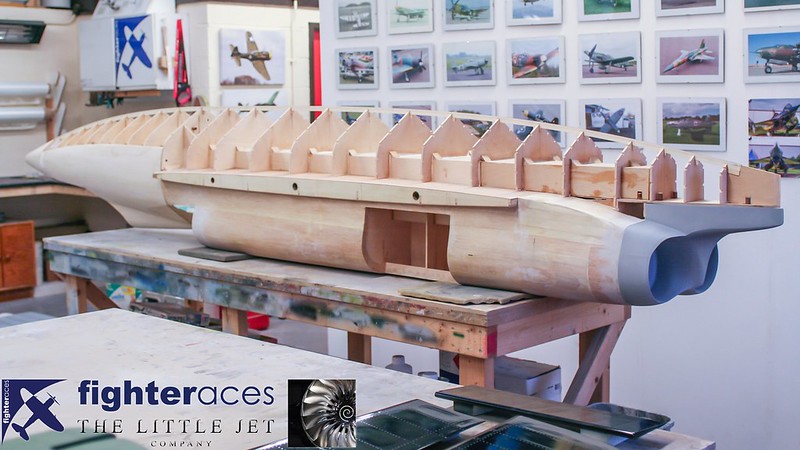
Another motivational assembly… I might be biased but its starting to look really good.
 <script async src="//embedr.flickr.com/assets/client-code.js" charset="utf-8"></script>
A good view showing just how thin the vertical stab is. The fin and the wings will have a full carbon pre-preg layup and be cured in the clave creating the strongest parts possible.
 <script async src="//embedr.flickr.com/assets/client-code.js" charset="utf-8"></script>
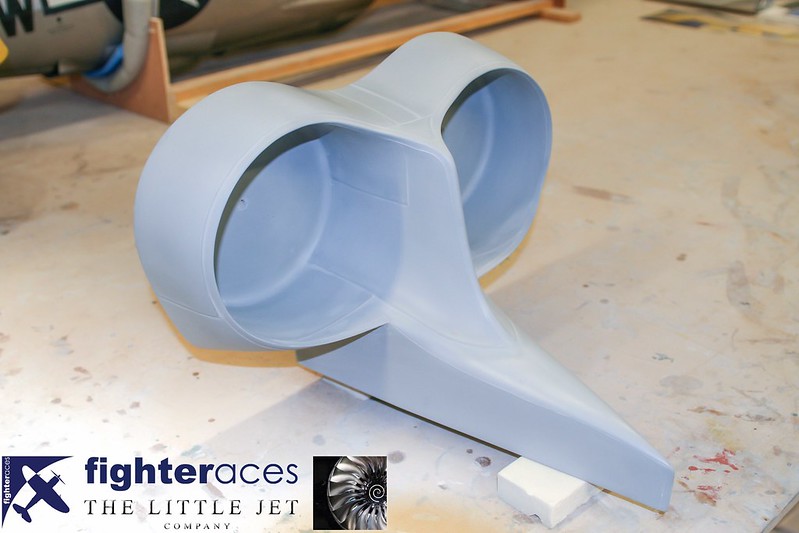
The exhaust pattern being blended to the fuselage.
 <script async src="//embedr.flickr.com/assets/client-code.js" charset="utf-8"></script>
<script async src="//embedr.flickr.com/assets/client-code.js" charset="utf-8"></script>A good view showing just how thin the vertical stab is. The fin and the wings will have a full carbon pre-preg layup and be cured in the clave creating the strongest parts possible.
<script async src="//embedr.flickr.com/assets/client-code.js" charset="utf-8"></script>The exhaust pattern being blended to the fuselage.
<script async src="//embedr.flickr.com/assets/client-code.js" charset="utf-8"></script>
11-11-2015, 04:08 PM
#104
Thread Starter
The surface prep & priming stages we are going through are a little different to what we'd normally use on a flying model.
The 'Re-Face' Alex has mentioned is a U-Pol product which is in effect sprayable car body filler. It is VERY thick and is like spraying treacle so has to be used through a large gun (1.8mm in this case). It builds very fast and once cured sanded beautifully filling every imperfection. After the 1st sanding with a small electric pad sander (flat surfaces only), we are applying 1 heavy coat of Klass Kote epoxy primer. This again builds very fast & sands superbly. This is then wet sanded with 120 before a 2nd coat. This has a 3rd sanding with 240 (wet) which leaves a very good surface.
As the pattern will be fully detailed, the application of flush rivets into an epoxy primer proves problematic as the epoxy doesn't melt very well...........multiple coats of standard grey cellulose primer were then applied to give a decent thickness to burn the rivets into as well as scribe in the flush panel lines.
A long process yes, but the end results as we'll show are well worth the effort to achieve the desired results on the pattern.
Phil Clark, FighterAces
11-11-2015, 10:42 PM
#105
My Feedback: (1)

Join Date: Jun 2005
Location: Europe
Posts: 164
Likes: 0
Received 0 Likes
on
0 Posts
Yes Sir, I also use U-Pol sprayable primer when I made small parts. Very useful thing. But on big parts and if you want to have guarantee for moulding process I use 2K primers only.
i recommend you to make some experiment with your release agent before moulding.
i recommend you to make some experiment with your release agent before moulding.
11-12-2015, 01:28 AM
#106
Thread Starter
Hi Mike, Thanks... We've followed the instructions from the tooling company with regard to paint process of the patterns the final coats are in 2K, I hope it pans out! (fingers crossed) FighterAces have made patterns before with no issues in the tooling using this process although this is the biggest to date. They will start with the smaller parts so if there are any issues we should catch it in time.
Cheers, Alex
Cheers, Alex
Last edited by Alex48; 11-12-2015 at 01:36 AM.
11-12-2015, 02:13 AM
#108
Thread Starter
It certainly makes me nervous Dave! The composite company seem un-concerned by it and by their standards this is not that big. Doesn't help my blood pressure though
Several different tooling techniques will be used, carbon LTM tooling on the solid parts which is basically a pre-preg carbon tooling layup thats bagged and put into the clave. On the parts that aren't dimensionally stable a more traditional cystic tooling will be used.
Several different tooling techniques will be used, carbon LTM tooling on the solid parts which is basically a pre-preg carbon tooling layup thats bagged and put into the clave. On the parts that aren't dimensionally stable a more traditional cystic tooling will be used.
Last edited by Alex48; 11-12-2015 at 02:19 AM.
11-12-2015, 05:31 AM
#109
It was more whether the structure and finish stays stable making the molds! Whole lot of chemical Voodoo going on setting that lot, I'm sure they will deal with it.
11-12-2015, 01:39 PM
#110
Thread Starter
It was more whether the structure and finish stays stable making the molds! Whole lot of chemical Voodoo going on setting that lot, I'm sure they will deal with it.
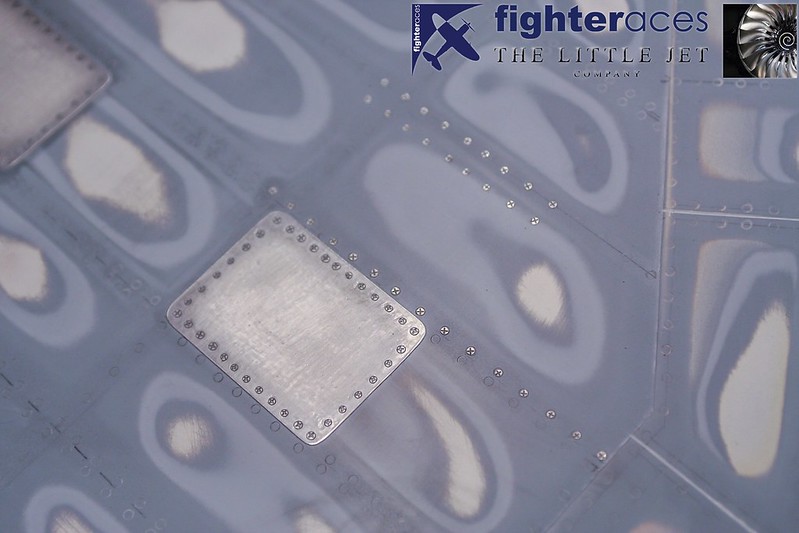
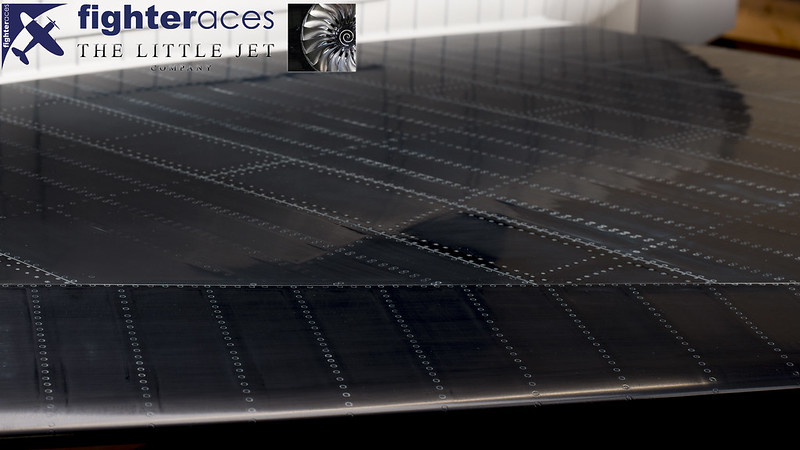
I’ll be the first to admit I’ve been very fussy with the surface detailing. Every rivet is being added to the pattern which amounts to over 100,000 each individually applied. It’s not only the rivets which will be emulated but we want to capture the whole character of the aircraft which involves producing every ripple or bowed panel which can be seen on the full-size. So often very large models are impressive only due to their size but lack any real depth of character. The full size was built to withstand 126,000 pound landing! thats around 7G at its max weight. It really was a bit of a battleship with regard to its construction and this creates a very distinctive appearance which we want the model to have. You can see the amount of effort FighterAces have put into this and really does look incredible... photos just don't do it justice. It's a very subtle effect which looks more prominent than it is in the flesh. While we wait for the hull CAD work on the fuselage FighterAces have used the time to make a start on the wings, fin and control surfaces building in the very subtle undulations in the surface which you can see below.
 <script async src="//embedr.flickr.com/assets/client-code.js" charset="utf-8"></script>
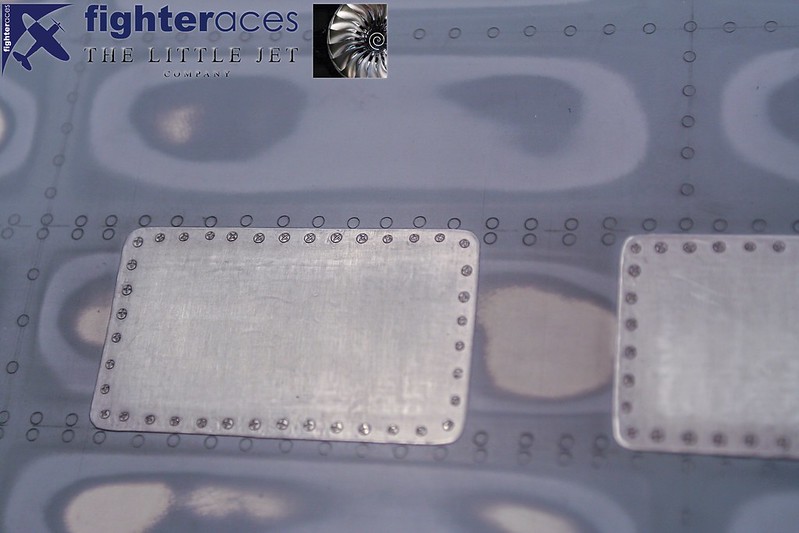 <script async src="//embedr.flickr.com/assets/client-code.js" charset="utf-8"></script>
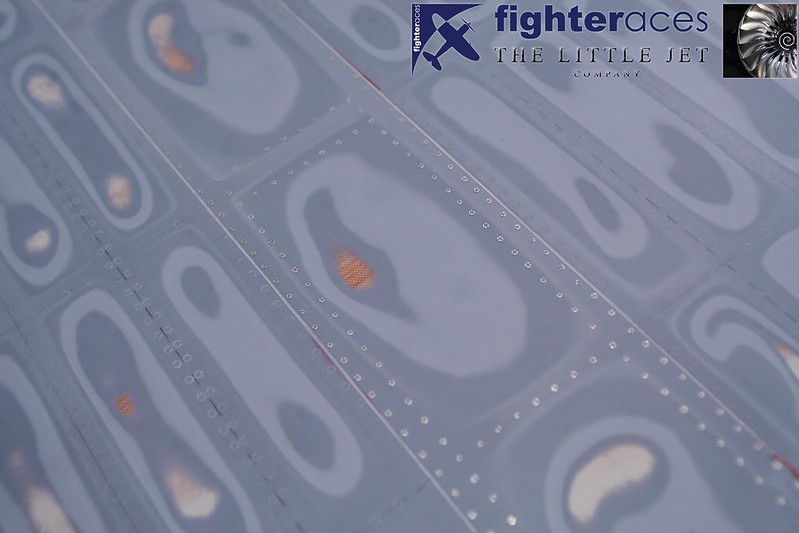 <script async src="//embedr.flickr.com/assets/client-code.js" charset="utf-8"></script>
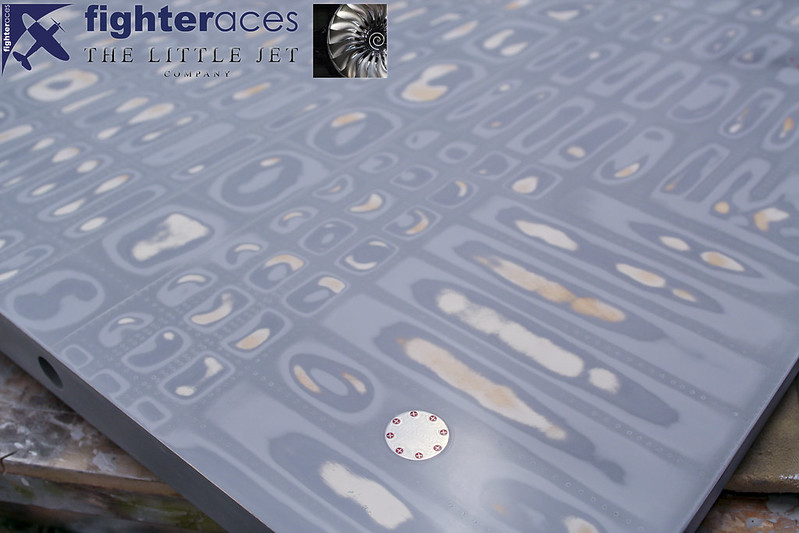 <script async src="//embedr.flickr.com/assets/client-code.js" charset="utf-8"></script>
The below picture hopefully shows the undulations in the panel work, our historical research also backs up this look. Ignore the large raised panel that runs though the wings. This is patch work to cover up where they chopped the wings off for transport.
 <script async src="//embedr.flickr.com/assets/client-code.js" charset="utf-8"></script>
 Last edited by Alex48; 11-12-2015 at 01:47 PM.
11-12-2015, 02:13 PM
#112
Thread Starter
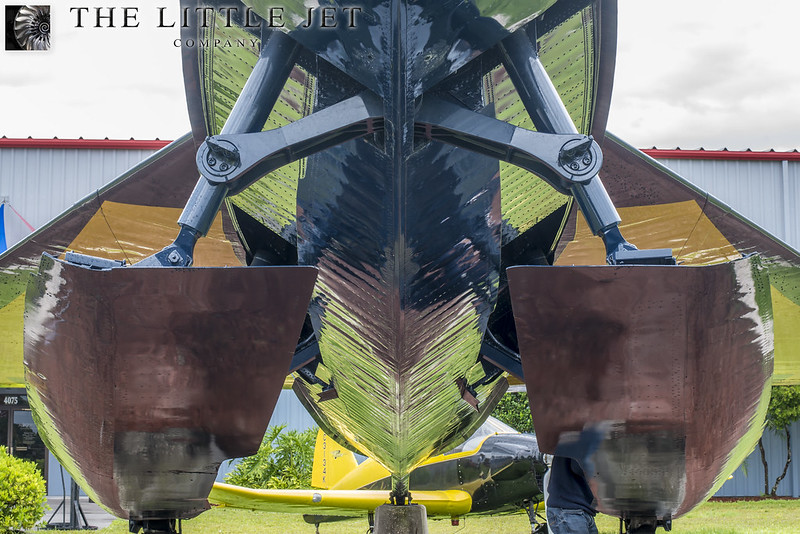
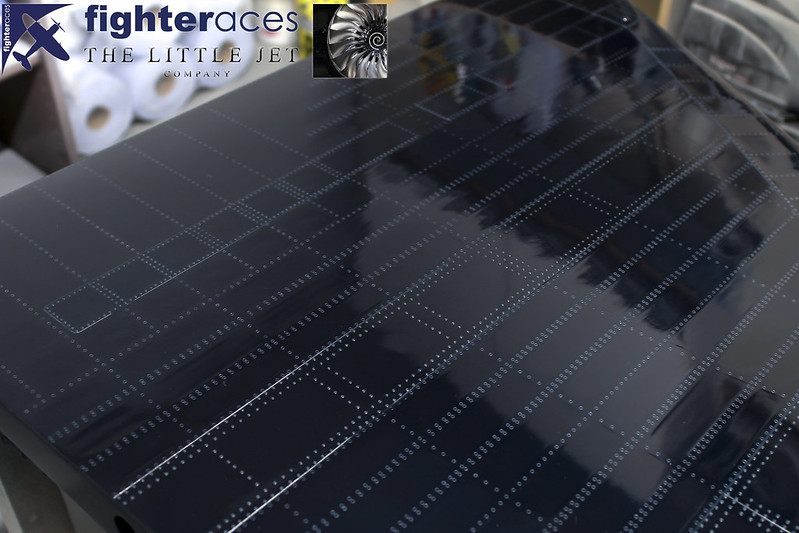
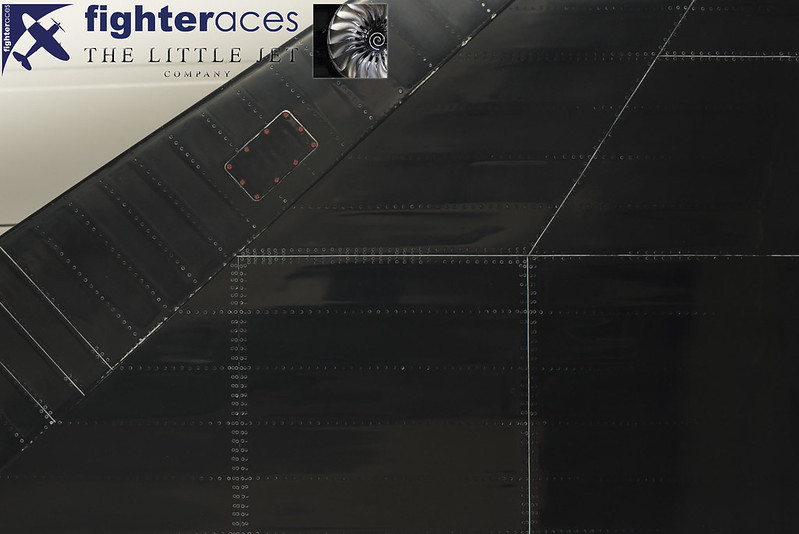
We think this looks about right on the wings for the flush sections but a few areas were re-worked. I think they went a bit insane when doing this and my fussy rivet counting didn't help! I think Phil said he was on around 30,000 of just the small cross heads!
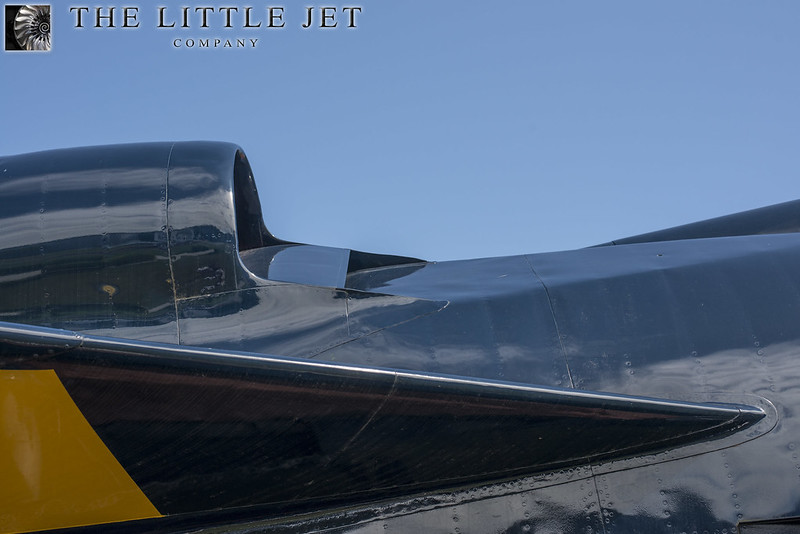
The prominant rivets we can see in the above photo in the ski wells are larger dome head rivets. The fuselage flush rivets do stand out more as you can see in this photo which the guys will hopefully emulate.
 <script async src="//embedr.flickr.com/assets/client-code.js" charset="utf-8"></script>
I think Phil said he was on around 30,000 of just the small cross heads!The prominant rivets we can see in the above photo in the ski wells are larger dome head rivets. The fuselage flush rivets do stand out more as you can see in this photo which the guys will hopefully emulate.
<script async src="//embedr.flickr.com/assets/client-code.js" charset="utf-8"></script>
Last edited by Alex48; 11-12-2015 at 02:33 PM. Reason: typo re spelling

 ..fill it up with foam to float!
11-13-2015, 06:52 AM
..fill it up with foam to float!
11-13-2015, 06:52 AM
#114
My Feedback: (6)
Hi Alex
Great work, looks like your molds will be a lot smother than the real thing. that said back in that day 90 % of all rivets were installed with hand held rivet gun and another person on the back side bucking them, and most of the rivet holes were dimpled for the flush rivets rather than countersinking witch also contributed to the rougher surface, also in the water tight area's they used a green sticky past in the holes and on the rivets when inserted and it would splatter and spread when the rivet was set to provide a seal and then the surface was cleaned with a solvent I think naptha but that was a long tome ago for me.
again hope you don't mind this bit of triva.
Cheers Bob T
11-15-2015, 03:08 AM
#115
Thread Starter
Thanks guys
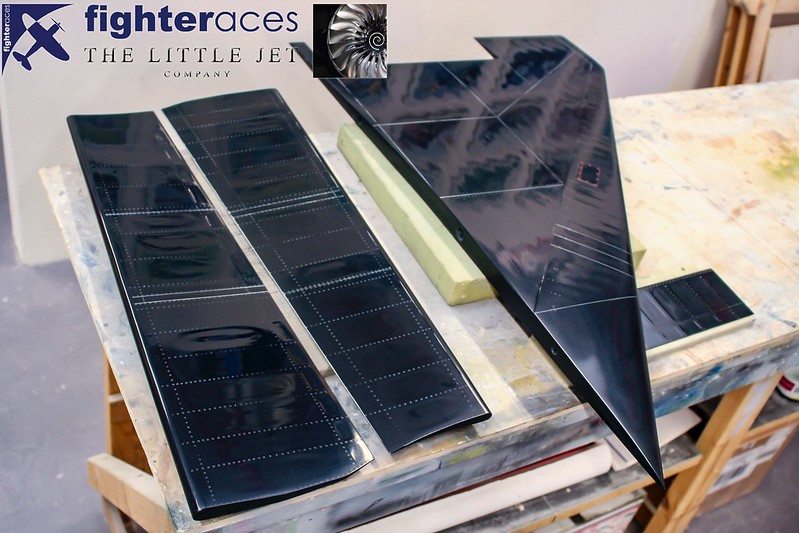
Here is the result after the first topcoat of 2k. Having seen this in person I can testify to the fact I’ve never seen something so convincing. Not only does it look incredible but the model is also very tactile… you’re just drawn to dragging you hand over the surface and marvelling at the subtle undulations. The photos really don’t do it justice. In the daylight the wings and fin look sublime but more importantly its created an effect almost indistinguishable from that of a real aircraft. Well done FighterAces as I know this was a big ask when I laid down the specification of the pattern!
Wing detail.
 <script async src="//embedr.flickr.com/assets/client-code.js" charset="utf-8"></script>
 <script async src="//embedr.flickr.com/assets/client-code.js" charset="utf-8"></script>
Fin detail.
 <script async src="//embedr.flickr.com/assets/client-code.js" charset="utf-8"></script>
Elevons, Fin and Rudder.
 <script async src="//embedr.flickr.com/assets/client-code.js" charset="utf-8"></script>
Here is the result after the first topcoat of 2k. Having seen this in person I can testify to the fact I’ve never seen something so convincing. Not only does it look incredible but the model is also very tactile… you’re just drawn to dragging you hand over the surface and marvelling at the subtle undulations. The photos really don’t do it justice. In the daylight the wings and fin look sublime but more importantly its created an effect almost indistinguishable from that of a real aircraft. Well done FighterAces as I know this was a big ask when I laid down the specification of the pattern!
Wing detail.
<script async src="//embedr.flickr.com/assets/client-code.js" charset="utf-8"></script><script async src="//embedr.flickr.com/assets/client-code.js" charset="utf-8"></script>Fin detail.
<script async src="//embedr.flickr.com/assets/client-code.js" charset="utf-8"></script>Elevons, Fin and Rudder.
<script async src="//embedr.flickr.com/assets/client-code.js" charset="utf-8"></script>
 11-16-2015, 09:57 AM
#120
Thread Starter
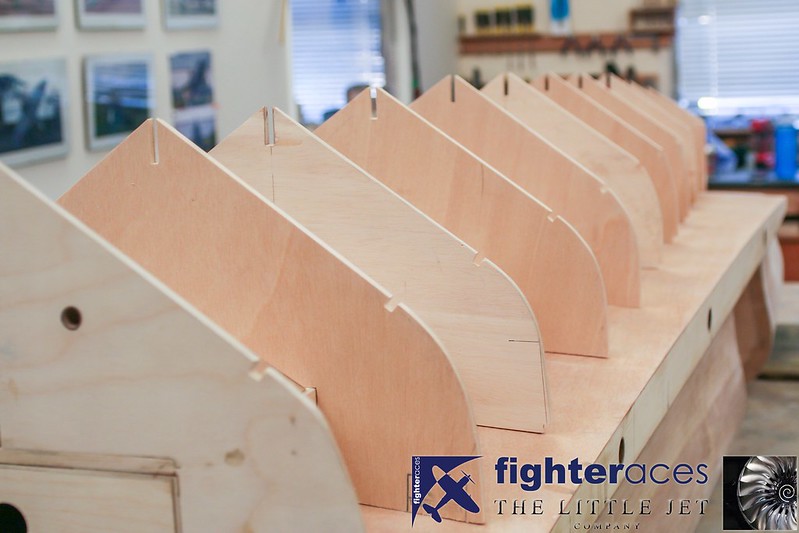
It’s time to finish the fuselage structure now that the CAD work for the hull is complete. The CAD work has used the dimensions from the Florida SeaDart and it’s important that the hull is built accurately as the ski mechanism is very geometrically sensitive.
 <script async src="//embedr.flickr.com/assets/client-code.js" charset="utf-8"></script>
 <script async src="//embedr.flickr.com/assets/client-code.js" charset="utf-8"></script>
 <script async src="//embedr.flickr.com/assets/client-code.js" charset="utf-8"></script>
<script async src="//embedr.flickr.com/assets/client-code.js" charset="utf-8"></script><script async src="//embedr.flickr.com/assets/client-code.js" charset="utf-8"></script><script async src="//embedr.flickr.com/assets/client-code.js" charset="utf-8"></script>
11-16-2015, 11:56 AM
#121
My Feedback: (5)

Join Date: Nov 2007
Location: Vacaville,
CA
Posts: 275
Likes: 0
Received 0 Likes
on
0 Posts
I've been thoroughly enjoying following along this thread and I've been impressed with the workmanship but the recent pictures reveal a level of craftsmanship that's second to none! A "well done" to all involved!
11-17-2015, 07:20 AM
#122
Thread Starter
Glad your enjoying the build... Loads more to come
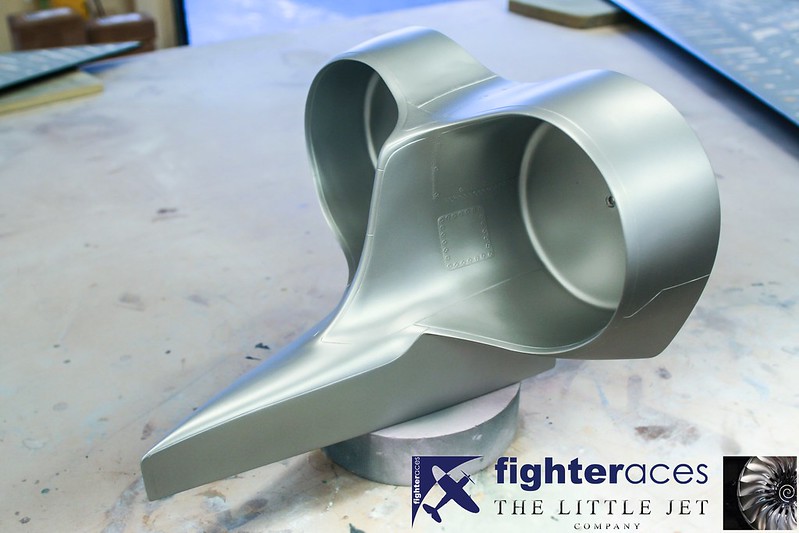
Detailing the exhaust.
 <script async src="//embedr.flickr.com/assets/client-code.js" charset="utf-8"></script>
It's had a light dusting of standard silver just for effect. We aim to assemble the whole pattern once complete and this will look better in the photos.
 <script async src="//embedr.flickr.com/assets/client-code.js" charset="utf-8"></script>
There is a bit more detail to add with some small rivets etc...
Detailing the exhaust.
<script async src="//embedr.flickr.com/assets/client-code.js" charset="utf-8"></script>It's had a light dusting of standard silver just for effect. We aim to assemble the whole pattern once complete and this will look better in the photos.
<script async src="//embedr.flickr.com/assets/client-code.js" charset="utf-8"></script>There is a bit more detail to add with some small rivets etc...
Last edited by Alex48; 11-17-2015 at 07:47 AM.
11-17-2015, 03:00 PM
#123
Thread Starter
The effect shown after the sanding shows the various product used...............
<script async src="//embedr.flickr.com/assets/client-code.js" charset="utf-8"></script>
Glass & epoxy
Reface
Klass Kote grey primer
Grey cellulose primer (2 different brand were used as we ran out of the 1st after the 1st coat.....the new batch being slightly darker than the 1st hence the dark, light dark' grey layers).
All rivets are burned in using the regular soldering iron technique. We did make them more prominent than you'd maybe do on a 'flying' model as opposed to a patter simply because a degree of definition will be lost in the colour coats + waxing etc.....prior to moulding.
The Blue is Klass kote. We mixed this 1 part colour, 1 part gloss catalyst, 2 parts Reducer to give a very thin mix so as not to partially fill in the rivets with the colour. The fact all are showing white/light blue is due to the fact the surfaces has been flatted (wet) so there are still traces of dry rubbing down water collecting in the rivet rings.
Phil Clark, FighterAces
<script async src="//embedr.flickr.com/assets/client-code.js" charset="utf-8"></script>Glass & epoxy
Reface
Klass Kote grey primer
Grey cellulose primer (2 different brand were used as we ran out of the 1st after the 1st coat.....the new batch being slightly darker than the 1st hence the dark, light dark' grey layers).
All rivets are burned in using the regular soldering iron technique. We did make them more prominent than you'd maybe do on a 'flying' model as opposed to a patter simply because a degree of definition will be lost in the colour coats + waxing etc.....prior to moulding.
The Blue is Klass kote. We mixed this 1 part colour, 1 part gloss catalyst, 2 parts Reducer to give a very thin mix so as not to partially fill in the rivets with the colour. The fact all are showing white/light blue is due to the fact the surfaces has been flatted (wet) so there are still traces of dry rubbing down water collecting in the rivet rings.
Phil Clark, FighterAces
 11-21-2015, 08:59 PM
#125
Junior Member
Join Date: Sep 2015
Posts: 10
Likes: 0
Received 0 Likes
on
0 Posts
Very nice work, great attention to detail. I'm wondering if the panel contour effect is the the reverse of the full size? It appears that the center of the panels has been sanded lower when normally the structure with the rivets is the depressed area,
LV
LV