


How To: Build a variable rate, reversible Fueling Station for you Jet!
 01-09-2016, 01:41 AM
#26

MANY THANKS TO THE OP for starting this thread. I'm happy to report that thanks to his inspiration I've found a neat little gadget which makes this project so stupid-easy that there's just no reason not to do it.
The original components #2 through #6 (cost: approx $12) from the original post (again, thanks for the excellent thread) are combined and already assembled in this little gem I found on Amazon for a ridiculously low price of $5.38 including shipping: http://www.amazon.com/gp/product/B00...ilpage_o05_s00
The above item has a reversing on/off switch and speed control in one neat little package. The assembly uses some current even when not in use though, so I added an el-cheapo push button on/off switch between this unit and the battery. Just for fun I also added an el-cheapo 12v red light to indicate when that second switch is on and the pump is "armed". I completed the project last night and it works great.
I have never figured out how to add pictures here, but if someone cares to explain it to me then I will gladly add some.
Last edited by highhorse; 01-09-2016 at 02:25 AM.
 01-09-2016, 06:14 AM
#28
MANY THANKS TO THE OP for starting this thread. I'm happy to report that thanks to his inspiration I've found a neat little gadget which makes this project so stupid-easy that there's just no reason not to do it.
The original components #2 through #6 (cost: approx $12) from the original post (again, thanks for the excellent thread) are combined and already assembled in this little gem I found on Amazon for a ridiculously low price of $5.38 including shipping: http://www.amazon.com/gp/product/B00...ilpage_o05_s00
The above item has a reversing on/off switch and speed control in one neat little package. The assembly uses some current even when not in use though, so I added an el-cheapo push button on/off switch between this unit and the battery. Just for fun I also added an el-cheapo 12v red light to indicate when that second switch is on and the pump is "armed". I completed the project last night and it works great.
I have never figured out how to add pictures here, but if someone cares to explain it to me then I will gladly add some.
The original components #2 through #6 (cost: approx $12) from the original post (again, thanks for the excellent thread) are combined and already assembled in this little gem I found on Amazon for a ridiculously low price of $5.38 including shipping: http://www.amazon.com/gp/product/B00...ilpage_o05_s00
The above item has a reversing on/off switch and speed control in one neat little package. The assembly uses some current even when not in use though, so I added an el-cheapo push button on/off switch between this unit and the battery. Just for fun I also added an el-cheapo 12v red light to indicate when that second switch is on and the pump is "armed". I completed the project last night and it works great.
I have never figured out how to add pictures here, but if someone cares to explain it to me then I will gladly add some.
great find, i love it. thank you!
01-09-2016, 07:43 AM
#29

I'm getting ready to start assembling my fuel station and that's a neat item you discovered. I would like to see how you incorporated it into the design. Loading pictures here is very easy.
1. Take whatever picture you want to post, load it into your computer and save it in a file you can find (probably somewhere in "pictures")
2. Reply to any post and in the reply section click on the "Image Insert" icon here (red arrow):
3. This box will open and click on "Select Files"
4. Search your computer to find the picture or pictures you want to load. Highlight the picture(s) and then select "Upload File(s)"
Your picture(s) will appear in your reply. Then just click "Post Quick Reply" and you are done.
You can practice posting a picture in the RC Universe forum called "Test Posting Forum"
Anybody who can fly a full scale aerobatic airplane and build a variable speed reversing fuel pump station can figure out how to post a picture!
Craig
01-09-2016, 12:06 PM
#30
Thanks for the photo assist. Here you can see the original pump and new electronics installed into/onto a new project box. This particular box is hinged for easy access and was the most expensive part of the upgrade. The first pic is of the speed control components (reversing switch and speed control) on the side of the box. The second is the arming switch and indicator light (which illuminates when armed) I added on top. In the third you can see the circuit board velcro'd to the inside of the hinged portion, the temporary Lipo (I will use LiFe as the permanent Battery because I don't want lipos on a fuel can!) and you can see that the unit is armed, as evidenced by the glowing light.
Last edited by highhorse; 01-09-2016 at 02:57 PM.
01-09-2016, 12:26 PM
#31
Well *** RCU? Why did you rotate each of my pics 90 degrees? I hate this site right now. Normally love it but right now I'm fed up. Apparently I'm better at flying and building than posting, but I've posted to other sites with no issues.
At least the pics are correct orientation when opened. Perhaps the thumbnails default to landscape, whereas I took the pics in portrait.
At least the pics are correct orientation when opened. Perhaps the thumbnails default to landscape, whereas I took the pics in portrait.
Last edited by highhorse; 01-09-2016 at 12:50 PM.
01-09-2016, 12:37 PM
#33
Another couple of goodies I've found to make life easier:
If you already have a fueling station and would simply like to add a variable speed feature then consider these units on Amazon. One has a neat little 0-100% of speed display, the other is more basic...
http://www.amazon.com/Unique-Goods-D...0XYJ74N115438S
http://www.amazon.com/Unique-Goods-1...QWDX74Y5A1AJ1H
05-30-2016, 06:55 AM
#34
[QUOTE=highhorse;12158490]MANY THANKS TO THE OP for starting this thread. I'm happy to report that thanks to his inspiration I've found a neat little gadget which makes this project so stupid-easy that there's just no reason not to do it.
The original components #2 through #6 (cost: approx $12) from the original post (again, thanks for the excellent thread) are combined and already assembled in this little gem I found on Amazon for a ridiculously low price of $5.38 including shipping: http://www.amazon.com/gp/product/B00...ilpage_o05_s00
The above item has a reversing on/off switch and speed control in one neat little package. The assembly uses some current even when not in use though, so I added an el-cheapo push button on/off switch between this unit and the battery. Just for fun I also added an el-cheapo 12v red light to indicate when that second switch is on and the pump is "armed". I completed the project last night and it works great.
[QUOTE]
Thanks to you Don and the OP! I finally got around to updating my Jersey Modeler refueler with the contraption Don found on Amazon. The price is up to a whopping $11.99 but it was super easy to retrofit my setup with just a new box and some of the Jersey components. I used it for the first time last weekend at First in Flight and loved being able to hook up any size/volt battery and easily control the flow. I like to start fast and then slow down as I reach full. I can fuel up quicker but also control the pressure that builds up in the system during fueling, which helps to avoid overfueling and spills. No problem with this set up and WAY cheaper than the commercial variable flow systems on the market.
Craig
Last edited by CraigG; 05-30-2016 at 06:58 AM.
05-30-2016, 08:19 AM
#35

Here's what I've been doing for the past few years. I got really tired of transferring kero. Near impossible not to end up spilling some. I always get kero in the same container, so I made a pump that sits on top and just transfer it between cans. ;-) For my gassers, I made switch out of a project box from radio shack and bought a pump.


03-28-2018, 04:26 PM
#36

My Feedback: (2)
[QUOTE=CraigG;12219360][QUOTE=highhorse;12158490]MANY THANKS TO THE OP for starting this thread. I'm happy to report that thanks to his inspiration I've found a neat little gadget which makes this project so stupid-easy that there's just no reason not to do it.
The original components #2 through #6 (cost: approx $12) from the original post (again, thanks for the excellent thread) are combined and already assembled in this little gem I found on Amazon for a ridiculously low price of $5.38 including shipping: http://www.amazon.com/gp/product/B00...ilpage_o05_s00
The above item has a reversing on/off switch and speed control in one neat little package. The assembly uses some current even when not in use though, so I added an el-cheapo push button on/off switch between this unit and the battery. Just for fun I also added an el-cheapo 12v red light to indicate when that second switch is on and the pump is "armed". I completed the project last night and it works great.
Thanks to you Don and the OP! I finally got around to updating my Jersey Modeler refueler with the contraption Don found on Amazon. The price is up to a whopping $11.99 but it was super easy to retrofit my setup with just a new box and some of the Jersey components. I used it for the first time last weekend at First in Flight and loved being able to hook up any size/volt battery and easily control the flow. I like to start fast and then slow down as I reach full. I can fuel up quicker but also control the pressure that builds up in the system during fueling, which helps to avoid overfueling and spills. No problem with this set up and WAY cheaper than the commercial variable flow systems on the market.
Craig
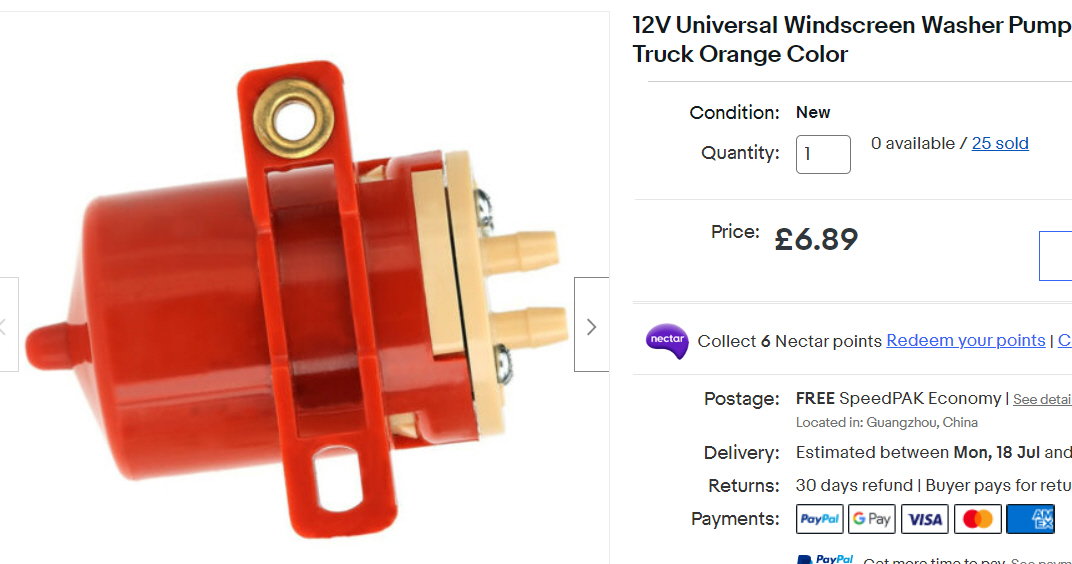
any one can tell where I can get this pump from.
and what is the brand or name of it.
thanks
The original components #2 through #6 (cost: approx $12) from the original post (again, thanks for the excellent thread) are combined and already assembled in this little gem I found on Amazon for a ridiculously low price of $5.38 including shipping: http://www.amazon.com/gp/product/B00...ilpage_o05_s00
The above item has a reversing on/off switch and speed control in one neat little package. The assembly uses some current even when not in use though, so I added an el-cheapo push button on/off switch between this unit and the battery. Just for fun I also added an el-cheapo 12v red light to indicate when that second switch is on and the pump is "armed". I completed the project last night and it works great.
Thanks to you Don and the OP! I finally got around to updating my Jersey Modeler refueler with the contraption Don found on Amazon. The price is up to a whopping $11.99 but it was super easy to retrofit my setup with just a new box and some of the Jersey components. I used it for the first time last weekend at First in Flight and loved being able to hook up any size/volt battery and easily control the flow. I like to start fast and then slow down as I reach full. I can fuel up quicker but also control the pressure that builds up in the system during fueling, which helps to avoid overfueling and spills. No problem with this set up and WAY cheaper than the commercial variable flow systems on the market.
Craig
and what is the brand or name of it.
thanks
03-29-2018, 03:07 AM
#37
 11-20-2020, 03:43 AM
#39


The original components #2 through #6 (cost: approx $12) from the original post (again, thanks for the excellent thread) are combined and already assembled in this little gem I found on Amazon for a ridiculously low price of $5.38 including shipping: http://www.amazon.com/gp/product/B00...ilpage_o05_s00
The above item has a reversing on/off switch and speed control in one neat little package. The assembly uses some current even when not in use though, so I added an el-cheapo push button on/off switch between this unit and the battery. Just for fun I also added an el-cheapo 12v red light to indicate when that second switch is on and the pump is "armed". I completed the project last night and it works great. .
The above item has a reversing on/off switch and speed control in one neat little package. The assembly uses some current even when not in use though, so I added an el-cheapo push button on/off switch between this unit and the battery. Just for fun I also added an el-cheapo 12v red light to indicate when that second switch is on and the pump is "armed". I completed the project last night and it works great. .
 11-20-2020, 01:08 PM
#42
 11-21-2020, 06:35 AM
#43
Didn't realise when I ordered that it had to go round the moon and back before being delivered. I'm hoping they meant November.
07-03-2022, 02:18 PM
#44
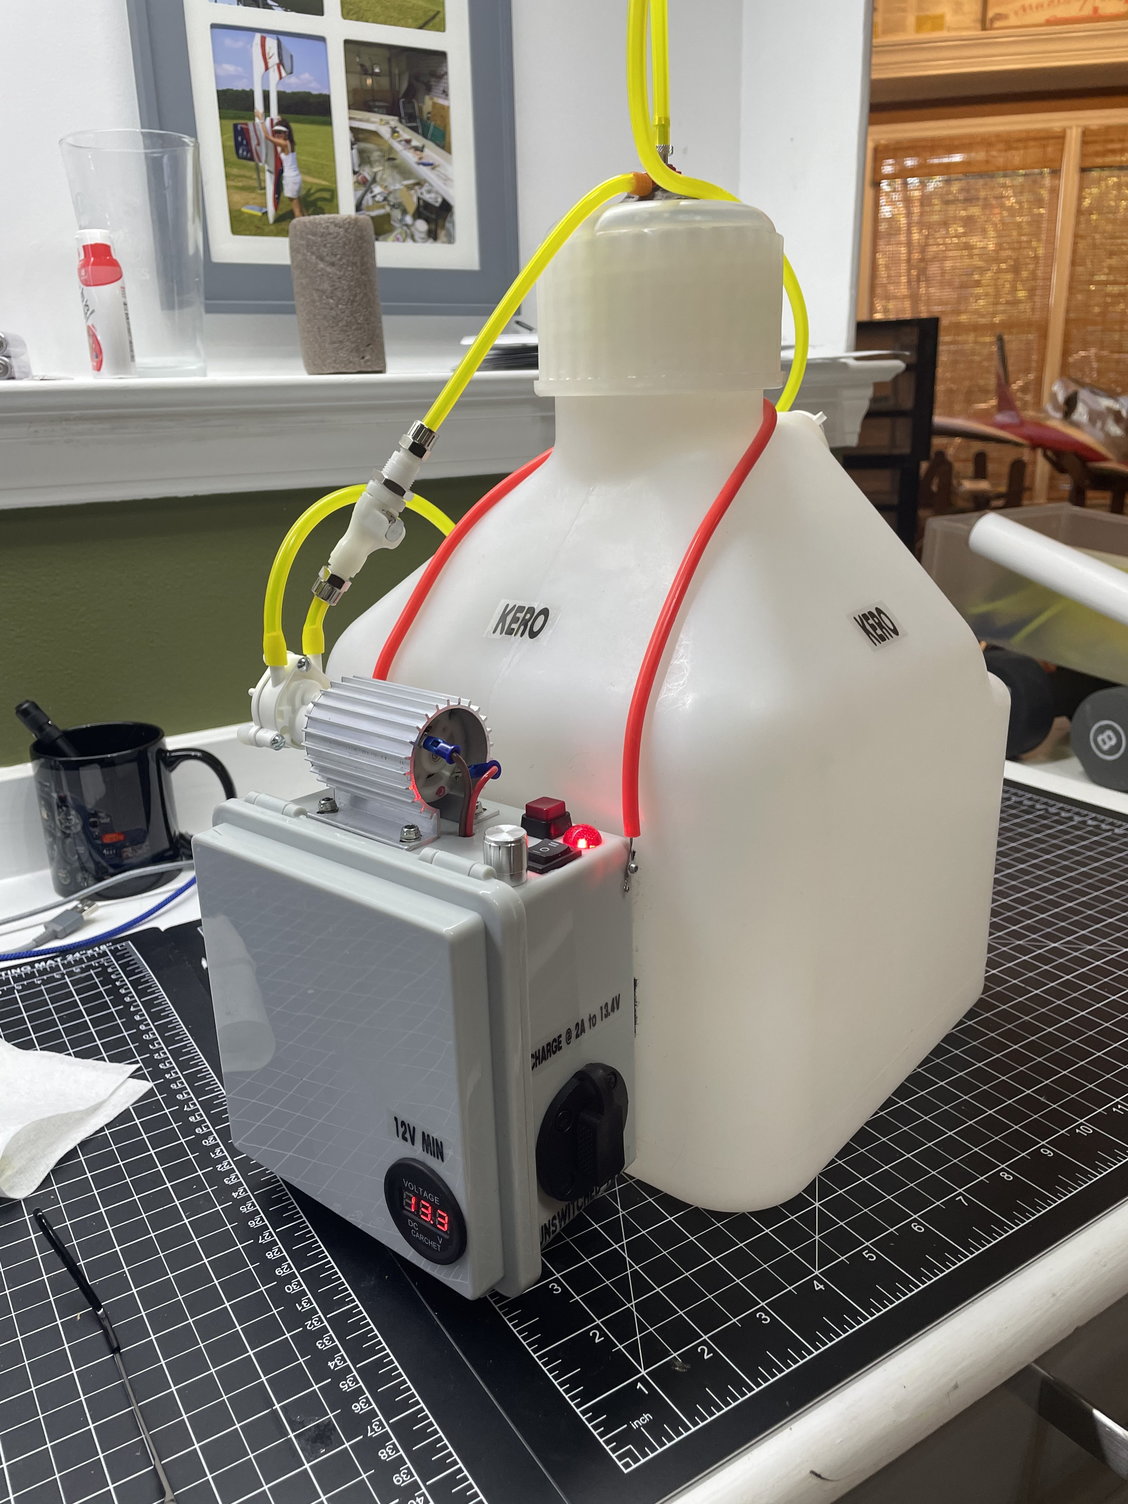
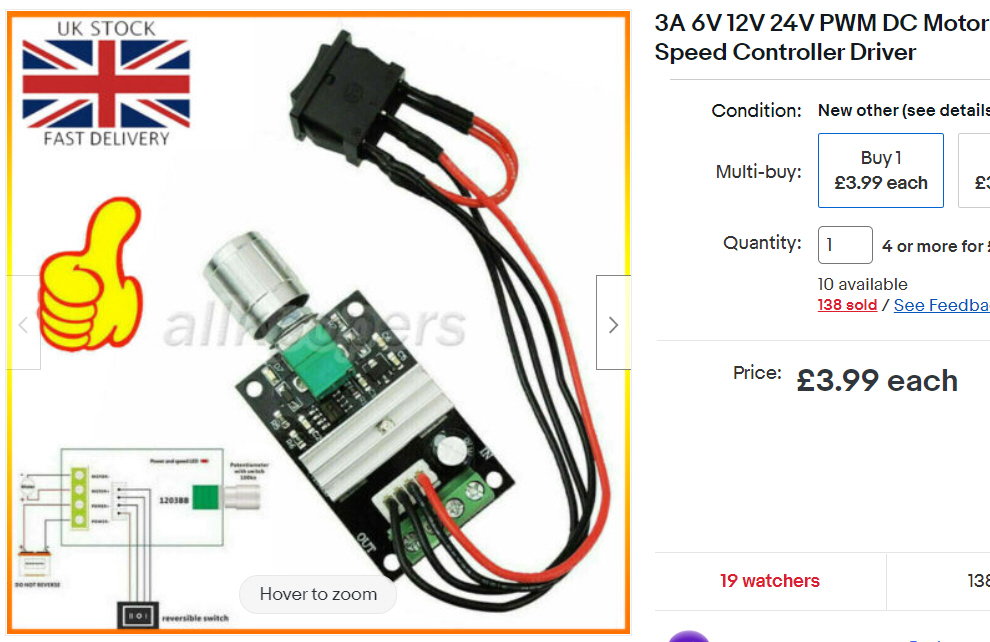
Just an update to this old thread. I have recently noticed that the speed controller I originally posted has become somewhat smaller, although at a few bucks more. The original still works great, and I just built a second unit with the new style for a 2.5 gallon jug. I got the new pump directly from Greylor, but it is available from several retail outlets for the same price. Overall, my newest setup is better than Jersey in some ways and not as good in others, primarily the can fittings. The savings for building my own was modest, and probably not worth my time except that I am able to use a 12V 6A LiFe battery for having used a larger battery box.
IMO the speed control addition to an existing single-speed setup is well worth the $11 or so for the part, but if building from bottom up as I just did, it’s a better time/money tradeoff to just buy the Jersey or similar product.
Here’s the link to the newer speed control:
IMO the speed control addition to an existing single-speed setup is well worth the $11 or so for the part, but if building from bottom up as I just did, it’s a better time/money tradeoff to just buy the Jersey or similar product.
Here’s the link to the newer speed control:
Last edited by highhorse; 07-03-2022 at 02:20 PM.
The following users liked this post:
rcman58 (07-03-2022)
07-04-2022, 05:04 AM
#45
[FYI, loads on Ebay today inc one from UK for �3.99 inc delivery, and many from China including batches of ten]
I find it convenient to have the unit separate from the 5 gal boat fuel tank that i use as a supply of jet fuel.
I Built two for myself, laser cutting the parts for the mounting from liteply.
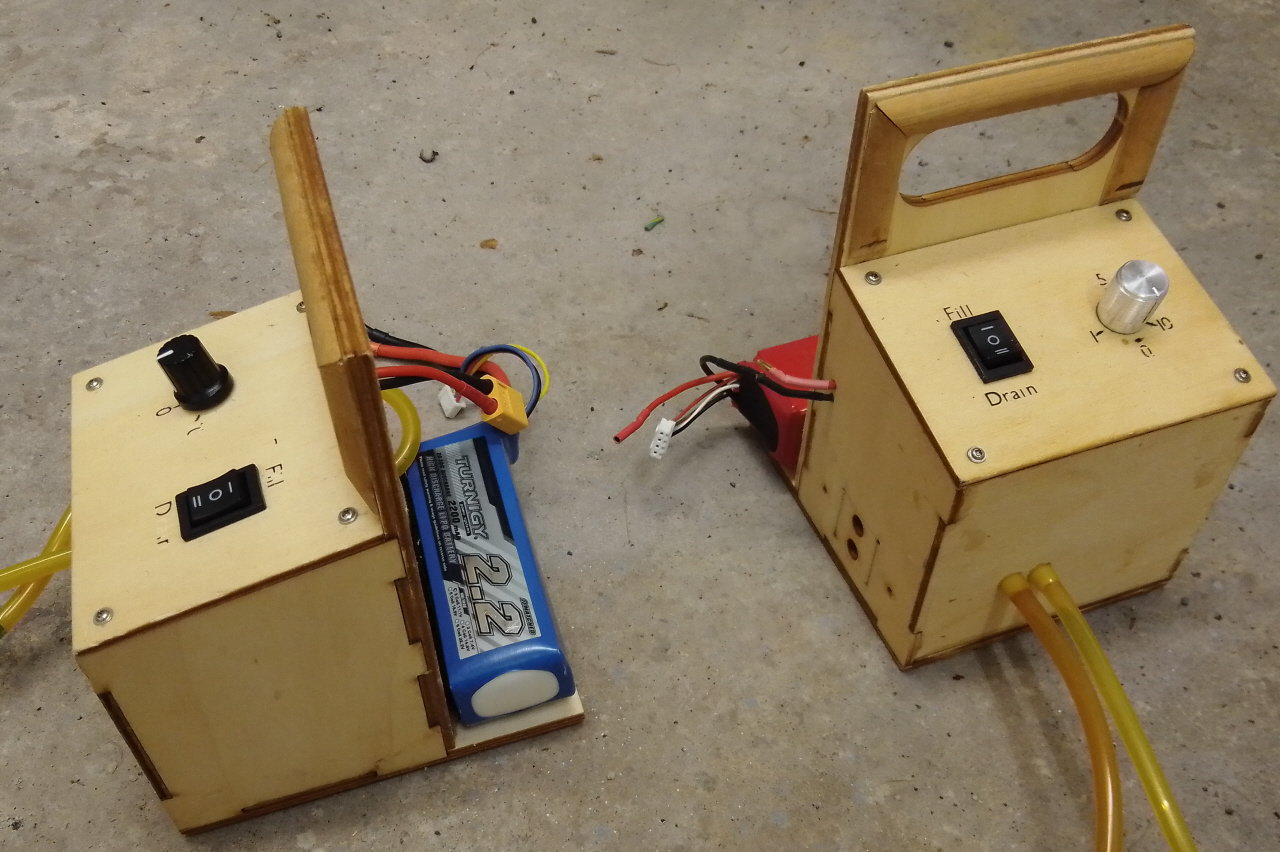
two complete pump units (just in case)
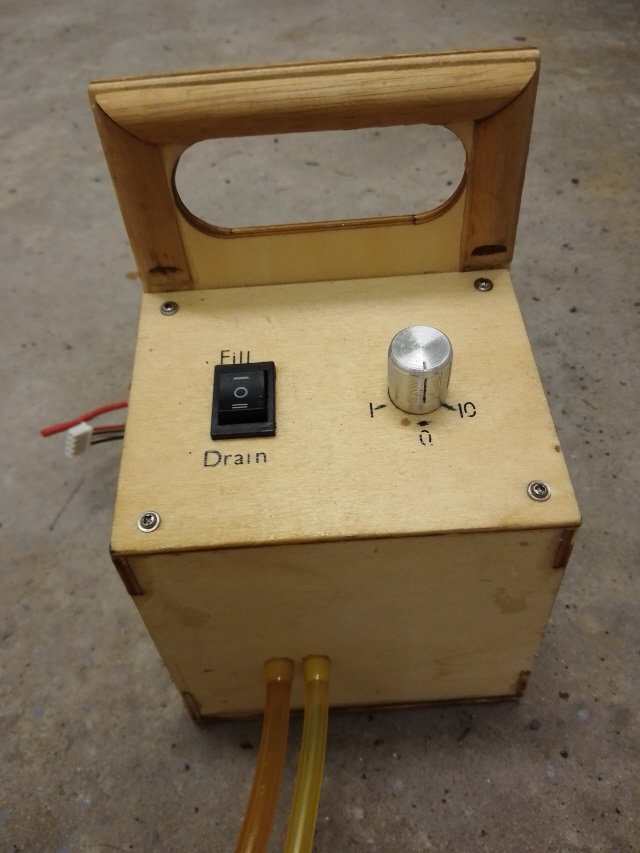
Controls on the top, fuel in and out low on the front.
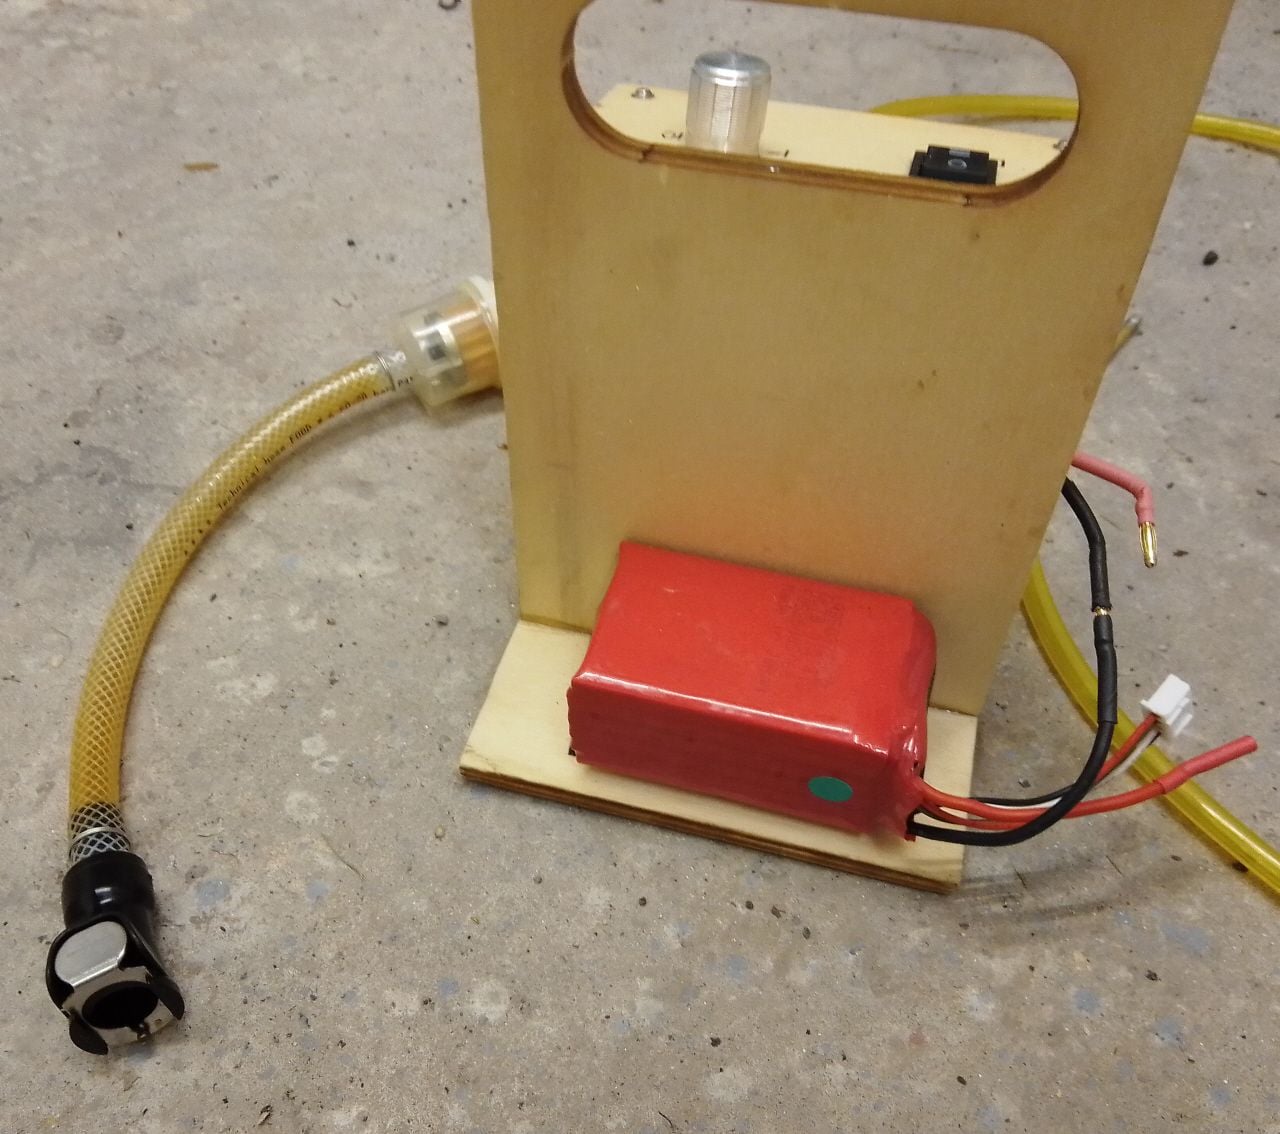
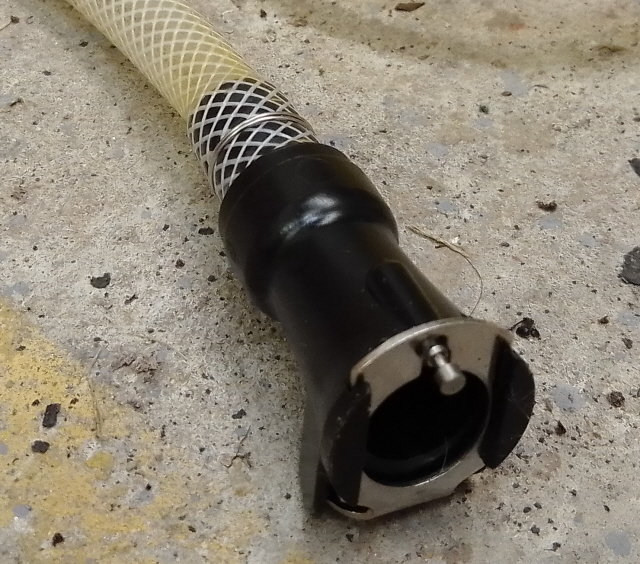
The battery is mounted with velcro on a shelf at the back, so I can use any old 3S Lipo or LiFe that is available. Current draw is small. The pump unit connects to the tank using a self-sealing coupling (also off Ebay)
 08-23-2022, 05:48 AM
#47
Join Date: May 2006
Location: Saint Dizier, FRANCE
Posts: 13
Likes: 0
Received 0 Likes
on
0 Posts
Hello,
I just found your post and share here my reliable project since it has been working for hundreds of french modellers.
--> on little pressure Rising at the outflow.
According to the 3 cases versions (polywood, 3Dprinted or Aluminium), it now looks like this:
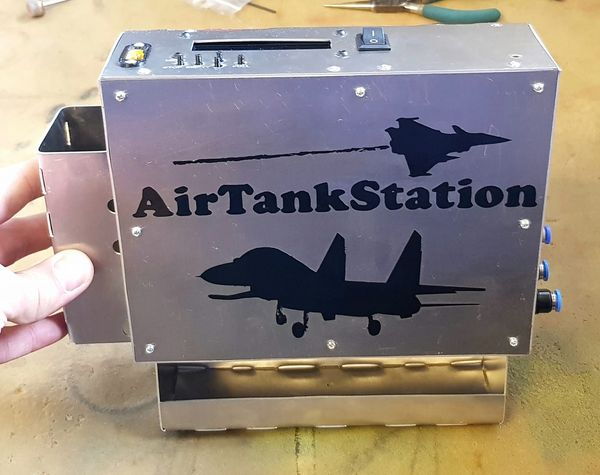
Aluminium version
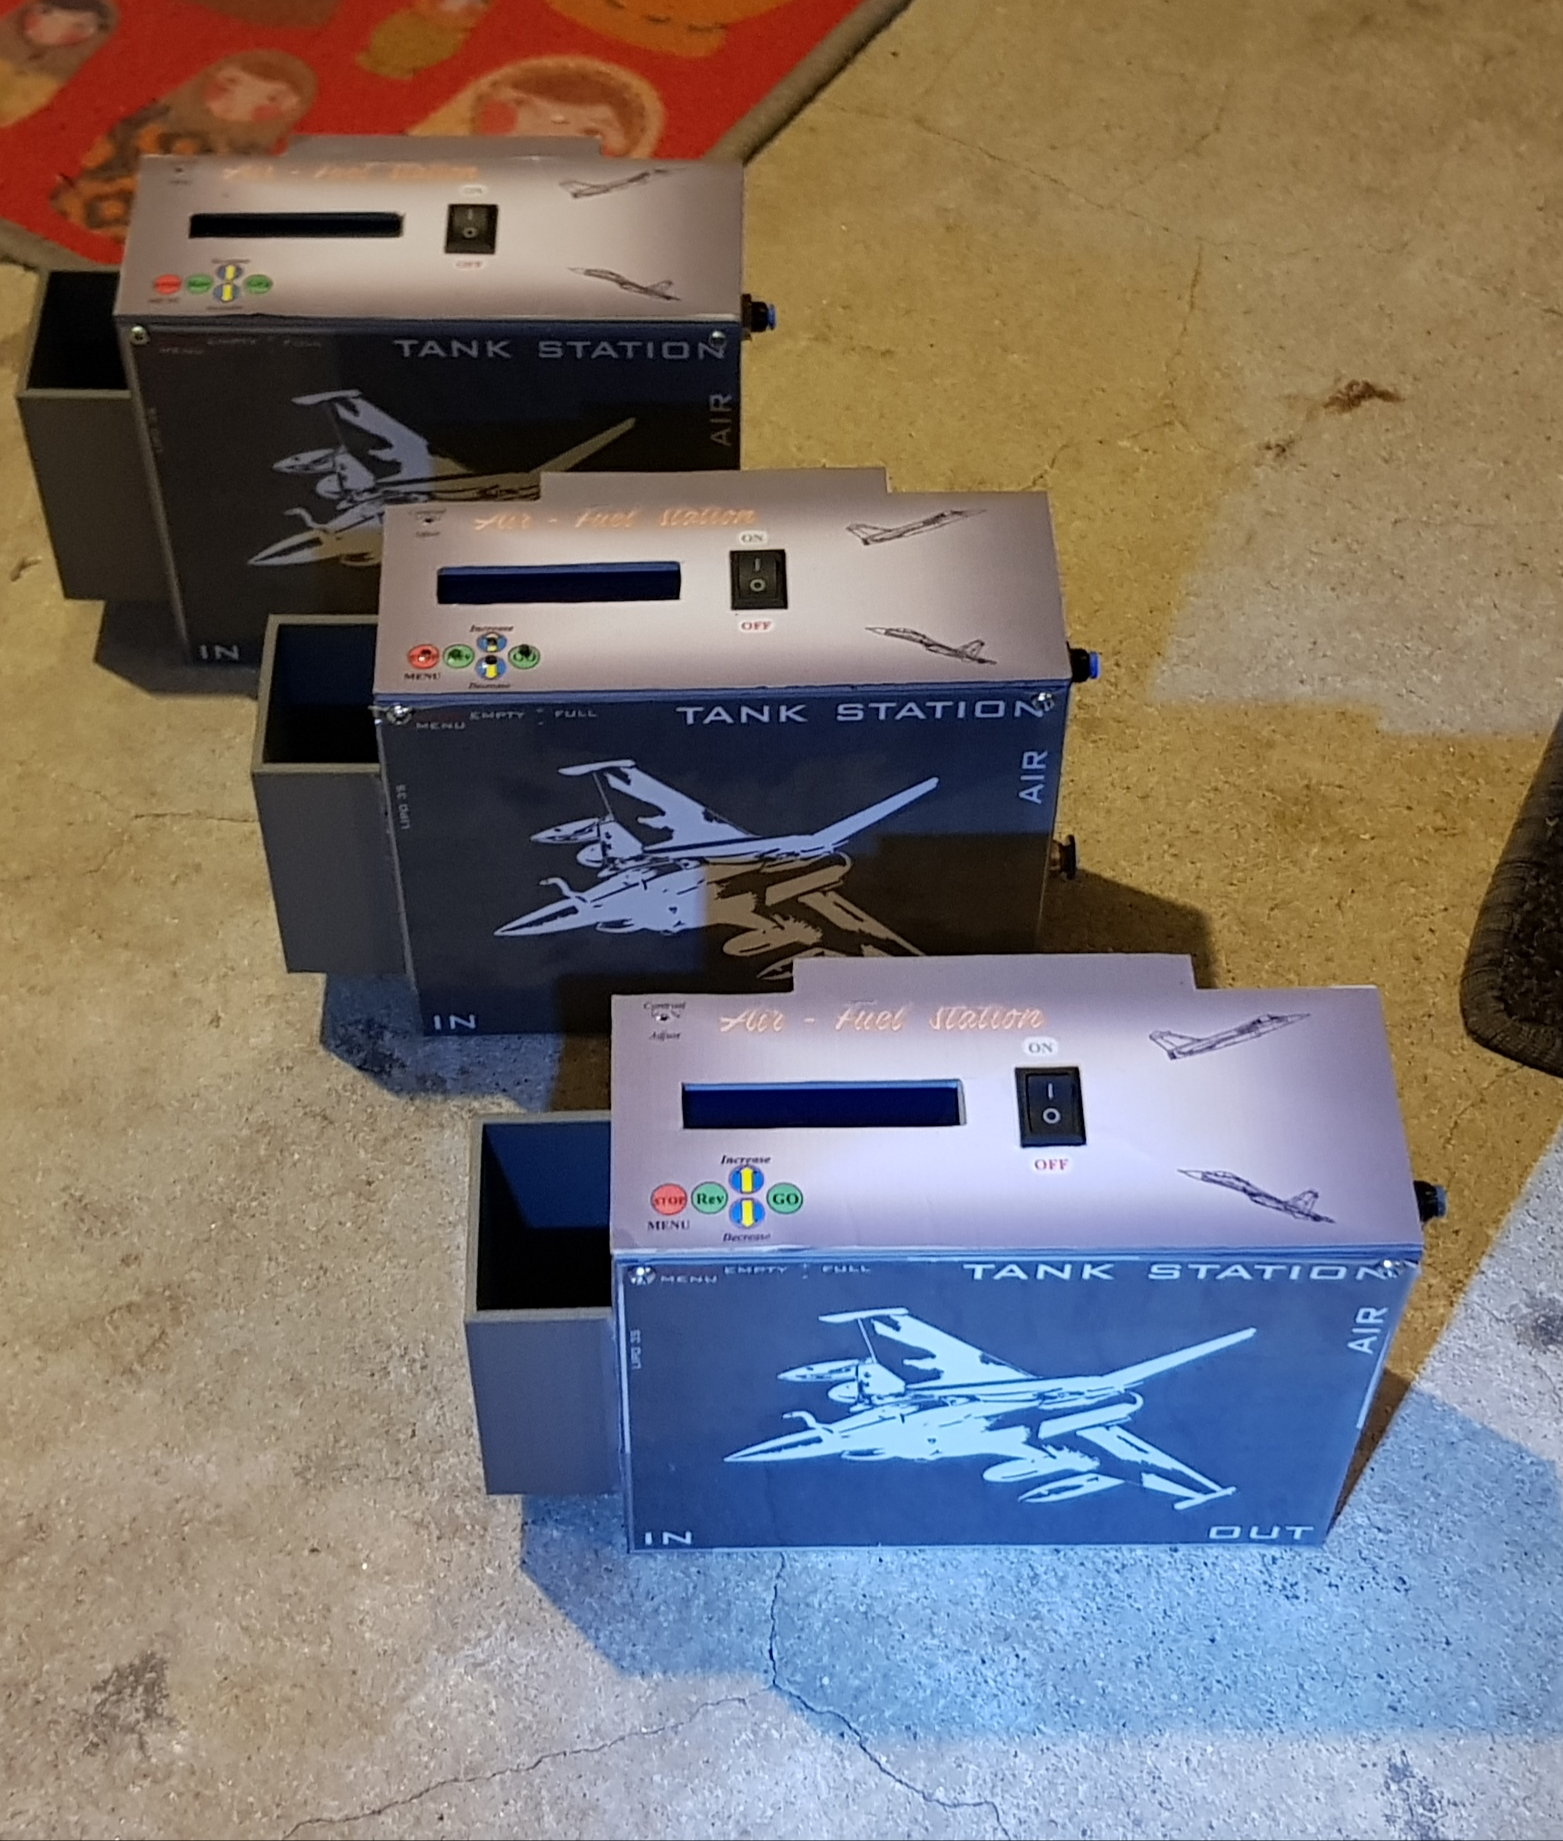
3D printed case
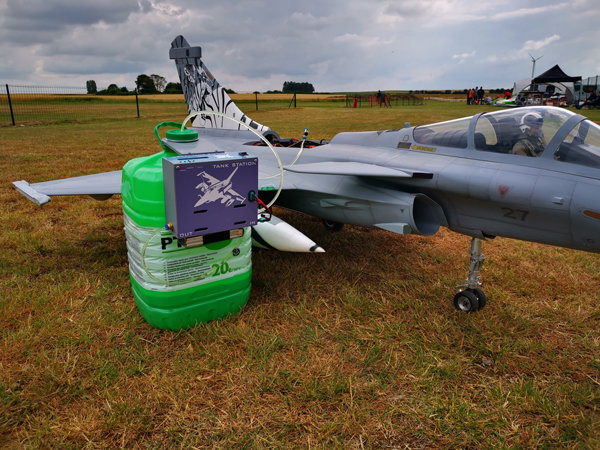
Ready to refuel
Full demo in vid�o:
Outside and inside details are here:
DETAILS SITE HERE
We sell this project (5h to build each and more than 3000 lines of C++ code ):
):
- 215� with air compressor
- 195 without air compressor.
Sincerely
Ga�tan
I just found your post and share here my reliable project since it has been working for hundreds of french modellers.
- Automatic Air compressor included, Measure the volume of offload, automatic stop:
--> on little pressure Rising at the outflow.
- Smooth start to avoid air bubbles (for bag's users), configurable reverse at the end to strike air bubbles or decrease overpressure of tank and avoid to spread fuel on runway via the venting outlet.
- WiFi (smartphone without APP!) configurable device to be more confortable ;
- Air pressure automatic cut-off at selected pressure (one pressure per model selectable) ;
According to the 3 cases versions (polywood, 3Dprinted or Aluminium), it now looks like this:
Aluminium version
3D printed case
Ready to refuel
Full demo in vid�o:
Outside and inside details are here:
DETAILS SITE HERE
We sell this project (5h to build each and more than 3000 lines of C++ code
):- 215� with air compressor
- 195 without air compressor.
Sincerely
Ga�tan
08-25-2022, 11:55 AM
#50
Very interesting thread. Like Gaetan's post above, I had always wanted a fueling station that measured fuel flow in and out of the tank. Nothing was available, so I built one too, though I never commercialized it like Gaetan is doing. After I finished it, JetCat came out with a station that does pretty much the same .. oh well! :-)
What I really wanted was an in-flight fuel state, as well as a time to empty estimate to be announced periodically. I've done all that with an app on Jeti, using the standard telemetry from the ECUs.
Next step was to see about making a "closed loop" system where the ECU monitors fuel burn, and the fueling station confirms the ECU numbers by measuring the refuel amount.
Since Jeti opened up a UART interface in a recent Lua API release, I connected a bluetooth interface on the back of the TX. I run an app on the TX to control the fuel station, and then I have all the info I need -- all inside the TX fuel station app -- to compare fuel burn from prev flight to refuel amount. So not only do I get time to empty announcements, I get confirmation every time I refuel that the system is working to the required accuracy. Nice.
It's not going to be really convenient until Jeti enables native WiFi or BT, natively (please Jeti!!) ... but it works very well and shows what is possible with a good radio and some good telemetry sensors. It's great fun for the electronics/computer geeks!
Dave
The following users liked this post:
Viper1GJ (08-26-2022)