


Skymaster F-18C Purchase from Chief....


 01-10-2016, 10:36 PM
#52

Join Date: Nov 2005
Location: Moss Vale, NSW, AUSTRALIA
Posts: 181
Likes: 0
Received 0 Likes
on
0 Posts
AS far as curing, its really more of an issue when it goes off to fast. Longer curing times usually promote a better bond.
01-10-2016, 11:04 PM
#53
Join Date: Nov 2005
Location: Moss Vale, NSW, AUSTRALIA
Posts: 181
Likes: 0
Received 0 Likes
on
0 Posts
First Pic is how it was originally, second pic is how it will look when Ive done repainting (hopefully) 3rd is the mount on the fuse, 4th is the ram with the improvised rubber stop. 4th is the mount on the airbrake, note the nuts on the screws. Inside is a little dusty at this point in time. The reason I decided to change the paint scheme is that I intend on getting the larger 1/6th SM F18 in the 20th Anniversary RAAF scheme ( which funnily enough was given the nickname Team USA). I have some high temp electrical shielding that I slide over the top of the ram and airline to stop it from melting, just secured at the top with a zip tie.
iain
Iain
 01-12-2016, 07:14 PM
#56
Ummm, Houston...we have a problem...
I need your thoughts asap! Aileron/Flap/Fuse all binding and wing isn't on all the way yet either..I sure hate to ruin this finish and start sanding things down. Looks like the aileron/flap just isn't square enough...
Also, if I glue the ailerons and flaps all the way in to the knuckle of the hinges, the trailing edges will not allow me to operate with enough throw/deflection on the ailerons and flaps. Now this is my first scale build from skymaster..so I have to ask...is it typical to trim this to fit and deflect properly?
Anyone else have to do this? The trailing edge I am talking about is the ones that cover the "air gaps"
https://www.youtube.com/watch?v=Lv9gE5J2ACc&feature=em-upload_owner#action=share
Last edited by Dblex; 01-12-2016 at 10:35 PM.
 01-13-2016, 12:51 AM
#58
Join Date: Nov 2005
Location: Moss Vale, NSW, AUSTRALIA
Posts: 181
Likes: 0
Received 0 Likes
on
0 Posts
I adjusted mine till I was happy with the fit. That included sanding the ends of aileron and flap so that they were square and not rubbing, I also sanded the bottom of the trailing edge of the wing so that flap had enough deflection on both sides.
01-13-2016, 04:41 AM
#59

I just used my bench disk sander to very carefully take whatever material was needed on the ends of the ailerons and flaps to get them to work. When adjusting the flap throw, as has been mentioned you can take whatever material off of the bottom of the wing gap seal to get the proper throw on the flaps. Take material off slowly!
01-13-2016, 06:19 AM
#61

My Feedback: (7)

Join Date: Dec 2004
Location: Toronto,
ON, CANADA
Posts: 242
Likes: 0
Received 0 Likes
on
0 Posts
I had to do that with a SM Hawk just taped the flap and started sanding until it fit then touched it up with some paint
Its not in a real visible spot , I had to do the ail as well , not that hard just take your time draw a line to follow it makes it easier
Good luck
Ted
Its not in a real visible spot , I had to do the ail as well , not that hard just take your time draw a line to follow it makes it easier
Good luck
Ted
01-14-2016, 08:34 AM
#62
Got my flaps finished, I wanted to use the included fairing even though it's not really scale, it just looks better than an exposed wire. I had to trim a little, but it looks very aircraft like in my opinion, plus no servo hatch.


Instructions call for no more than 60mm, with the stab so close with flaps down at higher speed the elevator could be blanked out. You can see in the second picture I had to cut a hole in the flap to add a block of balsa to anchor the horn I made out of PC board material. The included horns were much to big and odd shaped. Mechanical leverage is gained by the distance of the control horn end point to the pivot point of the flaps, since the flaps are hinged at the center and not at the bottom I was able to make the horn much lower profile and still have sufficient stiffness if that make any sense! A tip is to glue the hinges in with the flap at full deflection, this will insure sufficient travel without binding.
Instructions call for no more than 60mm, with the stab so close with flaps down at higher speed the elevator could be blanked out. You can see in the second picture I had to cut a hole in the flap to add a block of balsa to anchor the horn I made out of PC board material. The included horns were much to big and odd shaped. Mechanical leverage is gained by the distance of the control horn end point to the pivot point of the flaps, since the flaps are hinged at the center and not at the bottom I was able to make the horn much lower profile and still have sufficient stiffness if that make any sense! A tip is to glue the hinges in with the flap at full deflection, this will insure sufficient travel without binding.
Last edited by dionysusbacchus; 01-14-2016 at 01:22 PM. Reason: Added Picture
01-14-2016, 04:49 PM
#64
Looks like both of you had to sand the flaps next to the fuse?!!??
any plans to cover them back up?
Also, trailing edges need to be trimmed some to get proper deflection. Any suggestions for making those long straight cuts??????
any plans to cover them back up?
Also, trailing edges need to be trimmed some to get proper deflection. Any suggestions for making those long straight cuts??????
Last edited by Dblex; 01-14-2016 at 07:22 PM.
01-14-2016, 07:30 PM
#65
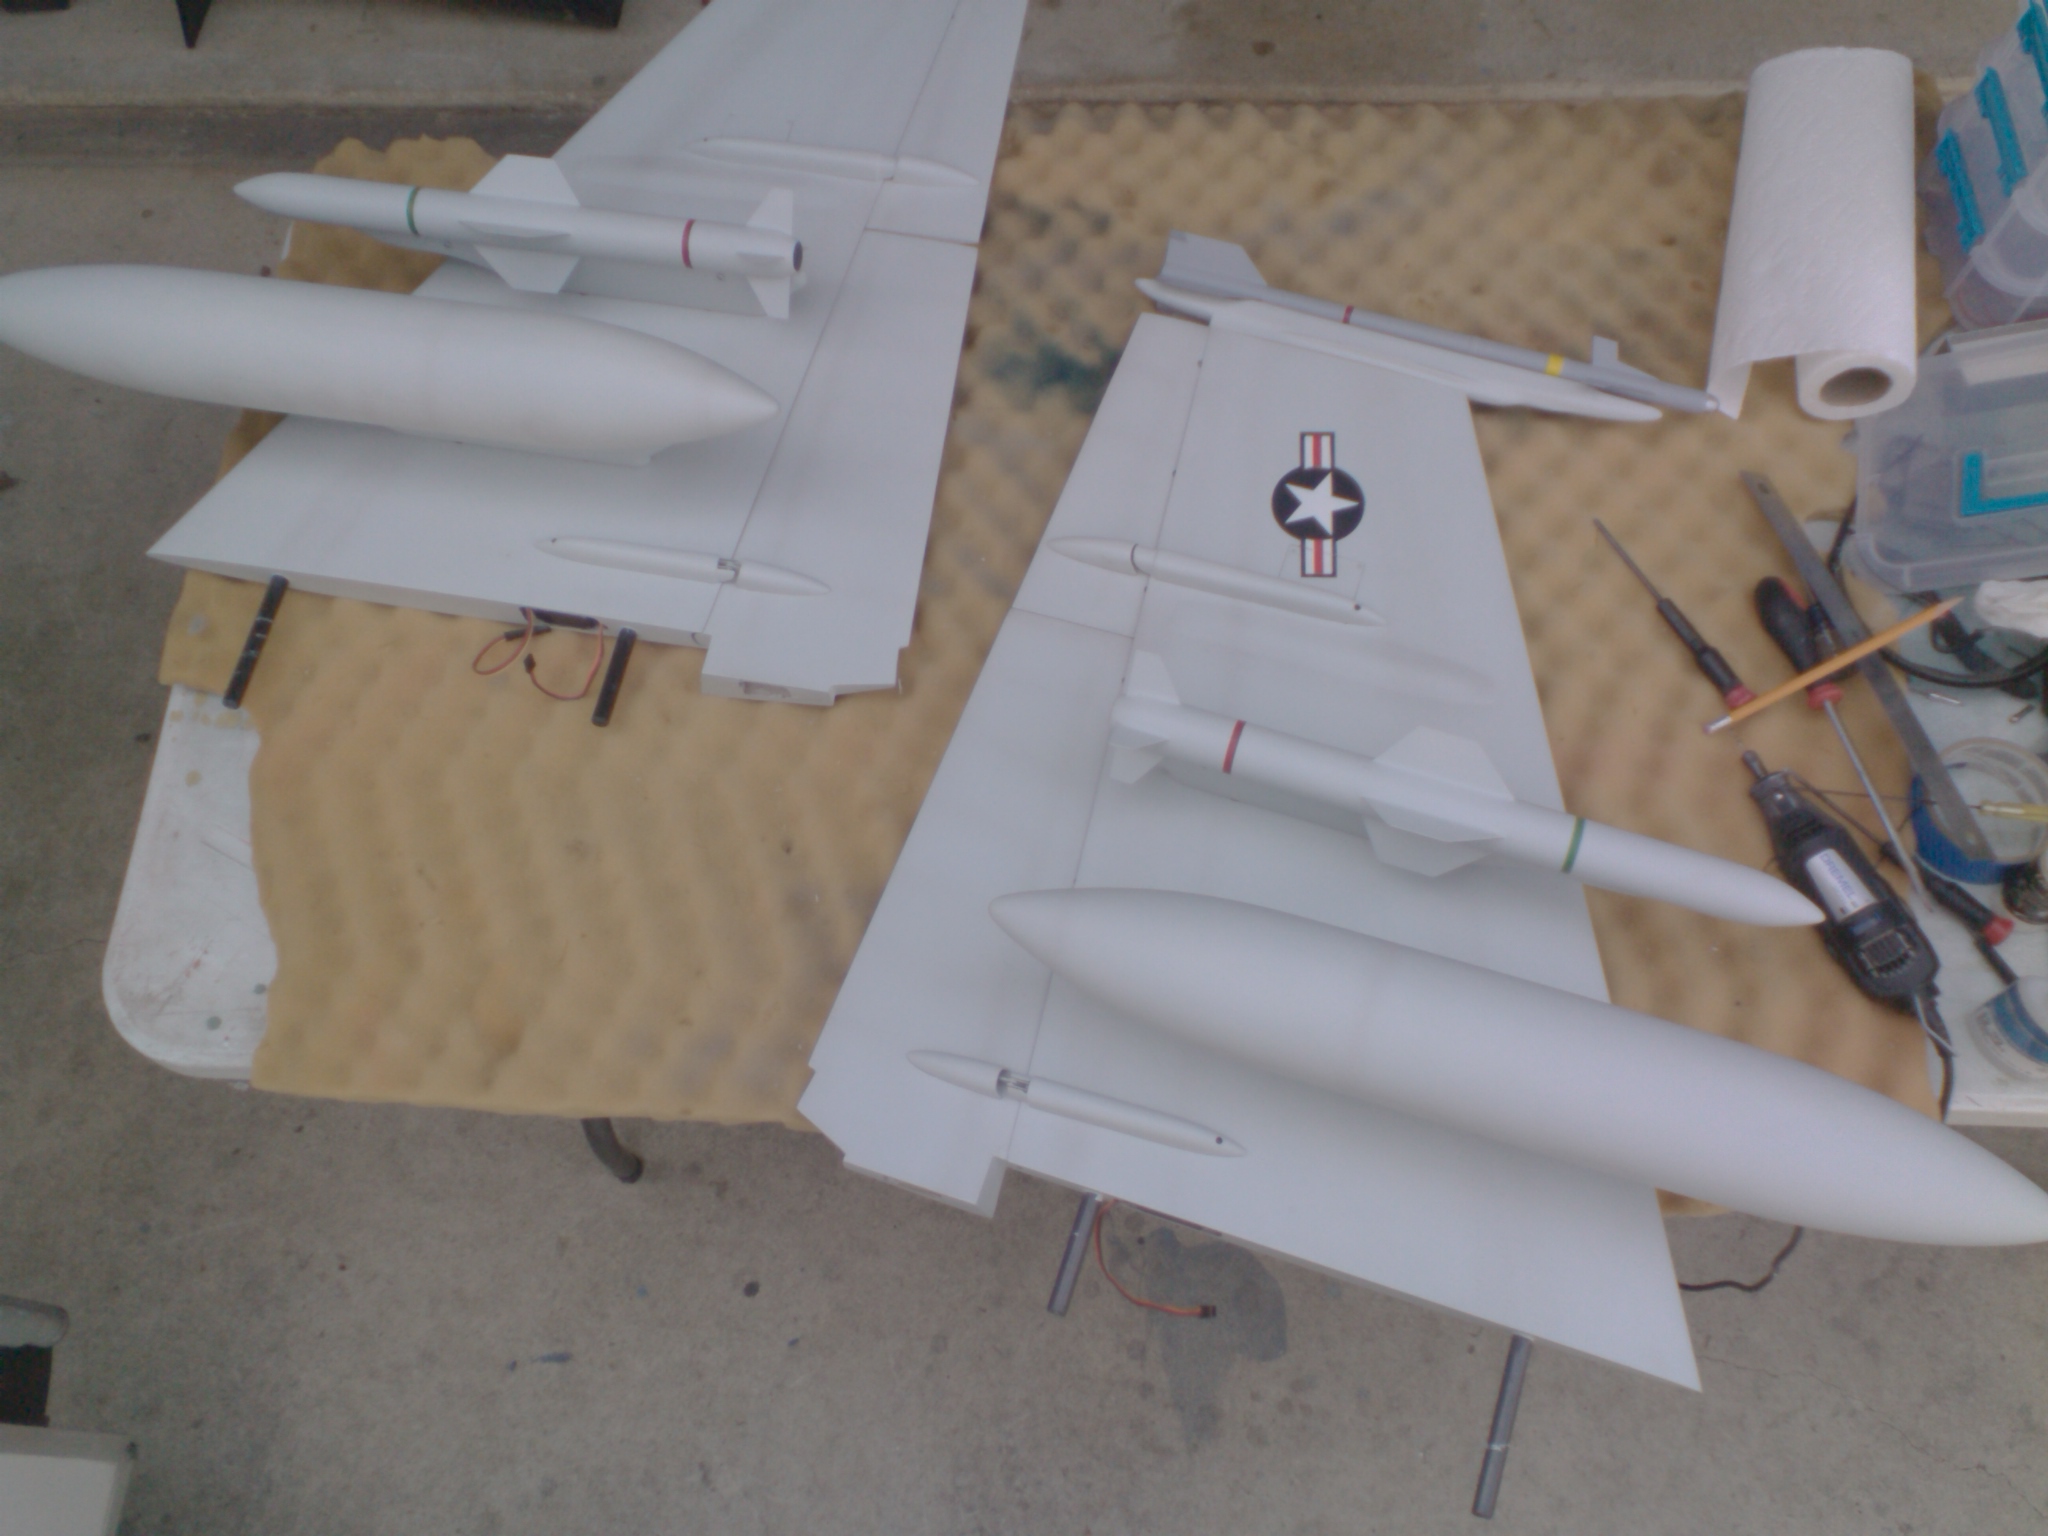
Thanks dbsonic! It's the skymaster ordinance for the F-18F. I see some guys installing all of the pylons that come with them, but they are different on the F-18c. Also, missiles do not fit on the fuselage properly, they interfere with the gear doors, so will have to make my own for that.
Dblex, I had to sand all of the ends of all of my control surfaces, and like I said I cut the ends of the flaps open to install balsa blocks. I repainted all but the flap ends, I will add balsa, seal and paint those, no big deal. Use Model Master enamels, I get diesel on the inner gear doors of my Panther when it runs out of the overflow and the Model Master paint holds up. No fuel will get on the end of the flaps anyway. I think they have Blue Angel blue, even if it is off slightly it will not show.
Dblex, I had to sand all of the ends of all of my control surfaces, and like I said I cut the ends of the flaps open to install balsa blocks. I repainted all but the flap ends, I will add balsa, seal and paint those, no big deal. Use Model Master enamels, I get diesel on the inner gear doors of my Panther when it runs out of the overflow and the Model Master paint holds up. No fuel will get on the end of the flaps anyway. I think they have Blue Angel blue, even if it is off slightly it will not show.
01-14-2016, 07:46 PM
#66
Thanks dbsonic! It's the skymaster ordinance for the F-18F. I see some guys installing all of the pylons that come with them, but they are different on the F-18c. Also, missiles do not fit on the fuselage properly, they interfere with the gear doors, so will have to make my own for that.
Dblex, I had to sand all of the ends of all of my control surfaces, and like I said I cut the ends of the flaps open to install balsa blocks. I repainted all but the flap ends, I will add balsa, seal and paint those, no big deal. Use Model Master enamels, I get diesel on the inner gear doors of my Panther when it runs out of the overflow and the Model Master paint holds up. No fuel will get on the end of the flaps anyway. I think they have Blue Angel blue, even if it is off slightly it will not show.
Dblex, I had to sand all of the ends of all of my control surfaces, and like I said I cut the ends of the flaps open to install balsa blocks. I repainted all but the flap ends, I will add balsa, seal and paint those, no big deal. Use Model Master enamels, I get diesel on the inner gear doors of my Panther when it runs out of the overflow and the Model Master paint holds up. No fuel will get on the end of the flaps anyway. I think they have Blue Angel blue, even if it is off slightly it will not show.
As for the paint, I went and had it color matched "acrylic enamel" for touch ups. Both the yellow and blue. They put it in a rattle can. $37!!!!
Last edited by Dblex; 01-14-2016 at 07:52 PM.
01-16-2016, 08:56 AM
#68
Ok, enough Google...
Elevator controls, drill tap anti rotation set screw??? Flat spot on the elevator rod and that's it?
this has disaster all over it.....
Just not a lot of room to get one drilled without me worrying about the integrity of the bracket when fully tightened.
Also, they sent 4 extra bearings in the kit...do I need to replace the painted ones that are sitting in the fuse?
Last edited by Dblex; 01-16-2016 at 09:32 AM.
01-16-2016, 10:44 AM
#69
My bearings were not painted to bad and work great.
Attached is a picture of where I drilled my control horn, it worked great. I drilled and tapped for a 6-32 set screw and used plenty of red locktite. It makes me feel much better about the linkage.

Still have some work to do on the servo mounts, but the stab linkage is finished.

Here you can see the set screw.

This is the right side, you can see the pin added to keep the brass bearings and all from coming out.
Attached is a picture of where I drilled my control horn, it worked great. I drilled and tapped for a 6-32 set screw and used plenty of red locktite. It makes me feel much better about the linkage.
Still have some work to do on the servo mounts, but the stab linkage is finished.
Here you can see the set screw.
This is the right side, you can see the pin added to keep the brass bearings and all from coming out.
01-16-2016, 10:48 AM
#70
Forgot the mention about the air brake, to keep it from closing too hard, I just added air line restrictors on both lines at the cylinder. This helps to slow it down and it closes very softly. But I did try it first without the restrictors and it broke off when it closed, just sanded it and glued it back on with Hysol.
01-16-2016, 04:05 PM
#73
I see many people mounting the turbine at a 3 degree angle and using a single pipe for single engine twin applications in Europe, getting rid of the split pipe would be nice. Anyone reading this have any idea where I could find out more about this? Check out this video of a giant F-15 built using http://www.csmithplans.com/products.html plans. It is angled, but it does not even need to be mounted in the center!
https://www.youtube.com/watch?v=89HTA3JKHMM
Here are some pictures of an Avonds F-15 with the same set up, the guy says it flies great, does not pull to one side or the other. What is the physics behind this, not my best subject!?


Hard to tell by the picture, but the pipe intake is angled slightly so that it is square with the end of the turbine. I would like to try this if I could get some assistance!
https://www.youtube.com/watch?v=89HTA3JKHMM
Here are some pictures of an Avonds F-15 with the same set up, the guy says it flies great, does not pull to one side or the other. What is the physics behind this, not my best subject!?
Hard to tell by the picture, but the pipe intake is angled slightly so that it is square with the end of the turbine. I would like to try this if I could get some assistance!
Last edited by dionysusbacchus; 01-16-2016 at 04:07 PM.
01-16-2016, 04:24 PM
#74
Join Date: Nov 2005
Location: Moss Vale, NSW, AUSTRALIA
Posts: 181
Likes: 0
Received 0 Likes
on
0 Posts

