Go Back  RCU Forums > RC Airplanes > RC Jets
Reload this Page >

Kingtech presents the all new T1 sports jet

Community
Search
Notices
RC Jets Discuss RC jets in this forum plus rc turbines and ducted fan power systems

Kingtech presents the all new T1 sports jet

Thread Tools
 
Search this Thread
 
Old 08-22-2016, 07:00 PM
  #326  
flejter1
 
flejter1's Avatar
 
Join Date: Apr 2006
Location: Oak Hills, CA
Posts: 525
Likes: 0
Received 12 Likes on 3 Posts
Default

Originally Posted by dontop
Dirk, I'd like to see a turbine ready version. Building's not my thing. I'll let the pros and the guys who live up north who have 6 months a year of bad weather do it.

Don
Hi Don,

I'm sure there are many quality builders in your area we can set you up with to build you a T-1. Most of the hard work is done on the T-1, like all the control surfaces are hinged and double control horns are installed at the factory. To me that is the most time consuming task for assembling a jet. Let me know if you want us to put the word out.


Dirk
Old 08-22-2016, 07:05 PM
  #327  
TonyBuilder
My Feedback: (11)
 
TonyBuilder's Avatar
 
Join Date: Mar 2010
Location: Austin , TX
Posts: 4,166
Likes: 0
Received 1 Like on 1 Post
Default

Originally Posted by flejter1
Hi Don,

I'm sure there are many quality builders in your area we can set you up with to build you a T-1. Most of the hard work is done on the T-1, like all the control surfaces are hinged and double control horns are installed at the factory. To me that is the most time consuming task for assembling a jet. Let me know if you want us to put the word out.


Dirk


TB
Old 08-23-2016, 07:08 AM
  #328  
Digital Pilot
 
Digital Pilot's Avatar
 
Join Date: Aug 2016
Location: Rocket City, AL
Posts: 614
Likes: 0
Received 4 Likes on 4 Posts
Default

More Photos
Attached Thumbnails Click image for larger version

Name:	FullSizeRender.jpg
Views:	1874
Size:	2.16 MB
ID:	2178011   Click image for larger version

Name:	IMG_2211.JPG
Views:	1778
Size:	1.98 MB
ID:	2178012   Click image for larger version

Name:	IMG_2215.JPG
Views:	1848
Size:	2.37 MB
ID:	2178013  
Old 08-23-2016, 07:21 AM
  #329  
gunradd
Thread Starter
My Feedback: (9)
 
gunradd's Avatar
 
Join Date: Aug 2008
Location: Springhill, FL
Posts: 3,426
Received 50 Likes on 43 Posts
Default

Originally Posted by Digital Pilot
More Photos

Nice clean install!! Much better then my rush job lol.

On the fuel tank I would highly recommend securing it with something. I used a big zip tie around it. When full of fuel and doing some high G maneuvers I would not trust the Velcro.
Old 08-23-2016, 07:22 AM
  #330  
gunradd
Thread Starter
My Feedback: (9)
 
gunradd's Avatar
 
Join Date: Aug 2008
Location: Springhill, FL
Posts: 3,426
Received 50 Likes on 43 Posts
Default

Also guys remember to tighten the wing clamp bolts before transportation or you will find they all fall out on the ride to the field.
Old 08-23-2016, 07:36 AM
  #331  
Digital Pilot
 
Digital Pilot's Avatar
 
Join Date: Aug 2016
Location: Rocket City, AL
Posts: 614
Likes: 0
Received 4 Likes on 4 Posts
Default

Thank you.
I have a couple Velcro straps I will use around the tank and board.
Old 08-23-2016, 07:41 AM
  #332  
Digital Pilot
 
Digital Pilot's Avatar
 
Join Date: Aug 2016
Location: Rocket City, AL
Posts: 614
Likes: 0
Received 4 Likes on 4 Posts
Default

I plan to Hysol nuts to the top side wing bolts so they can't work there way out. Iv had to do this in jets in the past and works well. If you ever need to remove them you still can.
Old 08-23-2016, 09:08 AM
  #333  
TonyBuilder
My Feedback: (11)
 
TonyBuilder's Avatar
 
Join Date: Mar 2010
Location: Austin , TX
Posts: 4,166
Likes: 0
Received 1 Like on 1 Post
Default

My jet came today

TB
Old 08-23-2016, 09:51 AM
  #334  
raron455
My Feedback: (38)
 
raron455's Avatar
 
Join Date: Sep 2012
Location: Waco TX
Posts: 1,130
Received 14 Likes on 11 Posts
Default

[QUOTE=TonyBuilder;12250027]My jet came today

TB[/QUOTE


Congrats Tony,,
keep up the post like the other fellas who are building theirs,, I wanna know what I'm in for when Mine gets here..
Old 08-23-2016, 12:03 PM
  #335  
sirrom
My Feedback: (4)
 
Join Date: Dec 2001
Location: Sarasota, FL
Posts: 1,053
Likes: 0
Received 8 Likes on 7 Posts
Default

Originally Posted by gunradd
Nice clean install!! Much better then my rush job lol.

On the fuel tank I would highly recommend securing it with something. I used a big zip tie around it. When full of fuel and doing some high G maneuvers I would not trust the Velcro.
OK, going to pull the trigger on one of these very soon. Already started gathering materials for the build. Can someone post the dimensions of the equipment mounting board please. I can lay it out on my computer with all the items, I plan on laser cutting mine to make it look nice and clean.

Patrick
Old 08-23-2016, 03:37 PM
  #336  
TonyBuilder
My Feedback: (11)
 
TonyBuilder's Avatar
 
Join Date: Mar 2010
Location: Austin , TX
Posts: 4,166
Likes: 0
Received 1 Like on 1 Post
Default

Ok so here is the un boxing.

the box is very sturdy.


My wing tub was loos in the box, but it did not do any damage

Attached Thumbnails Click image for larger version

Name:	image.jpeg
Views:	1613
Size:	1.02 MB
ID:	2178085   Click image for larger version

Name:	image.jpeg
Views:	1645
Size:	1.09 MB
ID:	2178086   Click image for larger version

Name:	image.jpeg
Views:	1580
Size:	1.10 MB
ID:	2178087  

Last edited by TonyBuilder; 08-23-2016 at 05:03 PM.
Old 08-23-2016, 03:43 PM
  #337  
TonyBuilder
My Feedback: (11)
 
TonyBuilder's Avatar
 
Join Date: Mar 2010
Location: Austin , TX
Posts: 4,166
Likes: 0
Received 1 Like on 1 Post
Default

First thing I noticed was the wheel wells are diferent.


So it looks like they changed the bottom of the wing at the wheel wells. This eliminates the option of doing inner gear doors but this will be good for the sports guy that just wants to put the gear in and go. It does come with doors for the struts and the noes wheel, but not as nice... For me as I like doing gear doors. Now I can just forget them and move on

TB
Attached Thumbnails Click image for larger version

Name:	image.jpeg
Views:	1558
Size:	967.5 KB
ID:	2178088   Click image for larger version

Name:	image.jpeg
Views:	1557
Size:	981.8 KB
ID:	2178089   Click image for larger version

Name:	image.jpeg
Views:	1542
Size:	1,023.4 KB
ID:	2178090  

Last edited by TonyBuilder; 08-23-2016 at 03:53 PM.
Old 08-23-2016, 03:49 PM
  #338  
TonyBuilder
My Feedback: (11)
 
TonyBuilder's Avatar
 
Join Date: Mar 2010
Location: Austin , TX
Posts: 4,166
Likes: 0
Received 1 Like on 1 Post
Default

I just did an inventory and visual inspection, wow the paint job and quality is amazing.


The craftsmanship is top notch!,

Attached Thumbnails Click image for larger version

Name:	image.jpeg
Views:	1537
Size:	967.6 KB
ID:	2178091   Click image for larger version

Name:	image.jpeg
Views:	1565
Size:	938.2 KB
ID:	2178092   Click image for larger version

Name:	image.jpeg
Views:	1503
Size:	904.9 KB
ID:	2178093   Click image for larger version

Name:	image.jpeg
Views:	1519
Size:	972.6 KB
ID:	2178094   Click image for larger version

Name:	image.jpeg
Views:	1573
Size:	1.44 MB
ID:	2178095   Click image for larger version

Name:	image.jpeg
Views:	1519
Size:	1.09 MB
ID:	2178096  

Last edited by TonyBuilder; 08-23-2016 at 03:52 PM.
Old 08-23-2016, 03:52 PM
  #339  
gunradd
Thread Starter
My Feedback: (9)
 
gunradd's Avatar
 
Join Date: Aug 2008
Location: Springhill, FL
Posts: 3,426
Received 50 Likes on 43 Posts
Default

Originally Posted by TonyBuilder
First thing I noticed was the wheel wells are diferent.


So so it looks like they changed the bottom of the wing at the wheel wells. This eliminates the option of doing inner gear doors but this will be good for the sports guy that just wants to put the gear in and go. It does come with doors for the struts and the noes wheel, but not as nice... For me as I like doing gear doors. Now I can just forget them and move on

TB
tony that is allot better then the prototypes. The well is so big on mine I had to trim it some to get the airlines into the fuselage on the bvm quick connections. Wish I had those wells
Old 08-23-2016, 03:56 PM
  #340  
TonyBuilder
My Feedback: (11)
 
TonyBuilder's Avatar
 
Join Date: Mar 2010
Location: Austin , TX
Posts: 4,166
Likes: 0
Received 1 Like on 1 Post
Default

Really impressed with the finish, only one area got damaged during shipping but it's the black so should be east to fix.


The hinges look good and tight, I really like the overall engineered design of this jet.


The wing is beautiful


TB
Attached Thumbnails Click image for larger version

Name:	image.jpeg
Views:	1497
Size:	1.01 MB
ID:	2178097   Click image for larger version

Name:	image.jpeg
Views:	1492
Size:	898.3 KB
ID:	2178098   Click image for larger version

Name:	image.jpeg
Views:	1531
Size:	1.16 MB
ID:	2178099   Click image for larger version

Name:	image.jpeg
Views:	1489
Size:	1.09 MB
ID:	2178100   Click image for larger version

Name:	image.jpeg
Views:	1498
Size:	1.12 MB
ID:	2178101   Click image for larger version

Name:	image.jpeg
Views:	1472
Size:	1.10 MB
ID:	2178102   Click image for larger version

Name:	image.jpeg
Views:	1480
Size:	1.16 MB
ID:	2178103  

Last edited by TonyBuilder; 08-23-2016 at 05:09 PM.
Old 08-23-2016, 04:07 PM
  #341  
TonyBuilder
My Feedback: (11)
 
TonyBuilder's Avatar
 
Join Date: Mar 2010
Location: Austin , TX
Posts: 4,166
Likes: 0
Received 1 Like on 1 Post
Default

The fuselage is huge!


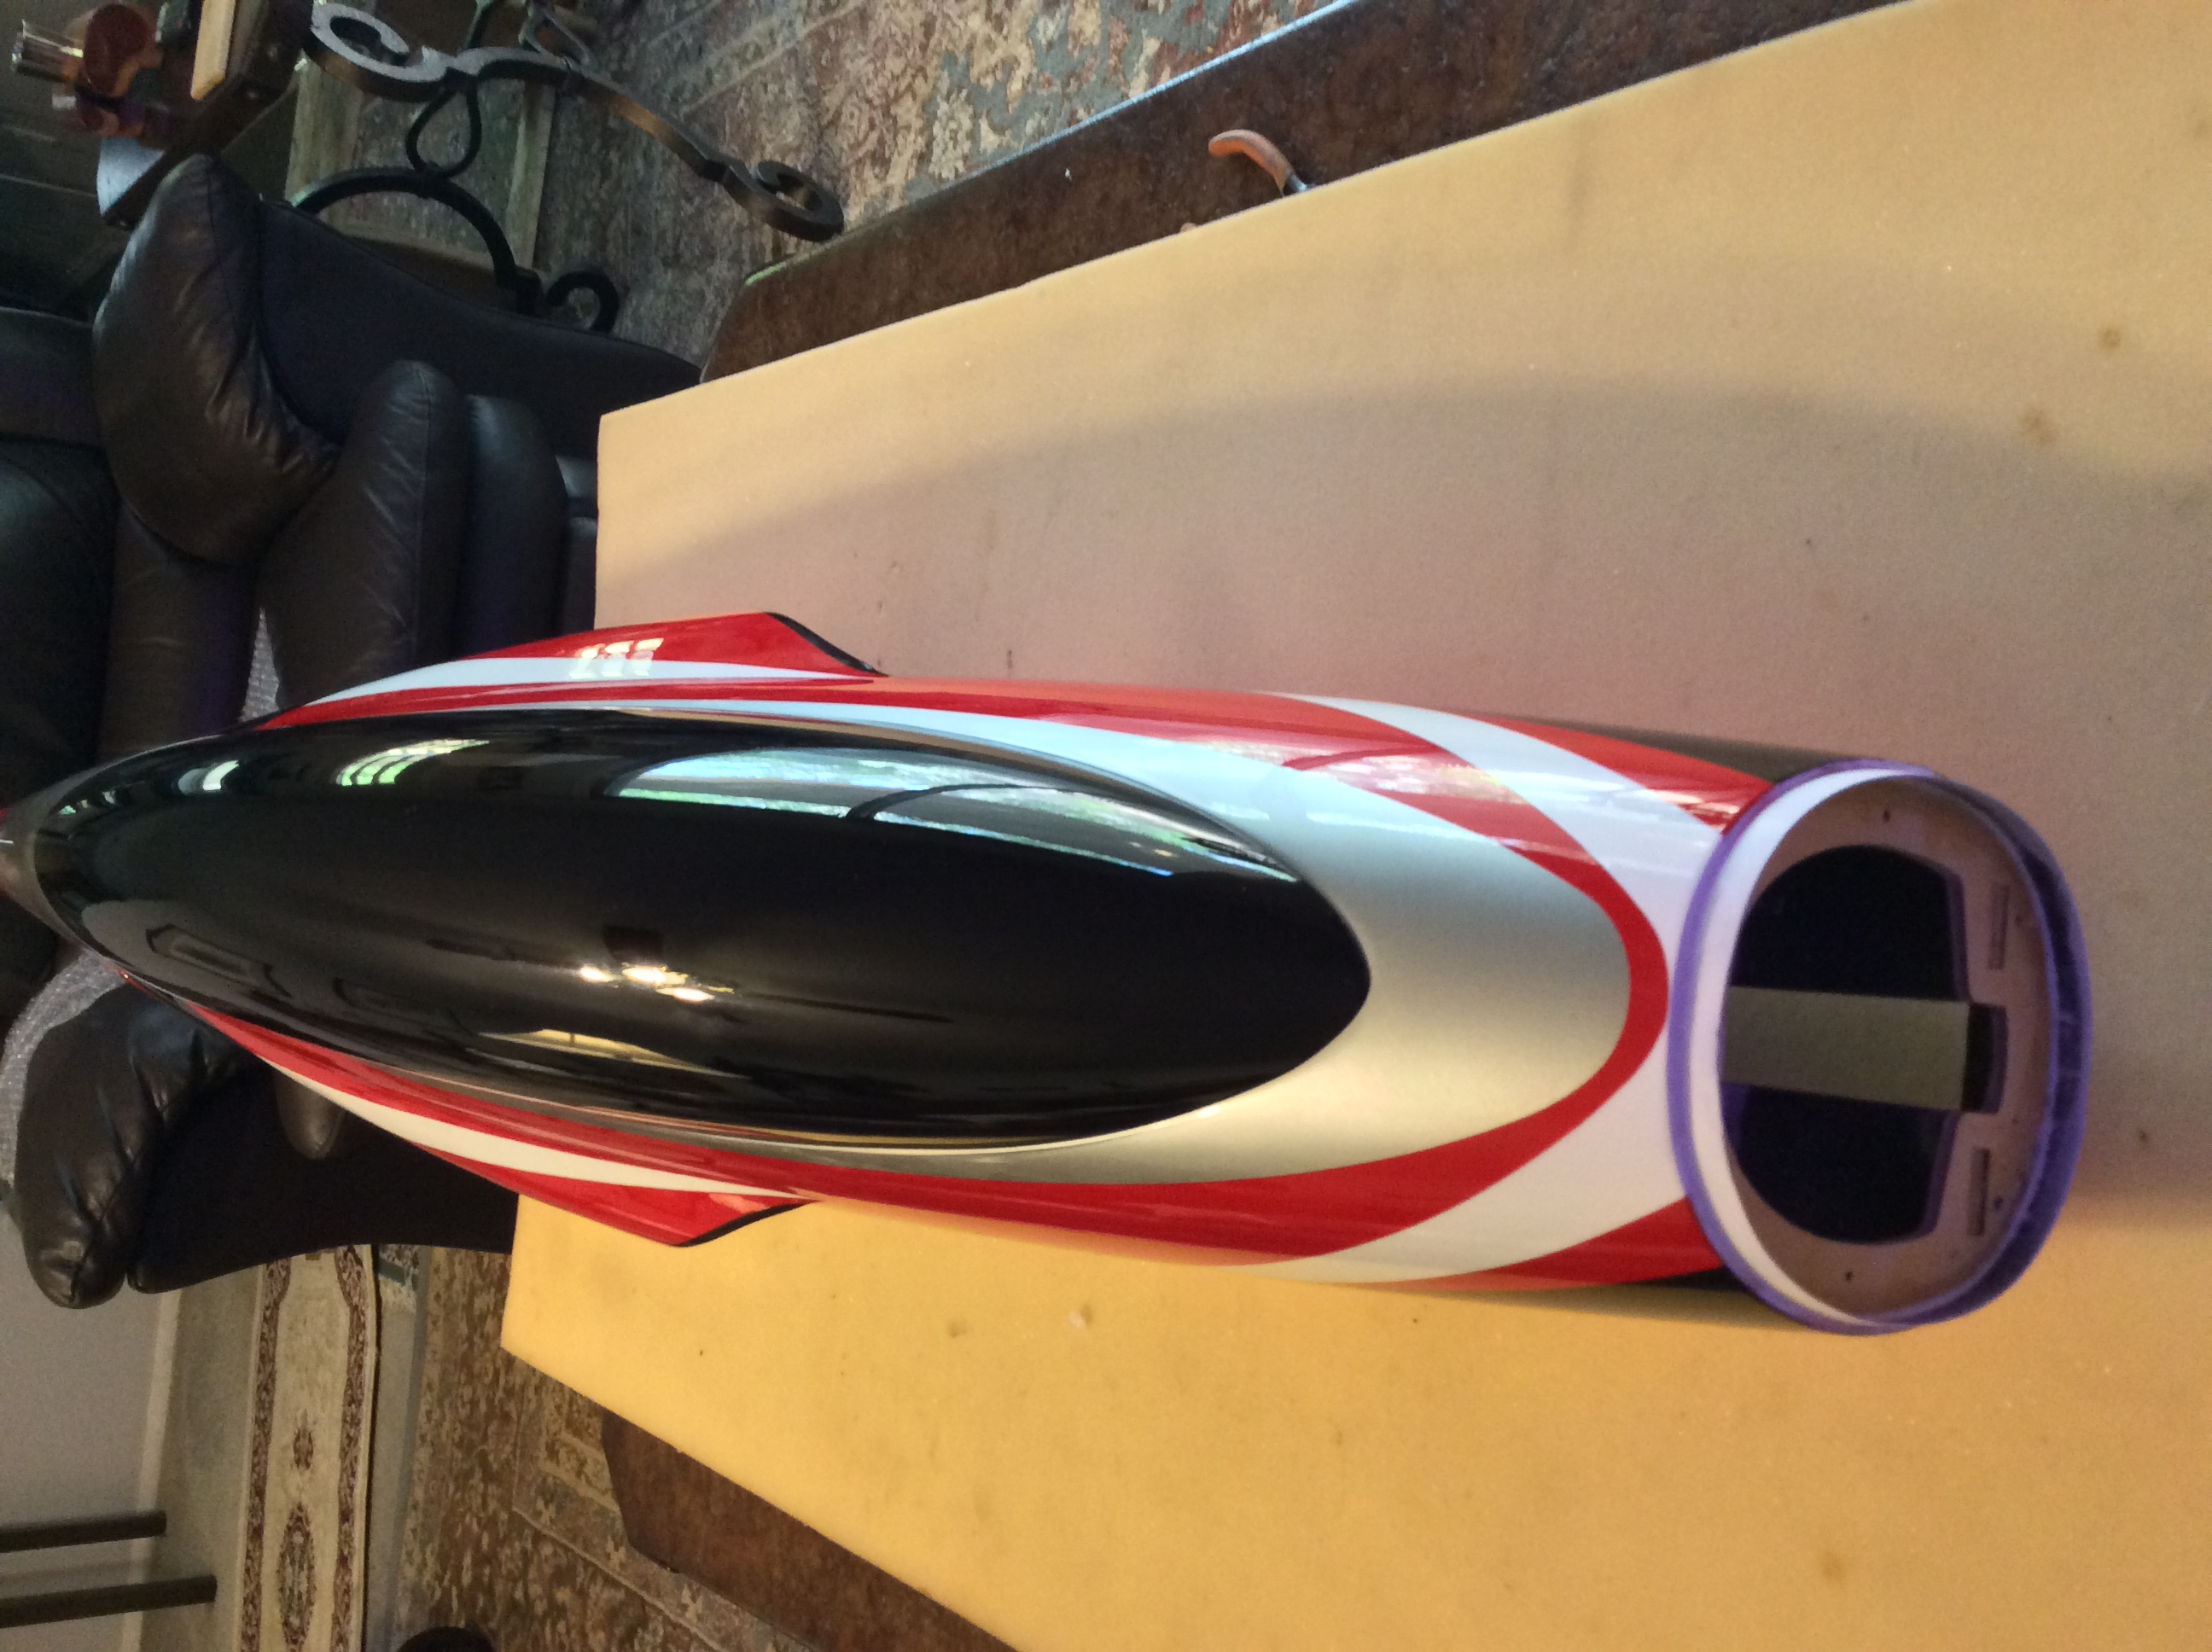
I got lucky, in my scrap pile I have an old CF wing tube from an Aeroworks Super cub that is exactly the same size, it is about 3/4 shorter so not sure that will mater.

I love the noes cone


Nicely engineered!


The canopy is a bit ode as it just slides forward to unlock, might throw a few magnets in.
Equipment tray!


Turbine hatch is well done.


TB
Attached Thumbnails Click image for larger version

Name:	image.jpeg
Views:	1557
Size:	1.28 MB
ID:	2178104   Click image for larger version

Name:	image.jpeg
Views:	1462
Size:	1.03 MB
ID:	2178105   Click image for larger version

Name:	image.jpeg
Views:	1475
Size:	1.00 MB
ID:	2178106   Click image for larger version

Name:	image.jpeg
Views:	1477
Size:	916.6 KB
ID:	2178107   Click image for larger version

Name:	image.jpeg
Views:	1463
Size:	819.6 KB
ID:	2178108   Click image for larger version

Name:	image.jpeg
Views:	1478
Size:	1.03 MB
ID:	2178109   Click image for larger version

Name:	image.jpeg
Views:	1452
Size:	1.27 MB
ID:	2178110   Click image for larger version

Name:	image.jpeg
Views:	1476
Size:	1.41 MB
ID:	2178111  

Click image for larger version

Name:	image.jpeg
Views:	1466
Size:	739.7 KB
ID:	2178112   Click image for larger version

Name:	image.jpeg
Views:	1447
Size:	799.8 KB
ID:	2178113  

Last edited by TonyBuilder; 08-23-2016 at 04:18 PM.
Old 08-23-2016, 04:20 PM
  #342  
TonyBuilder
My Feedback: (11)
 
TonyBuilder's Avatar
 
Join Date: Mar 2010
Location: Austin , TX
Posts: 4,166
Likes: 0
Received 1 Like on 1 Post
Default

Some more details from the un boxing.


Rear section.


Man this bird is big!


Let the build begin

TB
Attached Thumbnails Click image for larger version

Name:	image.jpeg
Views:	1445
Size:	963.8 KB
ID:	2178114   Click image for larger version

Name:	image.jpeg
Views:	1437
Size:	980.9 KB
ID:	2178115   Click image for larger version

Name:	image.jpeg
Views:	1454
Size:	1.01 MB
ID:	2178116   Click image for larger version

Name:	image.jpeg
Views:	1433
Size:	1.41 MB
ID:	2178117   Click image for larger version

Name:	image.jpeg
Views:	1418
Size:	922.6 KB
ID:	2178118   Click image for larger version

Name:	image.jpeg
Views:	1418
Size:	739.7 KB
ID:	2178119   Click image for larger version

Name:	image.jpeg
Views:	1468
Size:	821.1 KB
ID:	2178120   Click image for larger version

Name:	image.jpeg
Views:	1441
Size:	1.07 MB
ID:	2178121  

Click image for larger version

Name:	image.jpeg
Views:	1459
Size:	917.4 KB
ID:	2178122   Click image for larger version

Name:	image.jpeg
Views:	1421
Size:	852.6 KB
ID:	2178123   Click image for larger version

Name:	image.jpeg
Views:	1452
Size:	1.01 MB
ID:	2178124   Click image for larger version

Name:	image.jpeg
Views:	1463
Size:	1.04 MB
ID:	2178125   Click image for larger version

Name:	image.jpeg
Views:	1451
Size:	1.12 MB
ID:	2178126   Click image for larger version

Name:	image.jpeg
Views:	1539
Size:	1.28 MB
ID:	2178127  

Last edited by TonyBuilder; 08-23-2016 at 04:29 PM.
Old 08-23-2016, 05:36 PM
  #343  
lfierro1
 
Join Date: Aug 2009
Location: ogden, UT
Posts: 49
Likes: 0
Received 0 Likes on 0 Posts
Default

Originally Posted by sirrom
OK, going to pull the trigger on one of these very soon. Already started gathering materials for the build. Can someone post the dimensions of the equipment mounting board please. I can lay it out on my computer with all the items, I plan on laser cutting mine to make it look nice and clean.

Patrick

The equipment tray is 12 1/4 inches long by 6 1/2 at the front and 7 inches at the rear
Old 08-23-2016, 11:30 PM
  #344  
i3dm
My Feedback: (51)
 
Join Date: Jun 2004
Location: Reut,Israel
Posts: 4,346
Received 21 Likes on 18 Posts
Default

Tony, the back of the canopy already has powerful magents built inside.
Old 08-24-2016, 03:44 AM
  #345  
TonyBuilder
My Feedback: (11)
 
TonyBuilder's Avatar
 
Join Date: Mar 2010
Location: Austin , TX
Posts: 4,166
Likes: 0
Received 1 Like on 1 Post
Default Noes gear

I got the noes gear ready to install.

I went with dule push rods to spread the load from a single pivot point,
robart bolted clevis and 2/56 X 4/40 ball links on titanium rods with alternating threads for fine tuning.

I pinned the servo plate with a 2/56 button head screw.


Linkage.


Next I will prep the main gear.

TB
Attached Thumbnails Click image for larger version

Name:	image.jpeg
Views:	1470
Size:	884.1 KB
ID:	2178147   Click image for larger version

Name:	image.jpeg
Views:	1509
Size:	910.1 KB
ID:	2178148   Click image for larger version

Name:	image.jpeg
Views:	1470
Size:	1.31 MB
ID:	2178149   Click image for larger version

Name:	image.jpeg
Views:	1487
Size:	1.20 MB
ID:	2178150   Click image for larger version

Name:	image.jpeg
Views:	1491
Size:	1.13 MB
ID:	2178151  

Last edited by TonyBuilder; 08-24-2016 at 03:47 AM.
Old 08-24-2016, 03:47 AM
  #346  
Quandry
 
Join Date: Feb 2012
Location: Dublin, IRELAND
Posts: 520
Received 0 Likes on 0 Posts
Default

Is your pipe OK Tony? looks a little dinted :O
Old 08-24-2016, 04:18 AM
  #347  
gunradd
Thread Starter
My Feedback: (9)
 
gunradd's Avatar
 
Join Date: Aug 2008
Location: Springhill, FL
Posts: 3,426
Received 50 Likes on 43 Posts
Default

Originally Posted by Quandry
Is your pipe OK Tony? looks a little dinted :O
Pipe is fine they just are not pretty lol. They are plenty strong enough.
Old 08-24-2016, 04:43 AM
  #348  
Johnny9390
My Feedback: (34)
 
Join Date: Jan 2002
Location: Miami, FL
Posts: 613
Likes: 0
Received 2 Likes on 2 Posts
Default

Got a text from DHL saying my box had arrived!!!! Was all excited then realized it was just the gear! Lol spoke with Dirk and he told me mine should be here anyway. Question for you guys that received it. Unfortunately was told that EMS does not provide tracking number but rather they bring over to US and have USPS handle the delivery but looks like the box is too big to fit in a USPS truck. Did you guys receive a notice from USPS and have to pick up box yourself at their location??
Old 08-24-2016, 10:58 AM
  #349  
smiller
 
Join Date: Mar 2005
Location: rochester, NY
Posts: 234
Likes: 0
Received 5 Likes on 5 Posts
Default

Originally Posted by Johnny9390
Got a text from DHL saying my box had arrived!!!! Was all excited then realized it was just the gear! Lol spoke with Dirk and he told me mine should be here anyway. Question for you guys that received it. Unfortunately was told that EMS does not provide tracking number but rather they bring over to US and have USPS handle the delivery but looks like the box is too big to fit in a USPS truck. Did you guys receive a notice from USPS and have to pick up box yourself at their location??
Mine showed up yesterday at my place of work, no notice. it was recieved by our shipping dept. Box is not that big, should fit on most trucks. It was very well boxed as others have shown, Mine had a fist size hole in the side of the box, but luckily it was at a void in the box where no parts were!!

Scott
Old 08-24-2016, 12:04 PM
  #350  
Johnny9390
My Feedback: (34)
 
Join Date: Jan 2002
Location: Miami, FL
Posts: 613
Likes: 0
Received 2 Likes on 2 Posts
Default

Mine arrived today and was waiting for me outside my house!! Thanks Barry, Dirk, Chris , and Mr Ir Kim!


Contact Us - Archive - Advertising - Cookie Policy - Privacy Statement - Terms of Service -

Copyright © 2024 MH Sub I, LLC dba Internet Brands. All rights reserved. Use of this site indicates your consent to the Terms of Use.