


Firebird JET Trainer: Another Dr Honda budget build.
 11-03-2016, 03:23 AM
#1

Thread Starter
My Feedback: (4)

Join Date: Apr 2005
Location: Latrobe,
PA
Posts: 2,326
Likes: 0
Received 0 Likes
on
0 Posts
Hi Guys,
OK... I actually debated if I was going to post anything on this or not. The reason is... I found one other thread, and it quickly turned to a bashing session. (But I do understand the reasons) The reason I decided to start this post, is the fact that there was only one thread... AND... there was really zero info. So... let's address the 3 things in the other thread that came up.
1) The Name: Yes, I understand that there are some who take offence to the name, since JMP makes a very nice model using the firebird name. But, let's get over it, since JMP didn't "Invent" the name. To me... a Firebird is a car going back into the 60's.
2) Reaction 54 copy: Some have said they just ripped off BTE. Well... after putting my hands on the kit... I can say with 100% certainty, THEY DID NOT. Sure, the profile shape is Reaction-ish. But.... A) this model is smaller. B) The engine mounting section is totally different, C) The wing mount is different. D) and EVERY single piece of wood is different. SO, while it may be similar in appearance, it is 100% a different "kit."
3) Just build a Reaction: Some of us know... that if they open a box of lumber... it will never get finished. I'm one of those people. Sure, back in the day, I built. (when I was a teen) But now, with a job, kids, and other adult things that take my time... it's hard enough to just find time to get to the flying field. It has nothing to do with $$$... it has to do with time. Not to mention... this is smaller, so it really fits a deferent spot in the hobby.
With all that said... This is not a thread for debate, or bashing. This is an info thread since there isn't one anywhere on this site. (Thanks in advance for that)
After unboxing the kit, and giving it a once-over... I am actually impressed with the build quality. The parts are all cut clean, and they are glued well. I remember building my Falcon 120, and the first thing I did was to knock out all the formers, and re-glue them. I gave it some good squeezes, and twists... and nothing cracked lose. (LOL) Also, the covering was done very well.
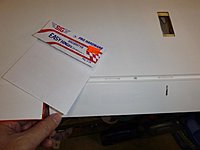
The kit's plastic hardware is typical Chinese. It looks good, but it doesn't leave you with a warm fuzzy feeling. It came with Robart style Pin Hinges... but I didn't care for the plastic. So, I will be replacing them with Sig EZ Hinges. It also came with steel pushrods, and ball joints for the control surfaces, but here again... not very good quality. The first issue is, they are small. They use 2mm screws, and rods. (Too small) And, the ball is very tight in the cup. Yes, you can work them a little, or give them a squeeze to loosen the ball... but I simply don't trust them. These will all be replaced with Dubro 4-40 ball joints. The final down side is the instructions. There is a 3" CD in the box with an assembly manual that is very basic. more or less... it's a set of pictures that says... build it. Now, anyone ready to fly a turbine, really shouldn't need instructions to build an ARF... but since they pimp it as a "Trainer"... it needs work in this respect.
The surprise of the kit is the rest of the hardware. The nose wheel leg is actual spring wire, and the "Spring" has the tell-tale sign of heat treating !! Most of the Chinese kits I've built... you have to toss wire legs in the trash... but this actually has a chance. The control horns are fiberglass, glue-in style, so I will be using them. The other surprise is the kit comes with a very nice set of electric brakes !! There is a controller, with 2 adjustment pots, and 2 main wheels with brakes in the hubs. Also, the hub and tires are very nice quality. The only down side is that they are a little heavy. But I guess the over all weight is lower than air, since you don't need a servo, valve, air tank, and hoses. The down side is the instructions. There are 4 sets of pins, but you only need 2... and after playing with the adjustment pots... I couldn't tell if they did anything. (Back to the poor instructions) But once it's together, I will try to post my findings.
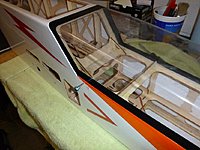
The last point I want to touch on is the design of the kit. First and foremost... the quality is super ! The quality of the wood is nice... bolt holes line up... the wing tube slides in snug, and the wings are flush when installed... the surfaces fit, and aren't warped... and the canopy fits the fuse like a glove. BUT....... To some... this is not a typical jet build. There is a lot of open structure, as you would see with a glow model. Now... assuming that the covering is good... this is actually a plus to me. Back in the day, we would really over build, and make models heavy, but now, we build light so they fly nice. So, to me, the build is great. This allows a larger model to fly on a smaller engine, and have low wing loading. I'm expecting this to fly more like a nice pattern plane, rather than a "Heavy Metal" jet. FYI... the empty airframe, with the brakes, and other hardware is just a little over 6 lbs. Oh, and for the guys who may "Poo-Poo" on the open frame... lets face it... we've now embraced foam, so why should this bother anyone??
This kit calls for a 60 size turbine... and I'm sure it would be a good match. But, because of how light it's built... I'm thinking this is actually a better match to a 44 sized engine. Personally, I think that's a good thing. Since the Ripmax mini is hard to get in the USA, and since the boomerang nano is no longer produced... this fills a gap that has gone away. Not to mention, you will save a good 2 lbs with a lighter engine, and needing less fuel. So... this build will get my Wren 44. I will link a vid with it flying on a 44.
That's it for now.
***********EDIT*****************
As you may know... Photobucket decided to make it cost $400 a year to hot link pics. I'm trying to rebuild some of the pics in this thread using postimage.org. So far, it's the only FREE way to do it.

OK... I actually debated if I was going to post anything on this or not. The reason is... I found one other thread, and it quickly turned to a bashing session. (But I do understand the reasons) The reason I decided to start this post, is the fact that there was only one thread... AND... there was really zero info. So... let's address the 3 things in the other thread that came up.
1) The Name: Yes, I understand that there are some who take offence to the name, since JMP makes a very nice model using the firebird name. But, let's get over it, since JMP didn't "Invent" the name. To me... a Firebird is a car going back into the 60's.
2) Reaction 54 copy: Some have said they just ripped off BTE. Well... after putting my hands on the kit... I can say with 100% certainty, THEY DID NOT. Sure, the profile shape is Reaction-ish. But.... A) this model is smaller. B) The engine mounting section is totally different, C) The wing mount is different. D) and EVERY single piece of wood is different. SO, while it may be similar in appearance, it is 100% a different "kit."
3) Just build a Reaction: Some of us know... that if they open a box of lumber... it will never get finished. I'm one of those people. Sure, back in the day, I built. (when I was a teen) But now, with a job, kids, and other adult things that take my time... it's hard enough to just find time to get to the flying field. It has nothing to do with $$$... it has to do with time. Not to mention... this is smaller, so it really fits a deferent spot in the hobby.
With all that said... This is not a thread for debate, or bashing. This is an info thread since there isn't one anywhere on this site. (Thanks in advance for that)
After unboxing the kit, and giving it a once-over... I am actually impressed with the build quality. The parts are all cut clean, and they are glued well. I remember building my Falcon 120, and the first thing I did was to knock out all the formers, and re-glue them. I gave it some good squeezes, and twists... and nothing cracked lose. (LOL) Also, the covering was done very well.
The kit's plastic hardware is typical Chinese. It looks good, but it doesn't leave you with a warm fuzzy feeling. It came with Robart style Pin Hinges... but I didn't care for the plastic. So, I will be replacing them with Sig EZ Hinges. It also came with steel pushrods, and ball joints for the control surfaces, but here again... not very good quality. The first issue is, they are small. They use 2mm screws, and rods. (Too small) And, the ball is very tight in the cup. Yes, you can work them a little, or give them a squeeze to loosen the ball... but I simply don't trust them. These will all be replaced with Dubro 4-40 ball joints. The final down side is the instructions. There is a 3" CD in the box with an assembly manual that is very basic. more or less... it's a set of pictures that says... build it. Now, anyone ready to fly a turbine, really shouldn't need instructions to build an ARF... but since they pimp it as a "Trainer"... it needs work in this respect.
The surprise of the kit is the rest of the hardware. The nose wheel leg is actual spring wire, and the "Spring" has the tell-tale sign of heat treating !! Most of the Chinese kits I've built... you have to toss wire legs in the trash... but this actually has a chance. The control horns are fiberglass, glue-in style, so I will be using them. The other surprise is the kit comes with a very nice set of electric brakes !! There is a controller, with 2 adjustment pots, and 2 main wheels with brakes in the hubs. Also, the hub and tires are very nice quality. The only down side is that they are a little heavy. But I guess the over all weight is lower than air, since you don't need a servo, valve, air tank, and hoses. The down side is the instructions. There are 4 sets of pins, but you only need 2... and after playing with the adjustment pots... I couldn't tell if they did anything. (Back to the poor instructions) But once it's together, I will try to post my findings.
The last point I want to touch on is the design of the kit. First and foremost... the quality is super ! The quality of the wood is nice... bolt holes line up... the wing tube slides in snug, and the wings are flush when installed... the surfaces fit, and aren't warped... and the canopy fits the fuse like a glove. BUT....... To some... this is not a typical jet build. There is a lot of open structure, as you would see with a glow model. Now... assuming that the covering is good... this is actually a plus to me. Back in the day, we would really over build, and make models heavy, but now, we build light so they fly nice. So, to me, the build is great. This allows a larger model to fly on a smaller engine, and have low wing loading. I'm expecting this to fly more like a nice pattern plane, rather than a "Heavy Metal" jet. FYI... the empty airframe, with the brakes, and other hardware is just a little over 6 lbs. Oh, and for the guys who may "Poo-Poo" on the open frame... lets face it... we've now embraced foam, so why should this bother anyone??
This kit calls for a 60 size turbine... and I'm sure it would be a good match. But, because of how light it's built... I'm thinking this is actually a better match to a 44 sized engine. Personally, I think that's a good thing. Since the Ripmax mini is hard to get in the USA, and since the boomerang nano is no longer produced... this fills a gap that has gone away. Not to mention, you will save a good 2 lbs with a lighter engine, and needing less fuel. So... this build will get my Wren 44. I will link a vid with it flying on a 44.
That's it for now.
***********EDIT*****************
As you may know... Photobucket decided to make it cost $400 a year to hot link pics. I'm trying to rebuild some of the pics in this thread using postimage.org. So far, it's the only FREE way to do it.
Last edited by Dr Honda; 09-13-2017 at 03:07 AM.

 11-03-2016, 05:20 AM
#3
Thread Starter
My Feedback: (4)
Join Date: Apr 2005
Location: Latrobe,
PA
Posts: 2,326
Likes: 0
Received 0 Likes
on
0 Posts
I just checked, and shipping is $49 for 2 day priority.
http://www.generalhobby.com/fire-bir...ch-p-1151.html
11-03-2016, 05:57 AM
#4
Thread Starter
My Feedback: (4)
Join Date: Apr 2005
Location: Latrobe,
PA
Posts: 2,326
Likes: 0
Received 0 Likes
on
0 Posts
Here's a vid from GB-Jets showing it on a Wren 44. The only down side to this kit, is even though they list it as a "Trainer"... it wont' be heavy enough for the USA AMA waver sign-off.
FYI... I found a vid of it flying with a P120... but personally... I think it would just rip it apart if you held the throttle open for more than a couple seconds.
https://youtu.be/Jxx8y_COq1Q
******EDIT*****
After getting it finished, if you install a 60, and some big batteries... it would hit the "12 lbs Dry" rule for AMA waiver flights.
Last edited by Dr Honda; 11-15-2016 at 04:30 PM.
11-03-2016, 12:55 PM
#5
Member
Join Date: Jun 2014
Location: Arizona
Posts: 44
Likes: 0
Received 0 Likes
on
0 Posts
Tony,
First off, well done! Swimming upstream and trying something a tad different. I applaud you. I stumbled across the Firebird a few weeks back when looking at wood airplanes for ideas for a scratch design. I was looking at Reactions, JetMach's, and Turbinators (I have two). I wanted a simple pusher with no thrust tube but retracts. I like the Turbinators I have but they are quite heavy. I want something light, hence the scratch idea. After downloading every photo I could find of all the above for comparison, I agree with you. Its not really a copy of anything. None of them are no more than they are pushers without a thrust tube.
The video you linked above shows pretty good performance on a Wren44. I think a set of inexpensive electric retracts would add a lot to it but I definitely 'get' it. I look forward to your build and hope you enjoy it. Post lots of pics for us
Scott
11-03-2016, 01:19 PM
#6
My Feedback: (19)
Here's a vid from GB-Jets showing it on a Wren 44. The only down side to this kit, is even though they list it as a "Trainer"... it wont' be heavy enough for the USA AMA waver sign-off.
FYI... I found a vid of it flying with a P120... but personally... I think it would just rip it apart if you held the throttle open for more than a couple seconds.
https://youtu.be/Jxx8y_COq1Q
FYI... I found a vid of it flying with a P120... but personally... I think it would just rip it apart if you held the throttle open for more than a couple seconds.
https://youtu.be/Jxx8y_COq1Q
About the trainer thing. the AMA requires 12lb empty weight for your waiver flight. the one in that video is right at 11.5lbs. I'm betting you could could put half a pound of lead on the Cg and it would fly just fine for your waiver flight then you just take it out. I hope the at some point the 12lb limit is relooked at with the popularity of the K45. It is a great entry point for folks wanting to get in to turbines. Requiring someone to get a "big" jet first is kind of dumb.
11-03-2016, 03:13 PM
#7
Thread Starter
My Feedback: (4)
Join Date: Apr 2005
Location: Latrobe,
PA
Posts: 2,326
Likes: 0
Received 0 Likes
on
0 Posts
Scott: Thanks for the input. I'm not a typical jetjock and I'm not into supper high speed. I just love the sound. So, this fits the bill. But with that said... I do have a Shock Jet with a Ram 1000 on it. LOL. But it's turned down a bit. (to around 22 lbs)
Why_fly_high: I'm hoping to be under 10 lbs wet. But, with a 60 size turbine, and a little extra weight, I'm sure it could get to 12 lbs. I'm on the fence with the 12lb rule. I do understand why they did it... but I think with the newer engines getting lighter and lighter... it may need to be looked at again. With that said... would you want a guy who got his waver on a foamy with a p20 jumping into a 50lb scale model without some time on a high wing loading airframe? (I don't know) Regardless... I've had mine for 5 years now.
Why_fly_high: I'm hoping to be under 10 lbs wet. But, with a 60 size turbine, and a little extra weight, I'm sure it could get to 12 lbs. I'm on the fence with the 12lb rule. I do understand why they did it... but I think with the newer engines getting lighter and lighter... it may need to be looked at again. With that said... would you want a guy who got his waver on a foamy with a p20 jumping into a 50lb scale model without some time on a high wing loading airframe? (I don't know) Regardless... I've had mine for 5 years now.
11-03-2016, 04:16 PM
#8

My Feedback: (4)
Join Date: Oct 2007
Location: St.Petersburg, FL
Posts: 175
Likes: 0
Received 0 Likes
on
0 Posts
Thanks for starting this thread Tony. I recently bought a Fire Bird Jet Trainer when Redwing RC had a sale on them.. I agree with your description, it is a well built model with near perfect fit, some hardware needing replacement with more robust pieces and next to useless instructions.
I am using a Jet Central Bee II turbine. I had this in my Shock Jet for over 100 flights. I sold the SJ airframe and have been working on a Turbanator, but that project kind of stalled and I saw the Fire Bird and jumped on it. Currently I'm at the 90% done/90% left to do stage, so finding this thread is just great for me.
Being smaller, lighter and a little more streamlined than the Shock Jet, I figured it would have somewhat better performance, Now that I have it far enough along to be within a few oz of it's true empty weight, I'm looking at a 13.7 Lb thrust turbine in a 13.5 Lb airplane, Essentially a 1:1 thrust to weight ratio. I'm starting to wonder if it isn't going to be overpowered.
I did have one mishap during assembly. I had the canopy sitting on the corner of the box on my bench. I was doing something at the other end of the bench and bumped it. I heard the canopy fall off the box, but thought nothing of it until I smelled burning plastic. Darn thing fell right on a hot trim iron. Doh! I have been trying to track down a replacement with no success. Anyone know where spares for this model can be had?
sp
11-07-2016, 06:25 PM
#10
Thread Starter
My Feedback: (4)
Join Date: Apr 2005
Location: Latrobe,
PA
Posts: 2,326
Likes: 0
Received 0 Likes
on
0 Posts
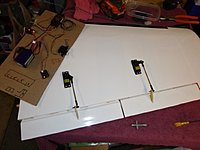
I got a little time to work on the Firebird tonight... so I decided to get the servos installed. For the most part, it was straight forward. The mounting rails are plywood, and are actually glued in. (lol) I can't tell you how many "Imported" ARF's crack and pop when you start to put a little pressure on them with a drill or screws. The people who framed it up used a glue that is slightly flexible, and penetrated the wood. Also, all the parts key together, so it helps with strength.
As before, I decided to replace the 2mm hardware with 4-40 DuBro.
The one Gotcha of the night was on the flaps. The control horns are glued into the same spot on the flaps. Because of this... if you want to use a Y-harness... it turns into an aileron. (they will move opposite) So... if you don't want to use another channel for the flaps... then you may want to make a new slot, and move the horn to the other side on one of the flaps. I decided to go "Old School" with it since I already glued the horns in place. I cracked the servo open and reversed it. I'm sure most of the old guys know this... but for the new guys... there's no reason to pay for a reverser, when you don't have an open channel. If you pop open the servo, all you have to do is reverse the power on the motor, and the 2 outer wires on the pot.
I also set up the canopy latch. It's a simple wire that catches 2 hooks on the canopy. The slots in the fuse are tight, but if you run a thin file in them... it will work perfect.
Last edited by Dr Honda; 09-13-2017 at 03:11 AM.
11-15-2016, 03:48 PM
#11
Thread Starter
My Feedback: (4)
Join Date: Apr 2005
Location: Latrobe,
PA
Posts: 2,326
Likes: 0
Received 0 Likes
on
0 Posts
Had some time today, and I was able to basically finish it.
With the little Wren, there is a lot of room in here. The rails are far enough apart, that I had to make filler plates. Oh... and it has both top and bottom hatches. (nice)
With the little Wren, there is a lot of room in here. The rails are far enough apart, that I had to make filler plates. Oh... and it has both top and bottom hatches. (nice)
Last edited by Dr Honda; 09-13-2017 at 03:11 AM.
11-15-2016, 03:59 PM
#12
Thread Starter
My Feedback: (4)
Join Date: Apr 2005
Location: Latrobe,
PA
Posts: 2,326
Likes: 0
Received 0 Likes
on
0 Posts
One of the things that bothered me, with the crappy instructions was... how to hook up and adjust the brakes. I sent Sky Sun Hobbies an email, and they promptly replied with a bad translation that didn't help at all.. (LOL) But at least they tried. I guess it was the same guy who wrote the manual. Anyway, after playing around with the controller, I realized that there are 2 sections, and each can operate 2 brakes. Then, after putting some power on it, I found that the adjustment pot, adjusts the output voltage to the brake. So, adjusting it will change how hard the brakes grab.
Since I decided to put a small engine in this jet... I decided to only put one brake as a nose wheel. I know... some of you guys will tell me it's dumb... but the Reaction uses a single electric (Kavan) nose brake... and a Shock used a flap, with sandpaper glued to it !! So, this is better. Besides, the 44 only has 0.3 lbs residual thrust, and I'm flying off grass. (don't really need a brake)
Since I decided to put a small engine in this jet... I decided to only put one brake as a nose wheel. I know... some of you guys will tell me it's dumb... but the Reaction uses a single electric (Kavan) nose brake... and a Shock used a flap, with sandpaper glued to it !! So, this is better. Besides, the 44 only has 0.3 lbs residual thrust, and I'm flying off grass. (don't really need a brake)
Last edited by Dr Honda; 09-13-2017 at 03:13 AM.
11-15-2016, 04:03 PM
#13
Thread Starter
My Feedback: (4)
Join Date: Apr 2005
Location: Latrobe,
PA
Posts: 2,326
Likes: 0
Received 0 Likes
on
0 Posts
One issue I ran into was where to put a vent. Since the frame is "Open"... there isn't any flats where I could simply drill a hole. So, for the first time... I had glue wood into the belly.
Last edited by Dr Honda; 09-13-2017 at 03:13 AM.
11-15-2016, 04:13 PM
#14
Thread Starter
My Feedback: (4)
Join Date: Apr 2005
Location: Latrobe,
PA
Posts: 2,326
Likes: 0
Received 0 Likes
on
0 Posts
I was able to (more or less) finish the model. So... here's the big question that we all wanted to know......
I have two 1700 mah Life Batteries for Rx power, and an 1800 mah 2 cell LiPo for the Wren. Oh... and the best part is I didn't need any extra weight to make it balance !!! I just moved the batteries around.
With a full header tank, and a splash of fuel in the main tank... it weighs in at 10 Lbs, 15 oz. (4.96 kg)
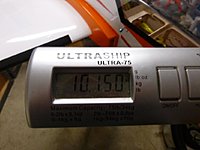
Last edited by Dr Honda; 09-13-2017 at 03:14 AM.
11-15-2016, 04:24 PM
#15
Thread Starter
My Feedback: (4)
Join Date: Apr 2005
Location: Latrobe,
PA
Posts: 2,326
Likes: 0
Received 0 Likes
on
0 Posts
At that weight... it should fly well with the Wren 44. If I were to put in an engine like a K60... I'm sure the performance would be slightly better... but there would be at least another pound for the install, and probably 2 lbs more in fuel.
Anyway... it looks like my "Take-off" weight will be 12 lbs 7 oz.
I'm hoping to get a good weekend, so I can give it a flight before winter comes. If I do... I will give a report.
Anyway... it looks like my "Take-off" weight will be 12 lbs 7 oz.
I'm hoping to get a good weekend, so I can give it a flight before winter comes. If I do... I will give a report.
11-16-2016, 06:22 AM
#17

At that weight... it should fly well with the Wren 44. If I were to put in an engine like a K60... I'm sure the performance would be slightly better... but there would be at least another pound for the install, and probably 2 lbs more in fuel.
Anyway... it looks like my "Take-off" weight will be 12 lbs 7 oz.
Anyway... it looks like my "Take-off" weight will be 12 lbs 7 oz.
Enjoying your report (makes a change). Not that I am thinking of buying one, as I prefer to design my own, but it's nice to see what others have done. Disappointed to see a straight wing. I think jet models look better with a little sweepback, as on mine or Jet Mach Super Sport
My own design 80" span jet trainer JayTee was designed and built in about 2007/2008 as a replacement and improvement on my Boomerang ARF, and powered by the same Wren 54 mk3 (6.3 kg/14 lb thrust). It weighed about 14 lb dry on wheels and the fuel tank is a 2 litre cider bottle.
It was later fitted with floats, and at one point I turned down the RPM limit of the engine to simulate the power of a 44 Gold. It still performed very well, even carrying floats. I just lost some vertical performance. It did nice loops but no longer enormous.
So to get back to your point, the 44 will be a good power plant for such a small light model.
I looked up generalhobby.com and found the wingspan, only 63" (same as the Falcon 120, which goes in my van in one piece).
What's not on the website, or your report yet, are details of the fuel tank. The website says 2.6 litre which is huge, even for the very thirsty jetCat or KingTech 60. On your Wren 44 you will get very long flights.
It is not clear where the engine and tank are placed relative to each other. Is the tank above the engine or ahead of it (as on mine)?
Alasdair
PS, saw your thread during a building break. I am nearly finished a low wing version of my JayTee (JayLow?) and just weighed the complete airframe including fixed gear, 2.85 kg 6.27 lb.
I cut the span to 74" on the low winger version, but otherwise the same as JayTee.
Last edited by alasdair; 11-16-2016 at 07:12 AM.
11-16-2016, 06:34 AM
#18
Member
Join Date: Jun 2014
Location: Arizona
Posts: 44
Likes: 0
Received 0 Likes
on
0 Posts
Nice airplane Alasdair. I'm headed toward a similar looking scratch model. I see it with a low wing with retracts. I agree with the sweep. Yours look sporty without trying for Mach3 I also see it as a way to manage ballast in these airplanes with a rear engine. I REALLY want the pound of nose weight (ballast and large batteries) out of my 15 pound airplane.
SP, I use a 1000-1300 3S on my electric brakes for the 83% turbinator. After three 6 minute flights its usually 80-90 % with heavy braking and several touch and go's. I size it more on ballast requirements than capacity. Its not working very hard at all.
If I didn't need the ballast, I would try them on the 2S receiver packs or even the 3S LiFe ECU battery. If they still needed 12V, I would stick a little 600-800 pack in there.
Scott
I also see it as a way to manage ballast in these airplanes with a rear engine. I REALLY want the pound of nose weight (ballast and large batteries) out of my 15 pound airplane. SP, I use a 1000-1300 3S on my electric brakes for the 83% turbinator. After three 6 minute flights its usually 80-90 % with heavy braking and several touch and go's. I size it more on ballast requirements than capacity. Its not working very hard at all.
If I didn't need the ballast, I would try them on the 2S receiver packs or even the 3S LiFe ECU battery. If they still needed 12V, I would stick a little 600-800 pack in there.
Scott
Last edited by Scott Todd; 11-16-2016 at 06:40 AM.
11-16-2016, 06:58 AM
#19
I did consider doing a smaller version of JayTee, similar in span to the Firebird, for a 44/45 size turbine.
But then Jets-Munt come out with a 44 size turbine with 70 N thrust and I thought, why bother?
I didn't know about the 12lb minimum rule in the US, for a jet waiver.
However in the UK we have a 7 kg maximum rule, above which we need to observe lots more regulations (like 400 foot AGL ceiling). My current 80" span JayTee fortunately fits in with both. I need about 240g of lead in the nose, along with the batteries.
Last edited by alasdair; 11-16-2016 at 07:11 AM.
11-16-2016, 07:05 AM
#20
I got a little time to work on the Firebird tonight... so I decided to get the servos installed. For the most part, it was straight forward. The mounting rails are plywood, and are actually glued in. ( Also, all the parts key together, so it helps with strength.
As before, I decided to replace the 2mm hardware with 4-40 DuBro.
As before, I decided to replace the 2mm hardware with 4-40 DuBro.
What size are 4-40 rods compared to 2 mm??
I think 2 mm steel rods are strong enough, but might not be stiff enough, leading to flutter. I used 2 mm rods on mine, with a steel clevis one end and Z-bend on the other. I sleeved the rods with carbon tube for added stiffness, for the ailerons.
On the subject of flutter, does the Firebird kit have any provision for mass balances?
Last edited by alasdair; 11-16-2016 at 07:10 AM.
11-16-2016, 07:51 AM
#21
Thread Starter
My Feedback: (4)
Join Date: Apr 2005
Location: Latrobe,
PA
Posts: 2,326
Likes: 0
Received 0 Likes
on
0 Posts
Smparry: Right now I'm tapped into one of the Rx packs. (just because the plugs fit) It's a 2s LiFe 1700mah battery. Since I have it on the nose, I don't have the power up too high. (output of around 2v) If I go much higher than that... the front tire skids. BUT... I was thinking that if there was an issue... and the control shorted out... I may lose the Rx. SO... I'm going to move it to my ECU battery. (2s LiPo) I need to make up an adaptor for it anyway, so I can send the voltage to my telemetry.
Alasdair: the 2mm rods would have been fine for the wing... but the run to the tail and elevator were kind of long, so flex was a possible issue. I could have glued a carbon tube over it for support, but I didn't like quality of the ball joints the kit came with. 4-40 is a common US size. (metric ball joints are harder to find) As far as size... it's closer to 3mm. It's not a huge difference, but it's heavier.
The fuel tank is above the engine... but it's forward. Depending where you set it... it can be very close to the CG. I have it mounted just in front, so there's not a large rear CG shift when I'm nose high. Right now... the CG is on the wing tube... but I'm guessing I will move it back after I get a flight or two on it. I used a 32 oz tank since I only have a 44 in this. With a 60... I'm sure you would want more fuel (50~60 oz or 2L) My bubble tank is a 2oz dubro tank with a felt clunk in it.
FYI... I still need to mount the sat Rx units. So no... they wont' just be lying in the fuselage when I go to fly it. (lol) Oh... and that's one of the new Spektrum receivers with the AS3X built it. I don't think this plane needs a gyro... but it should make it fly nice.
Last edited by Dr Honda; 09-13-2017 at 03:15 AM.
11-17-2016, 01:28 AM
#22
Hi Dr Honda,
The Firebird on fixed gear looks OK. What provision do they make in the kit for a retract conversion?
The plug-in wing looks good too. I have built my low- winger with a one piece wing fitted in a fuselage cut-out, but if I do a mark 2 I may change that to a wing tube like the Firebird. That would still leave the option of changing to retracts.
I think I will stick with my tandem arrangement of engine and fuel tank, as the over/under arrangement (like Tony Nijhuis's Retro-Jet) makes for a deep fuselage.
The Firebird wing looks straight. Do you know if the 25% chord line is straight, or or 30% or 50% or what?
And where is the kit recommended CG as % root chord? With that long nose and short tail arm I bet it is well forward.
Last edited by alasdair; 11-17-2016 at 03:13 AM.
11-17-2016, 04:21 AM
#23
Thread Starter
My Feedback: (4)
Join Date: Apr 2005
Location: Latrobe,
PA
Posts: 2,326
Likes: 0
Received 0 Likes
on
0 Posts
There isn't any provisions for retract gear. Since this is a trainer... I do understand. The fixed gear is easier to deal with, and takes the abuse of bad landings. BUT... since it's a wood kit, and just covered with a film... I don't think it would be too hard to add retracts to the wings. A little ply, and bass wood... and rail could be added. Most of the structure in the model is light ply. The only balsa is the tail group, and the sheeting on the wings. If you look at the pic at the top of the tread, you can see that the ribs, and shear web are ply.
I'm not quite sure what you are asking about the chord line. But the wing isn't really straight. It's a double tapper. I'll get a pic after I get a little coffee in me, and the kids off to school.
The manual says that the CG should be on the wing tube. (The fat point of the wing. on the spar) As far as a %... I will have to measure.
Just so you guys can see how bad the manual was... I'll attach it on this post.
Last edited by Dr Honda; 11-17-2016 at 04:26 AM.
11-17-2016, 06:42 AM
#24
Member
Join Date: Jun 2014
Location: Arizona
Posts: 44
Likes: 0
Received 0 Likes
on
0 Posts
Interesting questions about mass balance and chord line. Very few sport models have mass balances. I can't think of any. Good servos and linkages really make this a non issue for this type of model (or any really...)
Last edited by Scott Todd; 11-17-2016 at 07:09 AM.
11-17-2016, 08:14 AM
#25
Thread Starter
My Feedback: (4)
Join Date: Apr 2005
Location: Latrobe,
PA
Posts: 2,326
Likes: 0
Received 0 Likes
on
0 Posts
OK... here it is.
According to the manual... the CG is on the tube. The center of the tube, from the leading edge, where it hits the fuse is 5.75" Total chord is 20". SO... if my math is right... it puts it at 28.75%. (?) But like I said... it could probably go back another 0.5" to make the landings better. (but I don't know yet)
Here's a pic of the wing, with the tube in it. That way, you can see where the straight line is. I also put a long ruler on the front, parallel to the tube, so you can get an idea of the tapper. The rear is actually more tapered than the front. (Similar to a Reaction 54)
Scott: I agree. With short links, and good servos... it's not very common to have flutter. I know on the JetMach they say a balance can be added, but on this model... there's no provision for it.
Last edited by Dr Honda; 09-13-2017 at 03:15 AM.