


New Sport Jet: T-One Models Mini Fortune / Mini T1


 11-16-2018, 04:52 PM
#727

My Feedback: (1)
[QUOTE=camss69;12479097]
So do you have both brakes wired to the one controller
yes both brakes plug into the xicoy controller. Jr type plugs.
now that my cg has moved back to the 200mm mark ii am unhappy. I went vertical the other day and at the very top of the verticle line as i put some down elevator in to bring it around it snaped on me. Caught me by surprise.
190 felt more solid and stable to me.
but that is just personal preference.
brake are definitely better with the xicoy but you have to be careful as it still will pull to one side.Stan
So do you have both brakes wired to the one controller
yes both brakes plug into the xicoy controller. Jr type plugs.
now that my cg has moved back to the 200mm mark ii am unhappy. I went vertical the other day and at the very top of the verticle line as i put some down elevator in to bring it around it snaped on me. Caught me by surprise.
190 felt more solid and stable to me.
but that is just personal preference.
brake are definitely better with the xicoy but you have to be careful as it still will pull to one side.
11-26-2018, 10:43 AM
#729

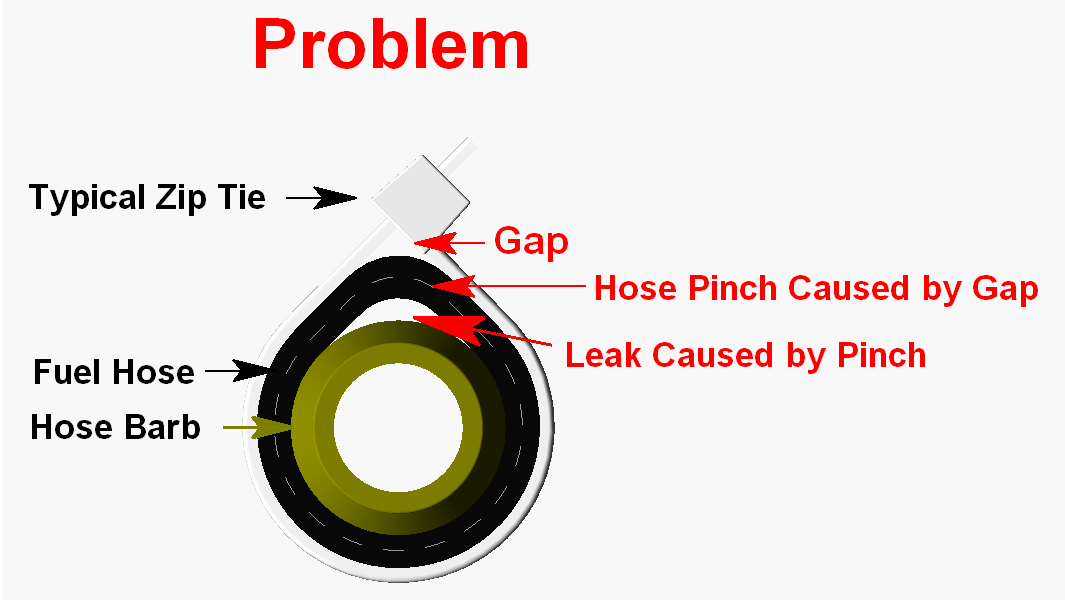
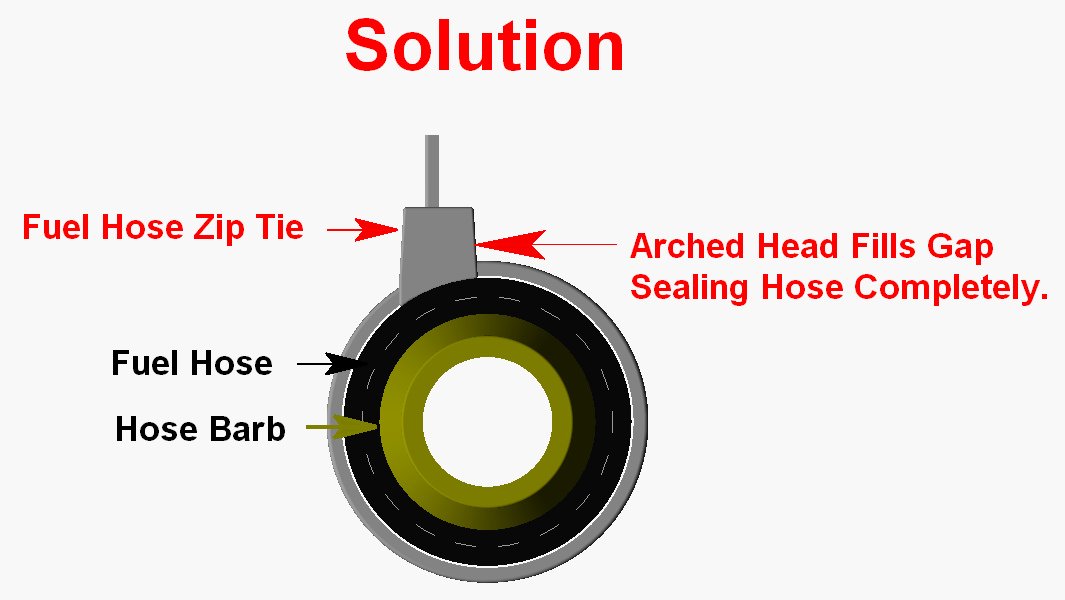
At work today and was complaining to a co-worker about how bad I am at attempting to safety wire my fuel line connections. He looked at me and asked why I�m not using �Fuel Line Zip Ties� and I said I didn�t know they existed! Sure enough he sent me a link and I ordered them. This seems to eliminate the concern using regular zip ties of the pinch point creating a potential air leak. Anyone see any issues using these?
https://www.fuelhoseziptie.com/

 11-26-2018, 12:59 PM
#731
I be definitely ordering some of those hose clamp ties!
I started the build on my latest T1 Mini this past weekend. I've noticed a couple of things I thought I would share: First, not many of the parts on these jets are interchangeable, even if the part itself fits, it's highly unlikely the paint lines will match. Of the three minis I ordered, none of the canopies or mid-hatches fit well except on the jet they came with, there is clearly a lot of hand craftsmanship going into these jets (that's a good thing ). The nose gear now comes with an extra strut connector pin assembly, which is a really nice if you ever bend your nose pin because it's pretty easy to change out. I noticed the aileron and flap hinging is much more stiff on this latest jet than the previous two, not sure if they changed up the manufacturing process or not. It's not a big deal, I just had to move it a few times to get it to loosen up. I also noticed that some of screws in the hardware pack used for mounting the servo brackets to the wing panel are cheaper metal, I broke one off just trying to mount it and believe me I did not apply that much torque, so be careful when mounting the servo brackets. The fuel tank seems a little lighter weight than the previous versions and the exhaust tube does not fit as snug in the rear wood bracket as the previous two versions, in fact it's pretty loose with about 1/8" play. Other than that everything is pretty much the same, I'm enjoying the build! I'm going with a Jeti system in this one, CBM200, 2x R3, DS-24, any advice from the Jeti experts is welcome!
Tom
I started the build on my latest T1 Mini this past weekend. I've noticed a couple of things I thought I would share: First, not many of the parts on these jets are interchangeable, even if the part itself fits, it's highly unlikely the paint lines will match. Of the three minis I ordered, none of the canopies or mid-hatches fit well except on the jet they came with, there is clearly a lot of hand craftsmanship going into these jets (that's a good thing
). The nose gear now comes with an extra strut connector pin assembly, which is a really nice if you ever bend your nose pin because it's pretty easy to change out. I noticed the aileron and flap hinging is much more stiff on this latest jet than the previous two, not sure if they changed up the manufacturing process or not. It's not a big deal, I just had to move it a few times to get it to loosen up. I also noticed that some of screws in the hardware pack used for mounting the servo brackets to the wing panel are cheaper metal, I broke one off just trying to mount it and believe me I did not apply that much torque, so be careful when mounting the servo brackets. The fuel tank seems a little lighter weight than the previous versions and the exhaust tube does not fit as snug in the rear wood bracket as the previous two versions, in fact it's pretty loose with about 1/8" play. Other than that everything is pretty much the same, I'm enjoying the build! I'm going with a Jeti system in this one, CBM200, 2x R3, DS-24, any advice from the Jeti experts is welcome!Tom
11-27-2018, 05:23 AM
#732

At work today and was complaining to a co-worker about how bad I am at attempting to safety wire my fuel line connections. He looked at me and asked why I�m not using �Fuel Line Zip Ties� and I said I didn�t know they existed! Sure enough he sent me a link and I ordered them. This seems to eliminate the concern using regular zip ties of the pinch point creating a potential air leak. Anyone see any issues using these?
https://www.fuelhoseziptie.com/
https://www.fuelhoseziptie.com/
 11-27-2018, 08:27 AM
#733
My Feedback: (1)
I be definitely ordering some of those hose clamp ties!
I started the build on my latest T1 Mini this past weekend. I've noticed a couple of things I thought I would share: First, not many of the parts on these jets are interchangeable, even if the part itself fits, it's highly unlikely the paint lines will match. Of the three minis I ordered, none of the canopies or mid-hatches fit well except on the jet they came with, there is clearly a lot of hand craftsmanship going into these jets (that's a good thing). The nose gear now comes with an extra strut connector pin assembly, which is a really nice if you ever bend your nose pin because it's pretty easy to change out. I noticed the aileron and flap hinging is much more stiff on this latest jet than the previous two, not sure if they changed up the manufacturing process or not. It's not a big deal, I just had to move it a few times to get it to loosen up. I also noticed that some of screws in the hardware pack used for mounting the servo brackets to the wing panel are cheaper metal, I broke one off just trying to mount it and believe me I did not apply that much torque, so be careful when mounting the servo brackets. The fuel tank seems a little lighter weight than the previous versions and the exhaust tube does not fit as snug in the rear wood bracket as the previous two versions, in fact it's pretty loose with about 1/8" play. Other than that everything is pretty much the same, I'm enjoying the build! I'm going with a Jeti system in this one, CBM200, 2x R3, DS-24, any advice from the Jeti experts is welcome!
Tom
I started the build on my latest T1 Mini this past weekend. I've noticed a couple of things I thought I would share: First, not many of the parts on these jets are interchangeable, even if the part itself fits, it's highly unlikely the paint lines will match. Of the three minis I ordered, none of the canopies or mid-hatches fit well except on the jet they came with, there is clearly a lot of hand craftsmanship going into these jets (that's a good thing
). The nose gear now comes with an extra strut connector pin assembly, which is a really nice if you ever bend your nose pin because it's pretty easy to change out. I noticed the aileron and flap hinging is much more stiff on this latest jet than the previous two, not sure if they changed up the manufacturing process or not. It's not a big deal, I just had to move it a few times to get it to loosen up. I also noticed that some of screws in the hardware pack used for mounting the servo brackets to the wing panel are cheaper metal, I broke one off just trying to mount it and believe me I did not apply that much torque, so be careful when mounting the servo brackets. The fuel tank seems a little lighter weight than the previous versions and the exhaust tube does not fit as snug in the rear wood bracket as the previous two versions, in fact it's pretty loose with about 1/8" play. Other than that everything is pretty much the same, I'm enjoying the build! I'm going with a Jeti system in this one, CBM200, 2x R3, DS-24, any advice from the Jeti experts is welcome!Tom
stan
11-27-2018, 09:15 AM
#734
11-27-2018, 10:15 AM
#735

My Feedback: (3)
I be definitely ordering some of those hose clamp ties!
I started the build on my latest T1 Mini this past weekend. I've noticed a couple of things I thought I would share: First, not many of the parts on these jets are interchangeable, even if the part itself fits, it's highly unlikely the paint lines will match. Of the three minis I ordered, none of the canopies or mid-hatches fit well except on the jet they came with, there is clearly a lot of hand craftsmanship going into these jets (that's a good thing). The nose gear now comes with an extra strut connector pin assembly, which is a really nice if you ever bend your nose pin because it's pretty easy to change out. I noticed the aileron and flap hinging is much more stiff on this latest jet than the previous two, not sure if they changed up the manufacturing process or not. It's not a big deal, I just had to move it a few times to get it to loosen up. I also noticed that some of screws in the hardware pack used for mounting the servo brackets to the wing panel are cheaper metal, I broke one off just trying to mount it and believe me I did not apply that much torque, so be careful when mounting the servo brackets. The fuel tank seems a little lighter weight than the previous versions and the exhaust tube does not fit as snug in the rear wood bracket as the previous two versions, in fact it's pretty loose with about 1/8" play. Other than that everything is pretty much the same, I'm enjoying the build! I'm going with a Jeti system in this one, CBM200, 2x R3, DS-24, any advice from the Jeti experts is welcome!
Tom
I started the build on my latest T1 Mini this past weekend. I've noticed a couple of things I thought I would share: First, not many of the parts on these jets are interchangeable, even if the part itself fits, it's highly unlikely the paint lines will match. Of the three minis I ordered, none of the canopies or mid-hatches fit well except on the jet they came with, there is clearly a lot of hand craftsmanship going into these jets (that's a good thing
). The nose gear now comes with an extra strut connector pin assembly, which is a really nice if you ever bend your nose pin because it's pretty easy to change out. I noticed the aileron and flap hinging is much more stiff on this latest jet than the previous two, not sure if they changed up the manufacturing process or not. It's not a big deal, I just had to move it a few times to get it to loosen up. I also noticed that some of screws in the hardware pack used for mounting the servo brackets to the wing panel are cheaper metal, I broke one off just trying to mount it and believe me I did not apply that much torque, so be careful when mounting the servo brackets. The fuel tank seems a little lighter weight than the previous versions and the exhaust tube does not fit as snug in the rear wood bracket as the previous two versions, in fact it's pretty loose with about 1/8" play. Other than that everything is pretty much the same, I'm enjoying the build! I'm going with a Jeti system in this one, CBM200, 2x R3, DS-24, any advice from the Jeti experts is welcome!Tom
Tim
11-27-2018, 02:34 PM
#736
I agree, space is limited. How are folks routing the jeti antennas inside the fuselag of the mini? I've been running Spektrum so I have not had to deal with long antenna wires. I know they need to be 90 degrees but there does not seem to be enough room for that...
11-27-2018, 02:36 PM
#737
11-27-2018, 02:51 PM
#738
My Feedback: (1)
i have been flying jeti now for almost 6 years. Great equipment. You will love it.
stan
11-27-2018, 03:19 PM
#739
I be definitely ordering some of those hose clamp ties!
I started the build on my latest T1 Mini this past weekend. I've noticed a couple of things I thought I would share: First, not many of the parts on these jets are interchangeable, even if the part itself fits, it's highly unlikely the paint lines will match. Of the three minis I ordered, none of the canopies or mid-hatches fit well except on the jet they came with, there is clearly a lot of hand craftsmanship going into these jets (that's a good thing). The nose gear now comes with an extra strut connector pin assembly, which is a really nice if you ever bend your nose pin because it's pretty easy to change out. I noticed the aileron and flap hinging is much more stiff on this latest jet than the previous two, not sure if they changed up the manufacturing process or not. It's not a big deal, I just had to move it a few times to get it to loosen up. I also noticed that some of screws in the hardware pack used for mounting the servo brackets to the wing panel are cheaper metal, I broke one off just trying to mount it and believe me I did not apply that much torque, so be careful when mounting the servo brackets. The fuel tank seems a little lighter weight than the previous versions and the exhaust tube does not fit as snug in the rear wood bracket as the previous two versions, in fact it's pretty loose with about 1/8" play. Other than that everything is pretty much the same, I'm enjoying the build! I'm going with a Jeti system in this one, CBM200, 2x R3, DS-24, any advice from the Jeti experts is welcome!
Tom
I started the build on my latest T1 Mini this past weekend. I've noticed a couple of things I thought I would share: First, not many of the parts on these jets are interchangeable, even if the part itself fits, it's highly unlikely the paint lines will match. Of the three minis I ordered, none of the canopies or mid-hatches fit well except on the jet they came with, there is clearly a lot of hand craftsmanship going into these jets (that's a good thing
). The nose gear now comes with an extra strut connector pin assembly, which is a really nice if you ever bend your nose pin because it's pretty easy to change out. I noticed the aileron and flap hinging is much more stiff on this latest jet than the previous two, not sure if they changed up the manufacturing process or not. It's not a big deal, I just had to move it a few times to get it to loosen up. I also noticed that some of screws in the hardware pack used for mounting the servo brackets to the wing panel are cheaper metal, I broke one off just trying to mount it and believe me I did not apply that much torque, so be careful when mounting the servo brackets. The fuel tank seems a little lighter weight than the previous versions and the exhaust tube does not fit as snug in the rear wood bracket as the previous two versions, in fact it's pretty loose with about 1/8" play. Other than that everything is pretty much the same, I'm enjoying the build! I'm going with a Jeti system in this one, CBM200, 2x R3, DS-24, any advice from the Jeti experts is welcome!Tom
I also run Jeti, I’m putting in a REX12A receiver, then I have one R3/RSW as a satellite and one as a remote switch to turn the plane off and on remotely. I’m also running a DSM 10 for battery rudundancy. I switched to Jeti this year and was a LONG time JR user, their equipment is top notch and the only limitations really are your imagination. A CB200 would be massive overkill for this size plane IMO.
11-27-2018, 03:58 PM
#741
Thanks for posting your findings. I replaced almost all of the hardware that came with the plane but mostly because I just HATE phillips screws. Interesting that you say the flaps and ailerons are stiff... my flaps are REALLY stiff but I was afraid to bend them too far to try to free them up. I�ll work them a little and see if they improve, the servos really buzz a lot when they are full down.
I also run Jeti, I�m putting in a REX12A receiver, then I have one R3/RSW as a satellite and one as a remote switch to turn the plane off and on remotely. I�m also running a DSM 10 for battery rudundancy. I switched to Jeti this year and was a LONG time JR user, their equipment is top notch and the only limitations really are your imagination. A CB200 would be massive overkill for this size plane IMO.
11-27-2018, 05:43 PM
#742

Guys, easy fix on the flaps.
This is normally due to the clear coat thickness after paint. Simply sand the side areas removing just the paint that slides into the flap hinge and its free.
This is normally due to the clear coat thickness after paint. Simply sand the side areas removing just the paint that slides into the flap hinge and its free.
Last edited by Digital Pilot; 11-27-2018 at 05:46 PM.
11-28-2018, 04:22 AM
#744
 There is not a single Philips in my Mini. I replaced everything with hex screws.
Stiff flaps....
11-28-2018, 07:07 PM
#747
My Feedback: (1)
Has anyone ever tried to put a lite coat of vaseline in our electric brakes to prevent them from grabbing and locking.
i am runing out of ideas short of buying the xicoy controller with a gyro. One brake always grabs harder and i wind up with embarrassing stops that want to swerve.
It is taking the fun away from flying this airplane for me.
stan
i am runing out of ideas short of buying the xicoy controller with a gyro. One brake always grabs harder and i wind up with embarrassing stops that want to swerve.
It is taking the fun away from flying this airplane for me.
stan
11-28-2018, 09:38 PM
#748
Has anyone ever tried to put a lite coat of vaseline in our electric brakes to prevent them from grabbing and locking.
i am runing out of ideas short of buying the xicoy controller with a gyro. One brake always grabs harder and i wind up with embarrassing stops that want to swerve.
It is taking the fun away from flying this airplane for me.
stan
i am runing out of ideas short of buying the xicoy controller with a gyro. One brake always grabs harder and i wind up with embarrassing stops that want to swerve.
It is taking the fun away from flying this airplane for me.
stan
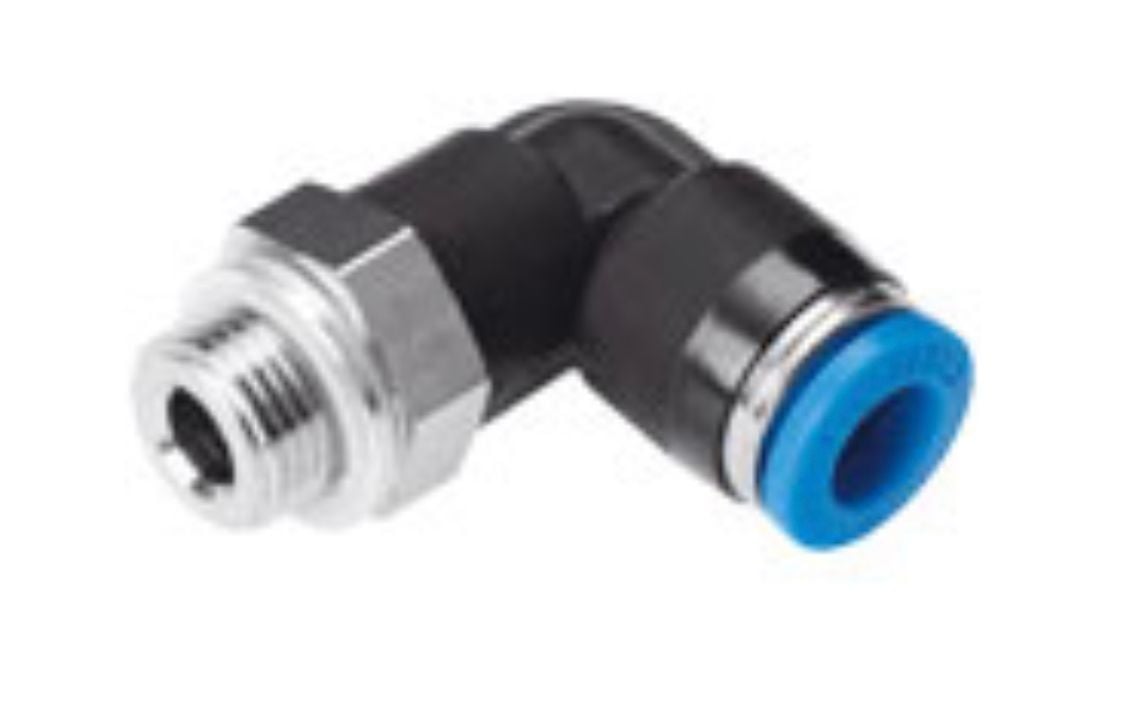
I have another question, when using festo fittings that are threaded on one side, do I just use the little gasket that came with them on the threaded side? I don�t have to Hysol them do I?
Last edited by camss69; 11-29-2018 at 05:23 AM.