


New Sport Jet: T-One Models Mini Fortune / Mini T1
 09-29-2018, 02:35 AM
#576


 09-29-2018, 02:52 AM
#577
Hot off of the press! I just finished the official build guide for the T-1 Mini. Dirk says it is plenty applicable to the T-1 and T-3 as well. Please enjoy...I hope it helps with your builds! Due to the 5MB limit of attachments here, a reduced quality PDF was needed to stay under that limit. I will host the original PDF on my web site until PRCJ gets it up on their site.
Attached PDF 4.0MB
Original PDF 5.7MB - http://t3chdad.com/downloads/T-1 Mini Instructions.pdf

Attached PDF 4.0MB
Original PDF 5.7MB - http://t3chdad.com/downloads/T-1 Mini Instructions.pdf
09-29-2018, 02:28 PM
#579

Is there something better to use for spacing the servos other than the supplied plywood spacers and stacking washers? The plywood spacers are compressing on me.
Looking at peoples builds, some are putting the ball link on the surface side and some on the servo side, does it matter? I was going ball link on the servo side and clevis on the surface side.
Looking at peoples builds, some are putting the ball link on the surface side and some on the servo side, does it matter? I was going ball link on the servo side and clevis on the surface side.
 09-30-2018, 04:47 AM
#581
Is there something better to use for spacing the servos other than the supplied plywood spacers and stacking washers? The plywood spacers are compressing on me.
Looking at peoples builds, some are putting the ball link on the surface side and some on the servo side, does it matter? I was going ball link on the servo side and clevis on the surface side.
Looking at peoples builds, some are putting the ball link on the surface side and some on the servo side, does it matter? I was going ball link on the servo side and clevis on the surface side.
10-01-2018, 12:08 PM
#583
10-01-2018, 12:11 PM
#584
Is there something better to use for spacing the servos other than the supplied plywood spacers and stacking washers? The plywood spacers are compressing on me.
Looking at peoples builds, some are putting the ball link on the surface side and some on the servo side, does it matter? I was going ball link on the servo side and clevis on the surface side.
Looking at peoples builds, some are putting the ball link on the surface side and some on the servo side, does it matter? I was going ball link on the servo side and clevis on the surface side.
10-01-2018, 03:50 PM
#586

My Feedback: (4)
Join Date: Aug 2004
Location: Orefield, PA
Posts: 20
Likes: 0
Received 0 Likes
on
0 Posts
Is there something better to use for spacing the servos other than the supplied plywood spacers and stacking washers? The plywood spacers are compressing on me.
A tip from one of buddies that built one of the first T1s. Soak the wooden spacers in CA. Let them set to cure. The spacers will harden up real nice.
Dean
A tip from one of buddies that built one of the first T1s. Soak the wooden spacers in CA. Let them set to cure. The spacers will harden up real nice.
Dean
10-01-2018, 05:44 PM
#587
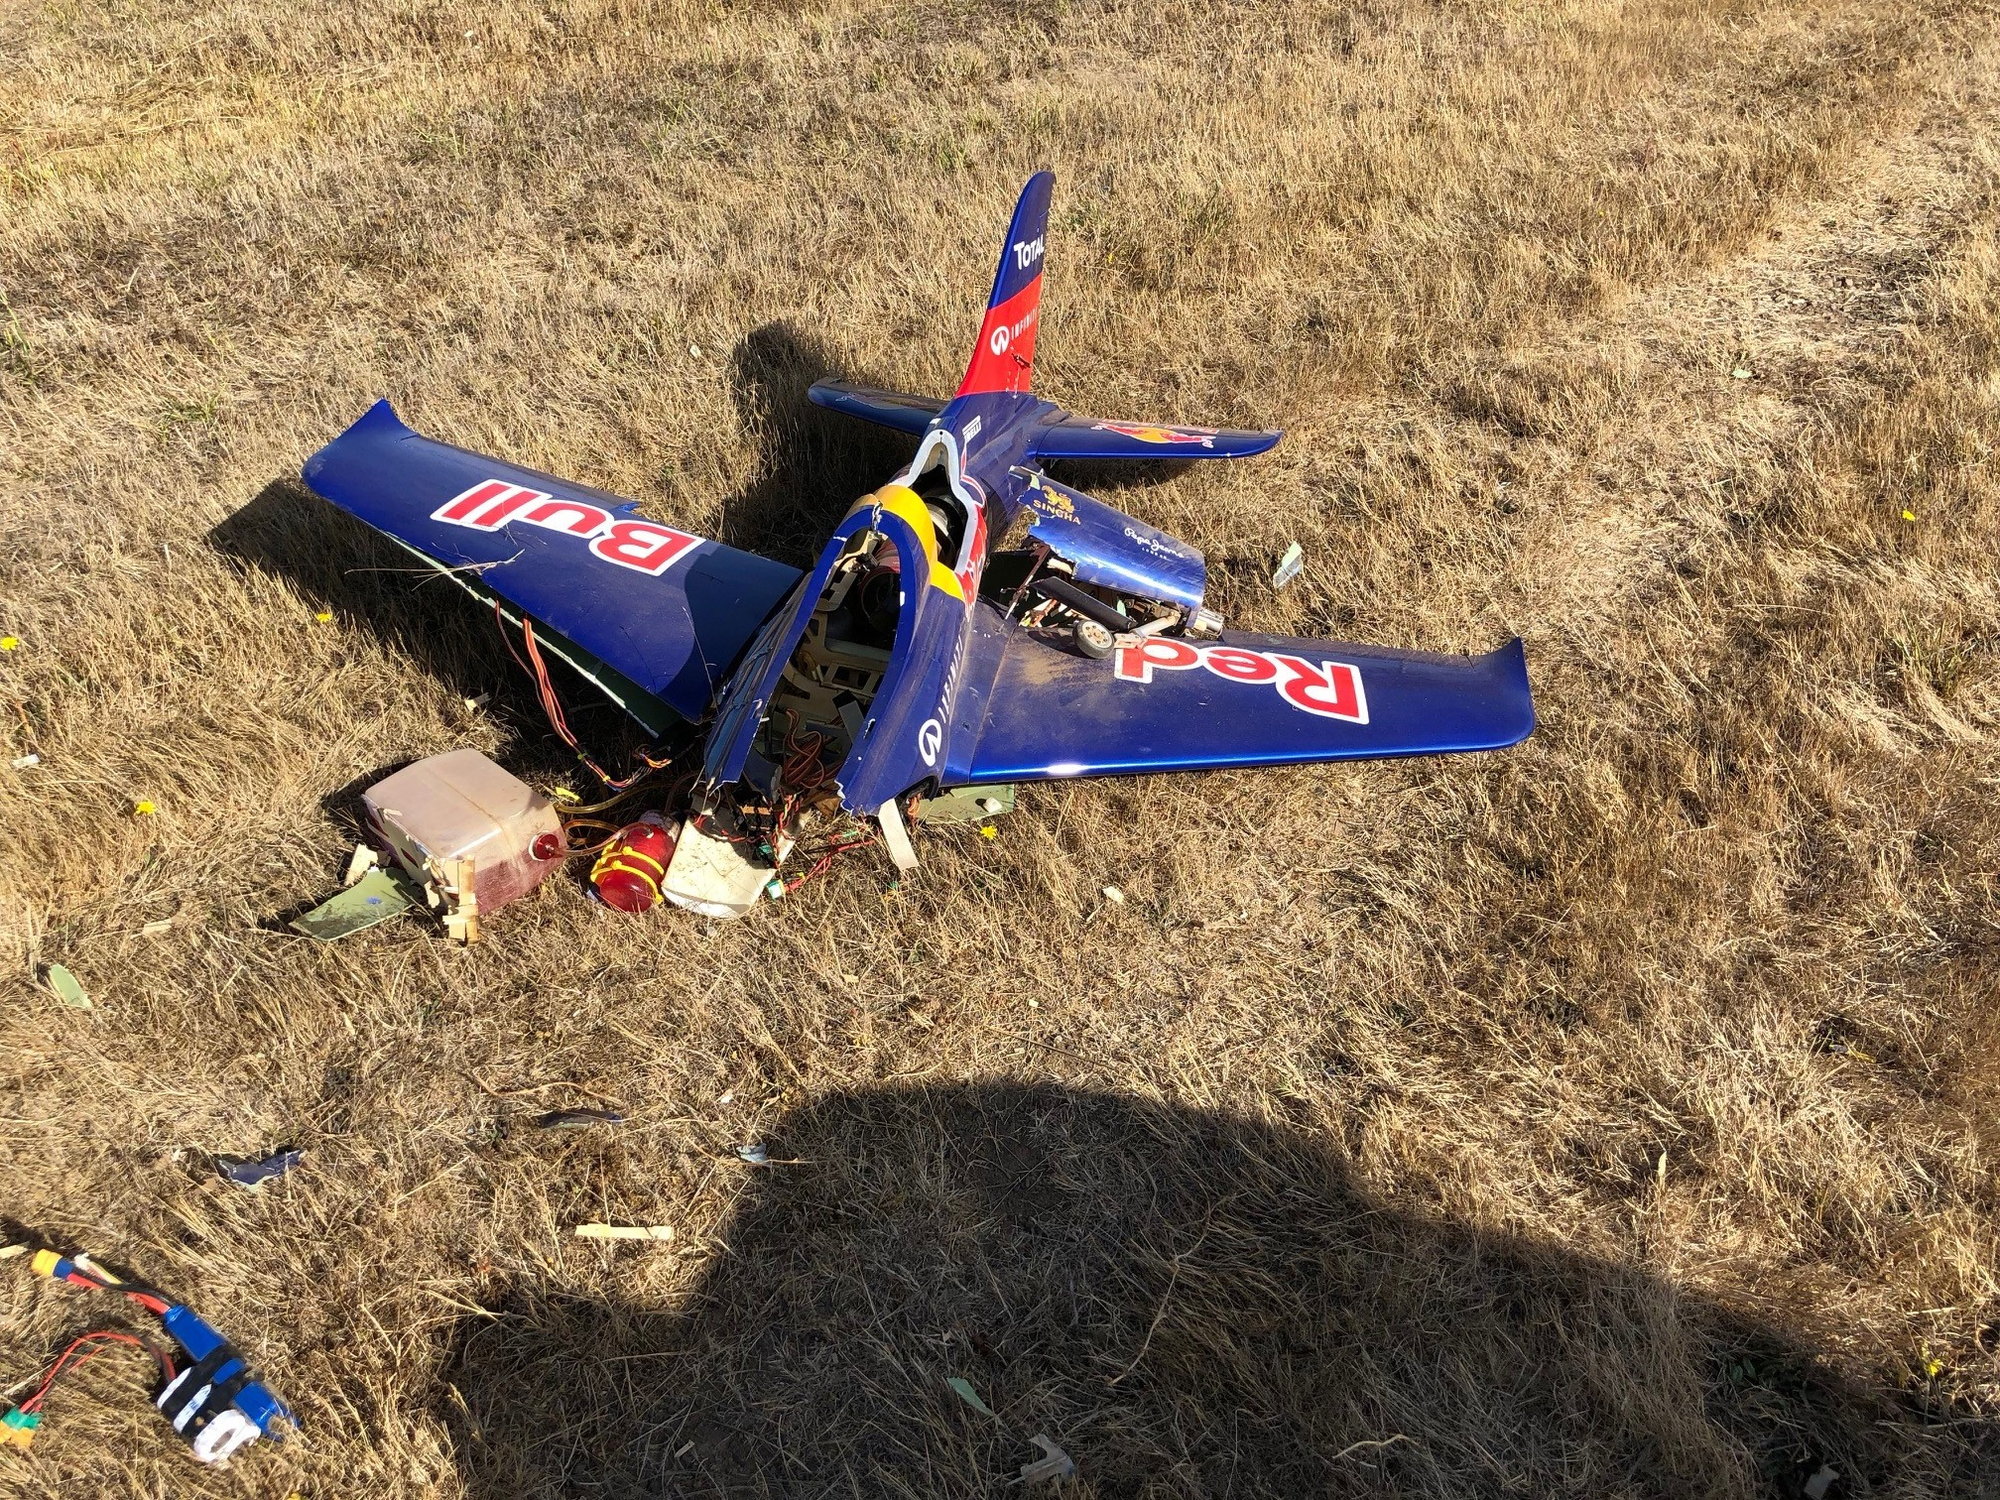
Had a bad day this past weekend and lost one of my T-1 minis, fortunately I still have my other T-1 Mini and regular T-1 to fly while I morn the loss of this baby. I've been flying turbines for just under seven years (~1000 flights) and this is my first loss, so I suppose it was bound to happen at some point. Initially I suspected some kind of flight control malfunction (servo, radio, gyro) but after watching the video (frame by frame) I'm convinced this accident was the result of a good ol' fashion stall. This was flight number 27 for this airframe but my first time shooting an approach from the north (rather than the south) with this particular jet. Because the approach from the north is much shorter than the approach from the south I rolled off the throttle about mid-way through the base leg with flaps full down, when I rolled out onto final I did not have the aircraft in a nose slightly low attitude to maintain airspeed, shortly after rolling out on final the right wing dipped very rapidly and the aircraft changed direction 90 deg to the right. I immediately went to full throttle in an effort to recover but the aircraft went behind some trees and I lost visual contact. At that point I cut the throttle and started the walk of shame. I was very pleasantly surprised to find the aircraft in the above condition, I expected much worse. Based on impact it looks like I was able to mostly level the aircraft before it hit the ground. The airframe is obviously a total loss, but all of the electronics are unharmed. The retracts are fine except for a bent pin on the nose gear. I will send the turbine back to Dirk for a complete inspection but the turbine does not even have a scratch on it.
My take-away from this event is: be very mindful of your nose attitude when you have the flaps all the way down and the throttle at idle, these jets will bleed energy very rapidly, and they will stall with no warning.
So now the big question is, order another T-1 mini or the new F-16?
10-02-2018, 12:03 PM
#588
Is there something better to use for spacing the servos other than the supplied plywood spacers and stacking washers? The plywood spacers are compressing on me.
A tip from one of buddies that built one of the first T1s. Soak the wooden spacers in CA. Let them set to cure. The spacers will harden up real nice.
Dean
A tip from one of buddies that built one of the first T1s. Soak the wooden spacers in CA. Let them set to cure. The spacers will harden up real nice.
Dean
Another question, when setting throws are you setting them at the widest part of the surface?
So I’d be setting throws of 20mm up and down for aileron at the widest point of the aileron, at the end closest to the fuse?
10-02-2018, 02:19 PM
#589
To be honest, this is the first aircraft in hundreds that I measured throws.  I measured each control surface to the corner of the adjacent fixed part of the flying surface. I used calipers set at the recommended distance and adjusted throws in the radio based on the calipers. I deviated from the manufacturer-recommended throws when it came to rudder. On rudder, I set the maximum throw that could be achieved mechanically without binding.
I hope that makes sense.
I measured each control surface to the corner of the adjacent fixed part of the flying surface. I used calipers set at the recommended distance and adjusted throws in the radio based on the calipers. I deviated from the manufacturer-recommended throws when it came to rudder. On rudder, I set the maximum throw that could be achieved mechanically without binding.I hope that makes sense.
Last edited by T3chDad; 10-02-2018 at 02:25 PM.
10-04-2018, 02:17 PM
#590
 10-08-2018, 03:54 AM
#592
Dry: 17lbs 5oz (7.85Kg)
Wet: 20lbs 14oz (9.5Kg)
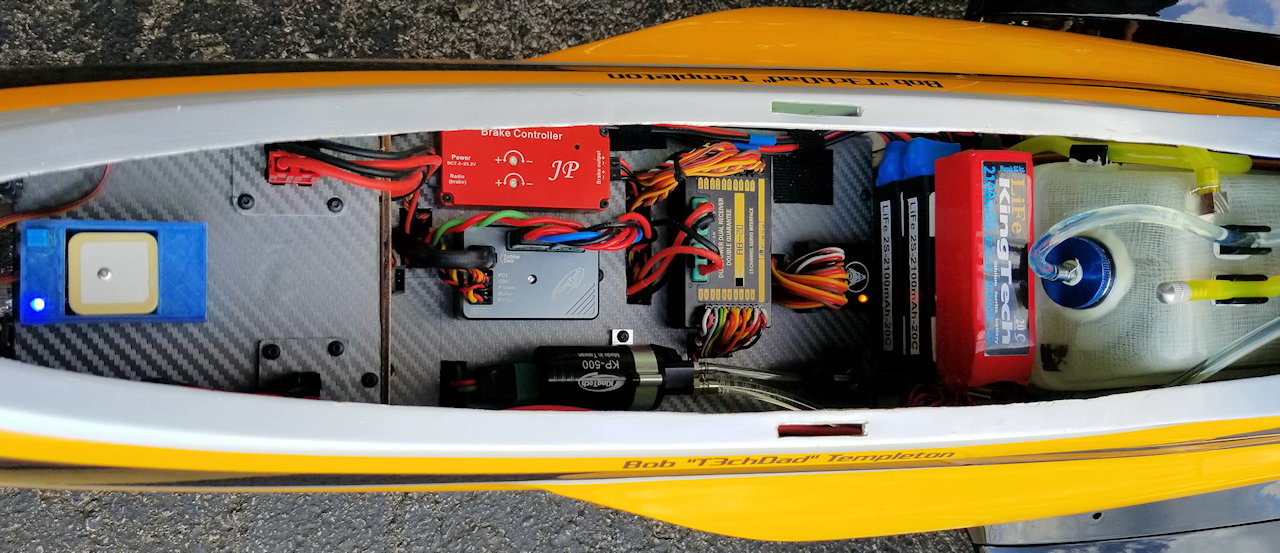
I think I've finalized my internal arrangements for CG. My CG is currently at 205mm. I've replaced all MPX connectors except going into the redundancy box with Anderson Power Poles. I'm much happier now, because I wound up hating MPX with a passion.

 10-15-2018, 08:34 AM
#593
My Feedback: (1)
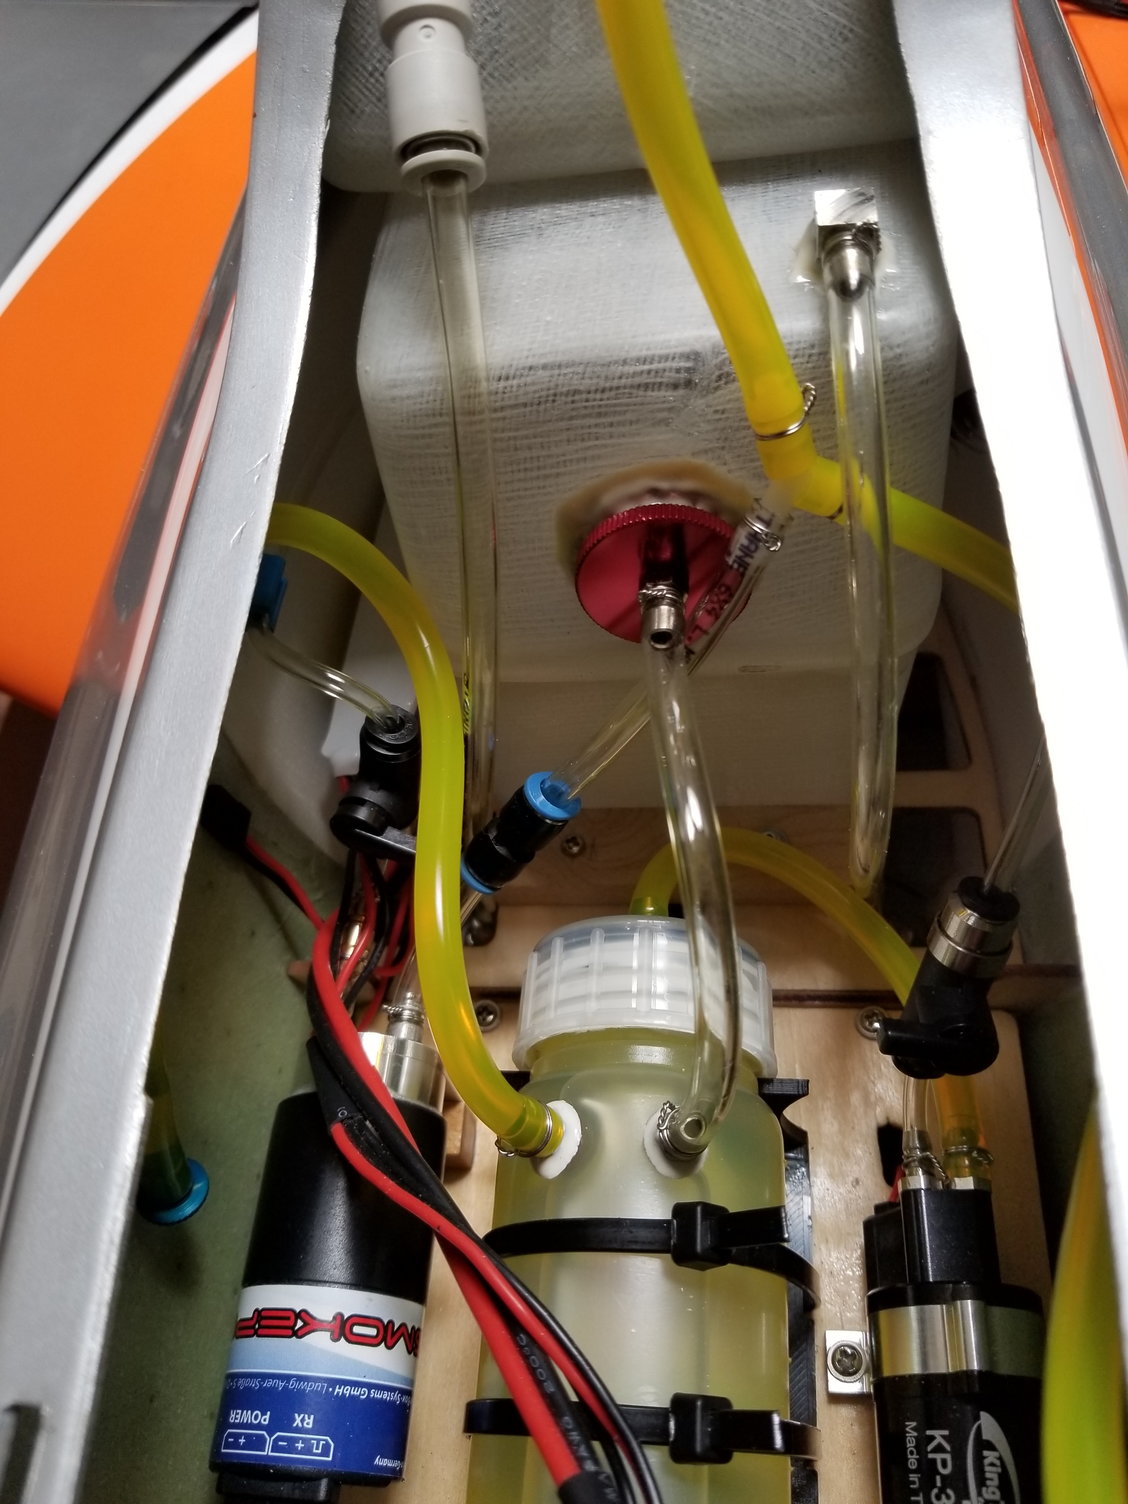
Here is a photo of the web in front of the tanks.
Because i have put a smoke system in my mini i am having a difficult time on where to place the batteries in order to reach the 200 mm balance point.
the ecu battery is going on top of the wing tube.
that leaves really no room as to where to place the two radio batteries.
because of all the fuel and vent lines infront of both fuel tanks i cannot put those batteries in front of the tanks.
any suggestions including a picture would be very helpful.
Stan
Last edited by tucson; 10-15-2018 at 08:42 AM. Reason: Picture
10-15-2018, 09:42 AM
#594

Here is a photo of the web in front of the tanks.
Because i have put a smoke system in my mini i am having a difficult time on where to place the batteries in order to reach the 200 mm balance point.
the ecu battery is going on top of the wing tube.
that leaves really no room as to where to place the two radio batteries.
because of all the fuel and vent lines infront of both fuel tanks i cannot put those batteries in front of the tanks.
any suggestions including a picture would be very helpful.
Stan
10-15-2018, 03:55 PM
#600