


X-treme/Skymaster A-10 1/7.5 Build
 11-20-2017, 06:21 AM
#26

Rav, Good to see a build thread that I know will get carried out! I have the 1/6ths, this will be good motivation :-). Wouldn't the K70 be perfect for this plane? I've been running two K45's for a few years, just got two K70's. Crazy that the same can size produces that much more power!
 11-20-2017, 09:29 AM
#27

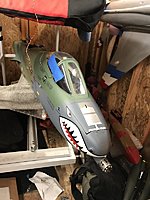
Hi from Mexico, I found this thread searching for a A10 Build thread, I receive mine two weeks ago, Its fantastic, I love it, I choosed for my A10 the Peanut Camo Sheme, I plan to build it with a pair of Jet Central Bee turbines, I had one and found another cheap, I know weight and balance is going to be a problem with this turbines but thats what I have, theres's a few helpfull threads to start the build, and I hope that in this thread find some tips too.
I have one question, how do you secure the Canopy in this plane?, I see that it have a guide/tube on the interior.
I'm going to start the build as soon as I have all the parts necesary to start.
I'm going to suscribe to this thread to see the progress.
Thanks
Sergio
I have one question, how do you secure the Canopy in this plane?, I see that it have a guide/tube on the interior.
I'm going to start the build as soon as I have all the parts necesary to start.
I'm going to suscribe to this thread to see the progress.
Thanks
Sergio
Welcome and feel free to post what ever you want man!
Rav, Good to see a build thread that I know will get carried out! I have the 1/6ths, this will be good motivation :-). Wouldn't the K70 be perfect for this plane? I've been running two K45's for a few years, just got two K70's. Crazy that the same can size produces that much more power!
I'm going to go with the K85 G2's. Apparently, they are the size of the K60's.
More work done over the weekend.
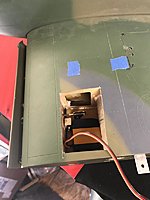
I wasn't crazy with how other people were mounting their elevator servo's, i.e. making some sort of plate and then sliding it in. I marked how much of the opening is actually covered by the fuselage and then cut the opening bigger and just installed the servos. I saved some weight by doing this too.
Frankly, I just don't trust the hidden linkages on a JESUS surface like the elevators, so out they came. I might even take a play from Maj. Woody's play book and have homedepot make me some matching paint to paint over the linkages.
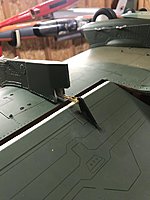
I had some carbon fiber airpower control horns around that I liked better than the fiberglass horns that came with the kit and I used them for both the elevators and the rudders.
11-27-2017, 11:16 AM
#29
I started on the main wheels.
The ultra bandit wheels are 4 inch. Not quite 4.5 inch, but the BVM struts are beefier. It will look much more scale now.
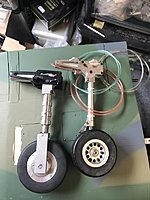
The BV gear have the mounting points higher up, while the skymaster units have the mounting points that sit flush with the wing, so I had to make some custom mounts.
I wanted to beef up the main gear area anyways.
The ultra bandit wheels are 4 inch. Not quite 4.5 inch, but the BVM struts are beefier. It will look much more scale now.
The BV gear have the mounting points higher up, while the skymaster units have the mounting points that sit flush with the wing, so I had to make some custom mounts.
I wanted to beef up the main gear area anyways.
12-01-2017, 11:45 AM
#35
I had some of the blue tape, take off a piece of the some of the written decals, so I am more careful when I place blue tap around the decals. Blue tape has not taken off the regular paint for me though.
I bought matching paint from home depot to help hide the linkages, but it will be useful for any touch ups!
12-01-2017, 04:34 PM
#36

Rav. It might be just the camera angle, but it looks like the clevis pin hole in the horns is behind the hinge line in a couple of the pictures? Is this just an illusion, or did you do it for a reason?
Scott
Scott
12-04-2017, 08:54 PM
#37
12-12-2017, 10:33 AM
#38

Join Date: Jan 2005
Location: COLIMAColima, MEXICO
Posts: 66
Likes: 0
Received 0 Likes
on
0 Posts
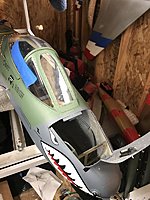
rcmigpilot,
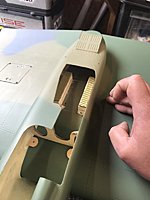
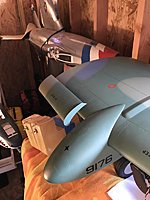
Here in these pics, you can see where the dowels are. I can even see some through the servo hatches. I can get you some measurements if you need some.
Attachment 2244923
Attachment 2244924
Here in these pics, you can see where the dowels are. I can even see some through the servo hatches. I can get you some measurements if you need some.
Attachment 2244923
Attachment 2244924
Thanks
Sergio
Last edited by sergio turbo; 12-12-2017 at 10:41 AM.
12-18-2017, 03:27 PM
#41
- 2248046[/attach]')]IMG_1233.JPG
- Great idea on touch up paint from Home Depot! $8 for 3 colors computer matched!
Sergio, I haven't forgot. I took some pics and I'll post them shortly.
12-18-2017, 09:26 PM
#43
BV's gear had two screws that were in perfect position for gear door mounts on the mains!
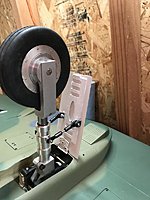
I was able to get some pics with the a-10 on it's legs!
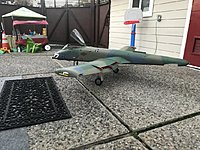
And for the coolest mod......(so far)..... Functional leading edge slats!!!
In....

Out...
I used two inter-threading sliding carbon fiber tubes. It made for a VERY stout and robust mechanism.
I was able to get some pics with the a-10 on it's legs!
And for the coolest mod......(so far)..... Functional leading edge slats!!!
In....
Out...
I used two inter-threading sliding carbon fiber tubes. It made for a VERY stout and robust mechanism.
12-19-2017, 12:29 PM
#44
Join Date: Jan 2005
Location: COLIMAColima, MEXICO
Posts: 66
Likes: 0
Received 0 Likes
on
0 Posts
Sergio,
Here is a pic with blue tape on all the dowels. The only one that did not have a dowel (that I could find) was the distal aileron pylon, the rear most screw. The front pylon screw had a clear dowel.
Attachment 2248086
Here is a pic with blue tape on all the dowels. The only one that did not have a dowel (that I could find) was the distal aileron pylon, the rear most screw. The front pylon screw had a clear dowel.
Attachment 2248086
12-23-2017, 08:39 PM
#47
Nice solution Sergio!
I'm surprised no one commented on the functional leading edge slats I installed!
Anyways, on to more building.
The outer pylon fits over the aileron linkage, this is a nice touch Anton!
I decided that since I want to keep as much weight up front as possible to offset the engine weight, a front hatch for air and fuel is what I'm opting for.
12-23-2017, 09:26 PM
#48
My Feedback: (26)
Nice solution Sergio!
I'm surprised no one commented on the functional leading edge slats I installed!
Anyways, on to more building.
The outer pylon fits over the aileron linkage, this is a nice touch Anton!
Attachment 2248542
I decided that since I want to keep as much weight up front as possible to offset the engine weight, a front hatch for air and fuel is what I'm opting for.
Attachment 2248543
Attachment 2248544
01-09-2018, 09:54 AM
#50

My Feedback: (4)
Okay! I gotta comment on the leading edge slats! Great addition! I will be starting build this week and LE slats and main gear doors area must for me! I will be adding Details 4 scale lights and ordnance. Be using Dreamworks elec retracts with SM stock struts & BVM wheel/brake upgrade. Powering with 2- K70. Cortex gyro MKS servos.
Keep info coming Ravill!
Thanks!
Rob
Keep info coming Ravill!
Thanks!
Rob