


CARF Ultra Flash Evo build thread +
 07-03-2023, 01:24 PM
#676

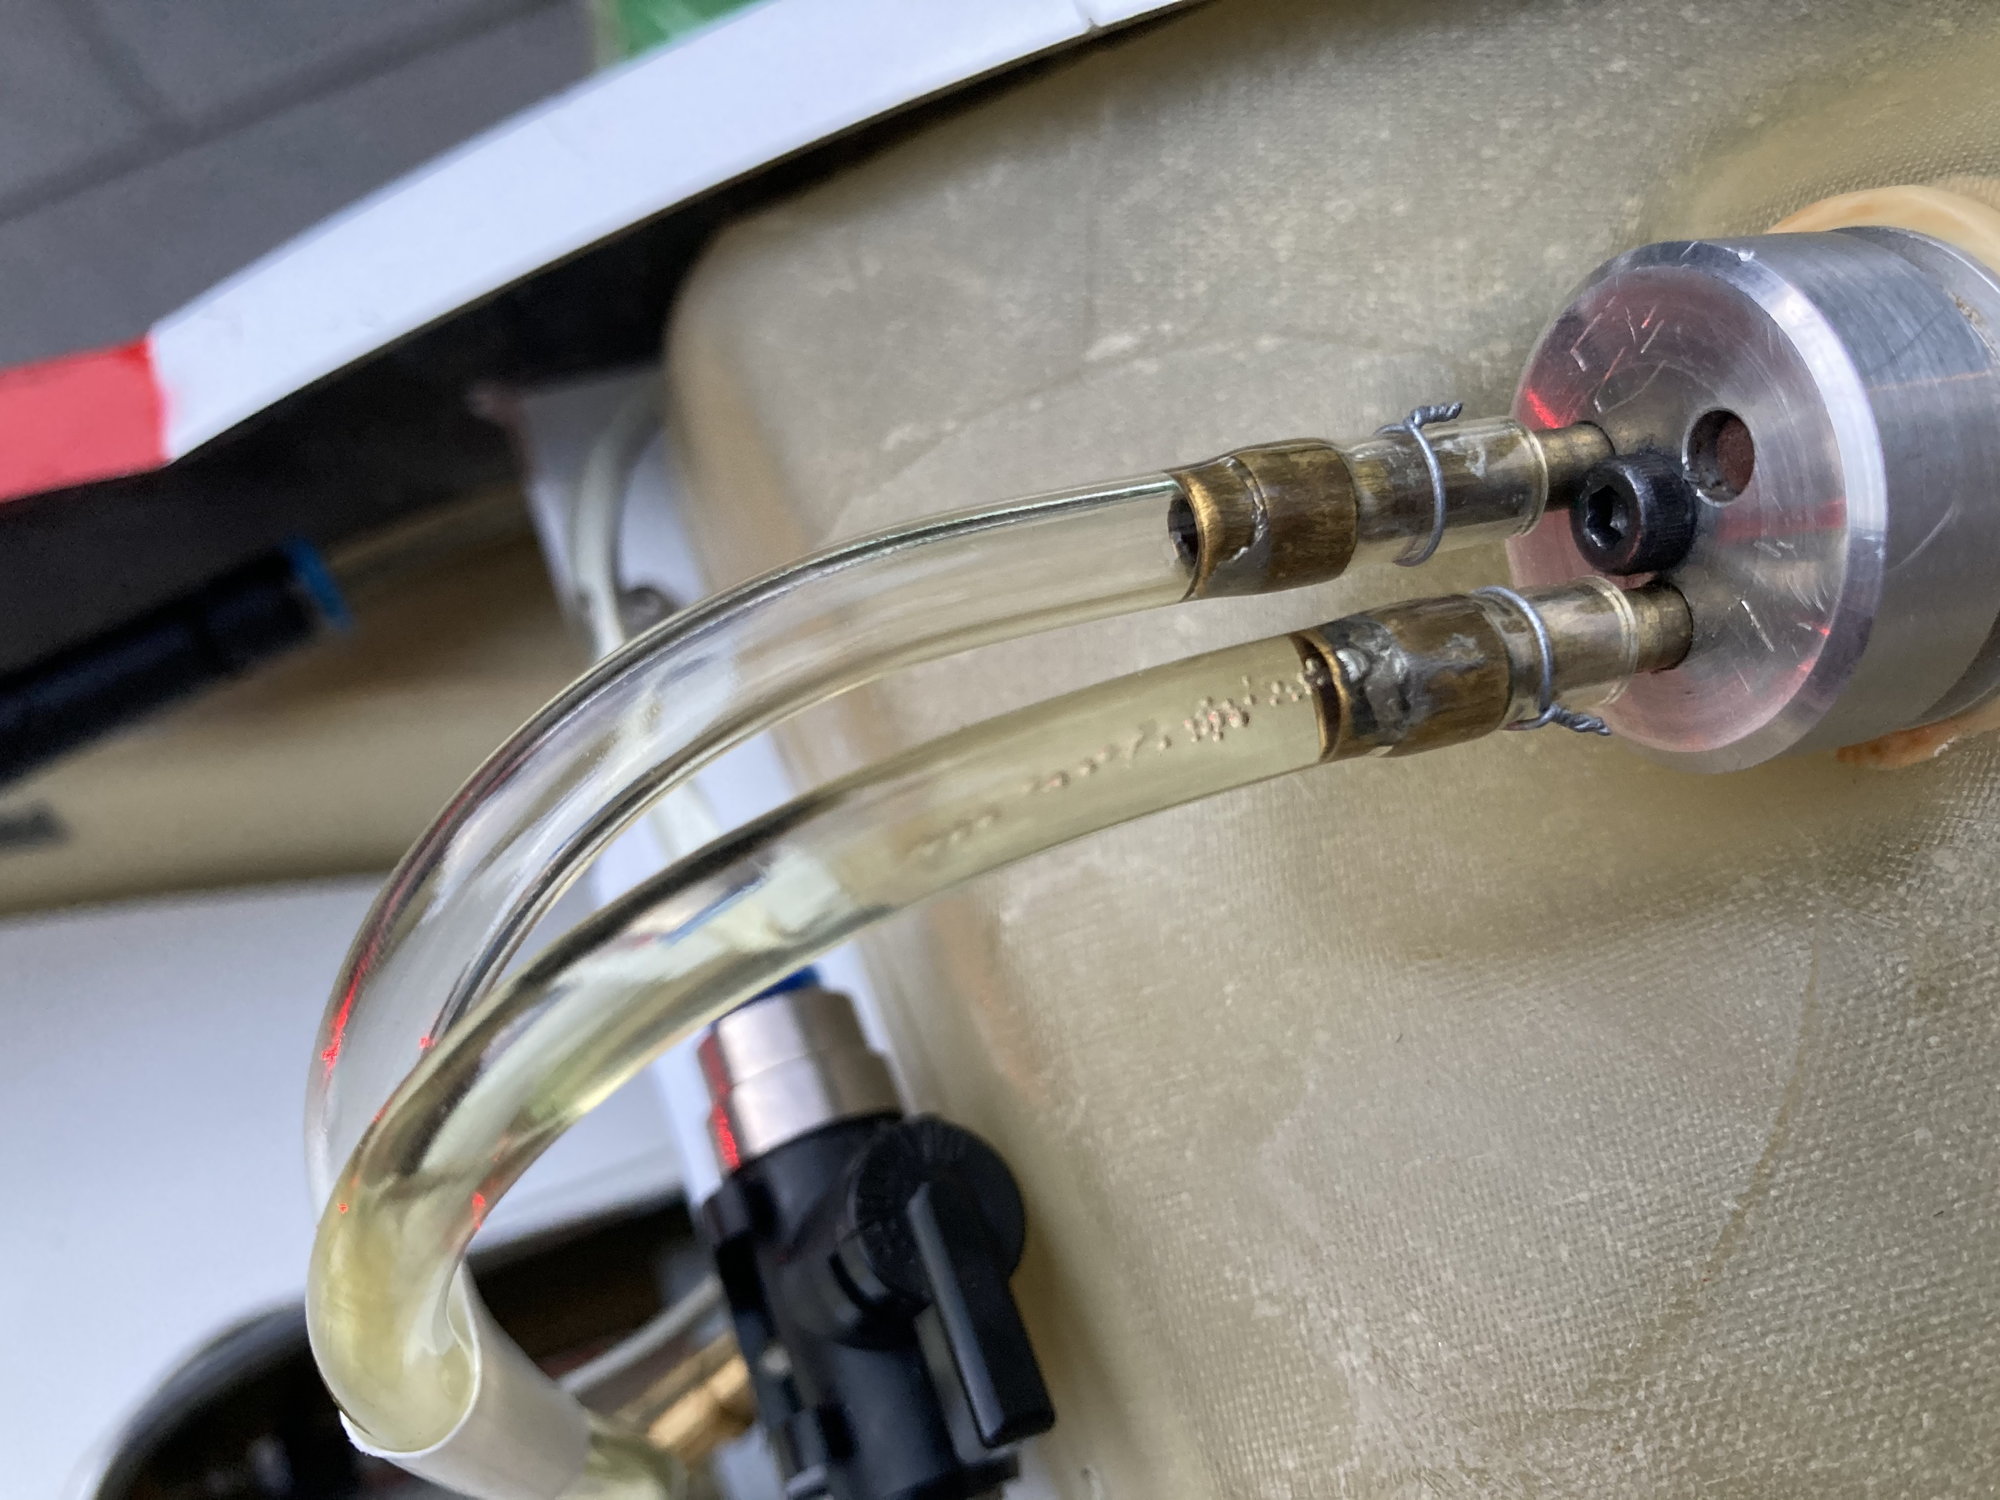
The bubbles are in the connection between Fuse-tank and hopper and occur consistently, regardless of throttle position. Causing 10-15ml additional air in the Hopper after 6 min of runtime on ground test.
I’m using the 10 years old standard 4mm brass tube through the rubber part of main tank outlet and also in between the two new tygon tube parts. At the end of the tygon I have a 15mm wide and quite long felt clunk installed.
Turbine is a P140RX and a CAT 130 V2 Hopper (no issues with bubbles from Hopper to Fuel Pump).
As I want to get rid of the little bubbles would you:
- ditch the brass tube and use a continuous Tygon tube?
- or ditch the Felt clunk and swap it to a simple clunk without felt
- or both?
- or exchange the complete Tank outlet rubber thing (is there any parts without mods)?
I‘d like to keep the ducts, so the Evo Tank wouldn’t fit
Thanks for your hints.
 07-03-2023, 03:31 PM
#677

Check the brass tubes very carefully - I had a case of air into the hopper/ air trap and it tuned out that the brass tube had split along its length, allowing air in once the main tank had drained down enough to uncover the cracked tube. It took a lot of looking to find the cause, as they were hair-line cracks.
I now only use stainless steel tube.
Paul
I now only use stainless steel tube.
Paul
The following users liked this post:
essyou35 (07-03-2023)
07-03-2023, 08:51 PM
#678
Thread Starter
Try gripping the lock wire with pliers and tightening more. It looks like the clear tube after the ferrule is not seated.
Also I have seen those bits of tube soldered to the main pipe not fully sealed, they needed a lot of cleaning before soldering.
Felt is the only way to go with the flat std fuselage tank. My Classic Flash which is the instruction manual aeroplane still has the same clunk 17 years later…main tank has not been apart since it was built! Still land with almost no air in the original BVM UAT fitted in 2006.
 07-04-2023, 10:57 AM
#680
Thank you guys, I put a new safety wire around the tube and pulled it tight with pliers. It sat nicely, despite it looked different on the pic.
Unfortunately it didn’t help, still same amount of bubbles.
What I do next is exchanging the brass tube. Maybe I skip the soldered ring. Do you think it’s essential? I’m not used to that kind of tube connection.
I also will replace the whole inner Tygon tube. Should I ditch the brass tube inside the tank and use Tygon all the way?
07-04-2023, 12:09 PM
#681
My Feedback: (1)
How about pressurizing the whole fuel system and looking for the leaks? Beats guessing.
I rigged up a bicycle pump to pump air in to the system. I submerge the tank under water and look for the bubbles. Another way is to spray soapy water on the joints and look for the bubbles.
I rigged up a bicycle pump to pump air in to the system. I submerge the tank under water and look for the bubbles. Another way is to spray soapy water on the joints and look for the bubbles.
Thank you guys, I put a new safety wire around the tube and pulled it tight with pliers. It sat nicely, despite it looked different on the pic.
Unfortunately it didn’t help, still same amount of bubbles.
What I do next is exchanging the brass tube. Maybe I skip the soldered ring. Do you think it’s essential? I’m not used to that kind of tube connection.
I also will replace the whole inner Tygon tube. Should I ditch the brass tube inside the tank and use Tygon all the way?
Unfortunately it didn’t help, still same amount of bubbles.
What I do next is exchanging the brass tube. Maybe I skip the soldered ring. Do you think it’s essential? I’m not used to that kind of tube connection.
I also will replace the whole inner Tygon tube. Should I ditch the brass tube inside the tank and use Tygon all the way?
 07-04-2023, 08:54 PM
#682
Thread Starter
The brass tube on the clunk is needed because of the fibreglass baffle.
Does the brass tube rotate in the bung when the cap is tight? I have seen people over heat when soldering the barb. Yes, the sleeve/barb is really needed.
Pressure testing the tank and wetting the bung/tubes is your next step. It does not need much pressure adding to do the job, too much you will pop the baffle loose inside
07-08-2023, 03:28 AM
#683
Thank you once again. The brass tube may be rotated with the Screw not tightened. Once fully tightened, i am not able to move the brass in any direction.
I was overthinking the whole thing and came to the conclusion, that air must come from somewhere outside the tank itself. Because the little bubbles appear even with the tank filled up to the top where the clunk and connected tygon / brass tubes are fully surrounded by fuel.
My plan is to replace the brass tube passing through the fitting. Also maybe the rubber part of the fitting with the two holes. Is this rubber a special Carf part or is there any chance to order it somewhere else maybe bit quicker?
Sorry by the way for crashing this flash thread, first I thought it’s a flash related issue due to the flat bottomed tank.
Last edited by rexmexx; 07-08-2023 at 04:30 AM.
07-08-2023, 04:12 AM
#684
My Feedback: (1)
The rubber bung may be the same size that Du-Bro or Sullivan sells. Perhaps your local hobby shop can match it.
When I fit rubber parts, or tubing I use a suitable lubricant. It helps the parts to seat firmly. Obviously, I try to keep it out of the inside of the fuel system.
When I fit rubber parts, or tubing I use a suitable lubricant. It helps the parts to seat firmly. Obviously, I try to keep it out of the inside of the fuel system.
07-08-2023, 05:50 AM
#685

The rubber bung may be the same size that Du-Bro or Sullivan sells. Perhaps your local hobby shop can match it.
When I fit rubber parts, or tubing I use a suitable lubricant. It helps the parts to seat firmly. Obviously, I try to keep it out of the inside of the fuel system.
When I fit rubber parts, or tubing I use a suitable lubricant. It helps the parts to seat firmly. Obviously, I try to keep it out of the inside of the fuel system.
07-18-2023, 07:35 AM
#687
Got a loaner stab to use until my replacement comes in… doesn’t match but that’s ok, at least I can fly the plane.
To both of our surprise, it bolted right in, fits perfect, almost better than the original stab… a day to put it all back together and then wait for this insane heat to break..
To both of our surprise, it bolted right in, fits perfect, almost better than the original stab… a day to put it all back together and then wait for this insane heat to break..
08-07-2023, 10:36 AM
#689
Hi after a lang abcense from building
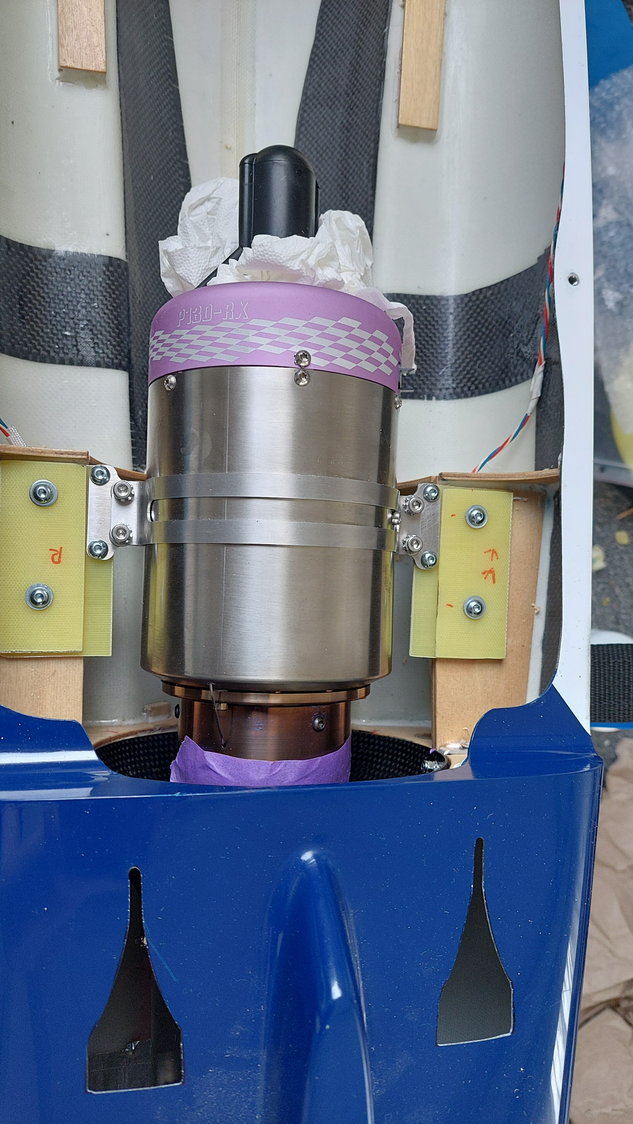
and when i came to installing my turbine P130Rx
looking at the picure's here from Dave i think i instaled it correct..
The tailcone of my engine sit's about 4,5cmm
inside the belmout.
But looking like the manual of pipe instalment from grumania it say's 4cm.
I mounted my turbine as forward as i could
And i want to make shure it is correct.
Becouse it is my first jetmodel with a thrust pipe
here is a picture of my turbine instaled
hope i have done it correct
regards peter
08-07-2023, 12:58 PM
#691
Thread Starter
The obsession with bell mouth length amuses me. The critical thing is turbine tail pipe back face to start of the steel tube. The various bell mouth sizes and lengths just confuse people!
25mm is a good gap, 2mm greater/shorter is acceptable
D
25mm is a good gap, 2mm greater/shorter is acceptable
D
08-07-2023, 12:58 PM
#692
Hi Peter,
25 to 35 millimeter from end of tailcone to beginning of the tube without bellmouth seems to be the right distance.
In case of the Flash, as far forward as you can is the best solution. So just go ahead.
Theres also a German guy who did some measurements regarding the distance in case you’re in doubt:
kind regards and good luck.
08-08-2023, 01:48 PM
#694
by the way, I owe you the fix for my bubble issue:
I exchanged everything that has to do with fuel tubing. From new tube from uat to the bung, the bung itself, all brass tubes and new Tygon as well as a new clunk inside the tank.
Still no improvement.
In the end I found out that the pump in my fuel station was sucking some air which I accepted before at all my other planes without felt clunk.
This sucked air was pumped as tiny bubbles all the way through the Hopper into the felt clunk where those bubbles found a new cosy home.
Once the turbine was started, they started to detach and were pumped back to the hopper causing a certain amount of air at the top of the hopper (I’d say about 10-20 ml / 1 tbl spoon)
So watch out for your fuel station in connection with felt clunks.
Thank you once again. The brass tube may be rotated with the Screw not tightened. Once fully tightened, i am not able to move the brass in any direction.
I was overthinking the whole thing and came to the conclusion, that air must come from somewhere outside the tank itself. Because the little bubbles appear even with the tank filled up to the top where the clunk and connected tygon / brass tubes are fully surrounded by fuel.
My plan is to replace the brass tube passing through the fitting. Also maybe the rubber part of the fitting with the two holes. Is this rubber a special Carf part or is there any chance to order it somewhere else maybe bit quicker?
Sorry by the way for crashing this flash thread, first I thought it’s a flash related issue due to the flat bottomed tank.
I was overthinking the whole thing and came to the conclusion, that air must come from somewhere outside the tank itself. Because the little bubbles appear even with the tank filled up to the top where the clunk and connected tygon / brass tubes are fully surrounded by fuel.
My plan is to replace the brass tube passing through the fitting. Also maybe the rubber part of the fitting with the two holes. Is this rubber a special Carf part or is there any chance to order it somewhere else maybe bit quicker?
Sorry by the way for crashing this flash thread, first I thought it’s a flash related issue due to the flat bottomed tank.
08-24-2023, 05:50 PM
#695

Is anyone using duel (or triple) rates? I'm assuming many use duel rates but I haven't found anyone posting their values in comparison to the CARF recommendations. I'm assuming the recommended rates in the manual would be considered mid to high? I typically use a low rate for high speed flying and increased rates for takeoff and landing.
08-24-2023, 06:02 PM
#696

the rates in the manual are the high rates. For some these may be a bit much especially for first flights. Because of the planes wide speed envelope, i would recommend dual if not triple rates, with around 15% expo on ailerons and elevator too ... tweak it from there to your liking.
The following users liked this post:
flaz (08-24-2023)
08-26-2023, 09:28 PM
#698
So today was my 3rd trip to the field with the UF.
The first two trips to the field did not end well. If I didn’t absolutely stick the landing the plane would start hopping really bad uncontrollably. This is far from my first jet. I have flown and maidened many planes for other members as well as my own. Both my first two trips to the field ended in broken horizontal stabs. This was extremely frustrating after seeing so many other people fly their UF’s without the same apparent landing issues.
After discussing it with two other pilots we decided that even though it flys great with a 232 CG, it’s a complete b*#>h to land with that CG.
Today I moved my receiver batts from just in front of the tank to up by the nose gear. Since I’m running very lightweight batts I also added 2oz of lead in the same location. I’m not really sure how much that moved the CG and honestly I didn’t really care. Today it was going to fly or die, that’s where I was with it.
Moving the CG just that little bit completely changed the plane and the landings. Yeah it flys *slightly* more nose heavy, the landings are WAY better! Like night and day I can fly the plane and not have to worry about the landings anymore.
Today I was finally able let her rip on the 3rd and 4th flights and it was a lot of fun with the 170. I think the 170 is a great match for the plane and it gets really good gas mileage too. After a pretty moderate to hard 6 min flight I still had right at a half the 4L tank. I’m sure I’ll fly it harder and harder from here on out so I won’t increase my 6 min timer.
Man, what a relief to get that figured out!!
Last edited by camss69; 08-27-2023 at 10:31 AM.
The following 2 users liked this post by camss69:
AEROSHELDON (08-27-2023),
paulhat (08-26-2023)