


Reaction 54 Jet Kit
 04-21-2016, 05:46 AM
#3451

My Feedback: (1)
Hang Times Hobbies (www.hangtimes.com) can also make what you want. I have a 7.2V, 3000 mah, nickel metal hydride in the nose of my R-54. Great nose weight!

 04-22-2016, 07:46 PM
#3455

My Feedback: (34)
Never having done a pull pull steering setup can someone guide me or send me a link to see how it's done. I've done it but seems to be some slack on nose steering. Tried to get it as tight as I could but still doesn't seem right. I've set it up like Bruce recommended with the nylon tubes to spread the wires when gear retracts. Works fine. When I extend the gear it takes a few secs. Maybe 2 while the gear locks to get the wires taught. Should I just tighten the bolts on the servo link to get the wires tighter?
04-23-2016, 04:26 AM
#3456

Never having done a pull pull steering setup can someone guide me or send me a link to see how it's done. I've done it but seems to be some slack on nose steering. Tried to get it as tight as I could but still doesn't seem right. I've set it up like Bruce recommended with the nylon tubes to spread the wires when gear retracts. Works fine. When I extend the gear it takes a few secs. Maybe 2 while the gear locks to get the wires taught. Should I just tighten the bolts on the servo link to get the wires tighter?
This is a common problem with cable steering setup. If you get the cables too tight, then the retracts won't lock in the extended position. They must have a little play in them so the retracts can lock in the extended position. I use a nylon zip tie to keep my cables tight. Take the nylon zip tie and place it between the cables in a half circle with the opening facing forward, cut off the lock tab on the zip tie, back far enough on the cable to allow the wheel to come between the two cables. Use heat shrink tubing to hold the zip tie in place on the cables. When the retract is retracted, the zip tie will move the cables out away from the wheel. I always store my models with retracts with the retracts retracted so the zip tie is not compressed or held in the half circle position. This keeps the zip tie from loosing it's tension. Hopes this helps you.....
Larry/Instructor
04-24-2016, 07:50 PM
#3457
My Feedback: (34)
Alright getting closer and closer.. couple question..
On the PST Gas solenoid Valve it is labeled 6V, although manual says its ok to use a 7.2 NIMH or 7.4 Lipo?? Is that ok??
I saw a post about the correct in/out lines on the gas solenoid valve, can someone point me to the right page. I am not gonna use an onboard tank. just plugging a can for start and disconnect for flight. I got this engine second hand and I think he had the lines backwards as well so wanted to clear that up. He had the festo that swivles coming out of the valve going to the onboard or external propane tank and tha barb nipple going to engine. only reason I know is he left the lines connected. LONG line meant that one was going to turbine. and that was connected to barb nipple on valve.
most importartant question I was settling up the pump today and header tank. I got the tank at close to the pump as i could. now question where is the best place to out the festo on/off ball valve?? between header and pump which could be tight since i have them almost facing each other , pump and engine or both??
Plane is getting very close.. will post pics tomorrow. all left to do is glue elevators and rudder, hook them up. and install all the equipment solderup the 9V battery cable to the brake line, mount the switch by the elevator arm..gear is all in and tested.. I think 3 more evenings and she should be ready to start..
Last edited by Johnny9390; 04-24-2016 at 08:04 PM.
04-26-2016, 04:02 PM
#3460

Johnny, you are asking equipment questions in this R54 thread which are not specific to the R54 in particular.
For a broader audience and more satisfactory answers, may I suggest posting JST and similar questions in stand-alone threads rather than hoping that someone subscribed to the R54 thread in particular also has knowledge of a given engine, battery makeup, radio, etc?
For a broader audience and more satisfactory answers, may I suggest posting JST and similar questions in stand-alone threads rather than hoping that someone subscribed to the R54 thread in particular also has knowledge of a given engine, battery makeup, radio, etc?
 04-26-2016, 08:15 PM
#3464
My Feedback: (34)
Sorry just seamed that alot of people have used this turbine for this jet.
Will dig up answers elsewhere. Sorry
Will dig up answers elsewhere. Sorry
Johnny, you are asking equipment questions in this R54 thread which are not specific to the R54 in particular.
For a broader audience and more satisfactory answers, may I suggest posting JST and similar questions in stand-alone threads rather than hoping that someone subscribed to the R54 thread in particular also has knowledge of a given engine, battery makeup, radio, etc?
For a broader audience and more satisfactory answers, may I suggest posting JST and similar questions in stand-alone threads rather than hoping that someone subscribed to the R54 thread in particular also has knowledge of a given engine, battery makeup, radio, etc?
 04-27-2016, 07:36 AM
#3468
My Feedback: (10)
Join Date: Jan 2002
Location: North Port,
FL
Posts: 1,109
Likes: 0
Received 0 Likes
on
0 Posts
Chic. . .
I love a good "kit bashing" end result airplane. The anhedral in the stab looks great. I look forward to seeing the end result.
Cheers,
Eric Clapp
A & E Jets USA
I love a good "kit bashing" end result airplane. The anhedral in the stab looks great. I look forward to seeing the end result.
Cheers,
Eric Clapp
A & E Jets USA
04-29-2016, 08:59 PM
#3470
My Feedback: (34)
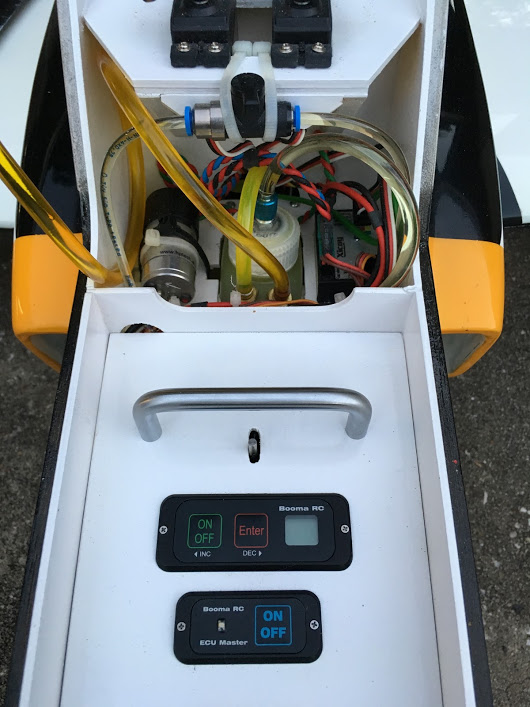
Got all the wiring done, Kavan brakes installed and work great. Might even have to grease up a bit cause they lock and hold pretty good. Electrodynamics made me a nice 7.2 2500 mah nicad pack for my PST Tems ECU. There is soo little to install in the front when using the electric retracts and no Propane tank inside that I think I will have to add weight up in the nose along with the 2500 A123 and the 2500 Mah Nicad for the ECU. Only thing in the boat tail is the ECU and the propane valve. few more days and she should be done. Gotta epoxy the aluminum plate. Clean up edges with aluminum tape, mount the turbine, setup all the throws and find a place for the 3 satellites. and shes ready to roll. Lets just hope the turbine starts up good. Bought it second hand and dont know how long it sat for. Fingers crossed everything goes well.


Last edited by Johnny9390; 04-29-2016 at 09:03 PM.
04-30-2016, 09:20 AM
#3472
My Feedback: (34)
I saw a post from someone here cant remember which one it was. I might just get some ply and make them stand up high up into the canopy. one in the front middle then the back on the oposite side of the pump. will post some more pics when I get it done. Had to come back to work and fly a little
05-01-2016, 12:30 PM
#3473
Bruce, I believe I have gremlins in my workshop. Once things enter my shop, I have no idea where they disappear too. The control cables you previously sent have not disappeared, maybe they are too large. I'm not sure if I asked for the brass soldering connectors to go along with the order but I can not locate them nor the hardwood engine wedge. Sooooooo, could you send me please, at least 5 of the brass soldering connectors for the control surface cables and a hardwood engine wedge. Please use my email address to send the Paypal invoice. ([email protected]) Again, many thanks for your support. Charles "Chic" White
05-11-2016, 03:33 PM
#3475
My Feedback: (1)
Join Date: Jan 2003
Location: Beaumont,
TX
Posts: 57
Likes: 0
Received 0 Likes
on
0 Posts
So here are some more pictures of my Reaction along with the inspiration.
The T50 is used by the South Koreans for thier airshow team, The Black Eagles. I picked the design, looking for something that hadn't been done, and shortly after CARF released the UF in the same pattern. At least I know I didn't pull this finish out of a box.
I still have to install the nose wheel door, but have run into some turbine issues I need to work out. I'll pick your brains in the next post.