


1/7th F-14D Scratch build thread *building started*

 10-10-2011, 04:50 AM
#927

ORIGINAL: dvs1
Thomas, How it the Tomcat coming? Any progress as of late?
I know its a little late in the game but I just realized I have this book from 1987 ''Book of Modern Warplanes''. Chapter 10 is about 65 pages on the F-14 and development. Has some pretty good pics and data just wondering if you have a copy or not? I know some of the close up shots like all your cockpit photos are in it.
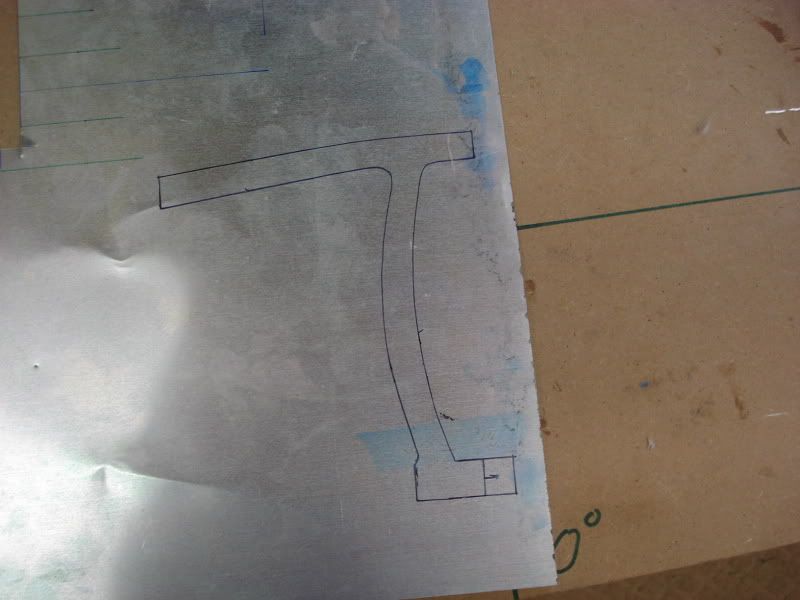
I haven't don't much. I was out of town for work the past 2 weeks, and have been recouping at home the past few days. I did get 99% of the last cockpit side panel finished in CAD, and the 2nd of the last 3 detail panels for the canopy are done. I'm hoping to get out in the shop today to finish the cockpit, one last light frame on the vertical stabs, and then start drawing the framing on the windscreen in prep for it to be detailed.
I have not seen that book. I'll have to go down to the library and see if they have it and if its worthwhile purchasing.
I've seen a few of the Danny Coreman books that he does on the F-14, F-16 and a few others. So far, He has the Best walk-around books that i have ever seen. They are very thorough for the entire airplane, and i have only had to use the "net" to find a few different views of different areas for better detail shots.
10-10-2011, 09:23 AM
#928
Senior Member

Sounds like you got it covered then. One thing I found interesting about the book was it even shows info like position and deflection of all control surfaces in the aircrafts different maneuvers and takeoff and landing. I see now why you need a 14+ channel radio to do all the proper scale mixing.
10-10-2011, 09:43 AM
#929
Hmm... I've got the deflection angles and what not for the flaps and slats at maneuver, takeoff and landing but that is it. I will definitely have to go look for that book to see what all it has in it that i don't have already.
Oh,
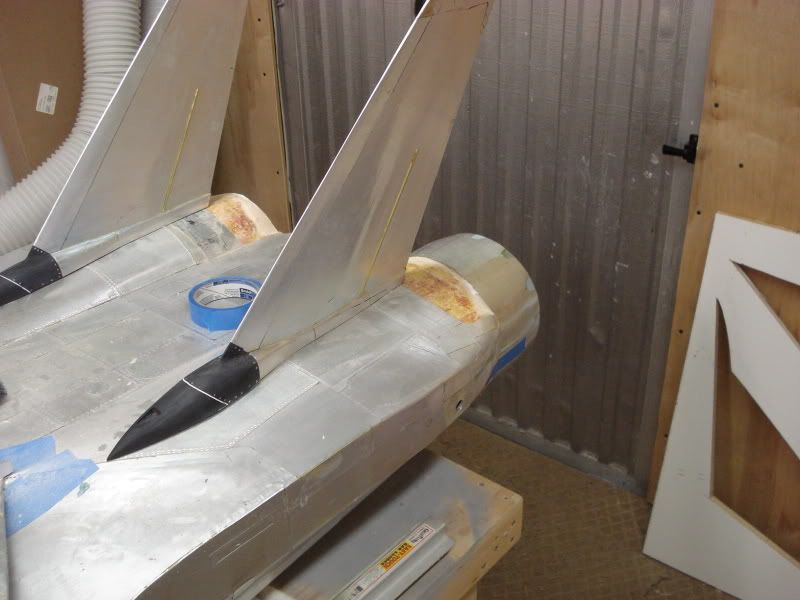
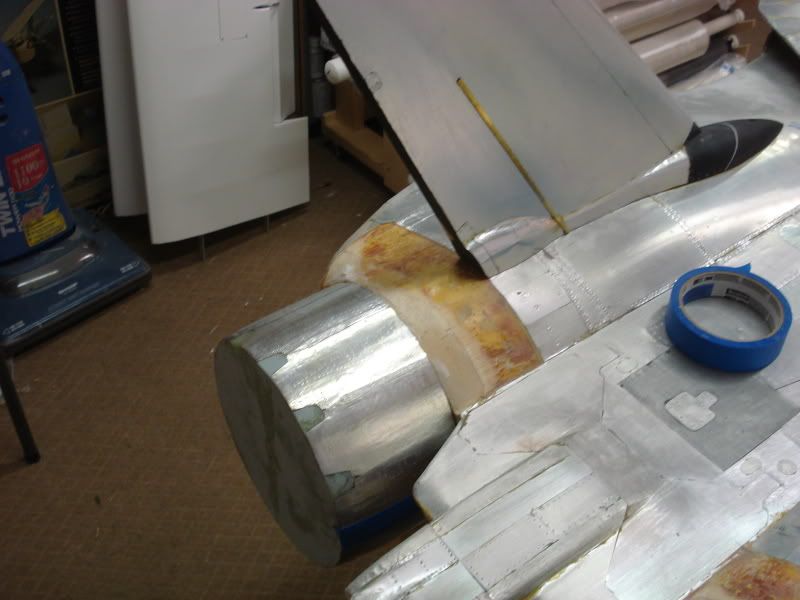
I did get out to the shop a bit this morning. The canopy frames are done other than cleaning the contact adhesive off. And the windscreen framing has been taped off and drawn. I've got to anneal some litho panels, then i can get on to forming, detailing and attaching them. Also a big more work has been done around the exhaust nozzle's. I'm hoping to find some of that green flowering foam so i can get the nozzle plug built and ready to glass..
I also realized i've got another 2 dozen detail items to place on the vertical fins... and to think i actually thought they were done. lol oh well
Oh,
I did get out to the shop a bit this morning. The canopy frames are done other than cleaning the contact adhesive off. And the windscreen framing has been taped off and drawn. I've got to anneal some litho panels, then i can get on to forming, detailing and attaching them. Also a big more work has been done around the exhaust nozzle's. I'm hoping to find some of that green flowering foam so i can get the nozzle plug built and ready to glass..
I also realized i've got another 2 dozen detail items to place on the vertical fins... and to think i actually thought they were done. lol oh well

 10-12-2011, 02:29 PM
#932
Here's the photo from the work a few days ago. Once the wife leaves to visit family(again), i'll be able to stay behind and get some real work done!
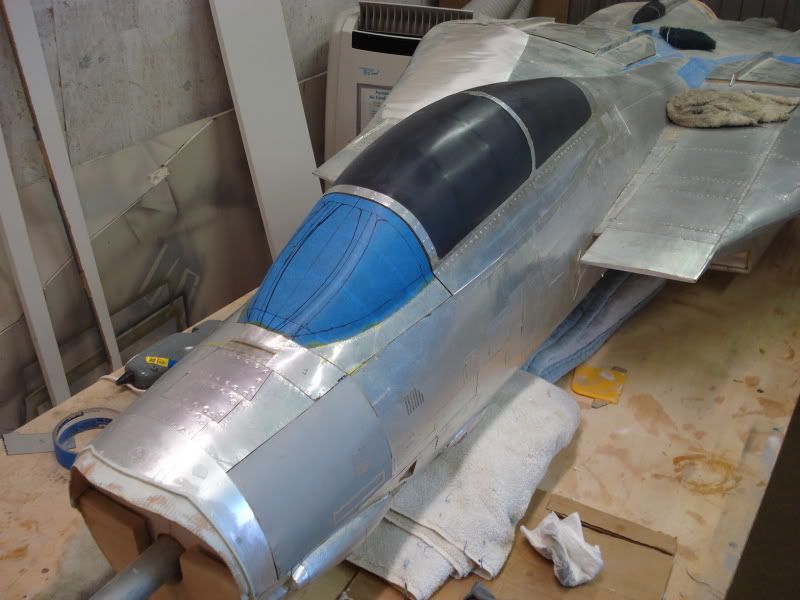
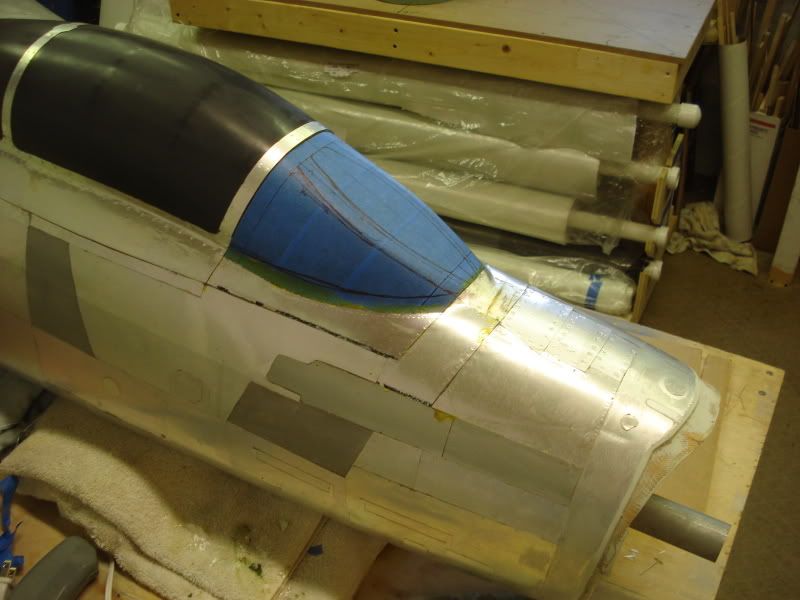
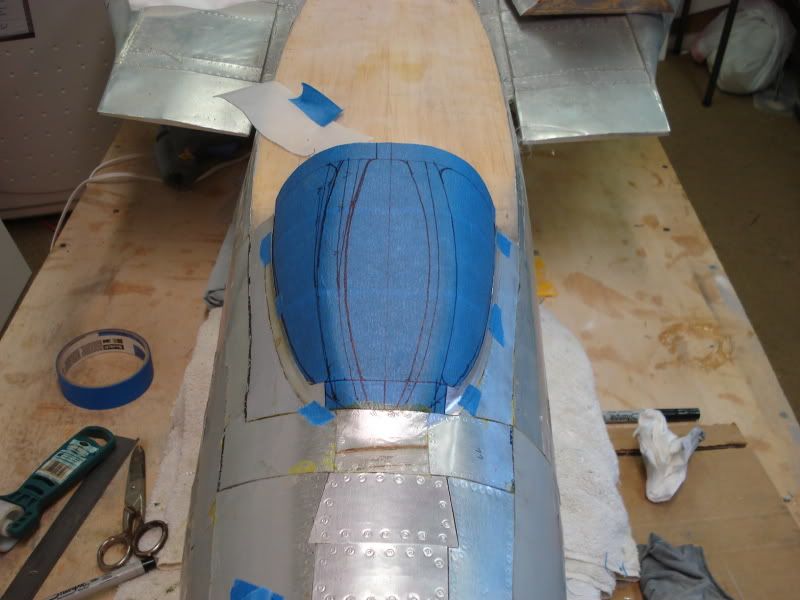
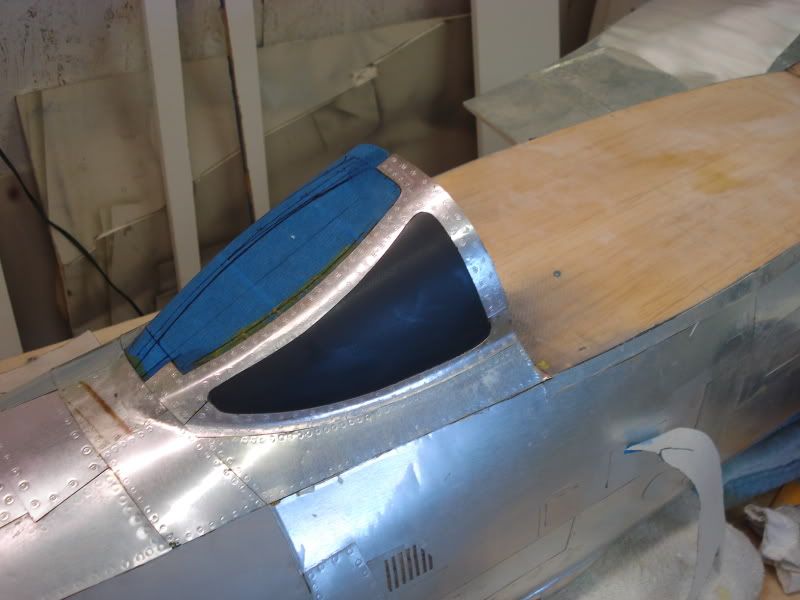
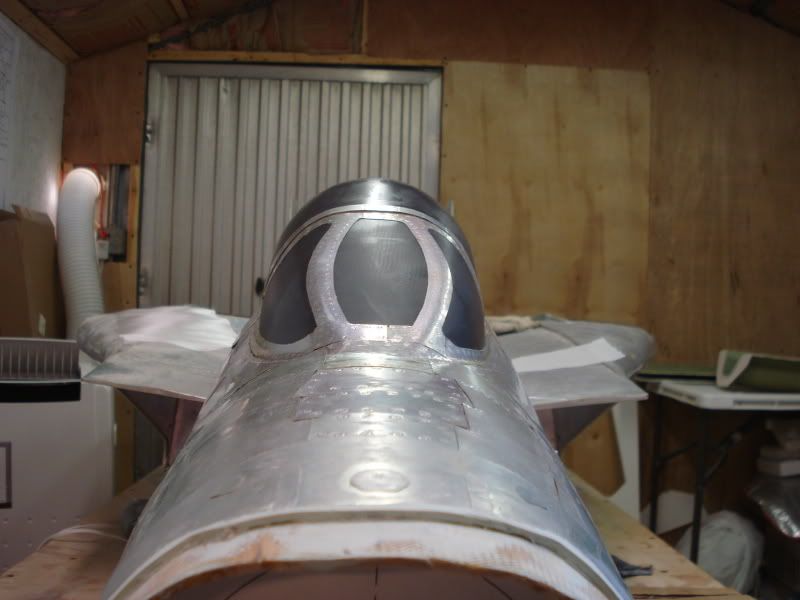
All of the canopy panels were detailed and installed:


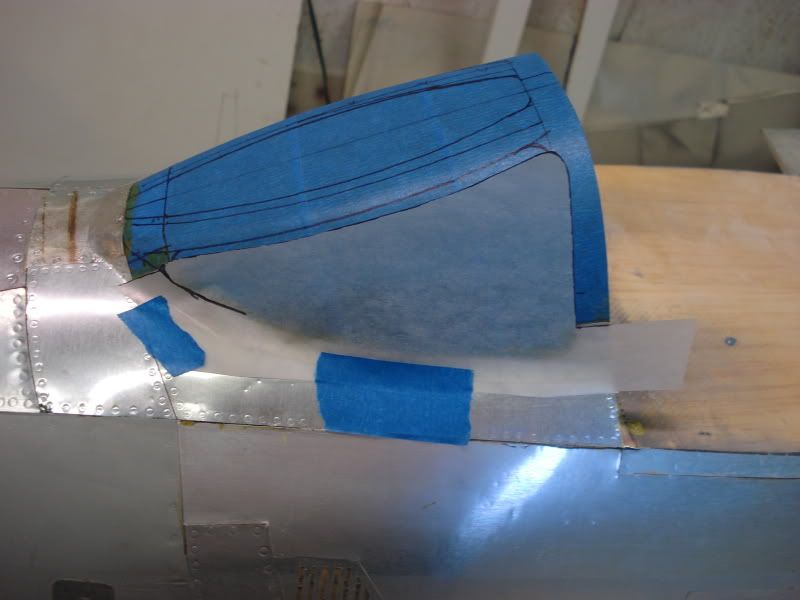
Then the Windscreen was taped off, and the frame outline drawn onto the tape:

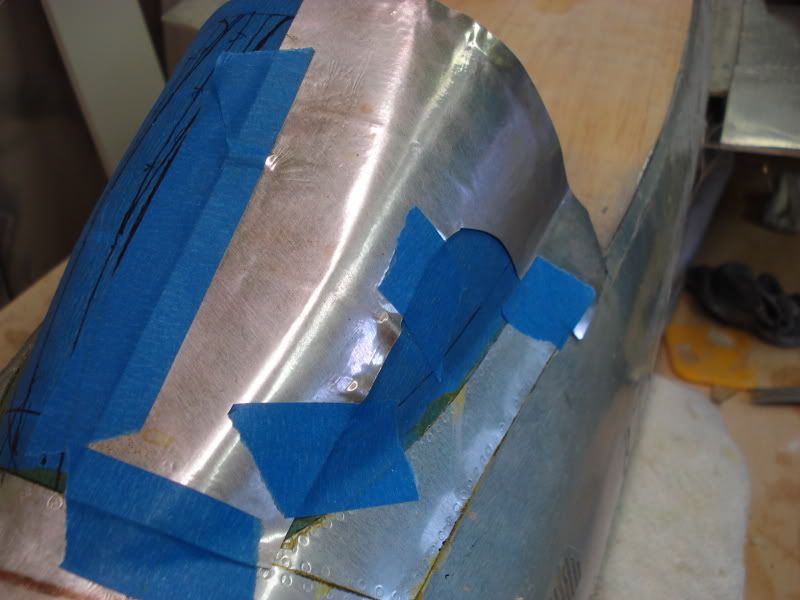
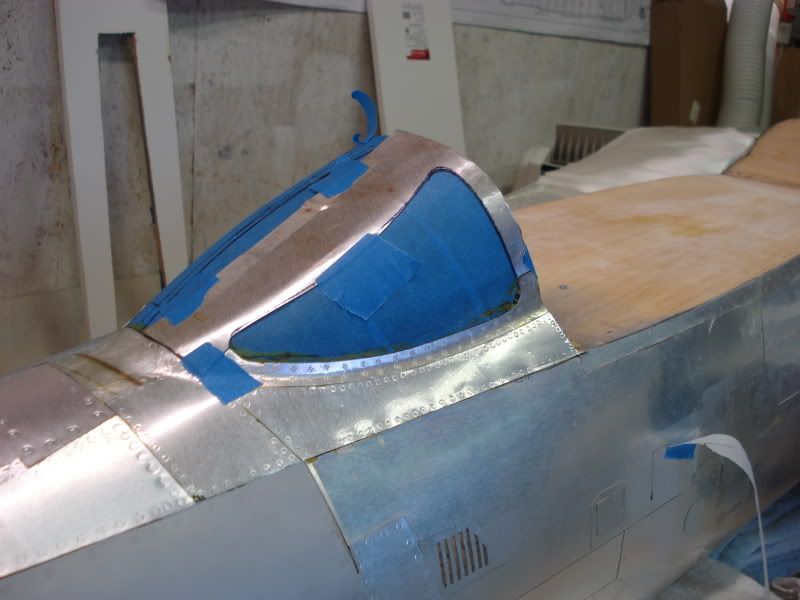
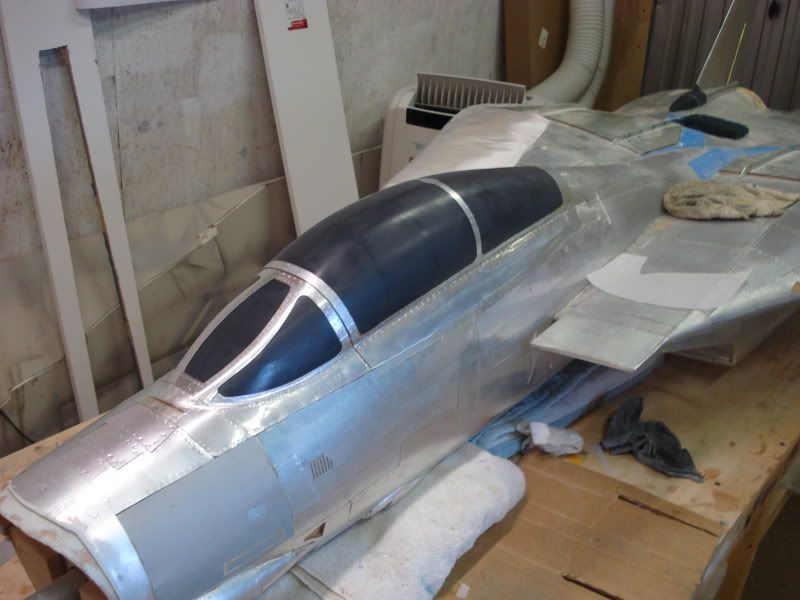
Then the excess glue was removed from the canopy frame, and the tape removed. The canopy is done and ready for molding...again


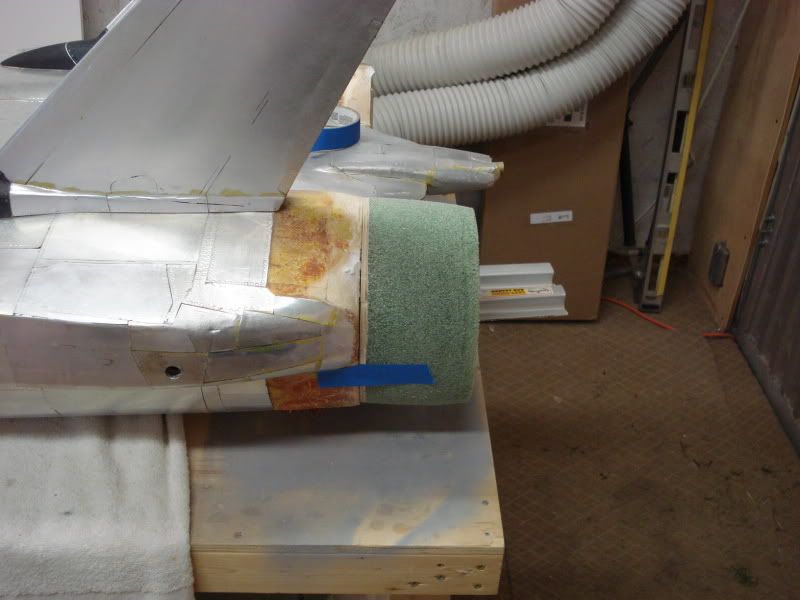
Then i got a shot of the Exhaust nozzle template set up against the fuselage. The shaping of the exhaust nozzle/fuselage mount area is nearly complete. I need to do a bit more in these 2 area's, then re-glass it and then the finishing can be done and the fuselage will be done and ready to mold, once the windscreen is detailed:

All of the canopy panels were detailed and installed:
Then the Windscreen was taped off, and the frame outline drawn onto the tape:
Then the excess glue was removed from the canopy frame, and the tape removed. The canopy is done and ready for molding...again
Then i got a shot of the Exhaust nozzle template set up against the fuselage. The shaping of the exhaust nozzle/fuselage mount area is nearly complete. I need to do a bit more in these 2 area's, then re-glass it and then the finishing can be done and the fuselage will be done and ready to mold, once the windscreen is detailed:
10-14-2011, 10:47 AM
#933
Alriighttty.....
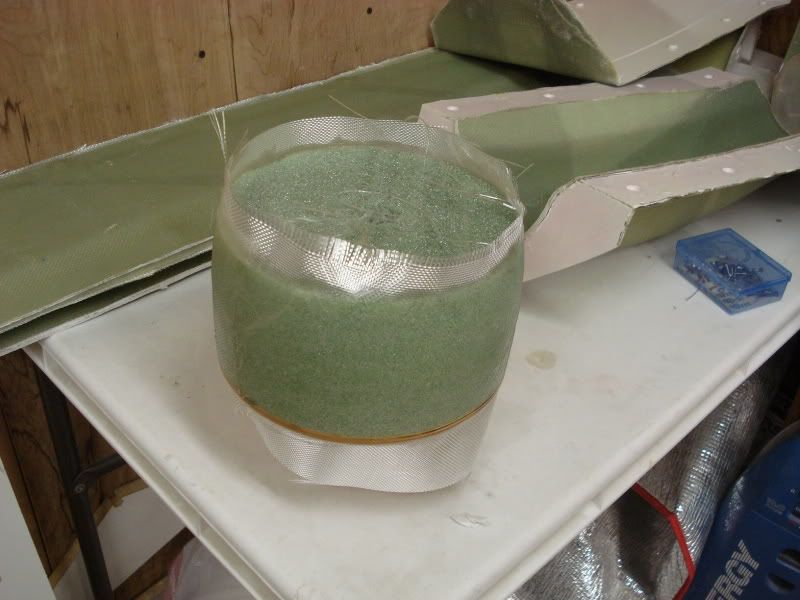
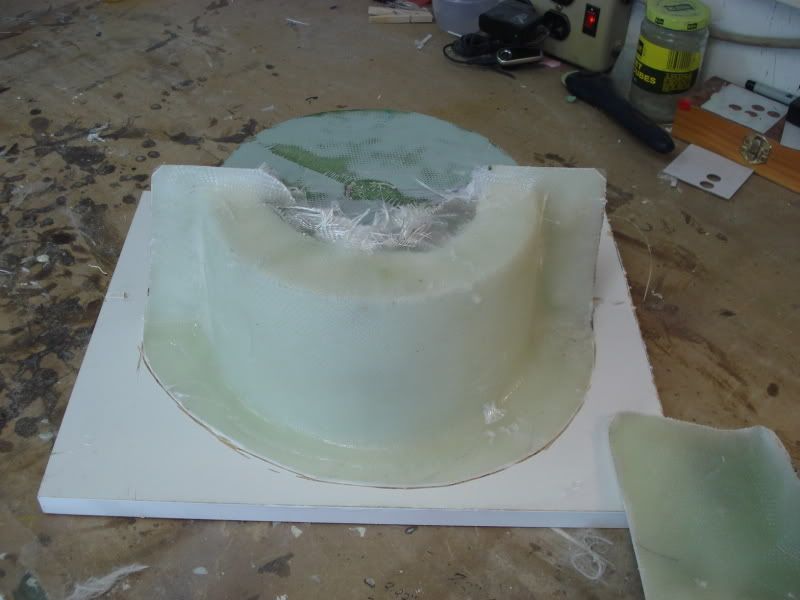
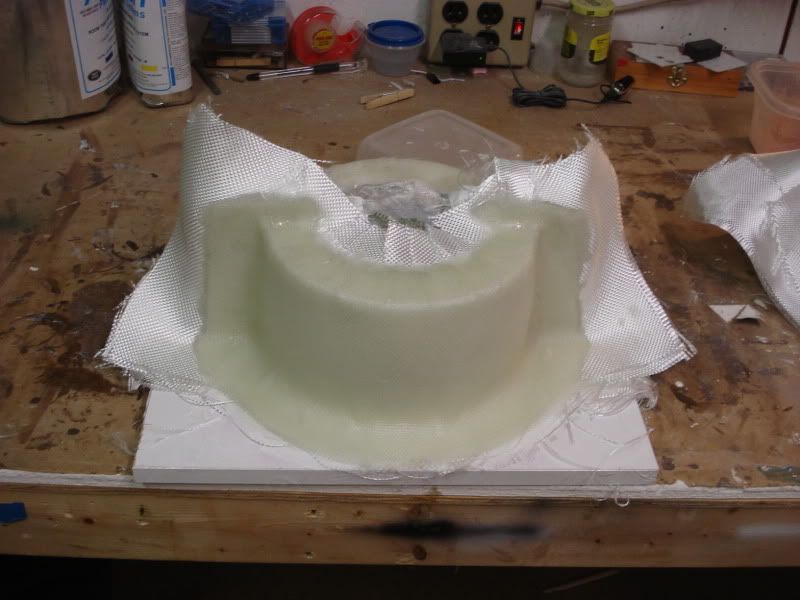
first up, a trip to Michaels arts and crafts to get some floral foam. Then a hole was drilled in the center of the exhaust nozzle plywood blank and a bind nut installed (actually i did this afterwards). Then some gorilla glue was smeared along the aft side of the plywood disc and then put down on the block of flora foam and weighted down with a gallon of PVA to cure. Once cured, the floral foam block was rough trimmed to shape.
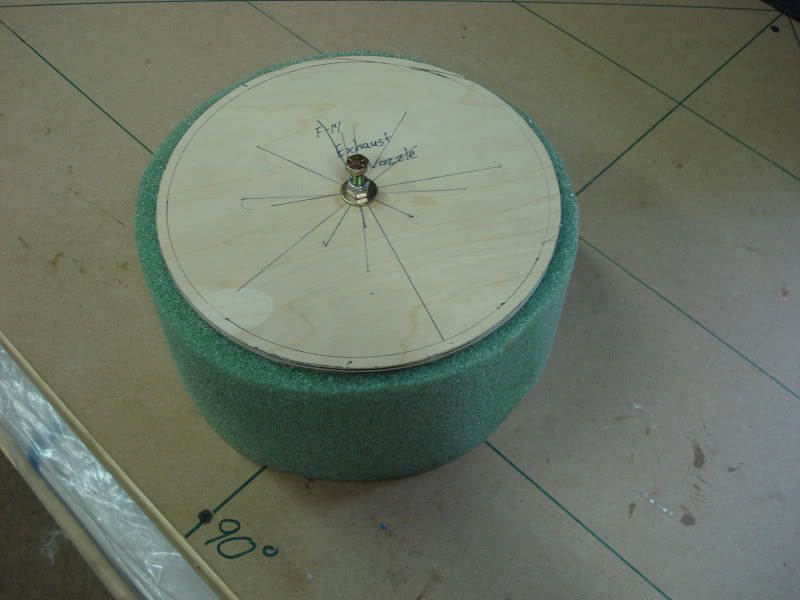
Then a bolt, locknut and washer was assembled together to give the drill press something to grab hold of, then the exhaust nozzle foam/wood thing was put in the drill press. The press was turned on, then after about 15 minutes with some sandpaper, the exhaust nozzle plug blank was shaped. Its now ready to be fiberglassed, and then detailed with the turkey feather's made from litho plate.
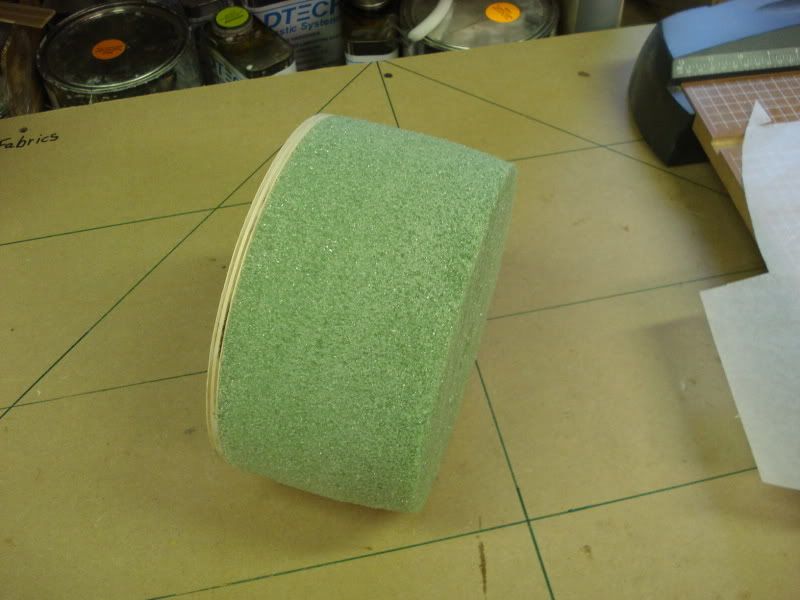
And of course, the customary test fit
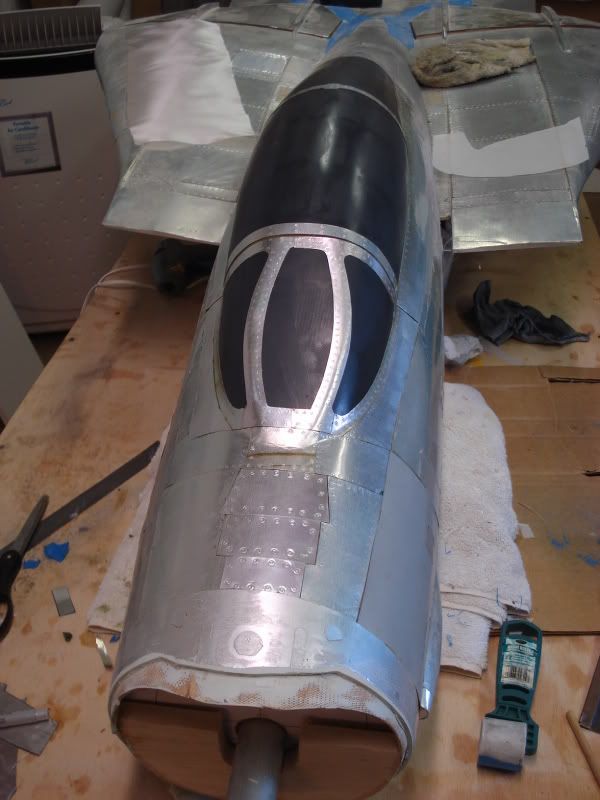
Then I got back to work on the windscreen panels. First off was the front center panel:
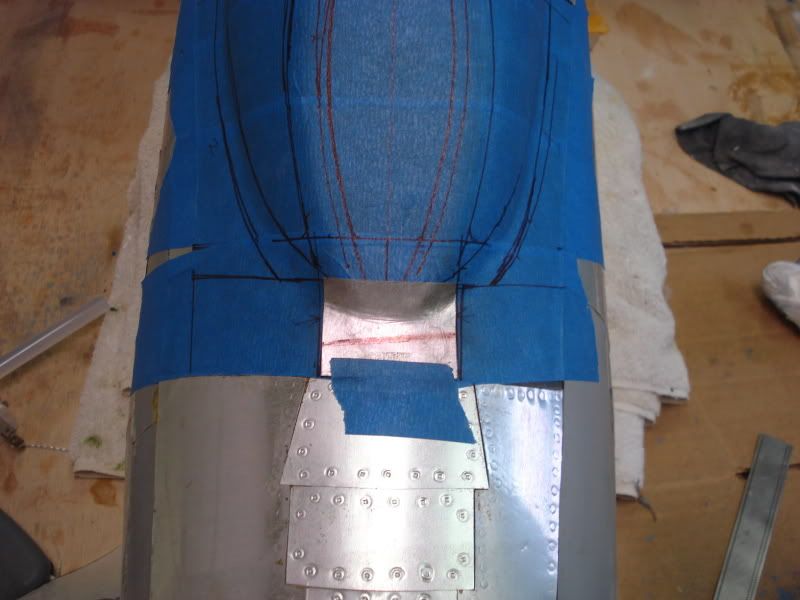
Then the 2 side panels just under the windscreen frame were made, then all 3 panels detailed and glued into place:
And since the actual windscreen frame is 4 separate pieces, that was the next thing up. The first panels i did, were the frame panels on the bottom of the side windscreen panels:

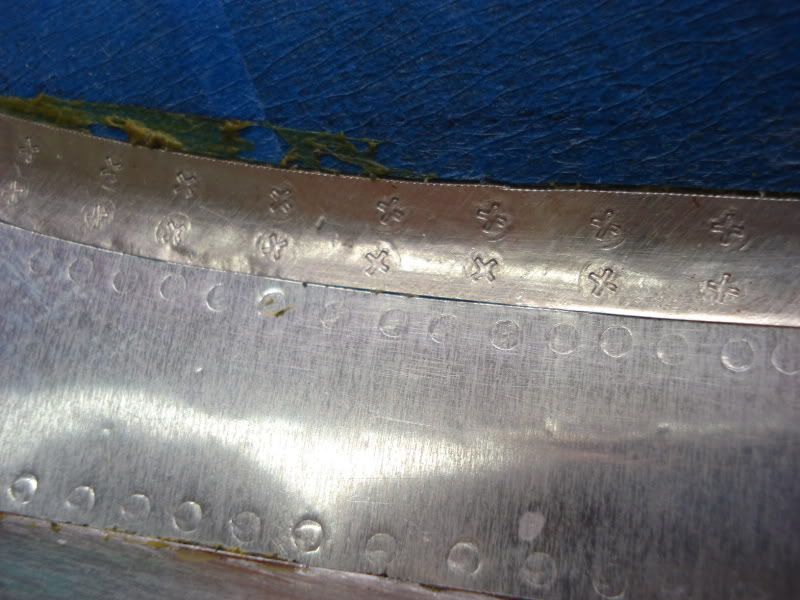
Then the top side and aft windscreen hope frame panels are one piece. and each side is slightly different. SOOOOo.... In order to form those, you have to have some fun with the litho panels.
I cut a triangle large enough to cover 3/4 of the windscreen, then annealed it ALLOT more than usual. The panel was then taped down the center of the windscreen and then it was "rolled" over to the side windscreen panels. It wouldn't roll completely over w/o having some huge wrinkles, so once it was rolled enough to differentiate exactly where the transition was, an large portion of the litho was cut out, but no so much that it didn't leave enough material for the
frame. Then the litho sheet was worked until it fit nice and snug with the windscreen. In the photo below, you will see a few bumps in the panel. These are intentional b/c they allow the panel to "shrink" a bit and fit correctly:
And what the panel looks like after its removed from the windscreen and before trimming to its final shape:

Next up, is to detail the little panels along the bottom sides, install them, then finish up the last 2 windscreen panels. Then i have a few little details on the vertical fins to do, and fiberglass the exhaust nozzle plug. Hopefully i can get all this done today b/c tomorrow is auto maintenance day...
first up, a trip to Michaels arts and crafts to get some floral foam. Then a hole was drilled in the center of the exhaust nozzle plywood blank and a bind nut installed (actually i did this afterwards). Then some gorilla glue was smeared along the aft side of the plywood disc and then put down on the block of flora foam and weighted down with a gallon of PVA to cure. Once cured, the floral foam block was rough trimmed to shape.
Then a bolt, locknut and washer was assembled together to give the drill press something to grab hold of, then the exhaust nozzle foam/wood thing was put in the drill press. The press was turned on, then after about 15 minutes with some sandpaper, the exhaust nozzle plug blank was shaped. Its now ready to be fiberglassed, and then detailed with the turkey feather's made from litho plate.
And of course, the customary test fit
Then I got back to work on the windscreen panels. First off was the front center panel:
Then the 2 side panels just under the windscreen frame were made, then all 3 panels detailed and glued into place:
And since the actual windscreen frame is 4 separate pieces, that was the next thing up. The first panels i did, were the frame panels on the bottom of the side windscreen panels:
Then the top side and aft windscreen hope frame panels are one piece. and each side is slightly different. SOOOOo.... In order to form those, you have to have some fun with the litho panels.
I cut a triangle large enough to cover 3/4 of the windscreen, then annealed it ALLOT more than usual. The panel was then taped down the center of the windscreen and then it was "rolled" over to the side windscreen panels. It wouldn't roll completely over w/o having some huge wrinkles, so once it was rolled enough to differentiate exactly where the transition was, an large portion of the litho was cut out, but no so much that it didn't leave enough material for the
frame. Then the litho sheet was worked until it fit nice and snug with the windscreen. In the photo below, you will see a few bumps in the panel. These are intentional b/c they allow the panel to "shrink" a bit and fit correctly:
And what the panel looks like after its removed from the windscreen and before trimming to its final shape:
Next up, is to detail the little panels along the bottom sides, install them, then finish up the last 2 windscreen panels. Then i have a few little details on the vertical fins to do, and fiberglass the exhaust nozzle plug. Hopefully i can get all this done today b/c tomorrow is auto maintenance day...
10-15-2011, 03:01 PM
#934
In between working on the truck (plus i did some of that last night), I did some work on the 14 today...
First up, was getting that windscreen done. Sooooo...
I installed the lower side frame panels to the windscreen:
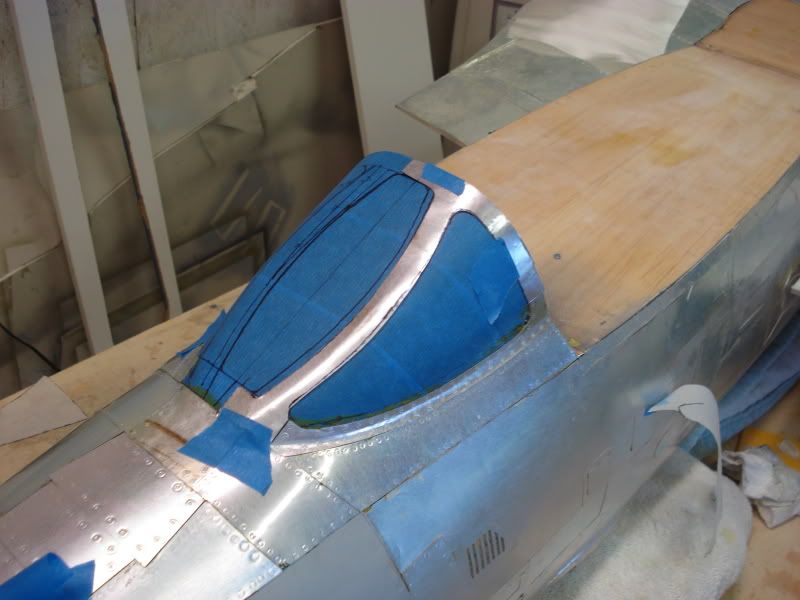
Then i made the template for trimming the left side windscreen opening on the piece of litho i made yesterday:
Then traced the template onto the litho panel, then cut that portion out:
Then i did the same for the center frame opening:
Then i flattened this out with my little roller and made a tracing of it for the other side:
Then all the screw details were hammered into the plate and attached to the windscreen:
Then the same thing was done for the other panel, and here it is completed:
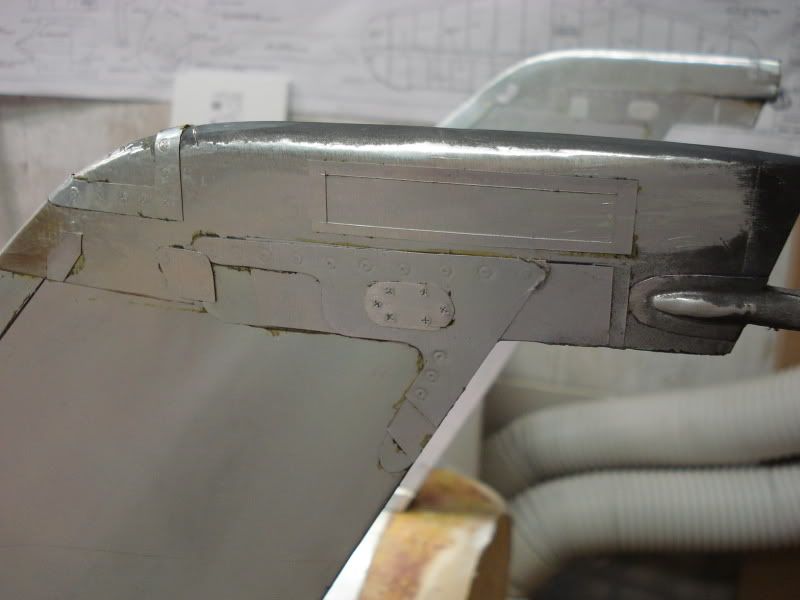
Then the light frames for the vertical fins, formation light frames, and the stiffeners (the brass parts) on the sides were made up and installed on the vertical fins:
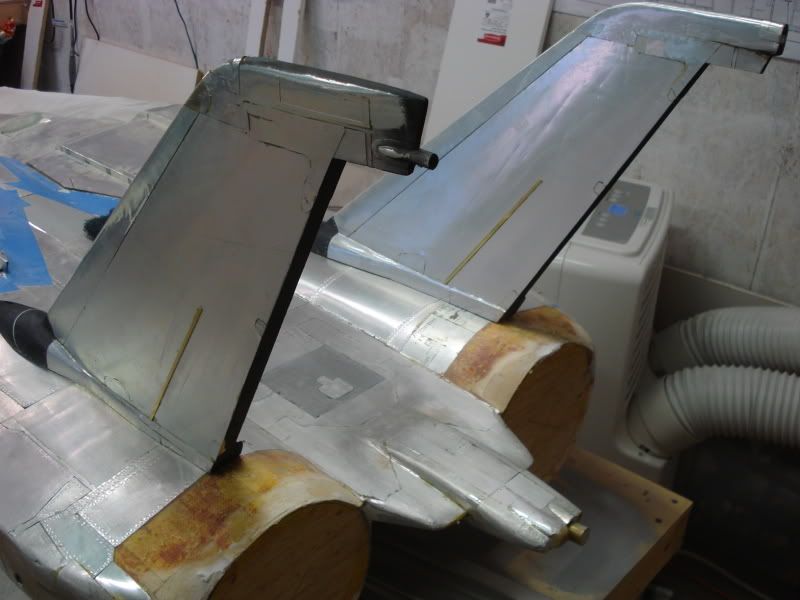
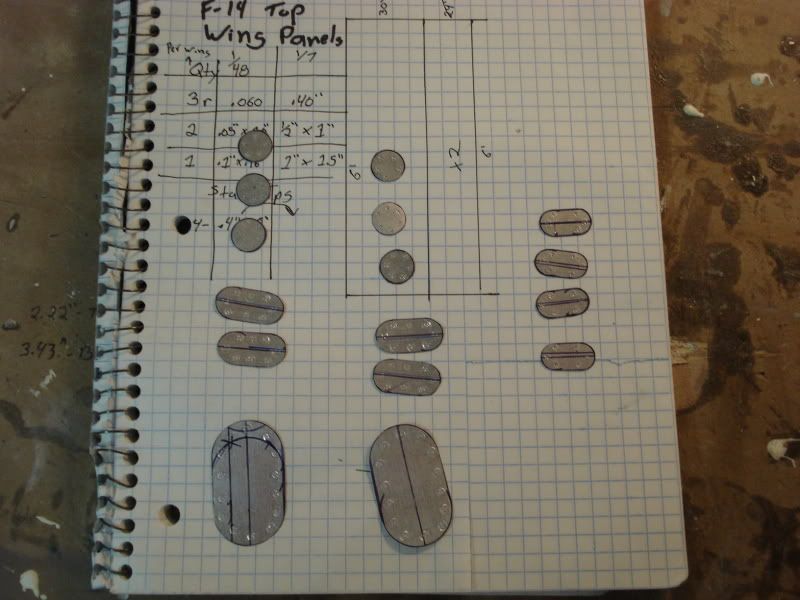
Then i made up the last 4 access panels for the vertical fins, and the last access panels for the wings. Once these are installed, All of the litho detailing will be 99% done. The only thing left to do, is the exhaust nozzle parts.
Then i glassed the exhaust nozzle plug. Once it goes green, i'll trim the glass and glass the end of the foam, then leave it to cure. Then i guess while i wait, I will either make the turkey feather panels, or finish the aft fuselage mods.
First up, was getting that windscreen done. Sooooo...
I installed the lower side frame panels to the windscreen:
Then i made the template for trimming the left side windscreen opening on the piece of litho i made yesterday:
Then traced the template onto the litho panel, then cut that portion out:
Then i did the same for the center frame opening:
Then i flattened this out with my little roller and made a tracing of it for the other side:
Then all the screw details were hammered into the plate and attached to the windscreen:
Then the same thing was done for the other panel, and here it is completed:
Then the light frames for the vertical fins, formation light frames, and the stiffeners (the brass parts) on the sides were made up and installed on the vertical fins:
Then i made up the last 4 access panels for the vertical fins, and the last access panels for the wings. Once these are installed, All of the litho detailing will be 99% done. The only thing left to do, is the exhaust nozzle parts.
Then i glassed the exhaust nozzle plug. Once it goes green, i'll trim the glass and glass the end of the foam, then leave it to cure. Then i guess while i wait, I will either make the turkey feather panels, or finish the aft fuselage mods.
10-15-2011, 07:47 PM
#935
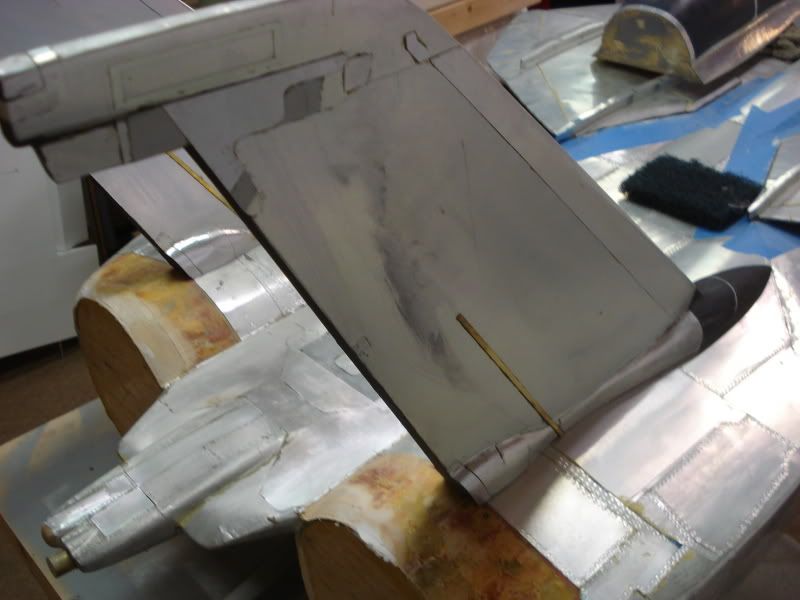
last little bit for tonight... The wings access panels were installed:

And the vertical stab panels were installed:
And a video with catchup progress for those who don't watch these forums, and some ramblings of the plans for molding, etc.
http://www.youtube.com/watch?v=FU1Jq7w24oA
And the vertical stab panels were installed:
And a video with catchup progress for those who don't watch these forums, and some ramblings of the plans for molding, etc.
http://www.youtube.com/watch?v=FU1Jq7w24oA
10-16-2011, 04:49 PM
#936
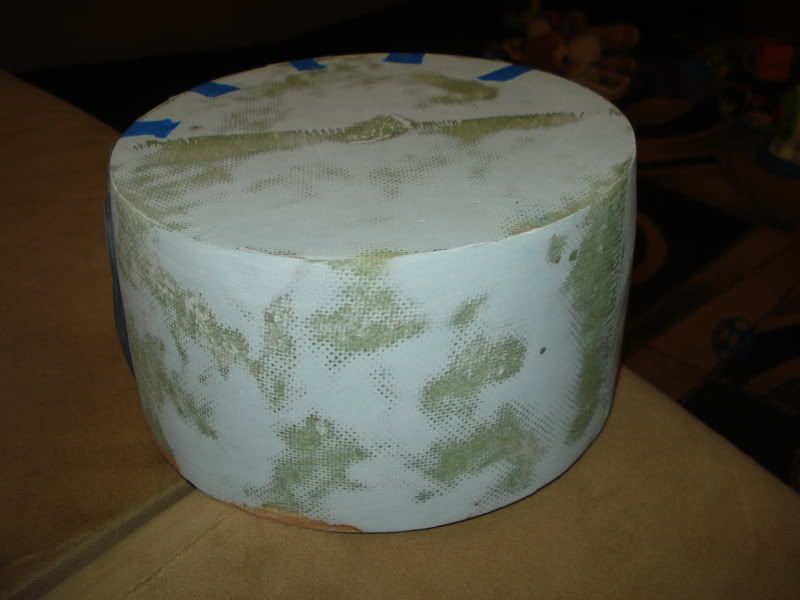
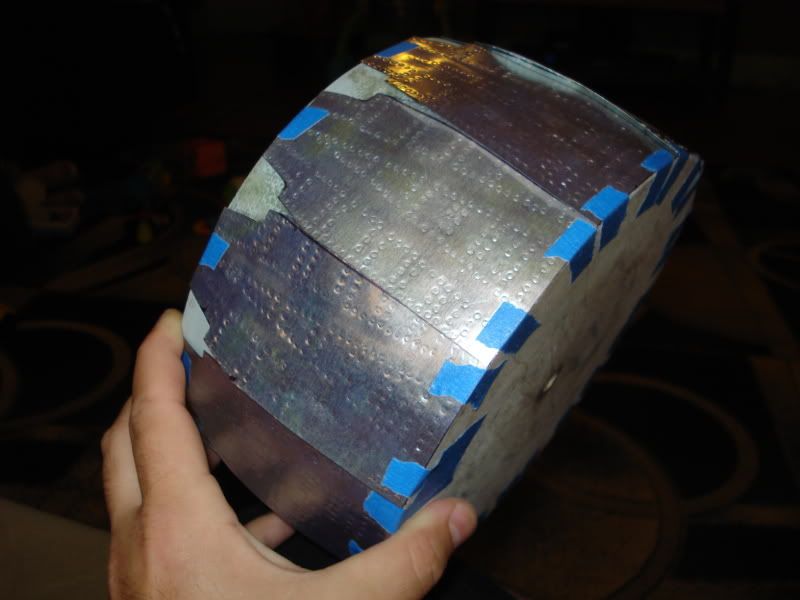
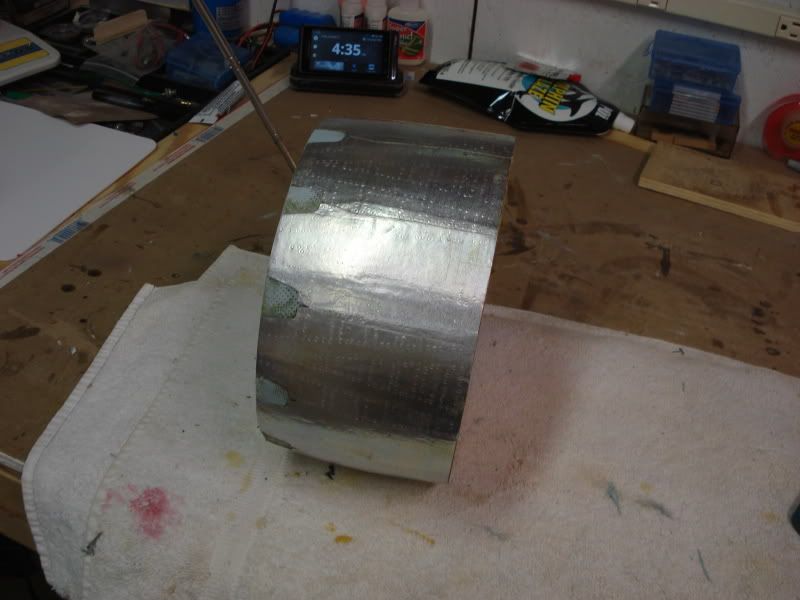
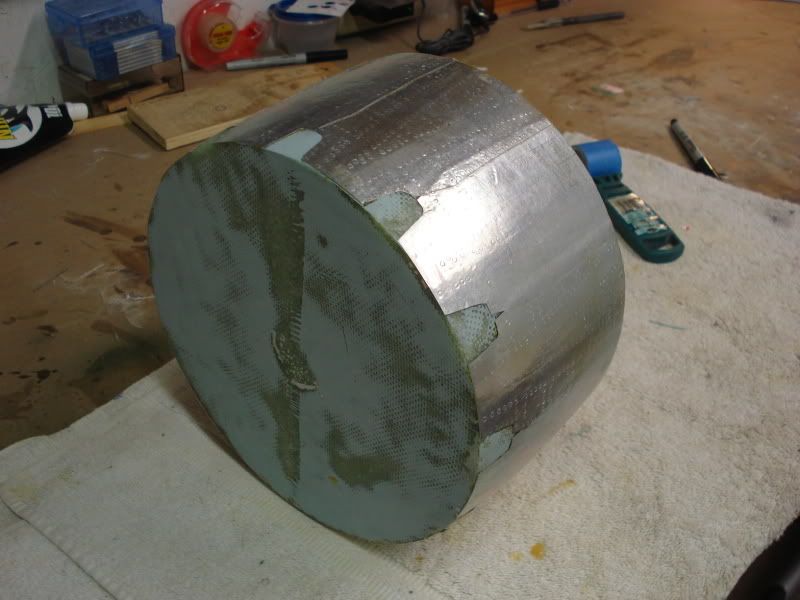
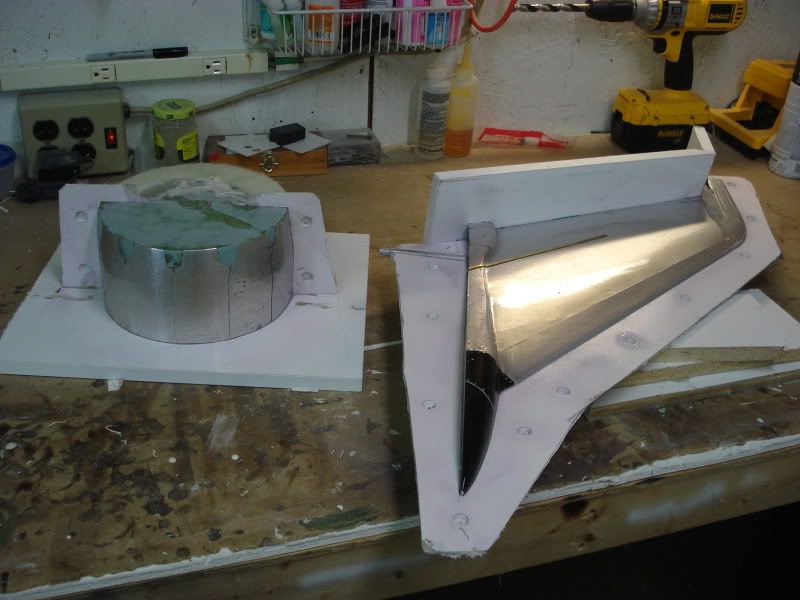
Its amazing how so little takes so long to do. Trimmed and glassed the exposed foam on the exhaust nozzle plug:

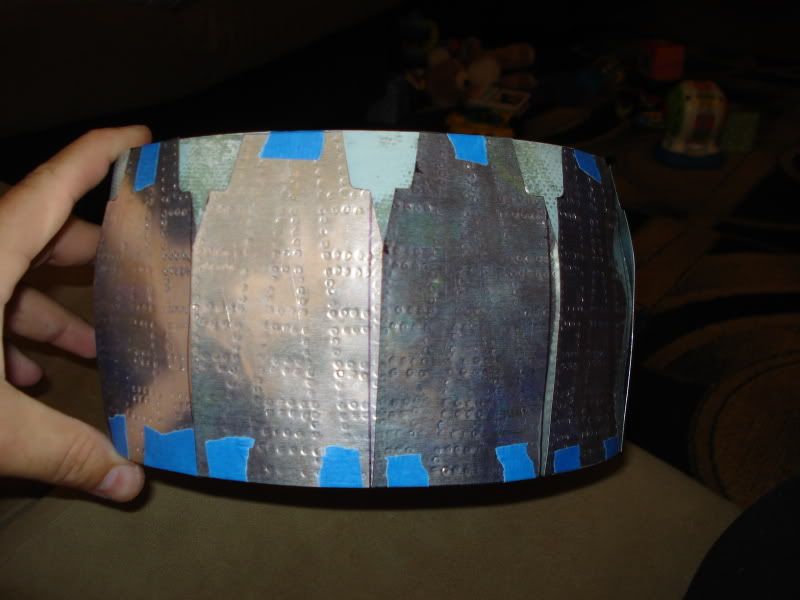
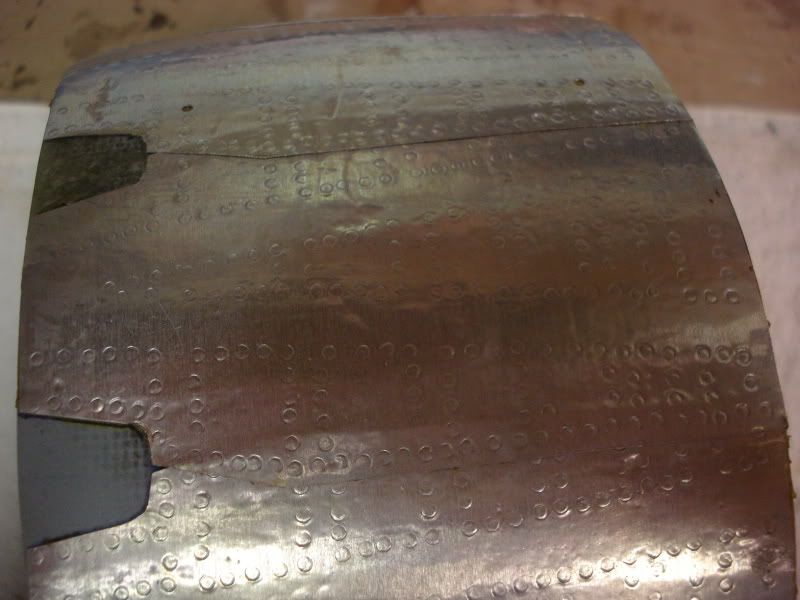
Then while i waited for that to cure, I made up 13 turkey feather panels for the exhaust nozzle (the nozzle only needs 12 panels). The 13th one was a mess up that was still utilized:

Then the rivet pattern was drawn out onto that 13th panel, and then a drill bit slightly larger than my rivet tool was used to drill the location of all the rivets.

The reason for the 13th panel with all the holes, is it allows you to get the rivet pattern exactly the same over all 12 panels.
So, then each panel was taped to the "cheese grater" panel and then the rivets were hammered into the panel.

Then 5 hours later, all 12 panels have been completed:

And a close-up of one of the panels:

And a video explaining more thoroughly how i came up with the dimensions of each panel:
http://www.youtube.com/watch?v=-jIb7rvDKZQ
Then while i waited for that to cure, I made up 13 turkey feather panels for the exhaust nozzle (the nozzle only needs 12 panels). The 13th one was a mess up that was still utilized:
Then the rivet pattern was drawn out onto that 13th panel, and then a drill bit slightly larger than my rivet tool was used to drill the location of all the rivets.
The reason for the 13th panel with all the holes, is it allows you to get the rivet pattern exactly the same over all 12 panels.
So, then each panel was taped to the "cheese grater" panel and then the rivets were hammered into the panel.
Then 5 hours later, all 12 panels have been completed:
And a close-up of one of the panels:
And a video explaining more thoroughly how i came up with the dimensions of each panel:
http://www.youtube.com/watch?v=-jIb7rvDKZQ
 10-17-2011, 01:02 AM
#938

Very nice.
You will need a lot of liquid wax to seal the interstices in between these panels. This will be necessary to ease the release of the mould and avoid damaging the plug too much.
Don't use paste wax in these areas since it would probably not seal the gaps between the panels properly.
You will need a lot of liquid wax to seal the interstices in between these panels. This will be necessary to ease the release of the mould and avoid damaging the plug too much.
Don't use paste wax in these areas since it would probably not seal the gaps between the panels properly.
10-17-2011, 05:51 AM
#939
ORIGINAL: olnico
Very nice.
You will need a lot of liquid wax to seal the interstices in between these panels. This will be necessary to ease the release of the mould and avoid damaging the plug too much.
Don't use paste wax in these areas since it would probably not seal the gaps between the panels properly.
Very nice.
You will need a lot of liquid wax to seal the interstices in between these panels. This will be necessary to ease the release of the mould and avoid damaging the plug too much.
Don't use paste wax in these areas since it would probably not seal the gaps between the panels properly.
I used the rudder and stabilators as guinea pigs for seeing how the mold detail worked out. I'm pleased to say that the paste wax got down even in the smallest of the panel lines and release was very easy. To add to that, I am also using a fairly thick layer of PVA liquid mold release as well just because i don't want these things to stick. But, thats not to say that the vertical stabs and fuselage won't have issues, as the doublers at the tips of the vertical stabs and 4 layers thick. Now just to get the remainder of the paint overspray and contact adhesive cleaned off, and they are ready to mold.
10-18-2011, 02:54 PM
#940
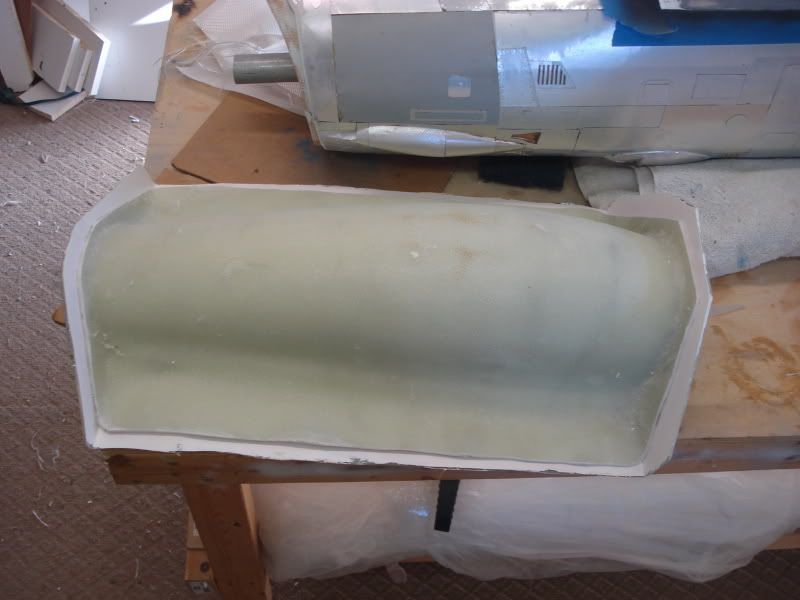
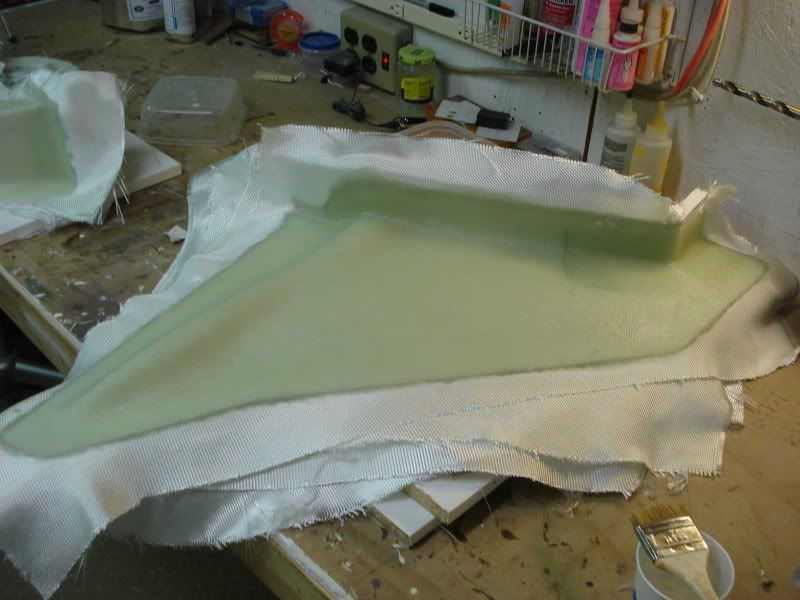
The plug glassed, filled and sanded. I'm not to worried about making this 100% perfect except for the aft corners of the cone.
Then i started doing the test-layout of the turkey feather panels. I've still got to anneal and form these, but they are essentially ready to install.
Then i started doing the test-layout of the turkey feather panels. I've still got to anneal and form these, but they are essentially ready to install.
10-21-2011, 01:53 PM
#941
Formed and permanently installed the burner can Petals on today. One of the edges of the first petal installed must not be glued, as it overlaps the top of the petal next to it. Once completed you get this:
For those concerned the rivet detail was to pronounced, It was that way b/c once they were annealed and formed, you end up with the rivets looking like this:
And of course it mocked up to the fuselage. Now i just need to finish the fuselage sections:
And the Fed-ex man dropped off some supplies, hopefully this is the last order of mold making supplies:
10-22-2011, 01:29 PM
#942
Did a bit of work to the tomcat so far today after doing some maintenance on some other stuff.
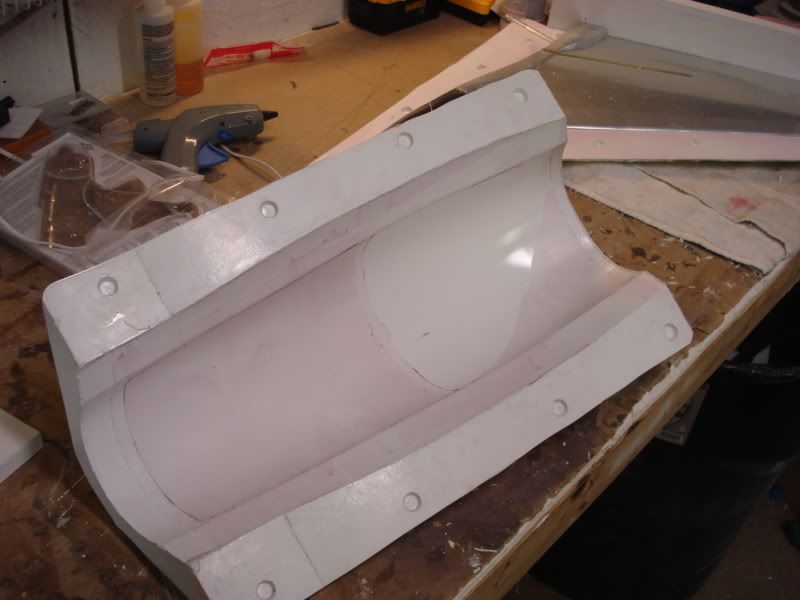
First up was doing the rough cut and mockup of the exhaust nozzle parting planes:

Then i finished the aft of the fuselage, and glassed the exposed balsa surfaces. Once this has cured, more body filler, sanding and then it'll be done. I also did a bit of filling around the over wing fairing hatch flanges, so they are nearly done as well:

Then started work on the vertical stab parting planes as well. the vertical sections along the trailing edge of the fin will allow me to build up a flange their so it will help strengthen the mold, and allow me a place to clamp the jig for the internal structure.

First up was doing the rough cut and mockup of the exhaust nozzle parting planes:
Then i finished the aft of the fuselage, and glassed the exposed balsa surfaces. Once this has cured, more body filler, sanding and then it'll be done. I also did a bit of filling around the over wing fairing hatch flanges, so they are nearly done as well:
Then started work on the vertical stab parting planes as well. the vertical sections along the trailing edge of the fin will allow me to build up a flange their so it will help strengthen the mold, and allow me a place to clamp the jig for the internal structure.
10-24-2011, 10:41 PM
#943
Since i have to go onto a third shift schedule for 1 night, I have tonight to pull an all nighter and do some work.
Soo..
The canopy is waxed and placed back into the canopy mold bottom:

Once the canopy is molded, the bottom portion of the mold will be trimmed slightly larger than what the canopy frame width should be. So, now your probably wondering how the canopy plug is held in place. I drilled 6 holes in the area that would be cut away later on, then used dry-wall screws to hold the canopy plug in place:

Then waxed the right vertical fin plug, built all the parting planes, then put some body filler to fill in the gaps. The body shop didn't have the stuff i normally used and recommended another to use, so I picked it up AND ordered my normal stuff. The difference between the 2 (normal stuff = Evercoat easy-sand, new stuff = dolphin glaze) is the easy-sand is a little thicker and doesn't sag as much as the dolphin glaze. That being said, the dolphin glaze works great if you have a really tight fitting parting plane, but if the fit is loose the ever-coat works better. since the vertical fin was fairly tight fitting around the leading edge, the dolphin worked well, but I will have to wait till my easy-sand shows up to finish filling the gaps.

Then I removed the excess fiberglass from the aft end of the fuse, sanded, put some body filler down, and now have some paint curing. I also did the same thing for the over-wing fairing flanges, and the cockpit deck. I have to do some sanding on the aft bottom side of the fuse and anything else that pops up in this area, then the fuselage will be done.


Soo..
The canopy is waxed and placed back into the canopy mold bottom:
Once the canopy is molded, the bottom portion of the mold will be trimmed slightly larger than what the canopy frame width should be. So, now your probably wondering how the canopy plug is held in place. I drilled 6 holes in the area that would be cut away later on, then used dry-wall screws to hold the canopy plug in place:
Then waxed the right vertical fin plug, built all the parting planes, then put some body filler to fill in the gaps. The body shop didn't have the stuff i normally used and recommended another to use, so I picked it up AND ordered my normal stuff. The difference between the 2 (normal stuff = Evercoat easy-sand, new stuff = dolphin glaze) is the easy-sand is a little thicker and doesn't sag as much as the dolphin glaze. That being said, the dolphin glaze works great if you have a really tight fitting parting plane, but if the fit is loose the ever-coat works better. since the vertical fin was fairly tight fitting around the leading edge, the dolphin worked well, but I will have to wait till my easy-sand shows up to finish filling the gaps.
Then I removed the excess fiberglass from the aft end of the fuse, sanded, put some body filler down, and now have some paint curing. I also did the same thing for the over-wing fairing flanges, and the cockpit deck. I have to do some sanding on the aft bottom side of the fuse and anything else that pops up in this area, then the fuselage will be done.
10-25-2011, 02:24 AM
#944

Join Date: Apr 2005
Location: Stockholm SWEDEN
Posts: 314
Likes: 0
Received 0 Likes
on
0 Posts
Wow! Labour of love! But im sure there is a bit perversion involved also.......... in other words Nice!
I do think there is an aeroplane somewhere in the other end of all that work.
I do think there is an aeroplane somewhere in the other end of all that work.
11-02-2011, 12:43 AM
#945
Alright, I'm back home after going off to visit family (IE vacation) and then getting called off vacation for 2 days to work.. Anyways, another all night'r to get onto a 3rd shift schedule for tomorrows work day(night). So on the way home, i picked up the evercoat "easy sand" body filler and got the one vertical stab and the exhaust nozzle parting planes completed, locating keys installed and then waxed it all again. These just need sprayed with PVA and they are ready to be molded, which will happen this weekend. After all that, i did some more filling and sanding on the fuselage area's (still working on getting these 100% perfect), and then cut out all the pieces of glass for the vertical stab, canopy frame and exhaust nozzle molds. I'm going to work fairly hard over the next 2 weeks to get the rest of the tail parts molded, after that I will have to take a break for 2 to 3 weeks, as we are moving into a larger home. Not looking forward to the packing and moving, but it is for the better, as I will be getting a full 2 car garage and another detached 1 car garage to use as shop space, So I will FINALLY have the room to build the CNC router and a larger building table I have been wanting for the past 2 1/2 years.


11-05-2011, 08:19 PM
#946
Progress... sweet Progress.....
After laying up the Canopy frame, right vertical stab and exhaust nozzle molds, I separated them, then trimmed the edges.
Then i popped the canopy frame plug out of the mold. The plug stuck in the mold around the frame "hoops" and along the bottom edges, so the plug received some damage to the litho detailings, but the mold came out great, so I can make up another plug by laying doing a thick layup of glass if I had to:
A close-up of the forward frame hoop area:
After trimming the Vertical stab and exhaust nozzle mold halves, the TE vertical stab parting planes were re-installed, then everything waxed and PVA'd. Ready for the 2nd halves to be molded up:
Then a few hours later (10), the 2nd half of the vertical stab and exhaust nozzle molds were finished being laid up:
Tomorrow's plan:
Trim the mold halves, wash the amine bloom off, then clamp the halves together till its ready to make parts. Then get the other vertical stab readied in its parting plane so it can be molded next week. I've got to start doing some packing of stuff in the shop to prep for the move, but if I can steal some time this week to get the over wing fairings and parting planes built up, I'll get those molded as well.
11-06-2011, 04:06 PM
#947
Yesterday's plan for today actually worked out well.
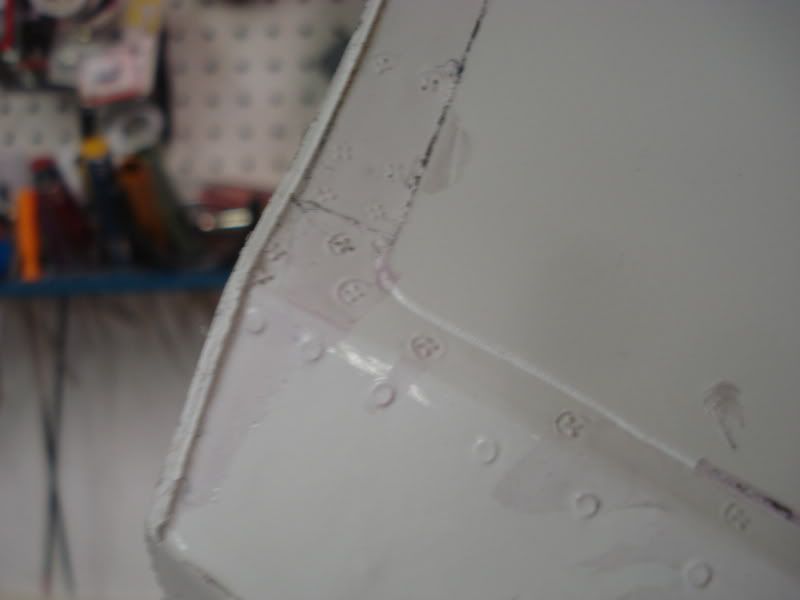
Trimmed and separated Exhaust nozzle mold. I tried to get a close-up photo showing the spot weld and rippled panel detail, but the white back-ground and my camera weren't playing well together.

The trimmed and separated Right vertical fin mold. I haven't cleaned the PVA out of these yet in the photos. All of the details transferred extremely well and I am VERY pleased.

Close up of the area where the doublers are simulated.

Close up of the phi;lips headed screws on the base fairing panels:

The plug did sustain a little damage. Not much, just a few panels loosed up:

The Tubular spar slots were molded slightly different on these molds than the stabs. Instead of splitting the rod at the exact center, i offset the parting plane slightly. This allows the spar tube to be firmly held into position on 1 half of the mold, so when all of the internal structure is added, it all gets held firmly.
Below are 2 photo's showing a spar in place. I haven't decided what the internal structure is going to look like yet, but I don't forsee it being very much.


Then i got the other vertical stab readied for molding. Its ready to have the PVA sprayed and then it can be molded. This one is a slightly more complicated mold b/c of the Naca duct on the lower fairing. So it will be a 3 piece mold, with the forward portion around the Naca duct being the 3rd part of the mold.

I got some packing done as well.

Trimmed and separated Exhaust nozzle mold. I tried to get a close-up photo showing the spot weld and rippled panel detail, but the white back-ground and my camera weren't playing well together.
The trimmed and separated Right vertical fin mold. I haven't cleaned the PVA out of these yet in the photos. All of the details transferred extremely well and I am VERY pleased.
Close up of the area where the doublers are simulated.
Close up of the phi;lips headed screws on the base fairing panels:
The plug did sustain a little damage. Not much, just a few panels loosed up:
The Tubular spar slots were molded slightly different on these molds than the stabs. Instead of splitting the rod at the exact center, i offset the parting plane slightly. This allows the spar tube to be firmly held into position on 1 half of the mold, so when all of the internal structure is added, it all gets held firmly.
Below are 2 photo's showing a spar in place. I haven't decided what the internal structure is going to look like yet, but I don't forsee it being very much.
Then i got the other vertical stab readied for molding. Its ready to have the PVA sprayed and then it can be molded. This one is a slightly more complicated mold b/c of the Naca duct on the lower fairing. So it will be a 3 piece mold, with the forward portion around the Naca duct being the 3rd part of the mold.
I got some packing done as well.
11-06-2011, 06:29 PM
#948


Join Date: Jan 2006
Location: Colorado Springs,
CO
Posts: 530
Likes: 0
Received 0 Likes
on
0 Posts
I flew the Tomcat from 1975 through 1996, mostly at NAS Oceana. I fly RC and have two turbine models. I have been following your build thread and am absolutely in awe of the build techniques and the detail of your molds. I look forward to watching your further progress!
Regards,
Gus Grissom
Regards,
Gus Grissom
11-10-2011, 09:02 PM
#949
Gus,
Glad to have ya following the thread. Maybe when i get the model done, I can attend and bring it to one of the Tomcat Sunset Reunions they have each year. I'm hoping to have one of them flying this year, so i can make a trip up to NY to fly it at the old grumman calverton facility to celebrate the 42nd anniv. of the Tomcat's first flight.
Glad to have ya following the thread. Maybe when i get the model done, I can attend and bring it to one of the Tomcat Sunset Reunions they have each year. I'm hoping to have one of them flying this year, so i can make a trip up to NY to fly it at the old grumman calverton facility to celebrate the 42nd anniv. of the Tomcat's first flight.
11-10-2011, 09:08 PM
#950
Just a short little update for tonight.
First Mold third of the left vertical stabilizer is laid up:

Also laid up the first half of the ventral fin:

Plan for the tomorrow, is to Get the over-wing fairings prepped to be molded. If time allows, I will lay up the molds for that. I've got to study for my annual re-currency training for work, so time probably wont allow. But i fully intend to get the vertical stab and ventral fins completed by the end of the weekend. I will have the Over-wing fairing molds completed by the end of next week as well, that way all that is left to be molded (that is nearly ready for molding) is the wing panels and fuselage.
First Mold third of the left vertical stabilizer is laid up:
Also laid up the first half of the ventral fin:
Plan for the tomorrow, is to Get the over-wing fairings prepped to be molded. If time allows, I will lay up the molds for that. I've got to study for my annual re-currency training for work, so time probably wont allow. But i fully intend to get the vertical stab and ventral fins completed by the end of the weekend. I will have the Over-wing fairing molds completed by the end of next week as well, that way all that is left to be molded (that is nearly ready for molding) is the wing panels and fuselage.

