


Jet legend F-4 "Journey Begins"
 12-27-2009, 01:25 PM
#51

Dave,
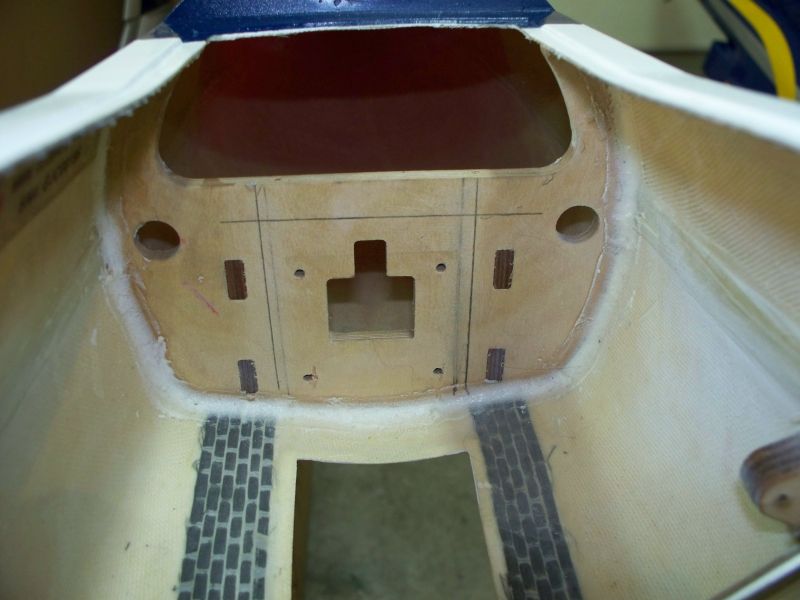
If I do cut the nose off, I'll be sure to post step by step photos. As it is, I am weighing all my options "which are very limited". This is purely a conceptual thought, and I would like others input on it. I am thinking of cutting the nose gear former as shown by the drawn vertical lines just inside the vertical supports and lower the top cutout as depicted by the horizontal line. This will open the area up such that I can get to the forward nose section to make a secure platform for mounting batteries, air tanks, etc;.
I was then going to make another former from c/f plate to which I would mount the nose gear retract and then bolt that plate to the existing corner sections, thus tying the former back together as if it were a solid unit. This will displace the nose gear retract about 3mm further rearward, but shouldn't really be an issue. Thoughts anyone?
 12-31-2009, 02:39 AM
#52
ORIGINAL: WhoDaMan
very clean I like that idea
Ron will you cut the nose off your bird and if you do please post steps
very clean I like that idea
Ron will you cut the nose off your bird and if you do please post steps
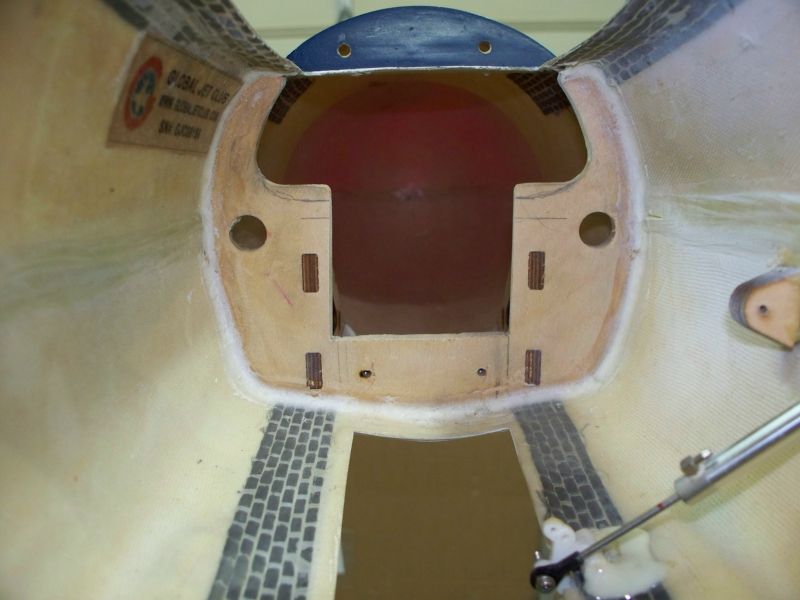
Well Dave, since no one was giving any pros or cons on my idea...I elected to go with my previous idea. Instead of cutting the nose off, I opened up the nose gear former. I cut a new gear mount out of 3mm c/f plate which will be bolted to the original gear plate. I elected to leave the bottom section of the original former to keep the former tied together as much as possible. This also left the bottom two original gear mounting holes that acted as a reference for locating the holes in the c/f plate. With the former now opened up, I can make a removable tray that will secure the batteries.
 12-31-2009, 10:46 AM
#55

looks good amigo and great idea tieing the former together with the carbon plate.
the 3mm shift aft might interfere with the cockpit tub. i had to cut 1/2" from the front section of my cockpit tub, mostly just the pilots legs though. (although this was on a SM F4) not sure if it will create a similar problem with this kit
keep up the great work. pics look great
the 3mm shift aft might interfere with the cockpit tub. i had to cut 1/2" from the front section of my cockpit tub, mostly just the pilots legs though. (although this was on a SM F4) not sure if it will create a similar problem with this kit
keep up the great work. pics look great
12-31-2009, 11:29 AM
#56

My Feedback: (7)

Join Date: Jan 2002
Location: Arlington Heights,
IL
Posts: 168
Likes: 0
Received 0 Likes
on
0 Posts
I was concerned about the vent system ecspecially with the Jetcat P-180 so I ground away the plastic nipples and replaced them with a larger diameter brass fitting, also going with a Tam pipe as the stock one looks a bit inadiquate.
Alittle bitof grinding too clear the stab from rubbing.
Roman
12-31-2009, 06:10 PM
#58
ORIGINAL: Falcon29
I was concerned about the vent system ecspecially with the Jetcat P-180 so I ground away the plastic nipples and replaced them with a larger diameter brass fitting, also going with a Tam pipe as the stock one looks a bit inadiquate.
A little bit of grinding too clear the stab from rubbing.
Roman
I was concerned about the vent system ecspecially with the Jetcat P-180 so I ground away the plastic nipples and replaced them with a larger diameter brass fitting, also going with a Tam pipe as the stock one looks a bit inadiquate.
A little bit of grinding too clear the stab from rubbing.
Roman
Even though Mike said the vents were sufficient, I think that going larger is a wise move on your part. It may not be needed, but I will be doing the same...better safe than sorry! On the stab notch, mine has plenty of clearance in that respect but the screws stand proud almost touching the stabs. The small screws used on mine are of the countersink variety, but the curved plate covers are not countersunk to accept them properly. I will remove those and lightly countersink the holes for a better fit of the screws. Nice job on the added rivet detail...I like it.
12-31-2009, 08:40 PM
#59

My Feedback: (2)

Join Date: May 2002
Location: Honolulu,
HI
Posts: 924
Likes: 0
Received 0 Likes
on
0 Posts
Happy new year everyone!!!
Hey Dave
Sorry for the late reply, I flew mine with 2 X Kingtech K-80s = good power
Then converted it to single Super Eagle, no issues, power was good. Im able to get off in about 250 ft and land in about 350 450. Normal flight about 75% throttle. Not blazing fast, enought power for loops some vertical.
Ronnie, looking good! Im working on mine now ill try and look re: the cockpit clearance. New Years eve in Honolulu is some what like a war zone (fireworks) so Ill not get much done tonight
Aloha
Duke
12-31-2009, 11:03 PM
#60
ORIGINAL: yeahbaby
looks good amigo and great idea tieing the former together with the carbon plate.
the 3mm shift aft might interfere with the cockpit tub. i had to cut 1/2'' from the front section of my cockpit tub, mostly just the pilots legs though. (although this was on a SM F4) not sure if it will create a similar problem with this kit
keep up the great work. pics look great
Buck,
No problem here with cockpit interference issue's...the gear even though moved back 3mm clears the tub fine.
 12-31-2009, 11:46 PM
#63
ORIGINAL: jeteye
Great project Ronnie. Should be a great flying machine. Have it ready in time for Jets Over Kentucky Week (July 4th-11th)[img][/img][img][/img].
Great project Ronnie. Should be a great flying machine. Have it ready in time for Jets Over Kentucky Week (July 4th-11th)[img][/img][img][/img].
I don't know Lewis, that's only seven months away
....be here before you know it. Can't wait though!Oops, only six months and a week...time is running out.
01-01-2010, 01:09 PM
#64
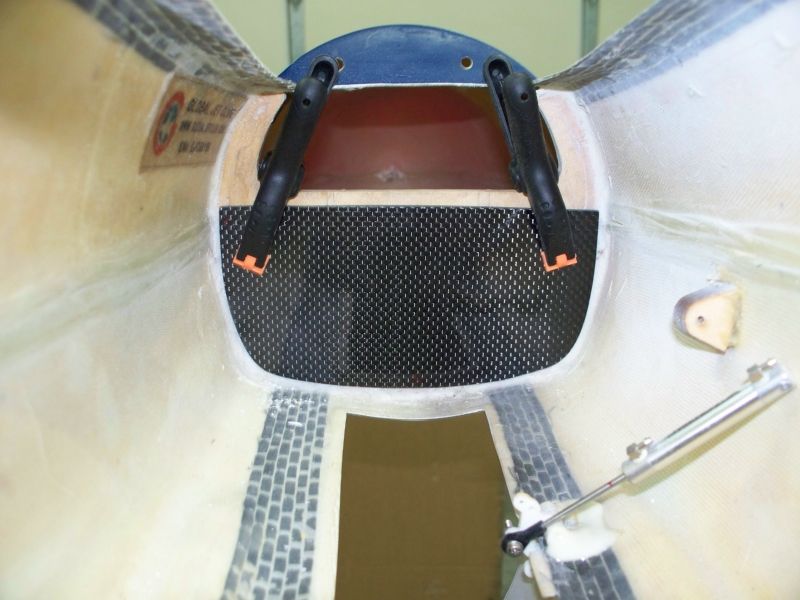
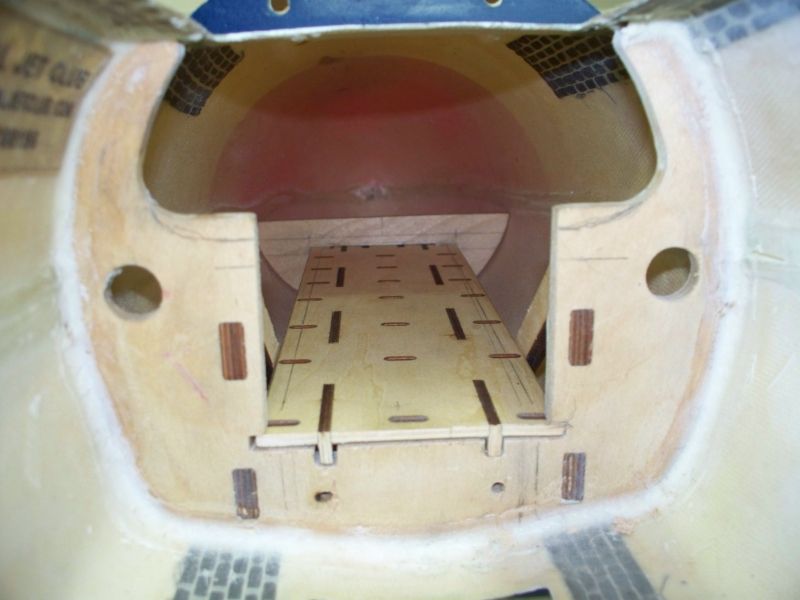
Thinking of how I was going to secure the forward battery tray I came up with the method as shown in the photo. I used the kit supplied front tray and modified it by narrowing the plate so that it was just wide enough to slide between the two nose gear former vertical supports. Two vertical notches were cut at the bottom of the original gear former to clear the stiffeners of the original tray and then two more horizontal notches cut at the bottom of the former so the tray would slide through.
I will make a half former with a rectangular slot to accept a tab cut into the forward edge of the tray to support it. The forward former will also act as a stop so that when the tray is slid in, the back edge of the tray rest on the bottom lip of the original former. When the 3mm c/f plate is bolted in and the forward former installed, it will essentially lock the battery tray in place.
I will make a half former with a rectangular slot to accept a tab cut into the forward edge of the tray to support it. The forward former will also act as a stop so that when the tray is slid in, the back edge of the tray rest on the bottom lip of the original former. When the 3mm c/f plate is bolted in and the forward former installed, it will essentially lock the battery tray in place.
01-01-2010, 01:23 PM
#65
My Feedback: (164)

Join Date: Dec 2001
Location: Davis,
CA
Posts: 4,243
Likes: 0
Received 0 Likes
on
0 Posts
Very clean install Ronnie,,,,,
I hope you don't mind this is the nose pod that Dave Hudson made for my F-4 ALQ-119 ECM pod. Also the new radar for the tail
I hope you don't mind this is the nose pod that Dave Hudson made for my F-4 ALQ-119 ECM pod. Also the new radar for the tail
 01-01-2010, 06:09 PM
#67
ORIGINAL: WhoDaMan
Very clean install Ronnie,,,,,
I hope you don't mind this is the nose pod that Dave Hudson made for my F-4 ALQ-119 ECM pod. Also the new radar for the tail
Very clean install Ronnie,,,,,
I hope you don't mind this is the nose pod that Dave Hudson made for my F-4 ALQ-119 ECM pod. Also the new radar for the tail
Dave,
I don't mind at all...love to see what others are doing. I had to go back and look at the pics of your plastic model to get a grasp of the mods you are making. Pretty extensive mod there on the vertical stab with the radar. She will be awesome when you get it loaded out and painted. That's whats great about this hobby, there is something for everyone's taste.
01-03-2010, 06:00 PM
#68
Ramon,
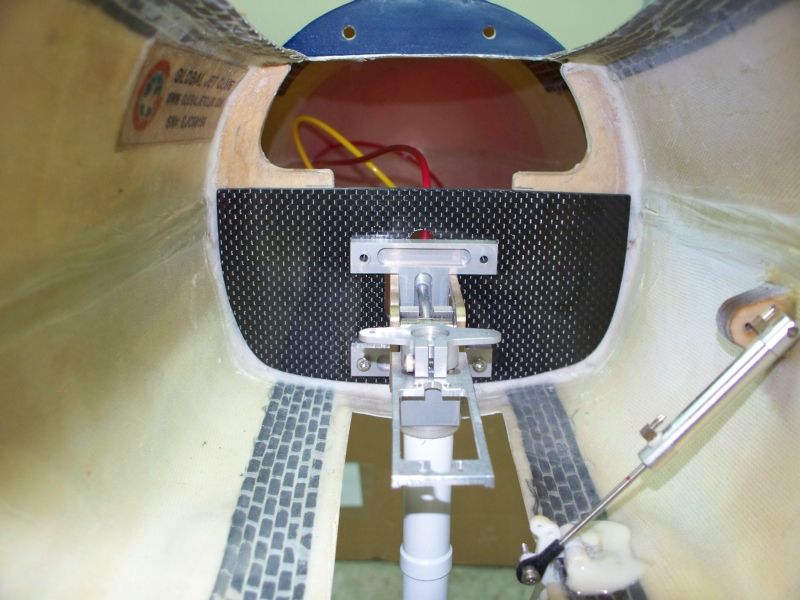
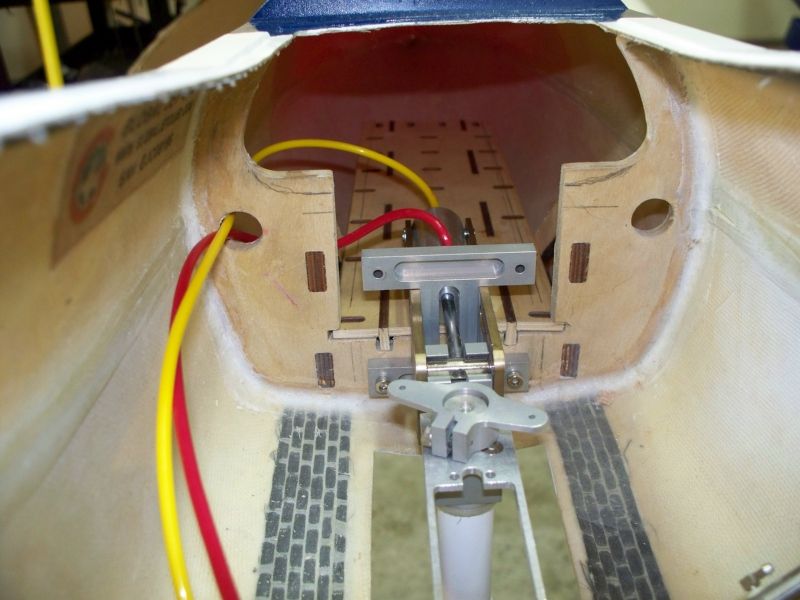
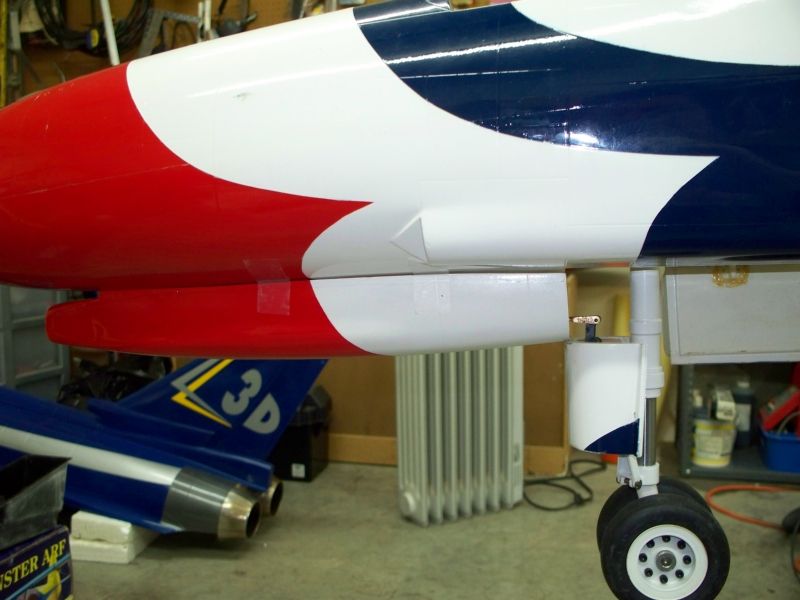
As I said earlier in regards to the small nose gear door actuation...I wanted something a little more solid than the wire method. Well, I got it, but it didn't come easy... PITA as matter of fact! I spent a lot of time figuring out how I was going to get the pneumatic cylinder in and make it removable for service, not to mention figure out the location it needed to be.
I ended up making the cylinder mount and then screwed that to a 1/4 ply center post. With the mount screwed to the post and all attached to the cylinder, I placed the whole assembly into position and located so that when the door was in the closed position the cylinder ram was completely retracted and then tacked glued the post into position with thin CA. The ram stroke in the extended position puts the door about vertical to the gear.
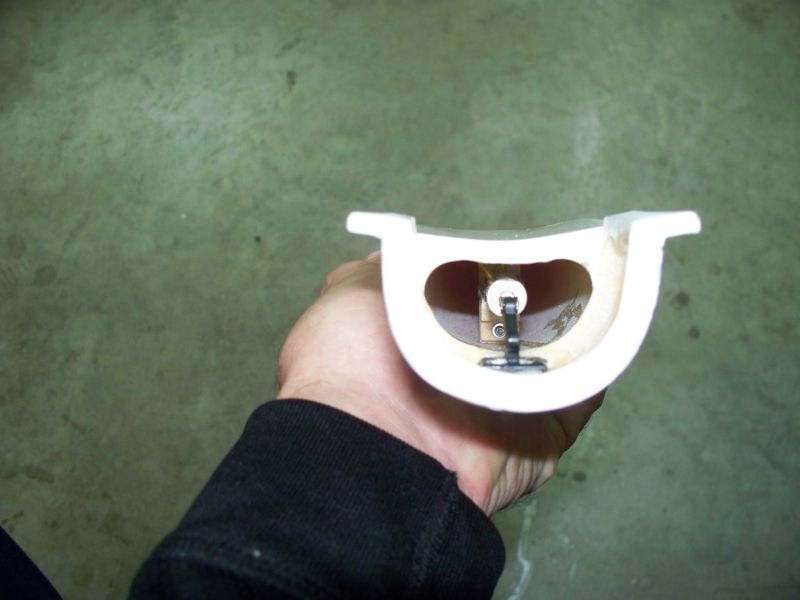
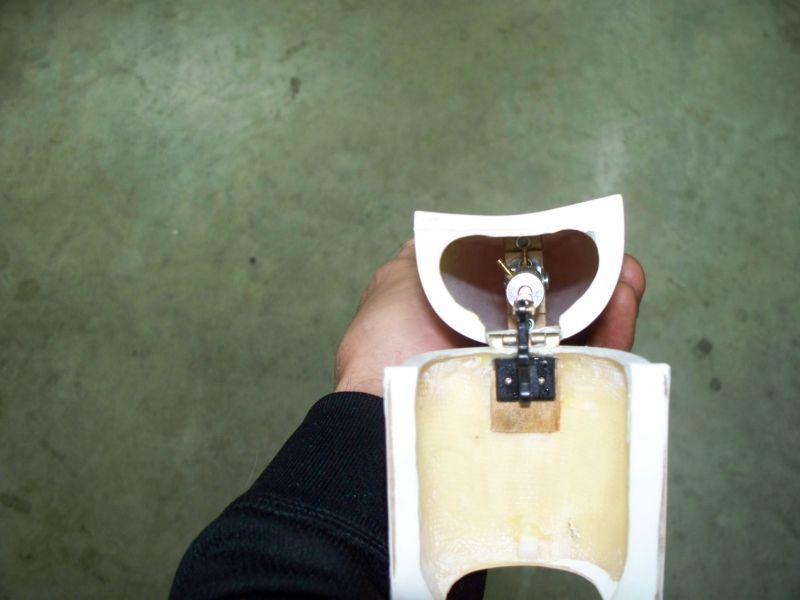
01-03-2010, 09:32 PM
#70
ORIGINAL: WhoDaMan
I'm glad you figured that out now I can send you mine so you can perfect it
I'm glad you figured that out now I can send you mine so you can perfect it
 01-04-2010, 06:52 AM
#71
My Feedback: (2)
Join Date: May 2002
Location: Honolulu,
HI
Posts: 924
Likes: 0
Received 0 Likes
on
0 Posts
Hi Ronnie
I did almost the same thing you did that sub nose door it is a bummer trying to figure it out. Yours looks way more robust than mine im sure it will work well.
I just came up with this tonight. Drilled a 1/16" hole in the side of the front nws servo mount and screwed in a ball link and ran a threaded rod down to the nose gear and trial fit the horn till it looked good. Works great, have to try it in the air Sunday. Now I won't have the sequencing headaches that I had using the air cylinder... I hope.
My door looks smaller because I cut off the base of the door and glued it to the fuselage for a more scale look.
01-04-2010, 03:53 PM
#73
My Feedback: (2)
Join Date: May 2002
Location: Honolulu,
HI
Posts: 924
Likes: 0
Received 0 Likes
on
0 Posts
Hey Buck
Happy new year!
I wanted to do that however the angle that nose strut hits the door makes a bumper difficult (I might have been looking at the wrong angle hmmm). Im sure if I made it big enough it would work, but was paranoid on the small door jamming the main nose door. I guess I could have used a elastic cord to keep it closed.
Aloha
Duke
01-04-2010, 06:55 PM
#74
Duke,
I like that setup and it also gives me something to fall back on in case I can't get the sequence of the air cylinder to work out. You clearly have eliminated the sequence issue with the direct link method. What makes that task difficult is finding the correct geometry.
I like that setup and it also gives me something to fall back on in case I can't get the sequence of the air cylinder to work out. You clearly have eliminated the sequence issue with the direct link method. What makes that task difficult is finding the correct geometry.
01-05-2010, 03:09 AM
#75
My Feedback: (2)
Join Date: May 2002
Location: Honolulu,
HI
Posts: 924
Likes: 0
Received 0 Likes
on
0 Posts
Hi Ronnie
If you need measurements let me know, as im working on the repairs Ill try and get them.
I had my engine quit last year and let me tell you deadsticks with an F-4 is not fun, anyway I had a big bubble or something and poof upwind pass in a roll had about 300 ft at 70% turned right away kind of a decending chandelle and ended up having to put it down downwind about 500 feet away from where I was standing. Well as luck would have it a wall obstructed my view during the final flare so I just pulled a little and hung on. It bounced a bit and then I re-flared slid on the asphalt and weeds for about 200 ft.
I thought it was done, nice suprise I had put a few minor scratches in the wing and knocked the tailcones off and popped the rear open a bit, I was so lucky... This F-4 is a tough bird! Ill try and post the video later.
Aloha
Duke