Go Back  RCU Forums > RC Airplanes > RC Jets
Reload this Page >

Falconwings Gear Door Tutorial

Community
Search
Notices
RC Jets Discuss RC jets in this forum plus rc turbines and ducted fan power systems

Falconwings Gear Door Tutorial

Thread Tools
 
Search this Thread
 
Old 09-04-2010, 04:01 PM
  #26  
ram3500-RCU
My Feedback: (221)
 
ram3500-RCU's Avatar
 
Join Date: Aug 2002
Location: n. canton, OH
Posts: 9,737
Received 12 Likes on 6 Posts
Default RE: Falconwings Gear Door Tutorial

Good work and very educational. Wish I had your computer skills.
Old 09-04-2010, 05:18 PM
  #27  
hooker53
My Feedback: (106)
 
Join Date: Nov 2003
Location: Martinsville, VA
Posts: 2,540
Likes: 0
Received 1 Like on 1 Post
Default RE: Falconwings Gear Door Tutorial

Dave, Thank you Thank you. Very good and will also print the Cyl work up, when you do it!!! Hooker53
Old 09-04-2010, 07:42 PM
  #28  
DavidR
Senior Member
My Feedback: (1)
 
Join Date: Dec 2001
Location: Oxford, MS
Posts: 3,241
Likes: 0
Received 0 Likes on 0 Posts
Default RE: Falconwings Gear Door Tutorial


ORIGINAL: FalconWings

Step 4. Repeat the same procedure for each hinge. Pay close attention to the hinge rotating freely, this is critical.
Also need to make sure your pivot point on your hinges is in line, especially if you use more than one hinge. Otherwise good illustration of door hinging.
Old 08-20-2015, 03:52 AM
  #29  
FalconWings
Thread Starter
My Feedback: (57)
 
FalconWings's Avatar
 
Join Date: Mar 2002
Location: Fort Worth, TX
Posts: 6,995
Received 15 Likes on 13 Posts
Default

I figure since there are so many F-16s out there, most being ARF with crappy gear door work......you may find this aid relevant.

Cheers,
David
Old 08-20-2015, 04:49 AM
  #30  
IFLYBVM2
My Feedback: (360)
 
Join Date: Dec 2001
Location: Georgetown, SC
Posts: 942
Likes: 0
Received 22 Likes on 20 Posts
Default

VERY well done..Concise and step by step. Thanks sooo much !
PS You should write manuals for the ARF companies....
Old 08-20-2015, 05:08 AM
  #31  
Guillermo Ibanez
My Feedback: (1)
 
Guillermo Ibanez's Avatar
 
Join Date: Nov 2004
Location: BarranquillaAtlantico, COLOMBIA
Posts: 977
Likes: 0
Received 0 Likes on 0 Posts
Default

Hey David, what about the gear door cylinder installation addendum.......There has been enough time to rest.......ha ha ha
Old 08-20-2015, 05:48 AM
  #32  
DrScoles
My Feedback: (18)
 
DrScoles's Avatar
 
Join Date: Sep 2002
Location: Sammamish, WA,
Posts: 2,394
Received 9 Likes on 9 Posts
Default

I see you did this five years ago. Man I wish I would have seen it earlier! So nice to see someone sharing their building knowledge instead of the advertising a new product or bashing one….
Old 08-20-2015, 06:38 AM
  #33  
NickC5FE
My Feedback: (31)
 
NickC5FE's Avatar
 
Join Date: Feb 2003
Location: Fairfield, CA
Posts: 2,887
Likes: 0
Received 1 Like on 1 Post
Default

Dave, really nice tutorial. I have been using that concept since i dont know how long and it works every time! Just my $.02- Could you do a tutorial for other things in landing gear install, like outer doors that must attach to the cylinder? I know there is a lot of trial and error figuring out the geometry, but just thought it may be easier to do on CAD...Thanks for the great work, you dont see "tutorials" or building advice much on here anymore probably because of the heavy influence of ARFs in the hobby now. Nick

Wow- just realized this was from 5 years ago....My bad ;-)
Old 08-20-2015, 06:52 AM
  #34  
FalconWings
Thread Starter
My Feedback: (57)
 
FalconWings's Avatar
 
Join Date: Mar 2002
Location: Fort Worth, TX
Posts: 6,995
Received 15 Likes on 13 Posts
Default

Originally Posted by IFLYBVM2
VERY well done..Concise and step by step. Thanks sooo much !
PS You should write manuals for the ARF companies....

No one's ever approached me, but yes I'd gladly do it. When I used to make installation drawings for F-35 Propulsion Stuff, mechanics would always compliment on how easy to read they were. If they can do it.....you can!! :-)
Old 08-20-2015, 06:53 AM
  #35  
FalconWings
Thread Starter
My Feedback: (57)
 
FalconWings's Avatar
 
Join Date: Mar 2002
Location: Fort Worth, TX
Posts: 6,995
Received 15 Likes on 13 Posts
Default

Guillo, Im on it :-)
Old 08-20-2015, 06:54 AM
  #36  
FalconWings
Thread Starter
My Feedback: (57)
 
FalconWings's Avatar
 
Join Date: Mar 2002
Location: Fort Worth, TX
Posts: 6,995
Received 15 Likes on 13 Posts
Default

NIck if you give me an example I could probably sketch something up.
Old 08-20-2015, 07:09 AM
  #37  
cycross
 
cycross's Avatar
 
Join Date: Dec 2005
Posts: 121
Received 1 Like on 1 Post
Default

FalconWings, Thank you for your sharing! Very useful and the CAD complements the instructions for clear understanding.
Old 08-20-2015, 07:30 AM
  #38  
Guillermo Ibanez
My Feedback: (1)
 
Guillermo Ibanez's Avatar
 
Join Date: Nov 2004
Location: BarranquillaAtlantico, COLOMBIA
Posts: 977
Likes: 0
Received 0 Likes on 0 Posts
Default

OK
Old 08-20-2015, 11:53 AM
  #39  
mr_matt
My Feedback: (10)
 
mr_matt's Avatar
 
Join Date: Dec 2001
Location: Oak Park, CA,
Posts: 10,446
Likes: 0
Received 12 Likes on 10 Posts
Default

Great old thread, I do the same thing but as the ghost of David Reid said, make sure the hinges line up. I usually pull the screws out of the hinges and drill them out for a wire hinge pin that runs through all of the hinges, and use it when gluing the bases down. As Falconwings says getting that hinge as close to the fuse as possible helps, great tip.
Old 08-21-2015, 04:52 AM
  #40  
FalconWings
Thread Starter
My Feedback: (57)
 
FalconWings's Avatar
 
Join Date: Mar 2002
Location: Fort Worth, TX
Posts: 6,995
Received 15 Likes on 13 Posts
Default

Ok, here we go, Door Cylinder installation.

#1 install the air cylinder to the door. The location of the sylinder mount on the door may take some trial and error, as it will define the amount of available "throw" for the door....similar to installing a control horn. On an F-16, it will have to be on the lower 20% of the door, mostly to keep it away from the wheel in the retracted position.
Retract the cylinder, and tape the door shut to the fuselage.
Attached Thumbnails Click image for larger version

Name:	in1.jpg
Views:	506
Size:	69.9 KB
ID:	2115913  
Old 08-21-2015, 04:54 AM
  #41  
FalconWings
Thread Starter
My Feedback: (57)
 
FalconWings's Avatar
 
Join Date: Mar 2002
Location: Fort Worth, TX
Posts: 6,995
Received 15 Likes on 13 Posts
Default

#2, swing the cylinder around along the door mount axis, and mark the circle traced on the bulkhead were the cylinder will be mounted.

Attached Thumbnails Click image for larger version

Name:	INS2.jpg
Views:	412
Size:	51.5 KB
ID:	2115914  
Old 08-21-2015, 04:55 AM
  #42  
FalconWings
Thread Starter
My Feedback: (57)
 
FalconWings's Avatar
 
Join Date: Mar 2002
Location: Fort Worth, TX
Posts: 6,995
Received 15 Likes on 13 Posts
Default

#3, Now try locking the door in the open position, and make sure it clears the landing gear strut in the exended position.

Attached Thumbnails Click image for larger version

Name:	INS4.jpg
Views:	432
Size:	86.4 KB
ID:	2115915  
Old 08-21-2015, 04:58 AM
  #43  
FalconWings
Thread Starter
My Feedback: (57)
 
FalconWings's Avatar
 
Join Date: Mar 2002
Location: Fort Worth, TX
Posts: 6,995
Received 15 Likes on 13 Posts
Default

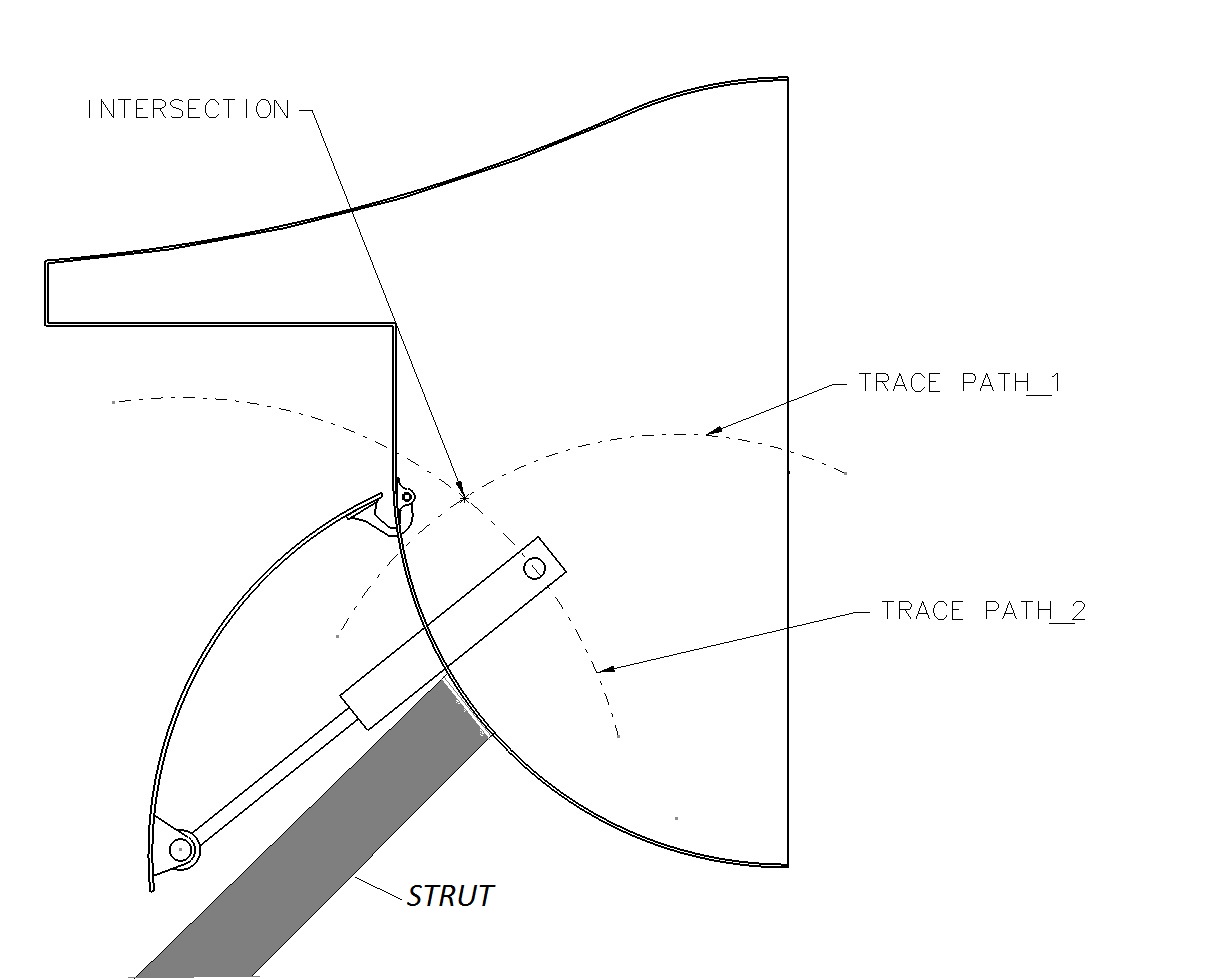
#4, Swing the air cylinder along the gear door mount axis again in the extended position, and trace on the bulkhead where the cylinder will be mounted. The intersection of the two traced cylinders will mark the location of the air cylinder mount on the bulkhead.

Attached Thumbnails Click image for larger version

Name:	INST4.jpg
Views:	460
Size:	93.4 KB
ID:	2115916  
Old 08-21-2015, 05:00 AM
  #44  
FalconWings
Thread Starter
My Feedback: (57)
 
FalconWings's Avatar
 
Join Date: Mar 2002
Location: Fort Worth, TX
Posts: 6,995
Received 15 Likes on 13 Posts
Default

#5 Finish the air cylinder installation. You may need to add 1/8" hardwoowd as a mounting block/standoff. It takes some trial and error to get it right, but this is the mechanical concept.

Attached Thumbnails Click image for larger version

Name:	INST5.jpg
Views:	417
Size:	53.2 KB
ID:	2115917  
Old 08-21-2015, 05:19 AM
  #45  
Guillermo Ibanez
My Feedback: (1)
 
Guillermo Ibanez's Avatar
 
Join Date: Nov 2004
Location: BarranquillaAtlantico, COLOMBIA
Posts: 977
Likes: 0
Received 0 Likes on 0 Posts
Default

Perfect. Very nice job

Thank you David
Old 08-21-2015, 05:53 PM
  #46  
sideshow
My Feedback: (11)
 
sideshow's Avatar
 
Join Date: Nov 2001
Location: Pleasanton, CA
Posts: 3,224
Received 2 Likes on 2 Posts
Default

Thanks so much for this.....

Posting Rules
You may not post new threads
You may not post replies
You may not post attachments
You may not edit your posts

BB code is On
Smilies are On
[IMG] code is On
HTML code is Off


Contact Us - Archive - Advertising - Cookie Policy - Privacy Statement - Terms of Service -

Copyright © 2024 MH Sub I, LLC dba Internet Brands. All rights reserved. Use of this site indicates your consent to the Terms of Use.