


DERIVATIVE, New 2X2
 07-01-2014, 12:27 PM
#226
Senior Member
Thread Starter
Hello Matt
Thanks for the informations.
I'm fond of building technique. So I found this notices :
http://www.aeromaniacs.com/pdf/Bob%2...ing%20Wing.pdf
http://www.modelaircraft.org/files/1049G-Fast.pdf
Claude
Thanks for the informations.
I'm fond of building technique. So I found this notices :
http://www.aeromaniacs.com/pdf/Bob%2...ing%20Wing.pdf
http://www.modelaircraft.org/files/1049G-Fast.pdf
Claude
But my goodness what an ugly plane. We have gotten so spoiled in pattern with the gorgeous planes we make and fly...LOL!
 07-03-2014, 06:02 AM
#227
Senior Member
Thread Starter
I'm progressing slowly and taking photos. I will be posting them over the holiday weekend (Independence Day in the US).
The batch of ribs is shaving a considerable amount of weight off the build, compared to straight foam. The 1/2 Lb density foam core weighs about 11 grams, which means if 1 Lb density foam is used which is far more typical, that's 20+ grams for each foam core. Hollowed out Balsa ribs (10 per panel) weigh 5 grams per panel. The extra work is worth it to me to shave that much weight off the stab.
The skins are taper sanded which shaves another 20% off each skin. The molded LEs weigh about 60% of what a shaped, carved stick LE would weigh. Stab/elevator area is 245 square inches. Again, building strong enough for the job and not overbuilding is the key....
07-08-2014, 06:50 AM
#228
Senior Member
Thread Starter
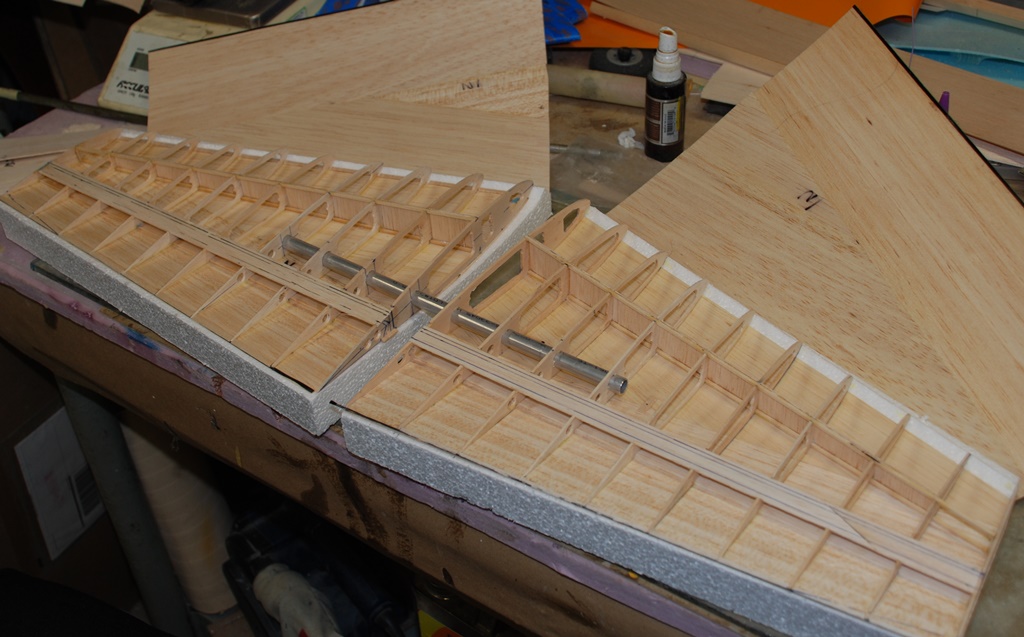
Some photos. Foam core prep was started with lining of the foam core with masking tape. Typically this step would not be required but in my case, the foam was very low density (<1/2 lb stock) and tended to fall apart. The tape added some resiliency so I could work with the cut stations.
Rib accuracy probably rivals laser-cutting. The Lost Foam method is worth the trouble I think. Weights are rather low about 20 grams each panel without the top sheet and socket installed yet.
I'll post final weights when I have the parts ready for covering.


Rib accuracy probably rivals laser-cutting. The Lost Foam method is worth the trouble I think. Weights are rather low about 20 grams each panel without the top sheet and socket installed yet.
I'll post final weights when I have the parts ready for covering.
Last edited by MTK; 07-08-2014 at 10:28 AM.
07-08-2014, 07:08 AM
#229
Senior Member
Thread Starter
The last photo above shows the Gator RC carbon tube and a couple different socket options. The black fiberglass (the lower tube) is the stock item that comes in the package. It weighs around 11 grams. The carbon tube (middle tube in the last photo above) is the stock item matched to the fiberglass socket. It also weighs 11 grams.
The top tube is a phenolic material that came stock with the aluminum tube. The phenolic weighs 9 1/2 grams.
The 1/32" balsa sheet lined with a layer of 1oz. fiberglass, weighs about 4 grams. It will be shaped around the carbon tube and will be used in the build. It makes no sense to use the stock socket materials when trying to remove weight from the structure. A balsa/glass tube is far lighter and strong enough. For wings too....
 07-09-2014, 06:31 AM
#231
Senior Member
Thread Starter
The stab skins are 1/16", 5-6 lb balsa. The thickness from the factory is around .075" so I sand these down to around .062" at the root and around .050" at the tips. I've discussed taper sanding of skins before. Ribs for the stab are 1/16" balsa mostly (except the root, 3/32"), a mix of contest grade and 8-10 lb stock. Ribs for the wing are 3/32" thick and again a mix of contest grade and 8-10 lb density.
The wing skins will be slightly thicker, 0.070" at the root and 0.050 taper sanded at the tip. In foam wings I sanded the skins to thinner section but in this open bay structure, a bit thicker won't hurt anything. I haven't decided the rib spacing of the wing yet. Leaning towards 2" (19 ribs) but haven't ruled out 1.75" (22 ribs). The cut foam core stations make either approach simple.
It is fairly easy to control the thickness....I mark the surface with a magic marker and I know that it penetrates about 0.005". When the mark is sanded off, I stop and measure with a caliper.
The skins are stiffened and sealed with laminating (thin) epoxy on the inside. I rub off as much as I can with paper towels. Enough remains to stiffen and seal the inside surface. Each stab skin gains about 1 gram of epoxy from this treatment.
BTW, there are a few tools that are indespensible when building for lightness and precision: Various lengths straight edges in both inch and cm gradations; A good gram scale with precision to 0.1 gram; A simple height gauge with 0.001" precision (mine is not digital); a good caliper or micrometer with 0.001" precision (don't need to be digital but it helps).
EDIT- I forgot the spars. The stab uses 3/32" square spruce and the wing will use 3/16" thick basswood, tapered from 3/8" at the root to 3/16" at the tip. Firm balsa can also work fine but I have the basswood and spruce already so why not? Weight between firm balsa (about 16 lb density) and basswood or spruce is very near a wash.
Last edited by MTK; 07-09-2014 at 06:39 AM.
07-09-2014, 08:35 PM
#232
Matt, can you post a link to where you discussed taper sanding?
Do you bandsaw or hot wire the cores?
Do you make 2 cuts in the core to get the rib thickness or sand?
One more thing. Do you leave the foam block in while the ribs dry, and if so how do you stop the foam block from gluing to the skin and rib?
Might be a stupid question, but thanks anyway.
Do you bandsaw or hot wire the cores?
Do you make 2 cuts in the core to get the rib thickness or sand?
One more thing. Do you leave the foam block in while the ribs dry, and if so how do you stop the foam block from gluing to the skin and rib?
Might be a stupid question, but thanks anyway.
Last edited by drac1; 07-09-2014 at 08:53 PM.
07-10-2014, 01:22 AM
#233

' The skins are stiffened and sealed with laminating (thin) epoxy on the inside. I rub off as much as I can with paper towels. Enough remains to stiffen and seal the inside surface. Each stab skin gains about 1 gram of epoxy from this treatment. '
Hi Matt,
Would you consider .2oz carbon veil on the inside instead - is lighter than absorbed epoxy and adds more tensile strength across the grain. It would help with confidence re the sanding of the sheets .
Brian
Hi Matt,
Would you consider .2oz carbon veil on the inside instead - is lighter than absorbed epoxy and adds more tensile strength across the grain. It would help with confidence re the sanding of the sheets .
Brian
07-10-2014, 05:56 AM
#234
Senior Member
Thread Starter
Matt, can you post a link to where you discussed taper sanding?
Do you bandsaw or hot wire the cores?
Do you make 2 cuts in the core to get the rib thickness or sand?
One more thing. Do you leave the foam block in while the ribs dry, and if so how do you stop the foam block from gluing to the skin and rib?
Might be a stupid question, but thanks anyway.
Do you bandsaw or hot wire the cores?
Do you make 2 cuts in the core to get the rib thickness or sand?
One more thing. Do you leave the foam block in while the ribs dry, and if so how do you stop the foam block from gluing to the skin and rib?
Might be a stupid question, but thanks anyway.
Although I have taper sanded balsa sheeting for years, I think the first place I mentioned it is in this thread. Check back several pages.
The cores were cut by a guy close to where I live who had done a lot of work for Selig (sailplanes). He was a master at his CNC hot wire cutter. I had never seen such precise work by anyone else before. Unfortunately Les has passed.....but his work still lives and is a model for others with CNC equipment to follow.
Regarding the relief in the cores for the ribs, these required a single cut with a zona saw and then sanding on a flat surface. BTW- the wing core I am prepping was ready sheeted and with socket in place. Converting a fully sheeted and fully prepped core is a little painful because of the work that went into that to begin with, but if the tooling makes several much lighter wings, it would be worth the extra work. Not that the foam wing panel was heavy. It was a 500 sq inch panel less than 9 ozs. fully prepped and ready for covering. However, if my estimates prove correct, the same panel built up should be around 7 ounces ready for covering
Regarding whether to leave the foam stations in place while the glue cures, I suppose it is possible but much trickier. I use the foam stations only to position the ribs precisely, then remove the foam. Then I tack glue front, middle and rear with ca. Then I fully glue with thinned carpenter's glue (using a syringe).
07-10-2014, 06:23 AM
#235
Senior Member
Thread Starter
Stab panels are small (about 115 sq inches each) and don't see the load a wing does. Carbon veil inside will add a lot of course. The panel would not need spars. I chose to do it the way I show.
I am planning to use some veil inside the wing panels, to go along with the basswood spars. The whole sheet doesn't need veil in that configuration. With basswood spars it probably doesn't need any veil. I will do veil to about half span primarily to allow easier handling without concern about breaking through skins
") 07-11-2014, 10:36 AM
07-11-2014, 10:36 AM
#237
Senior Member
Thread Starter
I know....but soright. Heck fully sheeting the stab is overkill but does provide a nicer surface to cover with veil/Jap tissue
I should shave 4 ounces off the tail which should be just enough to allow me the return of the forawrd wing position. It's the only reason for doing this exercize.
BTW- the balsa/glass sockets for the stab tube were installed last night. Each socket weighed a scant 1.7 grams. Wrapped some carbon tow around it to hold things together better. Strong enough for the job!!
Last edited by MTK; 07-11-2014 at 10:41 AM.
07-25-2014, 09:26 AM
#238
Senior Member
Thread Starter
The stab was fully sheeted, covered in veil and filled, (nitrate:baby powder, 1:2 ratio, with 2 parts thinner), prepping it for primer. Each half is at a good weight of about 55 grams to this point. It's lotsa work but worth the trouble to achieve the design parameters I initially had built into the model (it flew great early on but the engine was simply too much and so I changed to one more suitable)...
In comparison, I have stab weights for Acuracy, Griffen and Shinden: each stab half for these models weighs between 105 and 130 grams. I think these are all set-up for twin servos in the tail (excluded from the weights i show). Twin servos are convenient and simple, but they are heavy in the tail. To me, they compromise wing placement.
A correctly executed pull-pull set-up on elevators is the lightest possible and is the most versatile system we can have. But it is much more fussy a set-up to install....
07-28-2014, 02:01 PM
#240
Senior Member
Thread Starter
Note the control horns are 1/32" ply laminated in carbon. The stab tube sockets have the false ribs installed top and bottom to connect the sockets to the skins, forming an "I" beam structure.
The adjsuter setscrew detail is shown below. The actual adjsuter is a 1/4" length of phenolic tubing approximately 5/8" outside diameter x 1/4" inside. It is shaped accordingly elongating the inside hole to allow at least 3+/- degrees of adjustment. Simple and functional and most importantly, light and strong
Elevator with its formed LE, 3/32" light balsa.
BTW, the stab skins were treated with laminating epoxy on the outside as well. Each stab half picked up about 3 grams of epoxy using this treatment. It seals the balsa and stiffens the outside surface of the soft, contest grade sheets, making them more ding resistant. Covering is much easier and lighter in the long run. Try it!


