


Painted wing, stabs and advanced graphics
 01-02-2016, 04:55 PM
#151

Thread Starter
So I then came in and built up the background with a bit of red and white. Here is the finished product. I still have to do all the little touch up on the exposed edges of the ailerons and it will be ready for clear. It looks good now, but it will look a whole lot better after clear and cut and buff.
 01-02-2016, 05:08 PM
#152
Thread Starter
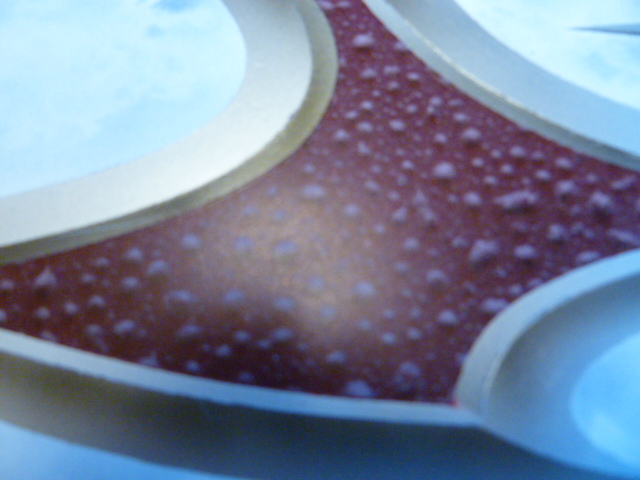
Here is where you need to stay flexible with this stuff. On the center portion of the graphic I intended to use a cool paint method call the "water drop" trick. It's very easy to do and looks just like water drops. What you do is spray water drops on the surface and just airbrush a light color from one direction at a low angle. You then let the water dry and shoot some candy over it to lock it down and shade the water drops.
I had it all done, but I got an ugly color shift when I shot the candy and it looked muddy. I didn't like the look and re shot it back to the red.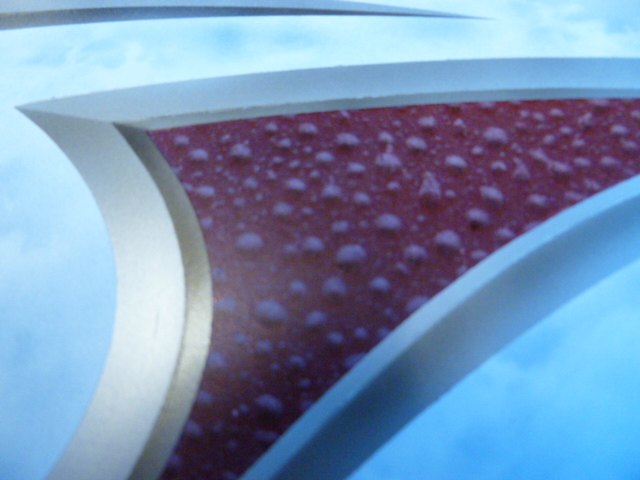
I had it all done, but I got an ugly color shift when I shot the candy and it looked muddy. I didn't like the look and re shot it back to the red.
Last edited by Portlandflyer; 01-02-2016 at 07:29 PM.
01-03-2016, 10:32 AM
#153
Hi Pat,
I’m having a lot of fun with my test piece. If you remember, I glued two 1/16 sheets on some plywood, puttied, sanded, lacquered, laid the silkspan, primed, sanded, and sprayed two coats of white krylon. After all that I could see, after a couple days of drying, the faint seam between the two balsa sheets through the paint. I was surprised! Never did I think I would see the seam.
Since this is just a test piece, I don’t want to use expensive paint. I’m using what I have. But I did go to Michaels and picked up a couple of acrylic bottles of airbrush paint. I masked my sample to try painting. I have some left over blue 3M 1/8 and 1/4 tape. The blue tape picked the acrylic paint right off the krylon white. I’ll have to sand and try again. Do you know of any paints I can buy in small samples that might work better? I don’t want to spend big $$ on practice. Does the green tape work better than the blue tape? I built a Seniorita a couple years ago and the blue tape pulled the Sig dope right off the Koverall.
Here is what I bought. http://www.amazon.com/gp/product/B00...ilpage_o03_s00
01-03-2016, 01:25 PM
#154
Thread Starter
Mike,
The reason you are getting the seam showing is the balsa is not stabilized being just two pieces of wood glued on edge. That being said, I have had it show up just a hair on a finished plane as well. I think it is due to the silkspan underlayment being so thin, something may telegraph through.
The way to minimize it its to let the Minwax dry (cure) before you shoot the primer. Keep in mind we are dealing with a water base product and it takes time for all the water to exit the finish. What is happening is the primer can lock in the water and the MinWax continues to shrink telegraphing what is below it. What I do is bring the wings and stabs into the house if it's cold in the shop for a couple of days to let it dry before priming.
A little telegraphing is just telling us we have an extremely thin finish, but you can reduce the chance.
No suggestions on paint. You are running up against compatibility. That's why I stick with Klass Kote epoxy primer as I know you can shoot just about anything over it and it will stick. If you stick to Matt and my methods you won't have a lifting problem at all. You should be fine with just about any brand of good quality top coat over the Klass Kote primer. Even good quality water base auto paint should be fine.I know what works for me, so I just stick with it.
I like the blue 3M and haven't had a problem with it. I have been using the green stuff for a few years and just like working with it. The key to getting a clean edge with the green 3M is to always clean the edge with a good cleaner like the stuff Coast Airbrush sells. The Coast cleaner is exceptional.
One other thing, I can't bring myself to use regular tan 1/2 or 3/4 inch masking tape on fresh paint. To me it just sticks too good. I get some leaking with the low tack blue, but I have never had it lift paint, so I stick to it.
This stuff is like anything else....it's a system...and if you experiment it may come back to bite you.
Last edited by Portlandflyer; 01-03-2016 at 10:47 PM.
01-03-2016, 02:11 PM
#155
Senior Member
Balsa seams can be smoothed out with the Dap filler Pat uses or balsa filler that I use. I suspect the balsa filler is Dap with balsa brown added. The trick is rubbing the filler into the seam and full drying overnight. Then fine sanding and feathering.
i agree with Pat regarding the covering thickness being exceedingly thin. It will show every imperfection so one has to be very very fussy about prep, before laying down the paper. It is the price you pay for extremely thin coverings. Remember plastic film is about 3 mils thick while we are working with 1 mil thickness with silkspan. And if prep is a little off, imperfections show up with film covering and glass also. Doesn't matter if epoxy resin was used for bedding or epoxy paint or polycrylic or nitrate.
Plastic film will tend to cover more evils if you will because it is thicker.
what has worked well for me is as follows:
I add more talc in the primer and will shoot seams first. Then I shoot the rest of the surface, overlapping the seams. Once cured, I look at the surface at different angles and if a seam shows, I sand and reshoot it, building it up so to speak.
Hope that helps
01-05-2016, 09:21 AM
#156
Thread Starter
Here is a different picture of one completed wing.
I have also attached a picture of the masking film before they are placed on the wing. You can see I have removed the 1/4 inch section ahead of time. That portion becomes the "outside" bevel.
I have also attached a picture of the masking film before they are placed on the wing. You can see I have removed the 1/4 inch section ahead of time. That portion becomes the "outside" bevel.
01-05-2016, 09:51 AM
#157
Thread Starter
I won't be posting much for a while as I still have one more wing and both stabs to complete, which is just a repeat of what we have gone over so far.
Let's go over what I would call more advanced masking methods that will create very clean results in much less time.
As I said before, I am always trying to mask to not have two colors butt against each other. Painting pinstripes like I have done on the wings can be very time consuming if we don't plan them ahead. I will have several on the fuselage that I will show the following method of painting and masking.
I have attached two views. One looking at a cross section and the other viewed straight down.
Let's say we are doing a silver pinstripe and we will be painting yellow on one side of the pinstripe and blue on the other (which I will be doing). On the cross section view you can see how the silver is shot on the surface with no masking tape. You can see how it tapers out on each side and does not create a hard edge. What I then do is lay out the pinstripe by just covering the silver that has been painted.
What I would then do is mask one side off on top of the 1/8 inch pinstripe tape and shoot let's say yellow. I would then pull the masking, leaving the 1/8 inch tape. I would then mask back over the yellow on top of the 1/8 inch tape and shoot the blue on the other side.
Now when you pull all the masking we have an extremely clean (and uniform) 1/8 inch pinstripe with only an edge from the yellow and the blue to clean up.
01-05-2016, 10:20 AM
#158
Senior Member

Join Date: Nov 2003
Location: Olathe,
KS
Posts: 165
Likes: 0
Received 0 Likes
on
0 Posts
Hi Pat,
thanks for this wonderful explanation on how to do this. I am looking forward to trying some of it and getting some good results.
I am not sure if it has been posted, what are you using for the vinyl masks and the transfer tape. I have some of the Oracal 651 that I use for graphics, but think you might be using something else for your masks, maybe something with less tack.
Otherwise, I pretty much have to read everything twice to get the whole picture; takes a while but once I digest it, it makes sense how you are doing everything.
Thanks
Doug
01-05-2016, 10:35 AM
#159
Thread Starter
Hi Pat,
thanks for this wonderful explanation on how to do this. I am looking forward to trying some of it and getting some good results.
I am not sure if it has been posted, what are you using for the vinyl masks and the transfer tape. I have some of the Oracal 651 that I use for graphics, but think you might be using something else for your masks, maybe something with less tack.
Otherwise, I pretty much have to read everything twice to get the whole picture; takes a while but once I digest it, it makes sense how you are doing everything.
Thanks
Doug
thanks for this wonderful explanation on how to do this. I am looking forward to trying some of it and getting some good results.
I am not sure if it has been posted, what are you using for the vinyl masks and the transfer tape. I have some of the Oracal 651 that I use for graphics, but think you might be using something else for your masks, maybe something with less tack.
Otherwise, I pretty much have to read everything twice to get the whole picture; takes a while but once I digest it, it makes sense how you are doing everything.
Thanks
Doug
Thank you for your kind words. I am using Mac mask, which is specifically designed for masking film to be used on a plotter. I like it for several reasons. First, it is solvent proof so I can shoot HOK paint right over it. Second it conforms to rounded shapes and third I have never had any paint bleed under it. It always creates extremely clean edges, better than tape. It is much lower tack versus regular vinyl.
http://www.signsupply.com/Vinyl/MacTac/8460SM.asp
I use RTape Clear Choice transfer tape. AT65, but most any medium tack transfer tape will work fine.
http://www.uscutter.com/RTape-Clear-...ion-Tape-100yd
Pat
01-05-2016, 01:19 PM
#160
Senior Member
Join Date: Nov 2003
Location: Olathe,
KS
Posts: 165
Likes: 0
Received 0 Likes
on
0 Posts
Thank you. Not a bad price. I will have to order some soon. I have seen a lot of checkerboard patterns in my area of the hobby. I think giving it the 3D look would be pretty awesome. An artist I am not so that could be challenging but might be worth it. I have done one paint job over glass using auto air colors. Learned a lot of what not to do. It is on a Q500 racer so not sure the life expectancy.
I have some silkspan at home, just not sure what weight. How would I be able to tell? If I took a pic and posted it here, would it be obvious? I am pretty sure it is not the light weight but not sure of the other.
Since I only have a single action airbrush, even though not as good as the dual action, I imagine it would still work fine for all of this. I also have the harbor freight touch-up gun which works ok. thought of getting an LVLP gun just not sure if that is the best idea other. not my area of expertise.
Cheers,
Doug
Last edited by scratchpc7; 01-05-2016 at 01:22 PM.
01-05-2016, 01:40 PM
#161
Thread Starter
Doug,
That's the best price I have found. Most places sell it only in big rolls that will be enough for a lifetime, but the shelf life is only a couple of years.
Hard to tell on the silkspan. The light stuff is just like tissue paper. The medium is maybe a little thinner than the paper you would run in a copy machine.
Yes a single action brush is perfectly fine. I just have guys start with a double action as it only adds a few bucks and they are so much more versatile as you advance your skills.
Actually 3D checker board pattern is not that hard to pull off. Someday I will do one as well. You lay it out in a drawing program like Corel Draw with just the black and white squares all the same size. What you do is go into a menu that allows you to skew the whole image they way you want to.....think of it like a waving flag. So now you have all these odd ball skewed black and white squares. When it gets cut on the plotter you would pull all the squares you would want let's say "red". You now paint it over a white background and pull the film. Now you come in and put in black shadows and white highlights...again think waving flag. It gives you this ultra cool waving checkerboard look that is pretty easy to do. The painting is simple. The time is in the computer, but isn't that big of a deal.
Too many ideas...not enough time, money and airplanes.
01-05-2016, 03:09 PM
#162
Thread Starter
Every time I make a post it reminds me of something I forgot about. A couple of things.
In my example above where we were painting yellow over the sliver area used for the pinstripe, I would not shoot the yellow over a white base with that small amount of silver showing on the edge. The first rule when shooting yellow is "if it can show through, it will". Yellow is likely the hardest color there is to get coverage without flaws or unwanted colors showing. In the case above I would just dust on a little white over the silver before I shoot the yellow. It probably won't show, but why take the chance. You don't need to cover the silver heavy with white.....just a few passes.
On that matter, shooting yellow over a silver base is perfectly fine, I just want it to be a solid base of silver or white. I would never shoot yellow over anything other than white or silver. I am sure other base colors will work, but I won't take the change.
One other thing about sanding or cleaning up the ridge edges after pulling masking tape or film. You have to be very careful about knocking that edge down over an area like a graphic that has been airbrushed or air gun shaded. Also on the wings I am painting (and fuselage) I have orange fading over yellow. On those ridges, you can not sand them or you will take off some of the ultra fine paint sprayed over the other color. In my case I am shooting orange over the yellow. If I try to sand those edges I am going to cut into the orange and have an ugly area to try to fix.
What some painters do is shoot what is called intercoat clear over those transition areas so they can sand them flush. Intercoat clear is just paint with no pigment in it. I have tried it and don't use this method because it is very easy to sand past the intercoat clear and you are right back with the same problem. Here is how I handle those areas. It may sound crazy, but I have the best results just waiting a day or two for the paint to cure and I lightly scrape off those high ridges with my thumbnail. I just use my nail like a scraper. I have tried other things like a scraper or razer blade, but I have better control with my thumbnail. On ridges that are solid paint, you can sand those down with 600 wet sand paper.
OK...I thought of another issue. When I say to bring your paint level up to 100%, what I am talking about is "saturation". Let's take red as an example. If we start shooting red, it will start out thin and bright if shot it over white, but as we continue to build it up, it takes on a whole different look. The term 100% simply means we have shot enough paint that the color does not change .We could shoot another 20 coats and it will still look the same. This is extremely important if we are embedding an image (graphic) like I did on the wings with the "AUSTRAL" ghost graphic logos. Remember when we pull the masking film we had white under the letters that I dusted yellow over to knock them back so they would barley show. If I had not brought the yellow up to 100%, when I dusted the yellow back over the white letters, I could of had a darker (more paint) level over the letters and they would stand out with a dark blob or a halo around them...pretty ugly.
Last edited by Portlandflyer; 01-05-2016 at 03:12 PM.
01-05-2016, 03:45 PM
#163
Thread Starter
The Harbor Freight guns do a pretty darn good job. A high dollar gun, won't necessarily make you a better painter. I would put the dough into other areas for now and upgrade later.
01-05-2016, 04:56 PM
#164
Senior Member
Every time I make a post it reminds me of something I forgot about. A couple of things.
In my example above where we were painting yellow over the sliver area used for the pinstripe, I would not shoot the yellow over a white base with that small amount of silver showing on the edge. The first rule when shooting yellow is "if it can show through, it will". Yellow is likely the hardest color there is to get coverage without flaws or unwanted colors showing. In the case above I would just dust on a little white over the silver before I shoot the yellow. It probably won't show, but why take the chance. You don't need to cover the silver heavy with white.....just a few passes.
On that matter, shooting yellow over a silver base is perfectly fine, I just want it to be a solid base of silver or white. I would never shoot yellow over anything other than white or silver. I am sure other base colors will work, but I won't take the change.
One other thing about sanding or cleaning up the ridge edges after pulling masking tape or film. You have to be very careful about knocking that edge down over an area like a graphic that has been airbrushed or air gun shaded. Also on the wings I am painting (and fuselage) I have orange fading over yellow. On those ridges, you can not sand them or you will take off some of the ultra fine paint sprayed over the other color. In my case I am shooting orange over the yellow. If I try to sand those edges I am going to cut into the orange and have an ugly area to try to fix.
What some painters do is shoot what is called intercoat clear over those transition areas so they can sand them flush. Intercoat clear is just paint with no pigment in it. I have tried it and don't use this method because it is very easy to sand past the intercoat clear and you are right back with the same problem. Here is how I handle those areas. It may sound crazy, but I have the best results just waiting a day or two for the paint to cure and I lightly scrape off those high ridges with my thumbnail. I just use my nail like a scraper. I have tried other things like a scraper or razer blade, but I have better control with my thumbnail. On ridges that are solid paint, you can sand those down with 600 wet sand paper.
OK...I thought of another issue. When I say to bring your paint level up to 100%, what I am talking about is "saturation". Let's take red as an example. If we start shooting red, it will start out thin and bright if shot it over white, but as we continue to build it up, it takes on a whole different look. The term 100% simply means we have shot enough paint that the color does not change .We could shoot another 20 coats and it will still look the same. This is extremely important if we are embedding an image (graphic) like I did on the wings with the "AUSTRAL" ghost graphic logos. Remember when we pull the masking film we had white under the letters that I dusted yellow over to knock them back so they would barley show. If I had not brought the yellow up to 100%, when I dusted the yellow back over the white letters, I could of had a darker (more paint) level over the letters and they would stand out with a dark blob or a halo around them...pretty ugly.
In my example above where we were painting yellow over the sliver area used for the pinstripe, I would not shoot the yellow over a white base with that small amount of silver showing on the edge. The first rule when shooting yellow is "if it can show through, it will". Yellow is likely the hardest color there is to get coverage without flaws or unwanted colors showing. In the case above I would just dust on a little white over the silver before I shoot the yellow. It probably won't show, but why take the chance. You don't need to cover the silver heavy with white.....just a few passes.
On that matter, shooting yellow over a silver base is perfectly fine, I just want it to be a solid base of silver or white. I would never shoot yellow over anything other than white or silver. I am sure other base colors will work, but I won't take the change.
One other thing about sanding or cleaning up the ridge edges after pulling masking tape or film. You have to be very careful about knocking that edge down over an area like a graphic that has been airbrushed or air gun shaded. Also on the wings I am painting (and fuselage) I have orange fading over yellow. On those ridges, you can not sand them or you will take off some of the ultra fine paint sprayed over the other color. In my case I am shooting orange over the yellow. If I try to sand those edges I am going to cut into the orange and have an ugly area to try to fix.
What some painters do is shoot what is called intercoat clear over those transition areas so they can sand them flush. Intercoat clear is just paint with no pigment in it. I have tried it and don't use this method because it is very easy to sand past the intercoat clear and you are right back with the same problem. Here is how I handle those areas. It may sound crazy, but I have the best results just waiting a day or two for the paint to cure and I lightly scrape off those high ridges with my thumbnail. I just use my nail like a scraper. I have tried other things like a scraper or razer blade, but I have better control with my thumbnail. On ridges that are solid paint, you can sand those down with 600 wet sand paper.
OK...I thought of another issue. When I say to bring your paint level up to 100%, what I am talking about is "saturation". Let's take red as an example. If we start shooting red, it will start out thin and bright if shot it over white, but as we continue to build it up, it takes on a whole different look. The term 100% simply means we have shot enough paint that the color does not change .We could shoot another 20 coats and it will still look the same. This is extremely important if we are embedding an image (graphic) like I did on the wings with the "AUSTRAL" ghost graphic logos. Remember when we pull the masking film we had white under the letters that I dusted yellow over to knock them back so they would barley show. If I had not brought the yellow up to 100%, when I dusted the yellow back over the white letters, I could of had a darker (more paint) level over the letters and they would stand out with a dark blob or a halo around them...pretty ugly.
Light silkspan weighs about 4-5 grams per sheet 24x36"
medium weighs 8-9 grams and heavy around 13.
Esaki Jap tissue light weighs 6-7, while medium and heavy grades weigh similar to silkspan grade for grade.
Using light versus medium, as Pat and I have found, is a world of difference. I highly recommend that one play with light on scrap first. I taught myself to use light on stabs and rudders. Medium use is a baby carriage, trivial by comparison. Heavy is just too heavy for our application because it is thicker stock. It takes more filling to get it ready for primer. But boy is it strong especially Esaki Jap tissue.
01-05-2016, 05:04 PM
#165
Senior Member
Simply gorgeous. Not for the uninitiated, but armed with this how to thread more might try getting their paint jobs to a higher level. I know I am
01-05-2016, 05:22 PM
#166
Thread Starter
Pat, have you used a standard pencil eraser on the edges? It quasi works on epoxy and catalyze do urethane except when the ridge is too large. With HOK paint it could work well since the coats are so thin. My paint is not here yet otherwise I would know for sure.
Light silkspan weighs about 4-5 grams per sheet 24x36"
medium weighs 8-9 grams and heavy around 13.
Esaki Jap tissue light weighs 6-7, while medium and heavy grades weigh similar to silkspan grade for grade.
Using light versus medium, as Pat and I have found, is a world of difference. I highly recommend that one play with light on scrap first. I taught myself to use light on stabs and rudders. Medium use is a baby carriage, trivial by comparison. Heavy is just too heavy for our application because it is thicker stock. It takes more filling to get it ready for primer. But boy is it strong especially Esaki Jap tissue.
No I haven't tried an eraser, but I will give it a shot. On all the edges that have shading I would only use my thumb nail.
01-05-2016, 05:27 PM
#167
Thread Starter
Thank you. That has really been the main reason for the thread was to try and get more guys to a higher level or at least try to get more guys back to building and painting. The reality is, the really, really good custom car and motorcycle painters would leave me in the dust, but I have fun pushing myself to the next level.
01-09-2016, 09:31 PM
#168
Thread Starter
OK, both wings are close to done.
Let's go over some masking methods that will help create fast and clean pinstripes. Using this system cuts the time in about half. This is another reason the plotter is so helpful. On the stabs I did a single bevel on the central graphic. All I did was drop out the inside line on the graphic that created the inside bevel on the wings., The reason I only do a single bevel on the stabs is the size of the inside bevel would be so small when reduced, it would be very difficult to work with.
The first thing I do is print the graphic out on the plotter to establish the layout the same as I did on the wings.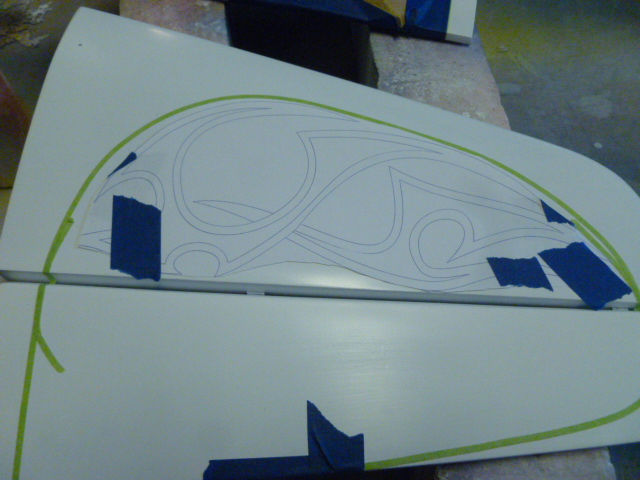
Here you can see the center is masked and the areas that will have pinstripes are shot with silver (Metalume).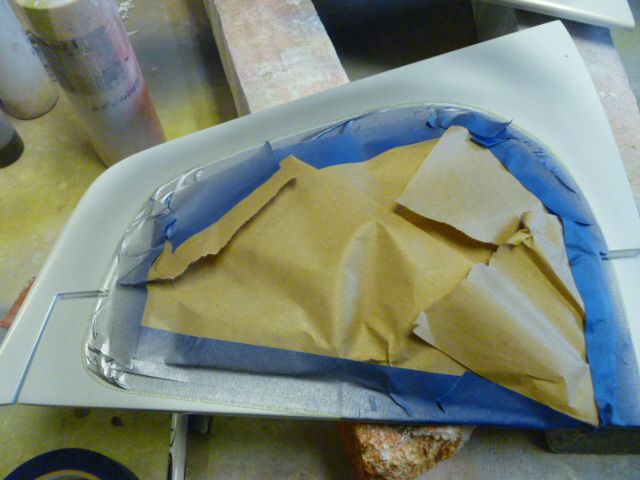
What I then do is just lay down 1/8 inch tape that covers the silver. These areas will become the pinstripes after everything is unasked.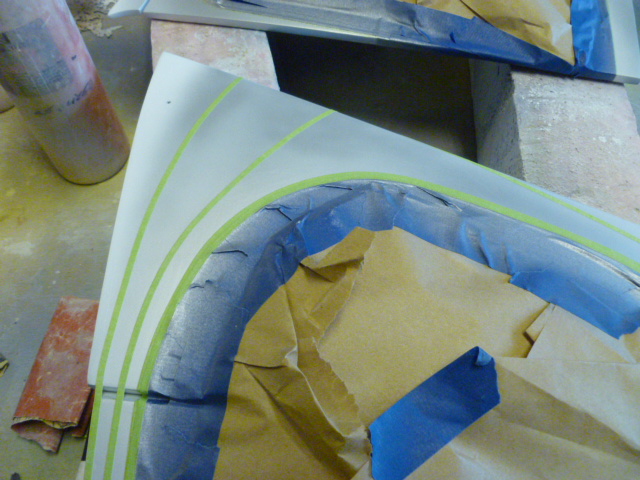
Now I continue masking so the only areas exposed are the ones to be painted yellow.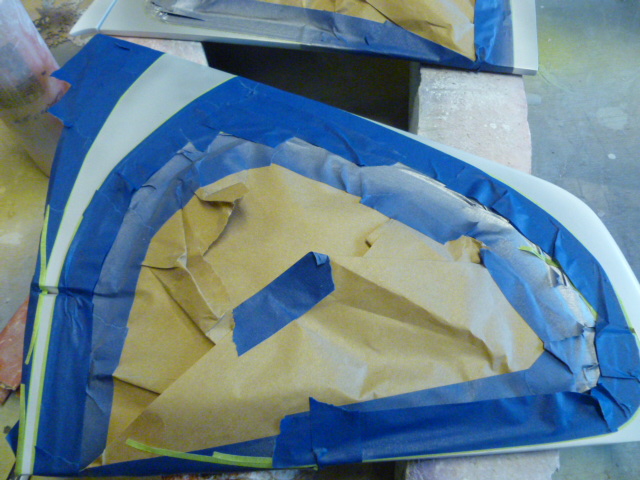
Yellow is shot.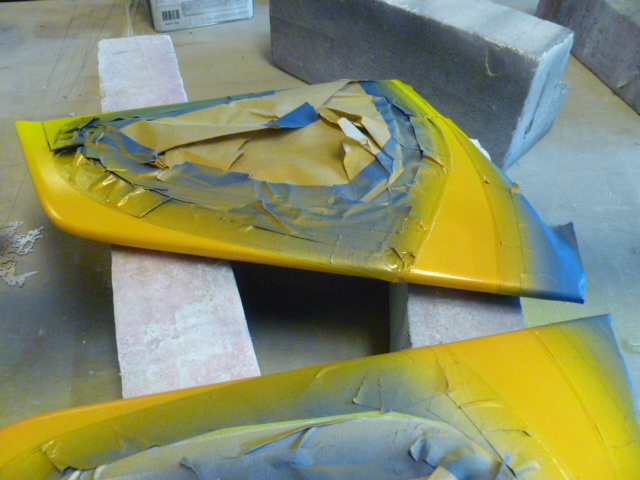 Orange is faded from front to back.
Now the yellow is masked and the areas to be blue are exposed.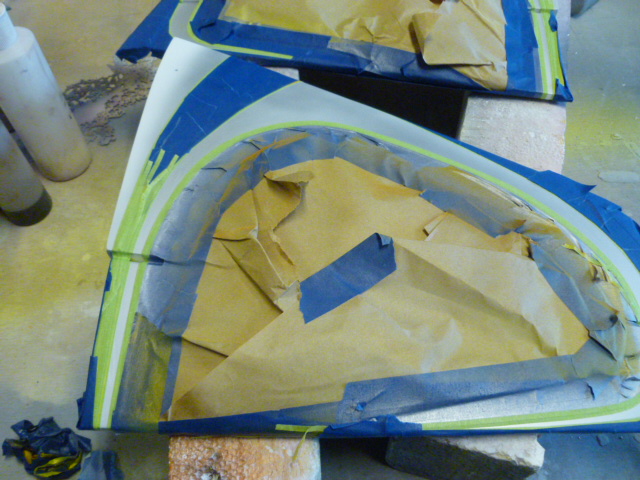
Blue is shot.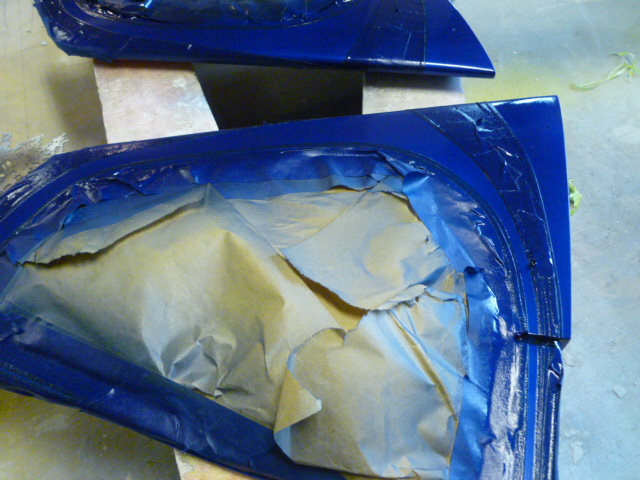
That's it. When we unmask, all of the pinstripes are exposed.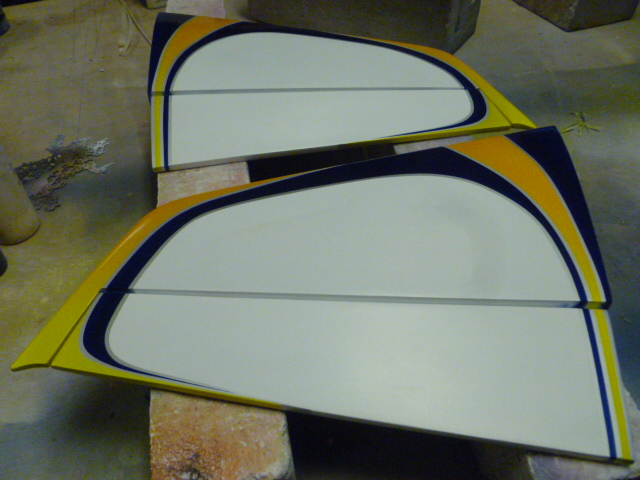
Let's go over some masking methods that will help create fast and clean pinstripes. Using this system cuts the time in about half. This is another reason the plotter is so helpful. On the stabs I did a single bevel on the central graphic. All I did was drop out the inside line on the graphic that created the inside bevel on the wings., The reason I only do a single bevel on the stabs is the size of the inside bevel would be so small when reduced, it would be very difficult to work with.
The first thing I do is print the graphic out on the plotter to establish the layout the same as I did on the wings.
Here you can see the center is masked and the areas that will have pinstripes are shot with silver (Metalume).
What I then do is just lay down 1/8 inch tape that covers the silver. These areas will become the pinstripes after everything is unasked.
Now I continue masking so the only areas exposed are the ones to be painted yellow.
Yellow is shot.
Now the yellow is masked and the areas to be blue are exposed.
Blue is shot.
That's it. When we unmask, all of the pinstripes are exposed.
01-09-2016, 09:46 PM
#169
Thread Starter
Now the single beveled center graphic.
The first thing is to lay down a bit of background texture.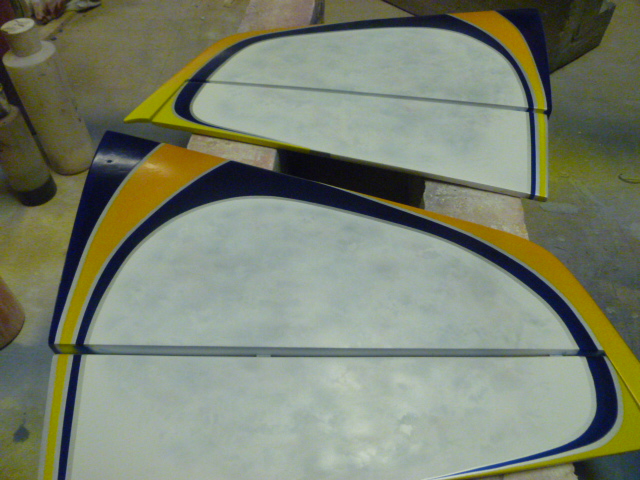
Half of the graphic is attached. A single piece of tape is used to hold the graphic in place.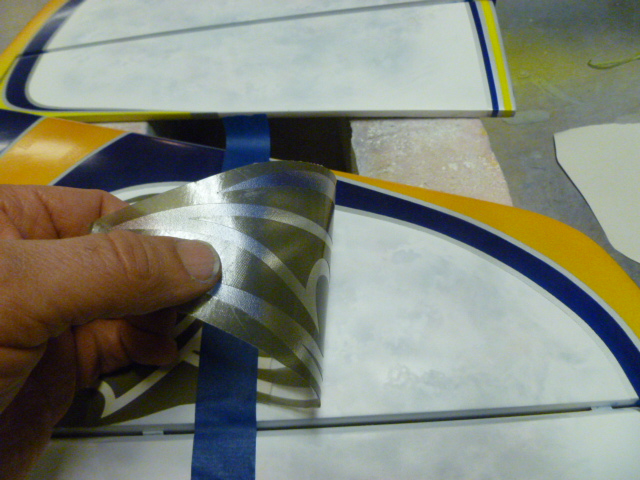
Now the other half.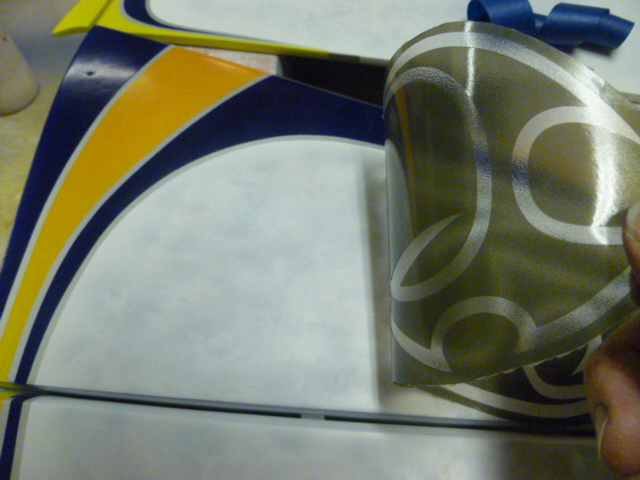
Graphic is down and masked off.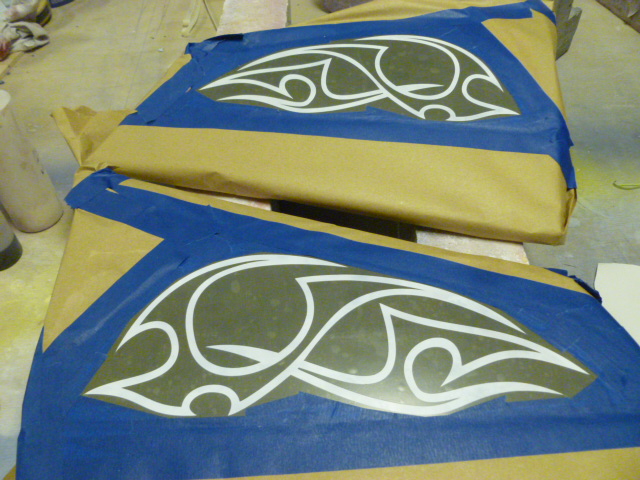
Silver (Metalume) is shot.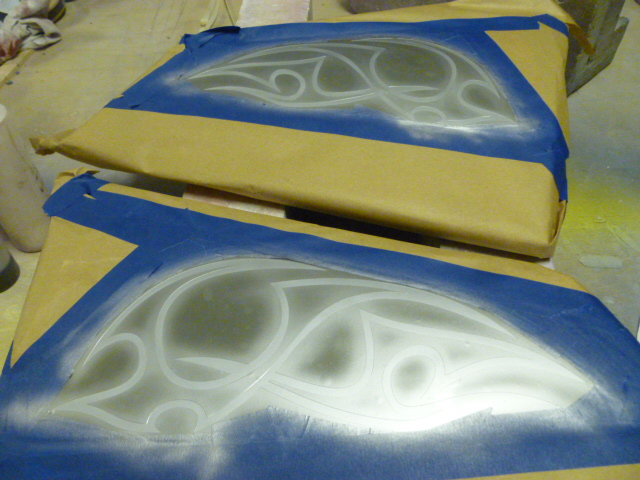
Bevels are painted.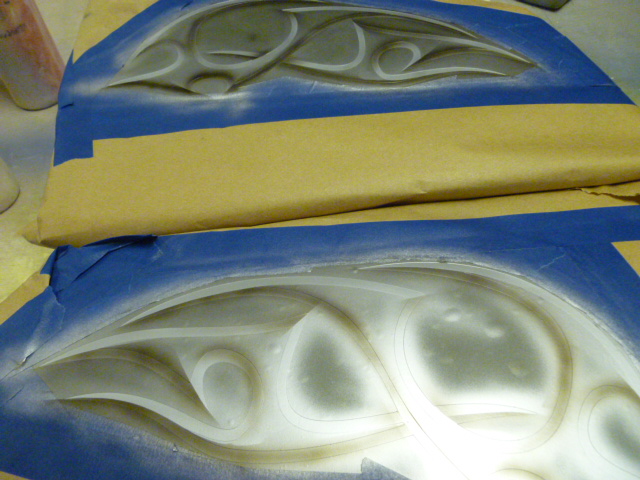
Center is pulled.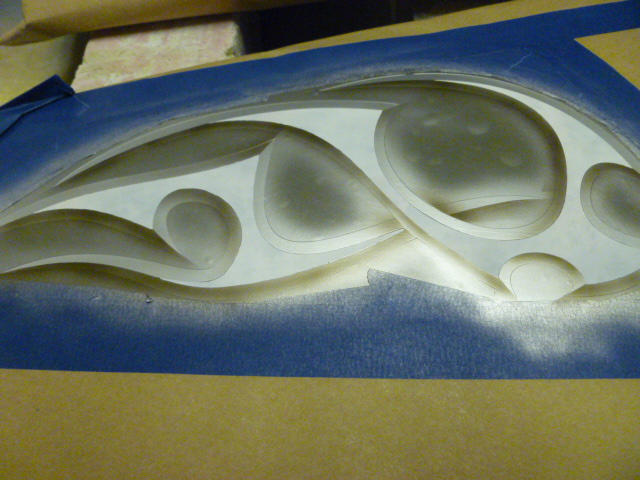
Bevel is masked.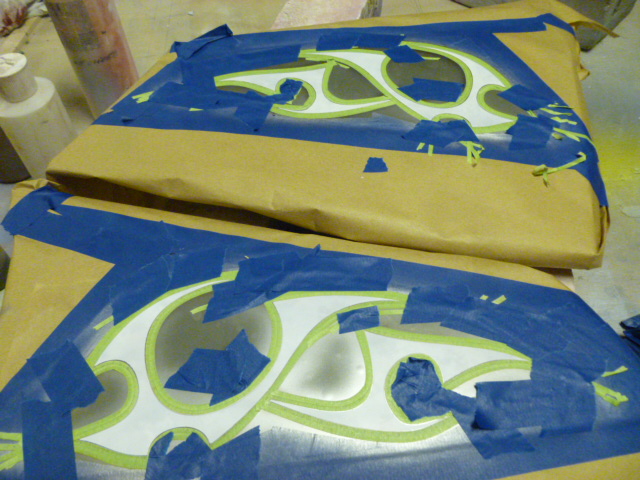
Center of graphic is shot.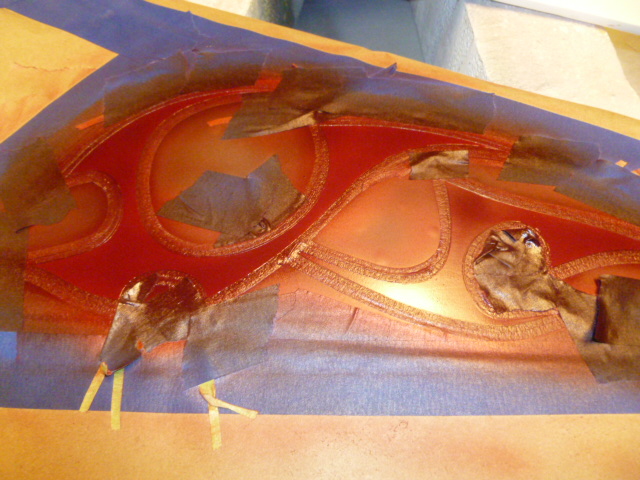
Unmasked.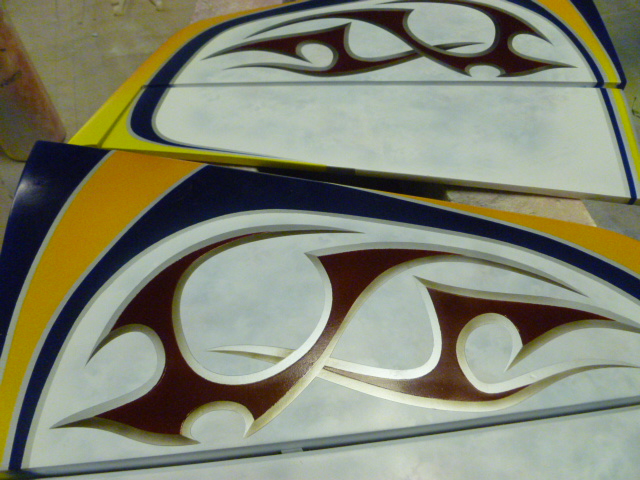
Background needs to be cleaned up, drop shadow painted under graphic and highlights on the graphic.
Last edited by Portlandflyer; 01-09-2016 at 09:58 PM.
01-10-2016, 10:01 PM
#170
Senior Member
Pat,
Your shading with black or grey then coming back with white in the center of some lines, gives them a tubular or rounded look. I see why you insist on a good quality airbrush.
The only gun I have is a decent quality HVLP touch up gun, but an airbrush is a must for this type of detail.
Beautiful work
01-10-2016, 10:54 PM
#171
Thread Starter
Matt,
Great eye. I was wondering if anyone ways going to pick up on that!
Actually it's easier than it looks. I am using thinned down black only....no white. Interestingly if you shoot white over the silver, it actually looks like a dark line or spot...really ugly. Here is how it's done. Take a look at the close up photos of the wing and you will see all I have done is kept the thinned down black shading close to the 1/8 inch bevel. In other words I am shooting black on only the upper half of the 1/4 inch band (bevel) and leaving the lower part silver. It plays a trick on the eye that the unpainted part is catching the light and it looks concave. The 1/8 inch bevel is too thin so I just shoot it with solid black, but keep in mind I am only shading the black, so the silver still shows through.
All shading should be with transparent paints so the under color shows through, so you would never want to use grey as grey is made by adding white to black so it would become opaque which you would never want as it would just look muddy (dark). That's also, why you would never shade with white for the same reason.
Now the highlight spots shot on the bevels that look white are actually three different layers. Again if you just shoot white on the silver it will look like a dark spot. Remember white is an opaque. What I do for the highlights is shoot a heavy coat of white followed by a dusting of white pearl and then just a dusting of the same silver (Metalume) over the pearl. It just takes a few seconds to do. When you do it this way, when the sun actually hits those highlight spots, they kind of glow, due to the pearl.
Like I said before, most of this stuff is a lot simpler than it looks. All you have to do is give the brain a piece of the puzzle and it fills in the balance.
Just like shooting the AUSTRAL letters, It's all an allusion, If we paint black on the side of the light (direction of light), and white on the other side, it tricks the brain to think it's concave. If we do the opposite, it appears to be convex.
Yes, all the little shading must be done with an airbrush. The good thing is, we don't need high dollar brushes to do a great job. It's not the brush, it's the guy behind it.
Last edited by Portlandflyer; 01-10-2016 at 10:57 PM.
01-11-2016, 10:36 PM
#173
Hi Pat,
Great Thread! I�ve decided to build a HOB Bonanza to try out your painting technique. The model is 1/2A sized and should fly well with the Novel 74 I happen to have. The fuselage has a plastic �top� to define the details. Most of the plastic will be painted. The wing is open frame that I�ll cover with silk over silkspan. I�ve never done that either but it looks easy and should make a good base for painting. I�m already ordering parts, including e-flight 1/2a electric retracts. The model is mostly white with two color pin stripes and aircraft letters with a boarder. I haven�t decided on the colors yet. It should be a fun build. I plan to use the House of Color paints.
How long before you can put tape over the paint? What paint will you use for the clear coat? Is it fuel proof?
Thanks
01-11-2016, 11:02 PM
#174
Thread Starter
Mike,
You are well on your way! Keep in mind, HOK paint is designed to be put on with several thin coats, versus laying it on heavy. If you shoot it thin and light to build it up to full strength, you should be fine to mask over it within 30 minutes or so. If it has a little tack when you rub it, let it cure a bit more. When it's ready for tape it will feel dry to the touch with no tack.
I think you will be fine shooting it over plastic, but you might consider their adhesion promoter:
http://www.coastairbrush.com/products.asp?cat=79
I use HOK Kosmic Urethane Show Klear. I like it better than their UC35 clear. I fly electric, but I would think any of their clears are fuel proof.
http://www.coastairbrush.com/products.asp?cat=756
HOK paint is high dollar, but worth it.
01-12-2016, 08:39 AM
#175
Senior Member
Join Date: Nov 2003
Location: Olathe,
KS
Posts: 165
Likes: 0
Received 0 Likes
on
0 Posts
Good day Pat,
Another question that again I cannot find in this thread Looking at the Metalume on the TCP site, they list five different options; coarse, medium, fine, ultra fine and super silver. Which type do you use and why?
Also, do you buy the premixed airbrush colors for the non-white and non-black?
Thanks again
Doug