


Painted wing, stabs and advanced graphics
 01-14-2016, 09:43 PM
#201

Thread Starter
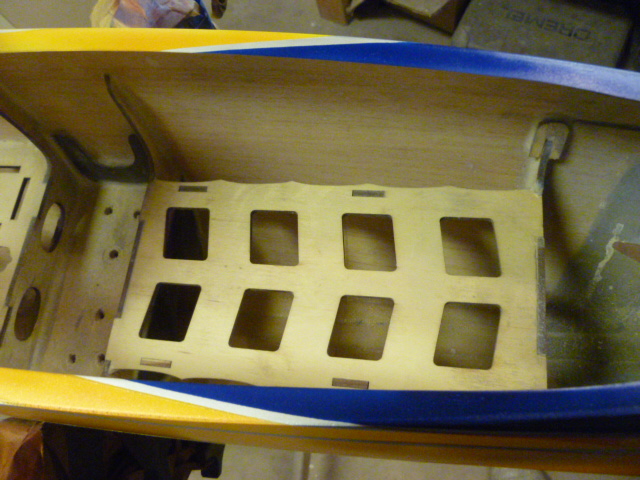
Alright I am now working on the fuselage.
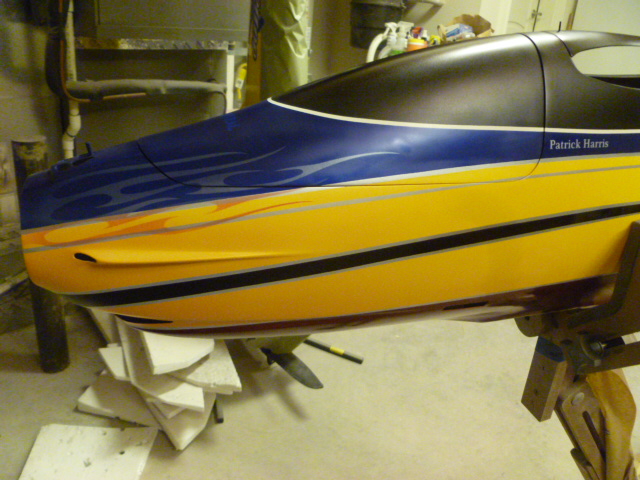
Here is a rough idea of what I am doing. Very sleek and clean lines. It looks simple, but has pinstripes on all color edges and multiple tapered pinstripes.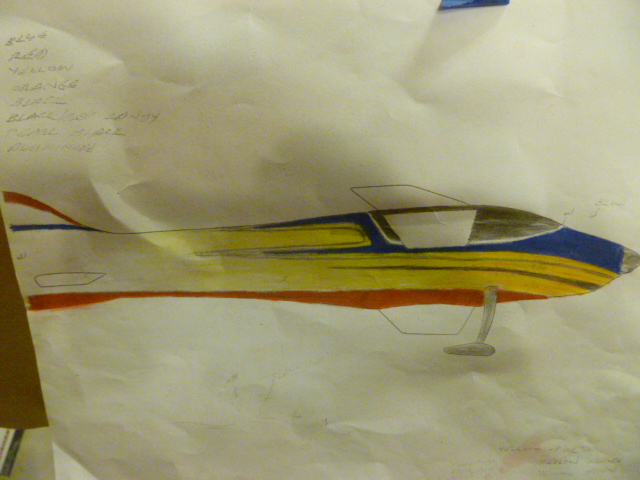
The pictures don't show it well, but the lower part is done with the front being orange/yellow, tapering to yellow to white. The red has been shot on the bottom which wraps around the rudder and fin. You can see I have hinged the rudder at this point. I find it easier to mask and paint it all as one unit.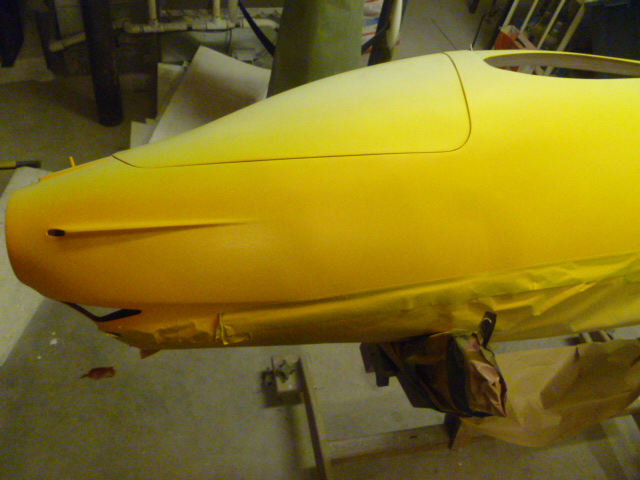
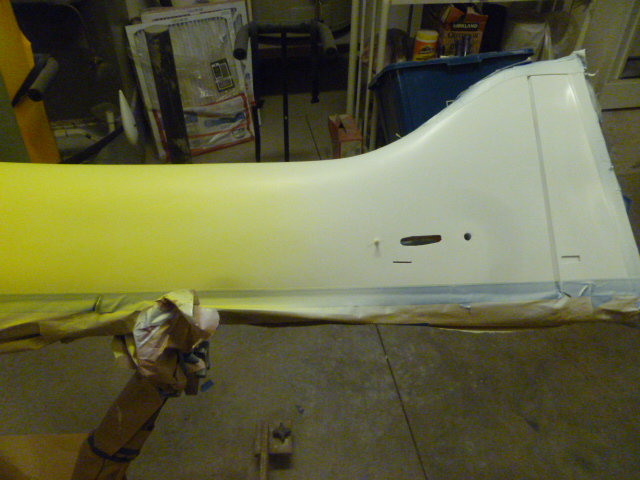
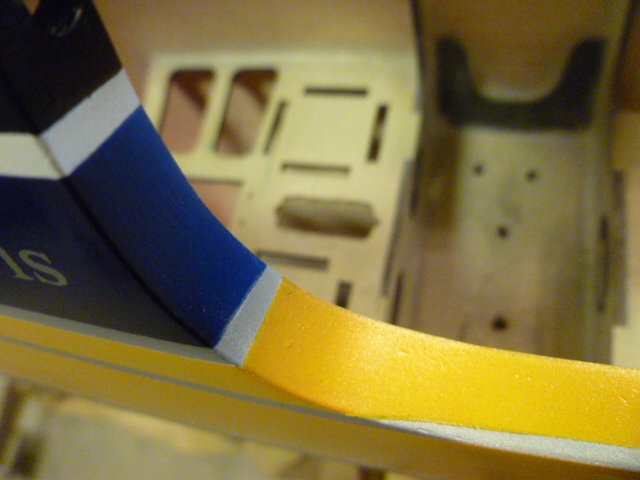
Here you can see I have painted the upper part white and just layed out a 1/8 inch tape over the white which will be pulled after the blue and canopy are painted. I really like the clean white line that separates the canopy. You can also see I have masked off the lower sections and shot sliver (Metalume) next to the mask line.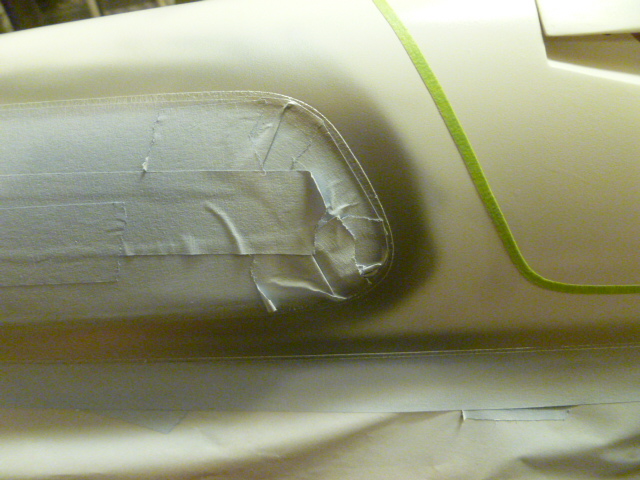
I now lay 1/8 inch tape over the sliver. This will create the pinstripe around the blue.
One thing that is very important is to mask back over the 1/8 inch tape to cover it and the 3/4 inch masking tape. This is called "bridging". If you don't do it, it's assured paint will leak between the masking. Here you can see it.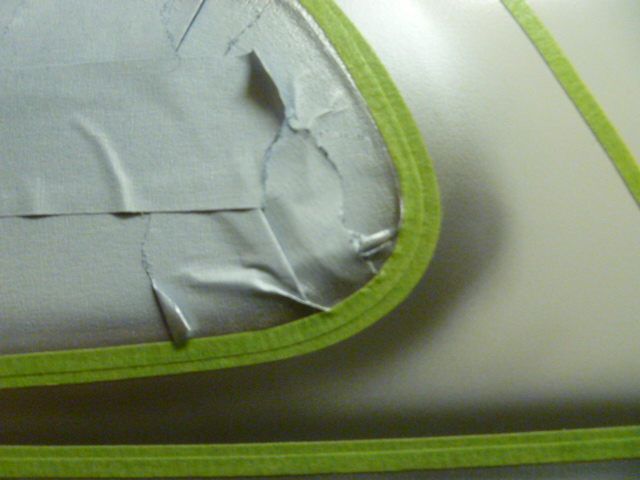
I put on one AUSTRAL masking film ahead of the canopy. I have done this two or three other times and it makes a very nice statement. This will become a ghost graphic.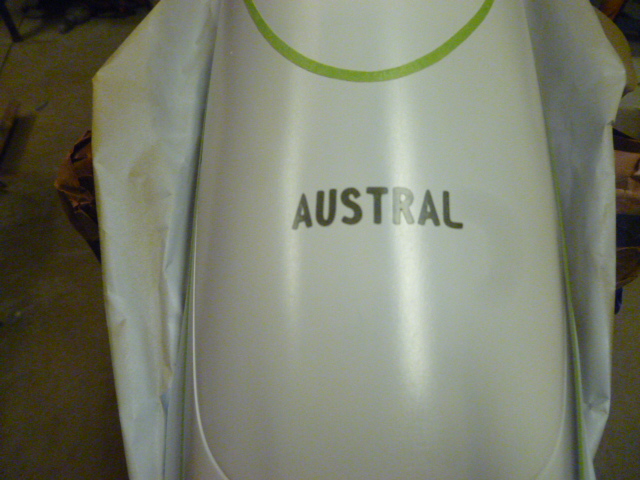
The blue is shot. You can see I just shoot right over the masking film.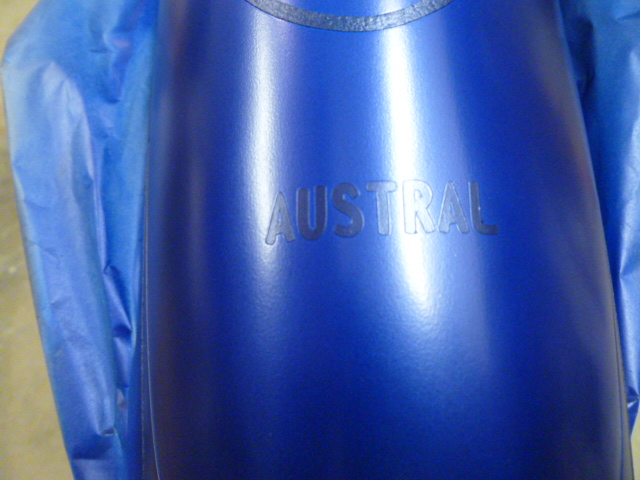
Now the film is pulled,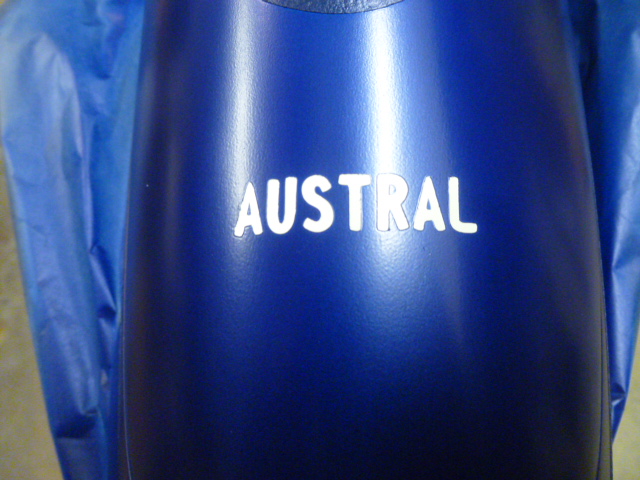
I now knock it back with blue.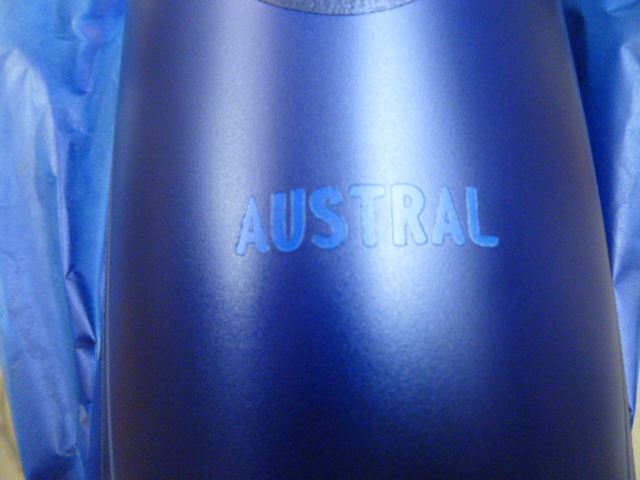
Mask are pulled which reveals the 1/8 inch pinstripe.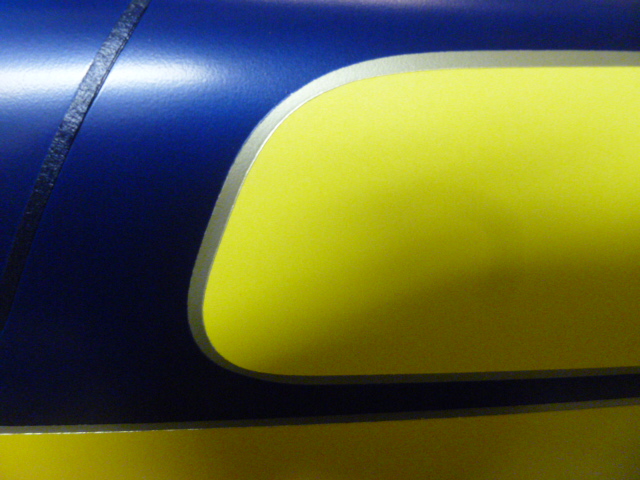
The picture is bad, but you can see how you can get tapered ultra clean pinstripes (and very easy) with this method of masking. You can see how the pinstripe has been tapered. This was all done by overlapping more of the sliver.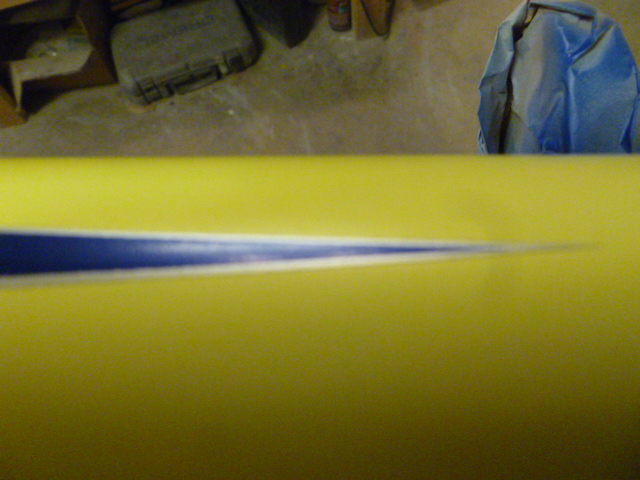
This picture of the taper was shot right after it was unmasked and has not been cleaned, but you can see the taper of the pinstripe.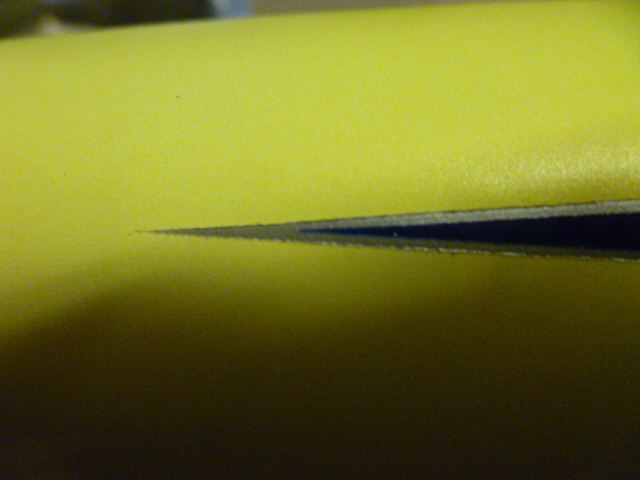
Here is a rough idea of what I am doing. Very sleek and clean lines. It looks simple, but has pinstripes on all color edges and multiple tapered pinstripes.
The pictures don't show it well, but the lower part is done with the front being orange/yellow, tapering to yellow to white. The red has been shot on the bottom which wraps around the rudder and fin. You can see I have hinged the rudder at this point. I find it easier to mask and paint it all as one unit.
Here you can see I have painted the upper part white and just layed out a 1/8 inch tape over the white which will be pulled after the blue and canopy are painted. I really like the clean white line that separates the canopy. You can also see I have masked off the lower sections and shot sliver (Metalume) next to the mask line.
I now lay 1/8 inch tape over the sliver. This will create the pinstripe around the blue.
One thing that is very important is to mask back over the 1/8 inch tape to cover it and the 3/4 inch masking tape. This is called "bridging". If you don't do it, it's assured paint will leak between the masking. Here you can see it.
I put on one AUSTRAL masking film ahead of the canopy. I have done this two or three other times and it makes a very nice statement. This will become a ghost graphic.
The blue is shot. You can see I just shoot right over the masking film.
Now the film is pulled,
I now knock it back with blue.
Mask are pulled which reveals the 1/8 inch pinstripe.
The picture is bad, but you can see how you can get tapered ultra clean pinstripes (and very easy) with this method of masking. You can see how the pinstripe has been tapered. This was all done by overlapping more of the sliver.
This picture of the taper was shot right after it was unmasked and has not been cleaned, but you can see the taper of the pinstripe.
 01-14-2016, 09:55 PM
#202
Thread Starter
One more very important tip.
Whenever you do shading like I did on the fuselage, wings and stabs which went from white to yellow to orange, we always want to shoot intercoat clear over them. Intercoat clear is just carrier without pigment. What it does is protect the shaded areas. Even with the best masking jobs, you will get some overspay leaking under the tape and of course always landing on the worse spots to fix. The bottom line is if you don't use intercoat clear to protect these areas, you can't sand off the overspay or use any type of cleaner or it will cut through and you will have a mess on your hands.
With intercoat clear I just use the same cleaner/ grease remover I use to clean the edge of the masking tape to wipe off the overspray.
HOK Intercoat clear that I use is: SG100
Last edited by Portlandflyer; 01-15-2016 at 08:52 AM.
01-16-2016, 05:50 PM
#203
Thread Starter
Vertical fin graphics
This is a graphic I found Goggling "Tribal Graphics". I did the conversion process described before to convert it to a vector file. I moved some stuff around to better fit the space on the fin.
As before, I print out a paper version to see if it will work.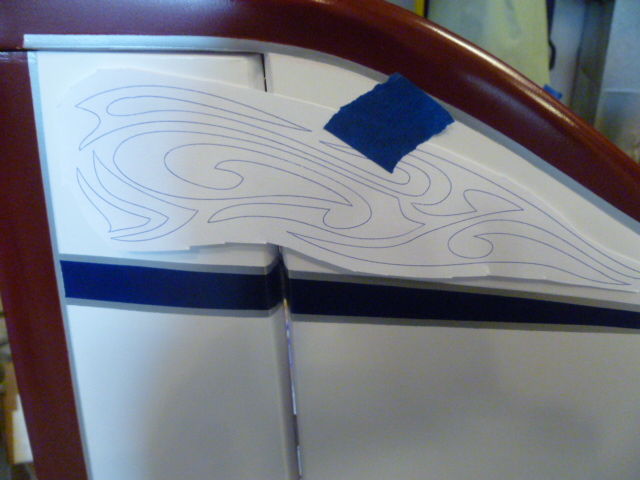
Here's the masking film applied and cut at the rudder.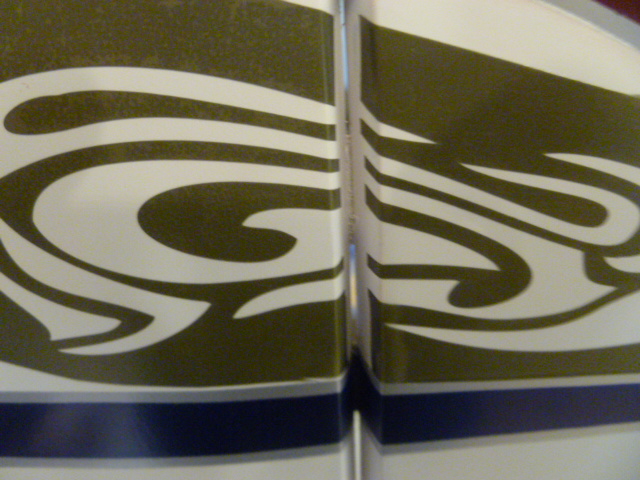
Rudder opening masked.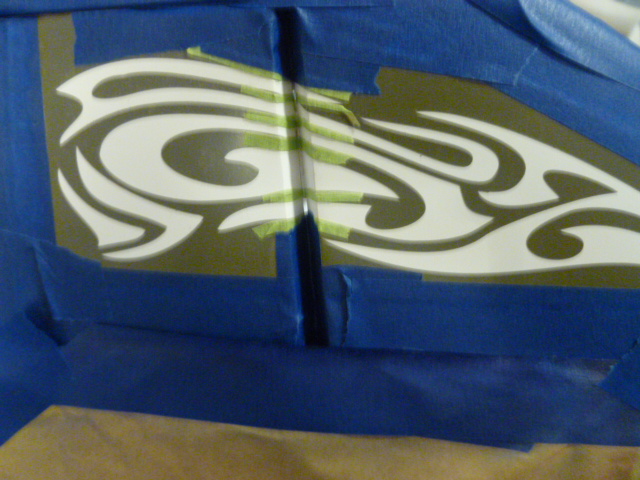
The whole graphic was shot with yellow pearl.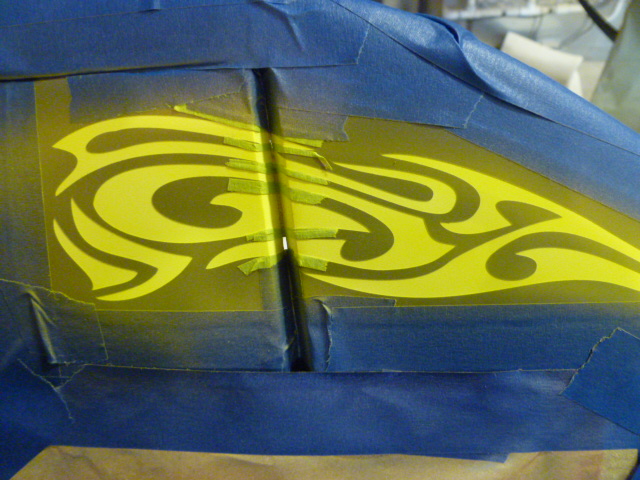
Orange pearl was shot on the back 2/3.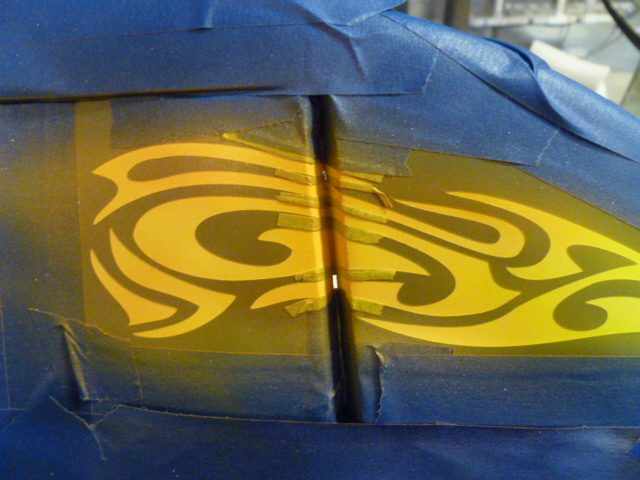
Red candy with HOK Metajules was shot on the back 1/3.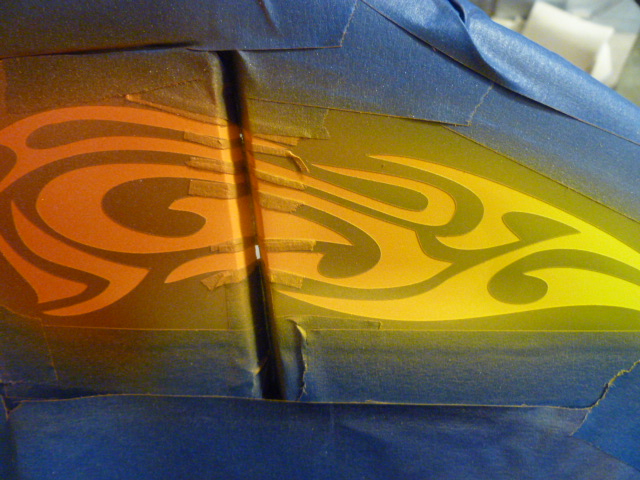
SG100 Intercoat clear was shot over the whole graphic. After unmasking.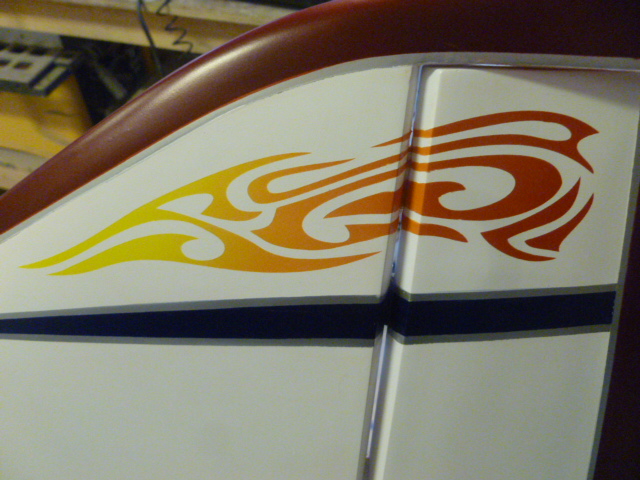
01-16-2016, 06:05 PM
#204
Thread Starter
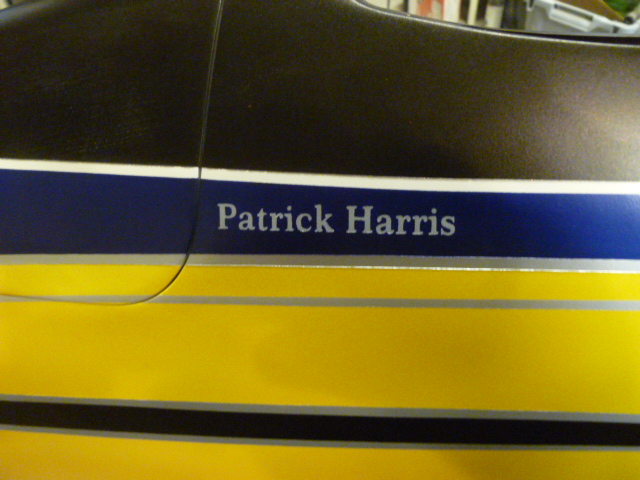
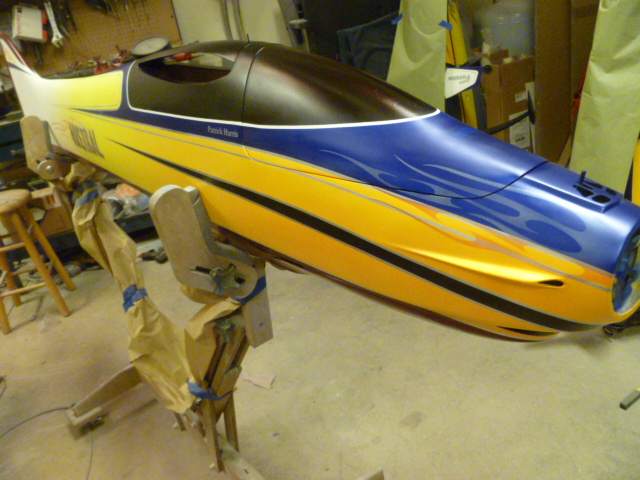
Next I did the name of the plane on the sides. There will be ghost flames under the name.
Same procedure with a paper printout for layout.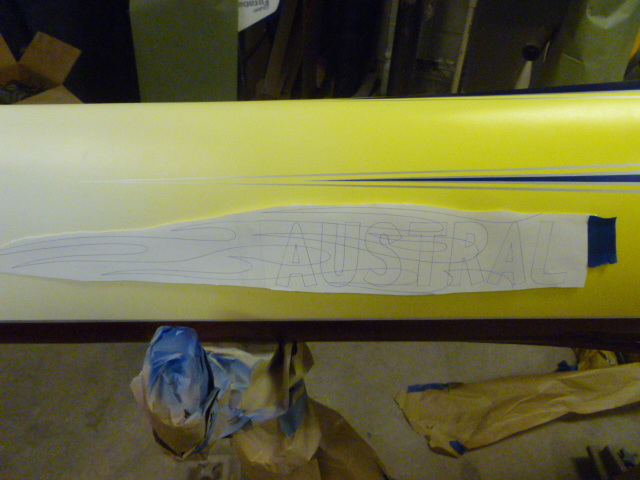
Here the ghost flame masking film was layed out and masked off.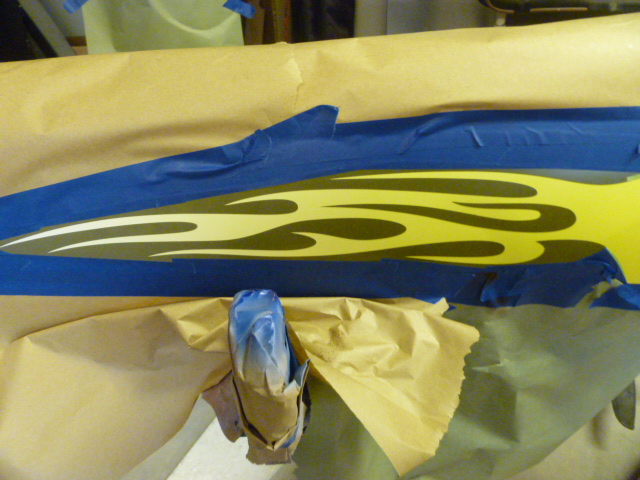
The whole graphic was shot with silver pearl with red candy shot on the tips and dusted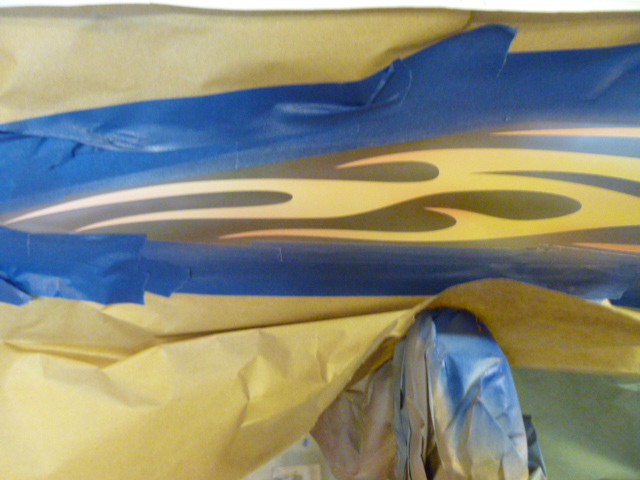
over the whole set of flames.
Flames are unmasked.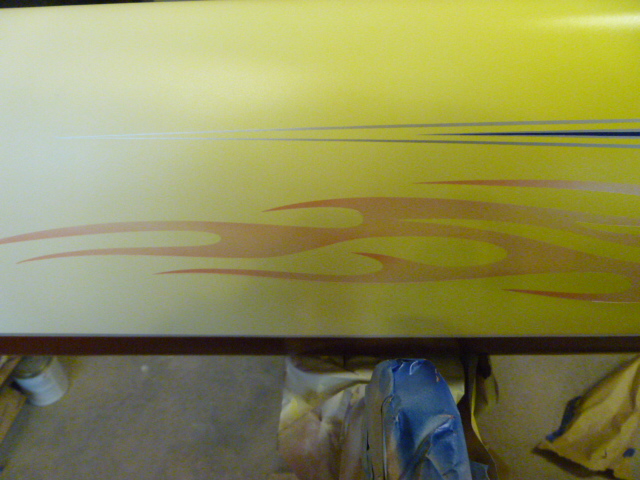
The Austral name was then layed over the flames. I am doing this opposite from the wings. On the wings the Austral name was shot to appear cut into the surface (concave). On the fuselage I painted it to appear as though it were protruding (convex) from the surface. I do that by painting white on the highlight side and black on the shadow side.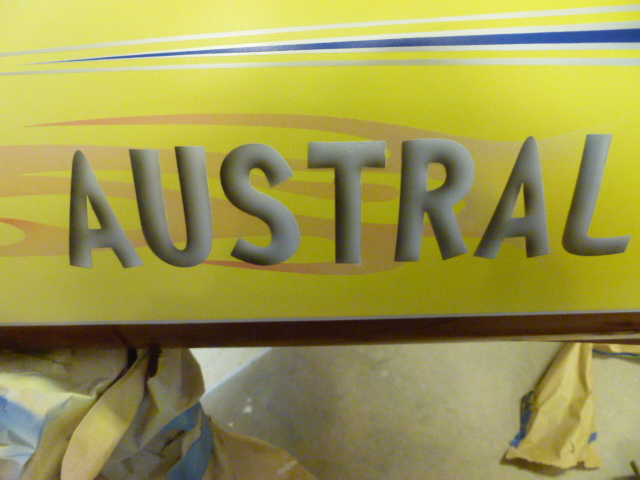
I now hand airbrush in a drop shadow to enhance the allusion further.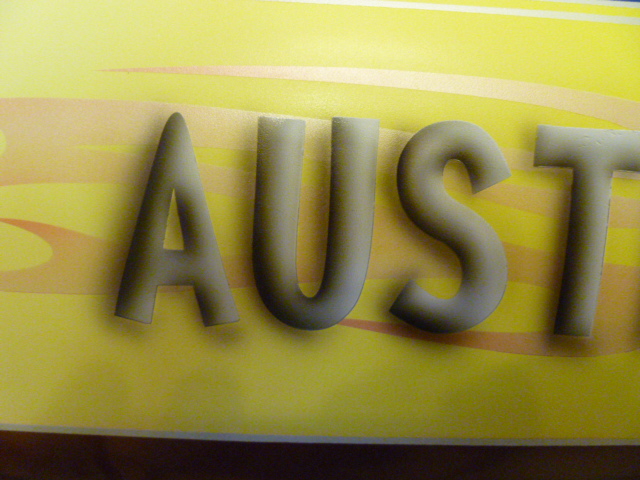
Finished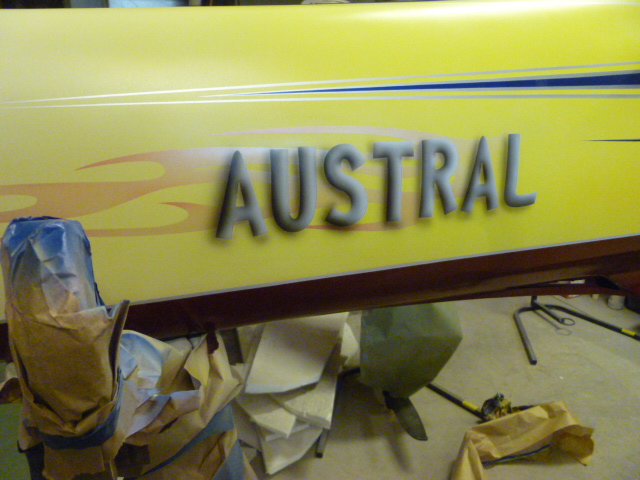
01-17-2016, 09:04 PM
#205
Thread Starter
OK I'm coming to the end.
As I said earlier, I try not to work off a firm pattern. As things start to come together, the plane will tell me what it needs. My actual tape layout was actually quite a bit different from my original drawing. With paper templates I wouldn't have been able to be as flexible.
After I had all the graphics on that I planed to do, the front of the fuselage just didn't look complete. It needed something to balance the center and tail graphics. I have several flame graphics and found one that fit perfect. I didn't want it to be overpowering so I painted them as very subtle ghost flames.
This is why I always try to do a paper layout before I cut the masking film. I printed it out and it was a bit small, so I just increased the size of the mask and it fit perfect.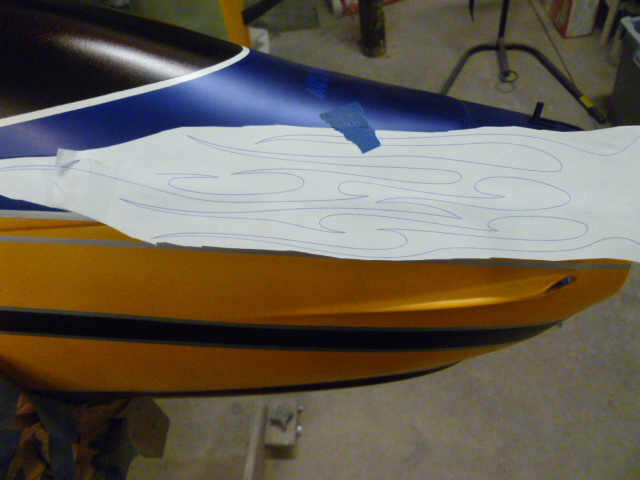
One thing about flames is to take into account how real flames would travel across the front of the plane. The way I envision real flames is they would be rising at the front and then slanting back down. That's how I laid out the masking film. I just dusted silver pearl over the flames that were over the blue.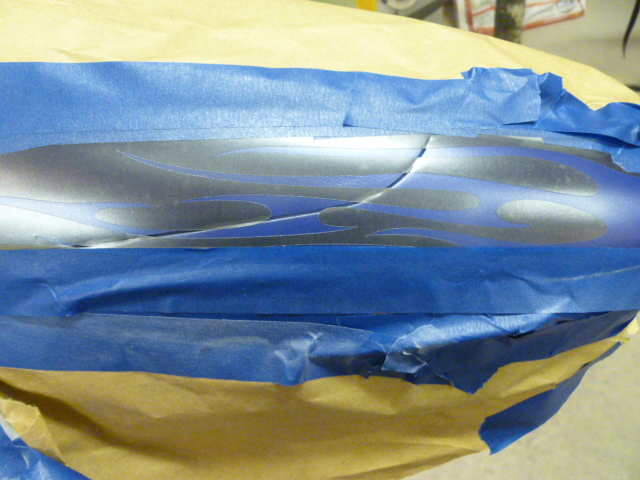
After the sliver pearl was shot I unmasked the areas that the flames laid over the orange and masked back over the blue.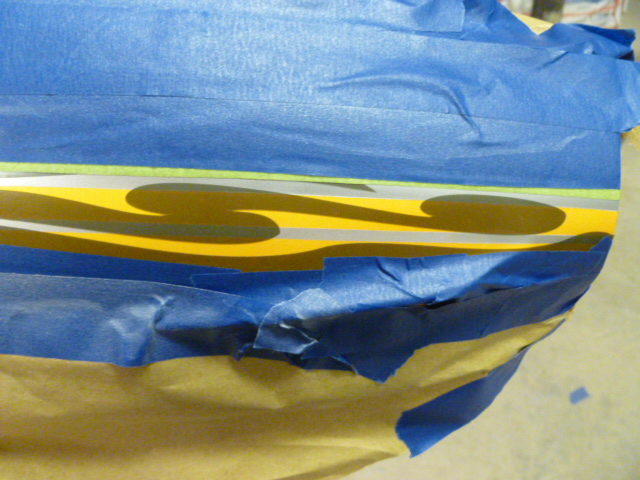
Over the orange I dusted pearl red.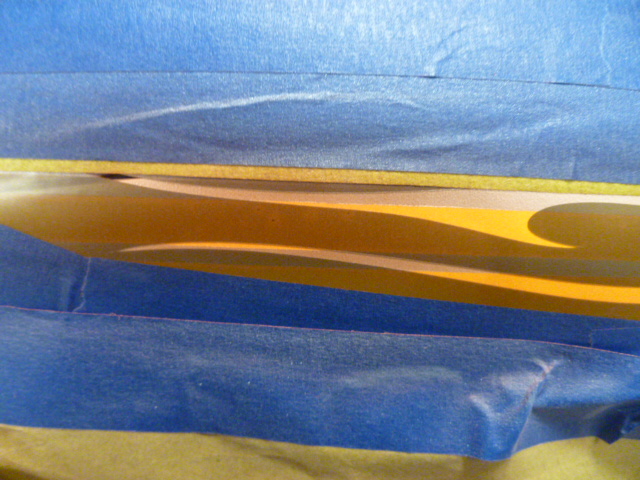
The key to ghost flames is to shoot about half the paint you think it needs, It really multiplies after it's unmasked.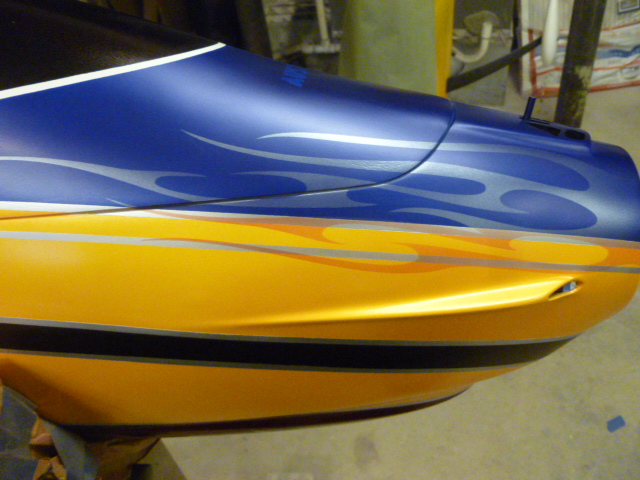
After the clear is on, the flames will be very transparent and glow in the sun. In some light conditions, they will be very hard to see, thus the name "ghost flames".
Last edited by Portlandflyer; 01-18-2016 at 11:32 AM.
01-17-2016, 09:22 PM
#206
Thread Starter
Alright, the last and most important graphic!
One of the things I like to do is finish off the paint lines on the canopy opening. It only take a few minutes and adds that extra bling.
Here are a few final shots before the clear is shot. I still have to finish and paint the wing struts.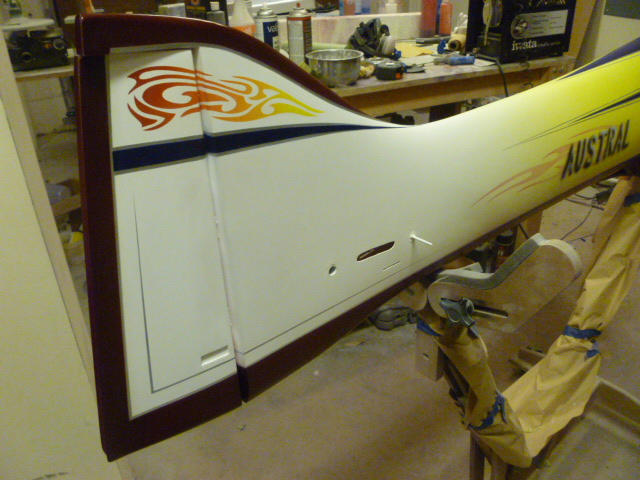
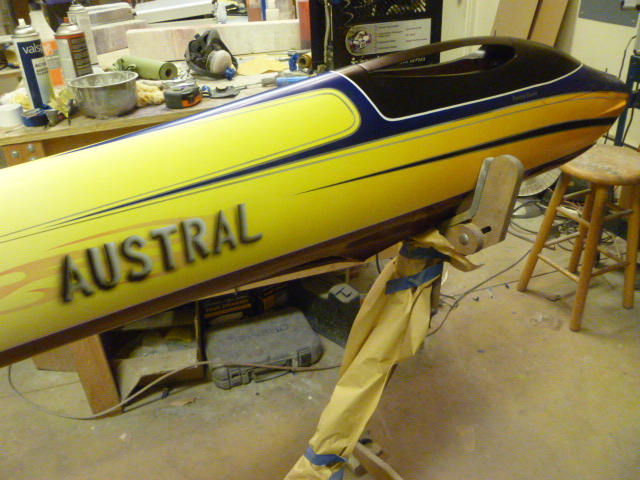
The canopy is not straight black. I hit on a combination a that really looks exceptional in the sun. I first shoot it with black and then lay a pretty heavy coat of HOK red candy with red Metajewels. The black stripe on the fuselage is painted the same way with silver pinstripes on the edges.
The real key to one of these type of paint jobs is to really focus on all the little small imperfections and FIX them. It's amassing how long it takes to clean up all those little spots. I spent about six hours just fixing stuff on the fuselage and still have a few more to go.
Next...clear, cut and buff.
BTW, I used 38 different masking films on the whole plane. Close to over the 40 some I used on the Evolaris.
One of the things I like to do is finish off the paint lines on the canopy opening. It only take a few minutes and adds that extra bling.
Here are a few final shots before the clear is shot. I still have to finish and paint the wing struts.
The canopy is not straight black. I hit on a combination a that really looks exceptional in the sun. I first shoot it with black and then lay a pretty heavy coat of HOK red candy with red Metajewels. The black stripe on the fuselage is painted the same way with silver pinstripes on the edges.
The real key to one of these type of paint jobs is to really focus on all the little small imperfections and FIX them. It's amassing how long it takes to clean up all those little spots. I spent about six hours just fixing stuff on the fuselage and still have a few more to go.
Next...clear, cut and buff.
BTW, I used 38 different masking films on the whole plane. Close to over the 40 some I used on the Evolaris.
Last edited by Portlandflyer; 01-18-2016 at 09:56 AM.
01-17-2016, 10:18 PM
#207
Thread Starter
One really, really important tip.
It is imperative that all colors be brought up to 100% saturation when you paint at this level. I talked about this before. 100% saturation simply means we have hit the maximum depth of color. We could add multiple coats and it will not darken the color. The reason this is so important is in doing repairs....and you will have a lot of them! If you have not shot to 100%, anytime we do a repair(shoot back over) you will always have a ring or dark spot where the repair is made.
Let's say we have not shot to 100% and we have a little spot that needs to be repaired. As we shoot the repair area, over spray will hit the areas around the repair area. By the time we have the repaired spot up to the right depth, the surrounding areas will now be too dark, leaving a dark spot or ring.
If we have shot our original base color to 100%, we can lay on as much paint as we want on the repair area and it will all blend in.
Last edited by Portlandflyer; 01-18-2016 at 09:54 AM.
01-18-2016, 07:09 AM
#208

Join Date: Nov 2007
Location: Boise,
ID
Posts: 14
Likes: 0
Received 0 Likes
on
0 Posts
Patrick,
Again this has been such a great tutorial...thank you for taking the time to share so many tips, hints and advice.
Your airplane looks beautiful! I am looking forward to seeing it all put together, hopefully in person some time.
Kerry
Again this has been such a great tutorial...thank you for taking the time to share so many tips, hints and advice.
Your airplane looks beautiful! I am looking forward to seeing it all put together, hopefully in person some time.
Kerry
01-18-2016, 09:53 AM
#209
Thread Starter
Thank you for your kind words. It takes a lot of time and effort to write this stuff up and when you get very few responses it makes me wonder if I am wasting my time posting this stuff. The reality is, there are likely only a handful of builders in the world that will ever go to these lengths in painting a plane, so I guess if I have inspire a couple of guys, it's worth it.
Well it looks like the Bosie pattern contest is back on, so maybe I will have it there. The problem is I have these beautiful painted planes, but my favorite in contest is my old beater Xareltoo with Mono Kote wings!
Pat
01-18-2016, 10:08 AM
#210
Senior Member

Join Date: Nov 2003
Location: Olathe,
KS
Posts: 165
Likes: 0
Received 0 Likes
on
0 Posts
Good day Pat,
just so you know, you've inspired me. I look forward to getting going on this. Took an old 3/32nd wing skin that I will never use, sanded smooth, then filled with the lightweight spackle and sanded as well. Then put on some xxxspan that I had with polycrylic and getting something that I can try out with. Picked up some Wicked colors from hobby lobby, and looking to get the airbrush soon. So I am on the way. And yes, you are right, not too many people will put forth the effort but I will be one of them.
Not sure on the silk/poly span that I used but it was 13 grams for two sheets, about 33" by 24". there does seem to be a technique to putting that one, but one more thing to learn. Probably my first plane to try this all out on will be an AR6 Q40 plane that I am building the wing for. It will have to be glass because I need the strength on the outside of the wing; but I can still employ these techniques anyways.
Here is a place that has some vector drawing to download, so that may limit a step for some.
all-silhouettes.com
The last Austral graphic that you painted, what is that font name? I've never seen it but I like the way it came out. I would love that for my NMPRA numbers, especially painted.
Thanks
Doug
01-18-2016, 10:14 AM
#211
Join Date: Nov 2007
Location: Boise,
ID
Posts: 14
Likes: 0
Received 0 Likes
on
0 Posts
Yes it is very much appreciated...
I just finished covering my wings on my new Episode. Next on to the fuselage. I plan on using some tips I gathered from you to do the painting on it. I know the Episode is not the newest of the new pattern planes but it is new to me and will take me a long way in my pattern venture. The wings turned out pleasing well I might add. I plan on attending several contests in the Pacific North West this year...wish me luck.
Kerry
Kerry,
Thank you for your kind words. It takes a lot of time and effort to write this stuff up and when you get very few responses it makes me wonder if I am wasting my time posting this stuff. The reality is, there are likely only a handful of builders in the world that will ever go to these lengths in painting a plane, so I guess if I have inspire a couple of guys, it's worth it.
Well it looks like the Bosie pattern contest is back on, so maybe I will have it there. The problem is I have these beautiful painted planes, but my favorite in contest is my old beater Xareltoo with Mono Kote wings!
Pat
 01-18-2016, 11:04 AM
#213
Thread Starter
Yes it is very much appreciated...
I just finished covering my wings on my new Episode. Next on to the fuselage. I plan on using some tips I gathered from you to do the painting on it. I know the Episode is not the newest of the new pattern planes but it is new to me and will take me a long way in my pattern venture. The wings turned out pleasing well I might add. I plan on attending several contests in the Pacific North West this year...wish me luck.
Kerry
I just finished covering my wings on my new Episode. Next on to the fuselage. I plan on using some tips I gathered from you to do the painting on it. I know the Episode is not the newest of the new pattern planes but it is new to me and will take me a long way in my pattern venture. The wings turned out pleasing well I might add. I plan on attending several contests in the Pacific North West this year...wish me luck.
Kerry
The Episode is a very good plane. If I can help, let me know. You don't need luck...you fly very well!
Pat
01-18-2016, 11:08 AM
#214
Thread Starter
01-18-2016, 11:27 AM
#215
Thread Starter
Good day Pat,
just so you know, you've inspired me. I look forward to getting going on this. Took an old 3/32nd wing skin that I will never use, sanded smooth, then filled with the lightweight spackle and sanded as well. Then put on some xxxspan that I had with polycrylic and getting something that I can try out with. Picked up some Wicked colors from hobby lobby, and looking to get the airbrush soon. So I am on the way. And yes, you are right, not too many people will put forth the effort but I will be one of them.
Not sure on the silk/poly span that I used but it was 13 grams for two sheets, about 33" by 24". there does seem to be a technique to putting that one, but one more thing to learn. Probably my first plane to try this all out on will be an AR6 Q40 plane that I am building the wing for. It will have to be glass because I need the strength on the outside of the wing; but I can still employ these techniques anyways.
Here is a place that has some vector drawing to download, so that may limit a step for some.
all-silhouettes.com
Doug,
The last Austral graphic that you painted, what is that font name? I've never seen it but I like the way it came out. I would love that for my NMPRA numbers, especially painted.
Thanks
Doug
Glad you are enjoying the journey.
I hope I still have the name of the font as once it's converted to a vector file I don't know what it is. It is one of the fonts in Corel Draw. It's the same one I used all over the plane. I just keep making different sizes of it. I will check later and let you know.
01-18-2016, 07:24 PM
#216
Thread Starter
Doug,
Glad you are enjoying the journey.
I hope I still have the name of the font as once it's converted to a vector file I don't know what it is. It is one of the fonts in Corel Draw. It's the same one I used all over the plane. I just keep making different sizes of it. I will check later and let you know.
It probably won't help unless you have Corel Draw. The name of the font is DFPOP-W9. Catchy name for a font.
01-18-2016, 10:38 PM
#217
Senior Member
Kerry,
Thank you for your kind words. It takes a lot of time and effort to write this stuff up and when you get very few responses it makes me wonder if I am wasting my time posting this stuff. The reality is, there are likely only a handful of builders in the world that will ever go to these lengths in painting a plane, so I guess if I have inspire a couple of guys, it's worth it.
Pat
I agree tho that as time consuming as tutorials are, coupled with the effort it takes to do them properly, the general response leaves a lot to be desired. The guys don't want to get it.... It's too difficult.
It it occurs to me that quite possibly the best place for real good work such as yours belongs in CL Stunt pages. After all they still judge concours d'elegance and appearance counts. Guys take real pride in their planes finish. In pattern we seem to have painted ourselves in the corner of the same cookie cutter crates for the most part. Very few of us do our own thing and fewer yet design our own.
I stopped posting new stuff I'm working on in regular pattern page. I've posted some new work in the classics page but even that will stop. I never thought the day would come when the classics would have so many Arfies in their midst but of course constant exposure contaminates the soul.
Last edited by MTK; 01-18-2016 at 10:43 PM.
01-18-2016, 11:10 PM
#218
Thread Starter
Pat, it is likely that most of the pattern folks in the US simply put their money down for their arfie. They don't have the building skill because they don't want to develop it. And when it comes to finishing a crate, well, just slapping a pair of colors on and some plastic film is good enough. That's not true in other countries as evidenced by the emails I get from foreign lands.
I agree tho that as time consuming as tutorials are, coupled with the effort it takes to do them properly, the general response leaves a lot to be desired. The guys don't want to get it.... It's too difficult.
It it occurs to me that quite possibly the best place for real good work such as yours belongs in CL Stunt pages. After all they still judge concours d'elegance and appearance counts. Guys take real pride in their planes finish. In pattern we seem to have painted ourselves in the corner of the same cookie cutter crates for the most part. Very few of us do our own thing and fewer yet design our own.
I stopped posting new stuff I'm working on in regular pattern page. I've posted some new work in the classics page but even that will stop. I never thought the day would come when the classics would have so many Arfies in their midst but of course constant exposure contaminates the soul.
I'm all for appearance points. I think I'll implement that in D8!
 01-19-2016, 05:41 AM
#219
Senior Member
Join Date: Nov 2003
Location: Olathe,
KS
Posts: 165
Likes: 0
Received 0 Likes
on
0 Posts
In reference to the finish, guess before my time, in the old Formula 1 race days, finish was part of the whole competition. there were some really nice finishes back then. There are still a few that paint. And then painting in the mold is quite common on the composite air frames; you have to paint backwards. And I think it would be real difficult to do the 3D highlights and such in the mold.
For me until the weather gets a little warmer, it will be hard to do a lot of this stuff since i paint the nasty stuff outdoors.
Pat, if you ever head out to Kansas to fly in the contest run by Vince, let me know so I can see those plane first-hand.
Two ideas, if you'd be able.
1.The one black plane with the flames all over it, I assume you were using the flame templates for doing that. Is that something you can show how to do?
2. Have you considered making video of any of these techniques to share, like the ones on how to spray using the templates, and such. or maybe you already know of some videos that show those things that you could share.
Cheers,
Doug
Last edited by scratchpc7; 01-19-2016 at 06:43 AM.
 01-19-2016, 10:22 AM
#222
Thread Starter
Guess they all can't have catchy names like chiller and coolsville. Since I did download the trial for corel draw, I do have this font, so I will be able to use that for now.
In reference to the finish, guess before my time, in the old Formula 1 race days, finish was part of the whole competition. there were some really nice finishes back then. There are still a few that paint. And then painting in the mold is quite common on the composite air frames; you have to paint backwards. And I think it would be real difficult to do the 3D highlights and such in the mold.
For me until the weather gets a little warmer, it will be hard to do a lot of this stuff since i paint the nasty stuff outdoors.
Pat, if you ever head out to Kansas to fly in the contest run by Vince, let me know so I can see those plane first-hand.
Two ideas, if you'd be able.
1.The one black plane with the flames all over it, I assume you were using the flame templates for doing that. Is that something you can show how to do?
2. Have you considered making video of any of these techniques to share, like the ones on how to spray using the templates, and such. or maybe you already know of some videos that show those things that you could share.
Cheers,
Doug
The fire is done with about 60 to 70% freehand airbrushing and the balance with hand held shields.
It's kind of interesting how this plane came about. Maybe ten years or so ago I was watching one of those car rebuild TV shows and this guy was on the show talking about a helicopter he painted in fire for the owners of a chain of pizza parlors. The story goes at a grand opening for a new pizza joint, by the time they landed there were fire trucks on the ground due to people calling 911 thinking a helicopter was crashing!
For some reason I had that in the back of my mind and thought it would be cool to paint a pattern plane in fire, but didn't know where to start. I did remember he called it "True Fire". Good old Google came to the rescue. I just typed into Google "True Fire Helicopter" and Bingo there it was. (Go ahead and type it in and you will find it just as fast) It only took a few clicks and I wound up on Mike Lavallee's site called Killer Paint. https://www.killerpaint.com/
No matter what you read on the internet, Mike was the guy that got the whole True Fire thing going. If you do a Google search, you will find a ton of guys doing it now and of course they all claim to be the original. Some guys even call it "Real Fire" to make it seem like they are doing something different. The problem with pretty much all the stuff on the internet about this just sucks.
I read a bunch of stuff and found most of it conflicting and the results were pretty poor so I just bought Mike's DVD on how to do it. He doesn't hold anything back on his DVD and tells you exactly how to do it. The challenge with it is most of it is done freehand and so it takes a while to get the "artistic" side of it down. It's not like the beveled edge stuff I did on the Austral paint job that is pretty mechanical. What I did was just start painting on a piece of sheet metal. Over a two week period I must have done it 15 to 20 times on that one panel. It probably had an 1/8 inch of paint on it.
The interesting thing about painting fire is it is really fast to do. In fact the faster you paint it, the better it looks. If you look at pictures of guys work on Google you will see most of them are way too mechanical...that's not what fire looks like. Coast Airbrush carries the DVD and they even have a True Fire kit of House of Kolor paint. That's how I started using House of Kolor paints. http://www.coastairbrush.com/search....=&stype=&scat=
If any of you guys are (and you should be) members of NSRCA, I did a K-Factor article a few years ago on it. There are a few guys doing it in water base paints with limited success. Here is an overview of Mike's video: https://www.youtube.com/watch?v=wEkSWR1hTkA
This guy is very good; https://www.youtube.com/watch?v=FyjVMlY3qos
https://www.youtube.com/watch?v=TTCQk9Pvyg8
No time to do videos myself. If I'm not building, I'm painting. If I'm not painting, I'm flying.
All of this stuff is out there, you just gotta look for it.