


Painted wing, stabs and advanced graphics
 01-19-2016, 12:11 PM
#226

Join Date: Feb 2014
Location: Sugar Land, Tx
Posts: 159
Likes: 0
Received 0 Likes
on
0 Posts
PAt,
You indicated you use a plotter to frame out your masks. What plotter is it and can you give the approximate cost? Really liked the work you have done and I am starting a new build (Lightning pattern plane by Jeff Corder) and may incorporate some of your process.
Thank you,
Sheldon
You indicated you use a plotter to frame out your masks. What plotter is it and can you give the approximate cost? Really liked the work you have done and I am starting a new build (Lightning pattern plane by Jeff Corder) and may incorporate some of your process.
Thank you,
Sheldon
 01-19-2016, 12:27 PM
#227
Thread Starter
PAt,
You indicated you use a plotter to frame out your masks. What plotter is it and can you give the approximate cost? Really liked the work you have done and I am starting a new build (Lightning pattern plane by Jeff Corder) and may incorporate some of your process.
Thank you,
Sheldon
You indicated you use a plotter to frame out your masks. What plotter is it and can you give the approximate cost? Really liked the work you have done and I am starting a new build (Lightning pattern plane by Jeff Corder) and may incorporate some of your process.
Thank you,
Sheldon
I covered the cutter I use at the outset of this thread, but here it is again.
Both of these will do a great job
http://www.uscutter.com/USCutter-MH-...n-Cut-Software
http://www.uscutter.com/USCutter-SC-Series-Vinyl-Cutter
Don't let the low cost turn you off. They are very good machines with great support.
The Lighting is a great airplane. I know Jeff and in fact he is following this thread. I also fly with his dad.
Last edited by Portlandflyer; 01-19-2016 at 02:54 PM.
01-19-2016, 07:08 PM
#228
PF, I had read the entire thread several times to “study”your painting technic wich is awesome and very inspiring. I have a couple of quetions.
1- Did you use any kind of primer on the fucelage prior to aplly the base coat? If so which one.
2- The other is the clear coat. Which product did you use?
Thank you very much.
1- Did you use any kind of primer on the fucelage prior to aplly the base coat? If so which one.
2- The other is the clear coat. Which product did you use?
Thank you very much.
Last edited by Ricardo M.; 01-20-2016 at 10:02 AM.
01-19-2016, 08:37 PM
#231

")

Seriously, That is a fine looking paint job!!!
Ken
01-19-2016, 08:41 PM
#232
Thread Starter
PF, I had read the entire thread several times to �study�your painting technic wich is awesome and very inspiring. I have a couple of quetions.
1- Did you use any kind of primer on the fucelageprior to aplly the base coat? If so which one.
2- The other is the clear coat. Which product didyou use?
Thank you very much.
1- Did you use any kind of primer on the fucelageprior to aplly the base coat? If so which one.
2- The other is the clear coat. Which product didyou use?
Thank you very much.
I use only a little bit of primer on the seams that always need to be filled and sanded smooth. I used Klass Kote white Epoxy primer, but there are a lot of good ones available. PPG makes a good one for fuselage work.
I am just getting ready to shoot the clear. I have been using (and like) House of Kolor Kosmic Uethane Show Klear. Excellent product with great clarity. Clarity in clear coats is something a lot of guys don't take into account. Most guys think clear is clear,,,,but it may not be all that clear!

http://www.coastairbrush.com/products.asp?cat=756
01-19-2016, 08:43 PM
#233
Thread Starter
That is a really ugly plane so to save you the embarrassment of other people seeing it I will offer to take it off your hands for the price of the shipping to me. I would really hate to see you ridiculed at your local flying field so I recommend to ship ASAP.
Seriously, That is a fine looking paint job!!!
Ken
Seriously, That is a fine looking paint job!!!
Ken
01-20-2016, 09:56 AM
#234
Ricardo,
I use only a little bit of primer on the seams that always need to be filled and sanded smooth. I used Klass Kote white Epoxy primer, but there are a lot of good ones available. PPG makes a good one for fuselage work.
I am just getting ready to shoot the clear. I have been using (and like) House of Kolor Kosmic Uethane Show Klear. Excellent product with great clarity. Clarity in clear coats is something a lot of guys don't take into account. Most guys think clear is clear,,,,but it may not be all that clear!
http://www.coastairbrush.com/products.asp?cat=756
Great Thanks.
01-20-2016, 10:03 AM
#235
Senior Member
01-20-2016, 10:32 AM
#237

Join Date: Nov 2007
Location: Boise,
ID
Posts: 14
Likes: 0
Received 0 Likes
on
0 Posts
Pat,
In post 225 the one with the plane assembled. The stand that you plane is sitting on... Is that something you made of can it be purchased commercially?
If it is something that you made do you have and will you share the plans for it?
Kerry
In post 225 the one with the plane assembled. The stand that you plane is sitting on... Is that something you made of can it be purchased commercially?
If it is something that you made do you have and will you share the plans for it?
Kerry
01-20-2016, 10:42 AM
#238
Thread Starter
I was waiting for someone to notice it. I bought it and have two of them. It's made by....are you ready for this....RC Airplane Stands! It's one of those things you could build, but by the time you get done you would have more time and money in it than it's worth. The problem was, I was using it in the shop all the time and flying bipes you need a stand at the field so I was taking it in and out all the time and just said Uncle and bought another one.
I will tell you it's one of the best tools for building I have ever owned. Bipes can be a real pain to build, but with this stand it's effortless. I can constantly adjust it to any position I need the plane to be in while I am working on it. The one in the shop is their Deluxe version which has heavy duty casters. That's the way to go for the shop. The one I leave in the truck for the field is their regular one without casters.
http://rcairplanestands.com/1.html
Last edited by Portlandflyer; 01-20-2016 at 01:34 PM.
01-20-2016, 01:33 PM
#239
Thread Starter
I am shooting clear today. For a bipe I normally shoot both wings and both stabs at the same time. I am only doing one wing and both stabs today. What happens is after 24 hours or so, the clear starts to cure so hard that it's really difficult to level all the surfaces, so one wing usually gets moved into the next day and by then the clear is just very difficult to work with.
I like to let clear cure for about 24 hours before I start to level it so I will start on them tomorrow afternoon.
A bit about clear. In one word I "HATE" to shoot clear. Walk into a custom car painting shop and ask for the best painter they have and chances are it's the guy that shoots clear. With base coats you have lots of latitude, with clear, you have almost none. The problems we have with clear is we are always walking on the edge of the cliff. Too little and we get lots of orange peel, Too heavy and it runs. It's a very fine line.
That being said, I do have suggestions and a lot of them are based on me making lots of mistakes. First off, DO NOT try to shoot clear with a small touch up gun. Touch up guns are for base coat, not clears. In my opinion use the right tool, and the right tool is a full sized gun with a 1.3 or 1.4 tip and needle. Clear by its nature is think stuff and if we try to shoot it in a small gun it's just not going to atomize properly and you will wind up getting lots of orange peel or worse.
So now we step up to this big huge gun to shoot a little bitty stab. In our mind we are thinking, "this is way to big of a gun so I better stay way back away from the surface or I am going to blow on way to much clear......wrong. At the beginning I talked about the "sweet" spot on a gun for optimal atomization. What happens when we move past that sweet spot the little bitty particles of clear (paint) are starting to come back together in larger drops and we wind up with the same orange peal problem. As I said at the outset of this thread the best way to find that sweet spot is to open the gun with full air on (no paint) and put your hand in front of the gun. Now move your hand towards the tip of the gun and the point you hear a distinct change in sound...you found that sweet spot distance. My guess is, it's a lot closer than you thought it would be. Most full sized guns are going to be about 6 inches from the surface or less.
OK, I shoot on a lot of clear, but I also take a lot off. When you are doing the type of graphics I am, you will have lots of ridges that the only way you can level them is to start with a lot of clear. I shoot a medium tack coat and two other fairly heavy coats. A tack coat is just a medium coat that the next coats have something to grab on to. If you just start out with a heavy coat, the chances are good you will have lots of runs. The other thing is to give them plenty of time between coats or you can get what is called "solvent pop". Solvent pop is when you shoot to much clear too soon and it traps the solvents so they can't escape. What happens is as the trapped solvent escapes it can create little pin holes in the clear. I have had it and you see it when the rubbing compound dries.
Now most guys are going to be fine with just shooting one or two coats of clear and calling it good, but I am after the best possible finish I can get. To get that "show car" finish, we are going to have to do what is called "cut and buff". Anytime we shoot clear (or paint for that matter), we always wind up with what is called "orange peel" which is named after the look of an oranges skin. The process starts by leveling the surface with sandpaper and working our way up in paper grit and finally using buffing compounds.
I prefer to start with 1,000 grit, but with all the leveling I have to do, I usually start with 600 grit paper. Now, I may go against the tide, but I do not use a sanding block when I sand clear. Now everything you read will tell you to use a sanding block, but keep in mind, what you are most likely reading is about finishing cars with flat surfaces. Well therein is the issue. I haven't seem many pattern planes (especially wings and stabs) that have lots of flat surfaces. I always sand wet with just clean water with a few drops of dish washing soap added for lubrication.
Our first sanding is by far the most time consuming as you are sanding, cleaning, drying and checking. What you are doing is removing all the little high spots and orange peel. After that step is done, we are now only removing the scratches from the prior sanding.
More later
Last edited by Portlandflyer; 01-21-2016 at 11:27 AM.
01-21-2016, 11:21 AM
#240
Thread Starter
Did I say I hate to shoot clear! If not, I hate to shoot clear. One of the reasons I hate clear is you can bust you butt for hours and hours cleaning up and fixing all the little stuff and the very second you shoot the first coat of clear about ten more pop up! That's what happened yesterday. I had time so I decided to shoot the fuselage. I spent about an hour cleaning and tack clothing it. Half way into the first coat of clear I found two smudges that you get mostly from tape residue. They didn't show before the clear, but they do now and of course they are at the very top of the fuselage. To be perfectly honest, no one will see them, but I will!
The other problem that showed up was a red cloud on the white. I say a cloud because that's what it looks like. Red is notorious for somehow working it's way onto white surfaces. Just handling the plane will transfer just the slightest amount of red and of course over white, it's going to show. From past experience I know red can be a big problem so I shot intercoat clear (SG100 HOK) on the red on the wings and stabs, but figured I could get away with it on the fuselage and it came back to bite me. Again it's just one small area of red that worked it's way onto the white and like I said, no one will see it except me, and I'm the only one that cares anyway, so I will fix them and start all over on the clear that oh by the way...I hate! I think I am going to start a new craze......matte finished airplanes with no clear...now that's the ticket!
The one wing and stabs that I shot are setting up nice and I will be cutting them today. Some of you older guys have likely heard the term "color sanding". Back before the 2K (base coat, clear coat) came into being, the way you produced show car finishes was to literally sand the paint flat to remove the orange peel and blems. As you would sand, you would literately see the color you were sanding floating on the surface in the water. With the base coat/clear systems "color" is the last thing you want to see. If you see color it just means you have cut past the clear into the base coat. And of course if you have graphics under the clear, you just messed them up too. When we sand clear it turns to a milky white. The term used now when working with 2K systems is "cut and buff". We are cutting the surface with sand paper and then buffing it back to a gloss. Sometimes you will hear the term color sanding on 2K, but it's not accurate.
Now after you get a good coat of clear on, most guys are going to leave it at that. The thought is "why sand and mess up a perfectly glossy finish". Trust me, the older I get the more I am starting to move to that thinking, but I know what is at the end of the road, and the effort is worth it. It is amazing the difference between a gloss coat left alone and a good cut and buff finish. To be perfectly honest, I never seem to be able to get the level of gloss back that I had before I started to cut and buff, but it's just a different level of gloss, more refined, if you will. I talked earlier in this thread about reflection and refraction (go back and find it, if you missed it). You see all gloss coats have some level of orange peel. I don't care if your 100 grand BMW was shot with a multi gazillion dollar robot, it will still have some level of orange peel. The problem is with those microscopic little bumps (orange peel), light is not reflected back to us evenly and gives us a level of distortion. If we have graphics under our clear, we may not be viewing it with utmost clarity and may look muddy.
Let's now level the surface with sand paper and bring the gloss back. What we now have is a level of gloss that has no surfaces to distort the light coming back to us. In fact a lot of that light will now penetrate past the clear, bounce around if you will, and then exit back to our eyes. The term for this is "refraction". The smoother our surface and clearer our surface coating is (clear) the more refraction we have, which equates to a higher allusion of depth.
More as I get into the cutting and buffing process. And did I say I hate clear?!
Last edited by Portlandflyer; 01-21-2016 at 11:24 AM.
01-21-2016, 02:00 PM
#241
Senior Member
I am shooting clear today. For a bipe I normally shoot both wings and both stabs at the same time. I am only doing one wing and both stabs today. What happens is after 24 hours or so, the clear starts to cure so hard that it's really difficult to level all the surfaces, so one wing usually gets moved into the next day and by then the clear is just very difficult to work with.
I like to let clear cure for about 24 hours before I start to level it so I will start on them tomorrow afternoon.
A bit about clear. In one word I "HATE" to shoot clear. Walk into a custom car painting shop and ask for the best painter they have and chances are it's the guy that shoots clear. With base coats you have lots of latitude, with clear, you have almost none. The problems we have with clear is we are always walking on the edge of the cliff. Too little and we get lots of orange peel, Too heavy and it runs. It's a very fine line.
That being said, I do have suggestions and a lot of them are based on me making lots of mistakes. First off, DO NOT try to shoot clear with a small touch up gun. Touch up guns are for base coat, not clears. In my opinion use the right tool, and the right tool is a full sized gun with a 1.3 or 1.4 tip and needle. Clear by its nature is think stuff and if we try to shoot it in a small gun it's just not going to atomize properly and you will wind up getting lots of orange peel or worse.
So now we step up to this big huge gun to shoot a little bitty stab. In our mind we are thinking, "this is way to big of a gun so I better stay way back away from the surface or I am going to blow on way to much clear......wrong. At the beginning I talked about the "sweet" spot on a gun for optimal atomization. What happens when we move past that sweet spot the little bitty particles of clear (paint) are starting to come back together in larger drops and we wind up with the same orange peal problem. As I said at the outset of this thread the best way to find that sweet spot is to open the gun with full air on (no paint) and put your hand in front of the gun. Now move your hand towards the tip of the gun and the point you hear a distinct change in sound...you found that sweet spot distance. My guess is, it's a lot closer than you thought it would be. Most full sized guns are going to be about 6 inches from the surface or less.
OK, I shoot on a lot of clear, but I also take a lot off. When you are doing the type of graphics I am, you will have lots of ridges that the only way you can level them is to start with a lot of clear. I shoot a medium tack coat and two other fairly heavy coats. A tack coat is just a medium coat that the next coats have something to grab on to. If you just start out with a heavy coat, the chances are good you will have lots of runs. The other thing is to give them plenty of time between coats or you can get what is called "solvent pop". Solvent pop is when you shoot to much clear too soon and it traps the solvents so they can't escape. What happens is as the trapped solvent escapes it can create little pin holes in the clear. I have had it and you see it when the rubbing compound dries.
Now most guys are going to be fine with just shooting one or two coats of clear and calling it good, but I am after the best possible finish I can get. To get that "show car" finish, we are going to have to do what is called "cut and buff". Anytime we shoot clear (or paint for that matter), we always wind up with what is called "orange peel" which is named after the look of an oranges skin. The process starts by leveling the surface with sandpaper and working our way up in paper grit and finally using buffing compounds.
I prefer to start with 1,000 grit, but with all the leveling I have to do, I usually start with 600 grit paper. Now, I may go against the tide, but I do not use a sanding block when I sand clear. Now everything you read will tell you to use a sanding block, but keep in mind, what you are most likely reading is about finishing cars with flat surfaces. Well therein is the issue. I haven't seem many pattern planes (especially wings and stabs) that have lots of flat surfaces. I always sand wet with just clean water with a few drops of dish washing soap added for lubrication.
Our first sanding is by far the most time consuming as you are sanding, cleaning, drying and checking. What you are doing is removing all the little high spots and orange peel. After that step is done, we are now only removing the scratches from the prior sanding.
More later
I like to let clear cure for about 24 hours before I start to level it so I will start on them tomorrow afternoon.
A bit about clear. In one word I "HATE" to shoot clear. Walk into a custom car painting shop and ask for the best painter they have and chances are it's the guy that shoots clear. With base coats you have lots of latitude, with clear, you have almost none. The problems we have with clear is we are always walking on the edge of the cliff. Too little and we get lots of orange peel, Too heavy and it runs. It's a very fine line.
That being said, I do have suggestions and a lot of them are based on me making lots of mistakes. First off, DO NOT try to shoot clear with a small touch up gun. Touch up guns are for base coat, not clears. In my opinion use the right tool, and the right tool is a full sized gun with a 1.3 or 1.4 tip and needle. Clear by its nature is think stuff and if we try to shoot it in a small gun it's just not going to atomize properly and you will wind up getting lots of orange peel or worse.
So now we step up to this big huge gun to shoot a little bitty stab. In our mind we are thinking, "this is way to big of a gun so I better stay way back away from the surface or I am going to blow on way to much clear......wrong. At the beginning I talked about the "sweet" spot on a gun for optimal atomization. What happens when we move past that sweet spot the little bitty particles of clear (paint) are starting to come back together in larger drops and we wind up with the same orange peal problem. As I said at the outset of this thread the best way to find that sweet spot is to open the gun with full air on (no paint) and put your hand in front of the gun. Now move your hand towards the tip of the gun and the point you hear a distinct change in sound...you found that sweet spot distance. My guess is, it's a lot closer than you thought it would be. Most full sized guns are going to be about 6 inches from the surface or less.
OK, I shoot on a lot of clear, but I also take a lot off. When you are doing the type of graphics I am, you will have lots of ridges that the only way you can level them is to start with a lot of clear. I shoot a medium tack coat and two other fairly heavy coats. A tack coat is just a medium coat that the next coats have something to grab on to. If you just start out with a heavy coat, the chances are good you will have lots of runs. The other thing is to give them plenty of time between coats or you can get what is called "solvent pop". Solvent pop is when you shoot to much clear too soon and it traps the solvents so they can't escape. What happens is as the trapped solvent escapes it can create little pin holes in the clear. I have had it and you see it when the rubbing compound dries.
Now most guys are going to be fine with just shooting one or two coats of clear and calling it good, but I am after the best possible finish I can get. To get that "show car" finish, we are going to have to do what is called "cut and buff". Anytime we shoot clear (or paint for that matter), we always wind up with what is called "orange peel" which is named after the look of an oranges skin. The process starts by leveling the surface with sandpaper and working our way up in paper grit and finally using buffing compounds.
I prefer to start with 1,000 grit, but with all the leveling I have to do, I usually start with 600 grit paper. Now, I may go against the tide, but I do not use a sanding block when I sand clear. Now everything you read will tell you to use a sanding block, but keep in mind, what you are most likely reading is about finishing cars with flat surfaces. Well therein is the issue. I haven't seem many pattern planes (especially wings and stabs) that have lots of flat surfaces. I always sand wet with just clean water with a few drops of dish washing soap added for lubrication.
Our first sanding is by far the most time consuming as you are sanding, cleaning, drying and checking. What you are doing is removing all the little high spots and orange peel. After that step is done, we are now only removing the scratches from the prior sanding.
More later
Do you thin the HOK urethane clear or shoot it straight?
Does HOK require induction time as do some others or do you just mix and shoot?
01-21-2016, 02:16 PM
#242
Thread Starter
Pat it sounds like you shoot quite a bit of clear on your finishes. What kind of weight build up is typical? Are we talking 10-15 grams per wing or 30-45grams, or more. I'm talking final gain after the polishing is finished.
Do you thin the HOK urethane clear or shoot it straight?
Does HOK require induction time as do some others or do you just mix and shoot?
Do you thin the HOK urethane clear or shoot it straight?
Does HOK require induction time as do some others or do you just mix and shoot?
I really don't have the numbers. Yes I do shoot a lot of clear, due to all the graphic edges, but I take a lot off. Also, if I weighed it now, in a few months in the sun it's going to weigh a lot less. It takes a long time for clear to fully outgas. I don't get that hung up on weight. It's going to weigh, what it's going to weigh. My attitude is, reduce as much weight along the way and that gives me the latitude on finish.
It is ultra important to mix HOK stuff just like they tell you. The stuff I shoot is 3 parts clear, one part catalyst and one part reducer. I didn't do it one time and went with more reducer thinking it would flow out better. Instead it did the opposite. It was drying in the air before it hit the surface and it looked like cottage cheese.
With their stuff, you mix and shoot. On the wing I shot yesterday I ran out on half the wing panel on my last coat and was able to mix up just a little a have it ready in no time.
01-21-2016, 07:49 PM
#243
When I get to this stage it's usually fisheyes that bite my butt YES I know is is improper surface prep, but I feel like I do a good job of that. I have a new air supply tank (80 gallon) but the same compressor. I hope the larger tank will let the air cool a bit more and let any contaminates drop out before they hit my filter/regulator. None of my hoses have ever had any oil in them. Maybe I need to rinse then with acetone just in case, but I do also use a filter at the gun.
I guess this is just one of life's little mysteries
Ken
YES I know is is improper surface prep, but I feel like I do a good job of that. I have a new air supply tank (80 gallon) but the same compressor. I hope the larger tank will let the air cool a bit more and let any contaminates drop out before they hit my filter/regulator. None of my hoses have ever had any oil in them. Maybe I need to rinse then with acetone just in case, but I do also use a filter at the gun. I guess this is just one of life's little mysteries
Ken
01-21-2016, 08:13 PM
#244
Thread Starter
When I get to this stage it's usually fisheyes that bite my butt YES I know is is improper surface prep, but I feel like I do a good job of that. I have a new air supply tank (80 gallon) but the same compressor. I hope the larger tank will let the air cool a bit more and let any contaminates drop out before they hit my filter/regulator. None of my hoses have ever had any oil in them. Maybe I need to rinse then with acetone just in case, but I do also use a filter at the gun.
I guess this is just one of life's little mysteries
Ken
YES I know is is improper surface prep, but I feel like I do a good job of that. I have a new air supply tank (80 gallon) but the same compressor. I hope the larger tank will let the air cool a bit more and let any contaminates drop out before they hit my filter/regulator. None of my hoses have ever had any oil in them. Maybe I need to rinse then with acetone just in case, but I do also use a filter at the gun. I guess this is just one of life's little mysteries
Ken
01-21-2016, 11:12 PM
#245
Thread Starter
One wing is close to done. I still need to do the ailerons.
You can ask 100 painters how they cut and buff and you will get 150 different answers. There really is no right or wrong way, but what ever works for you. In fact, this time around I used a totally different sanding pattern and a brand new compound. I usually sand in a crosshatch method with about ten passes with the paper one direction and then ten or so passes 90 degrees to the first passes.
This time I tried a different method I think I like even better, What I did was start with 600 wet in one direction until level and all the orange peel was gone. Then I moved up to 1,000 and sanded it wet at 90 degrees to the 600. I then moved to 1,500, again at 90 degree to the 1,000 and finished with 2,000, 90 degree to the 1,500. The reason for doing it this way is you can tell when the prior 90 degree cut is gone. If you still see sanding marks, just keep sanding.
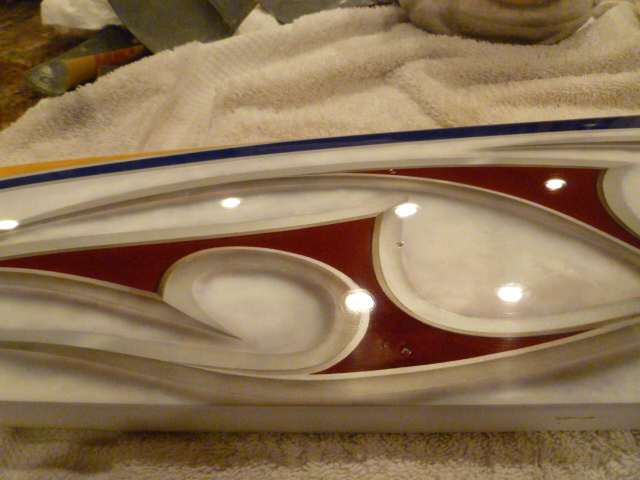
This picture was the clear before cutting. If you look at the edges of the glare spots you can see orange peel.
Here you can see I am just starting to cut the surface of the orange peel.
If you see any gloss, just keep sanding until it's gone.
The surface is now level with 600 and no gloss is showing.
I then moved up to 1,000, 1,500 and 2,000. I am trying a new compound and it is exceptional. It has only been out a short while, but the reviews have been positive. It's called System 51 and is water based with zero smell. It has three levels of grit, but the first two do about 99 percent of the work. With the first level of grit I was able to get a better finish than I have ever been able to with 3M in half the time.
http://www.coastairbrush.com/products.asp?cat=5
Coast Airbrush needs to start paying me a commission!
Here is the gloss with the first level of grit. Exceptional.
These are pictures after using all three levels of grit.


The biggest challenge we have when doing a cut and buff finish is the chance of cutting past the clear. What I do is just stay away from all the edges as much as possible. I sand very carefully up to the trailing edge and just stay totally away from the tips and leading edge. These areas will have a slight different look, but virtually know one will ever see it, and it will save you a massive amount of time and hassle. I don't sand those small areas, but hit them with rubbing compound to help them blend in.
You can ask 100 painters how they cut and buff and you will get 150 different answers. There really is no right or wrong way, but what ever works for you. In fact, this time around I used a totally different sanding pattern and a brand new compound. I usually sand in a crosshatch method with about ten passes with the paper one direction and then ten or so passes 90 degrees to the first passes.
This time I tried a different method I think I like even better, What I did was start with 600 wet in one direction until level and all the orange peel was gone. Then I moved up to 1,000 and sanded it wet at 90 degrees to the 600. I then moved to 1,500, again at 90 degree to the 1,000 and finished with 2,000, 90 degree to the 1,500. The reason for doing it this way is you can tell when the prior 90 degree cut is gone. If you still see sanding marks, just keep sanding.
This picture was the clear before cutting. If you look at the edges of the glare spots you can see orange peel.
Here you can see I am just starting to cut the surface of the orange peel.
If you see any gloss, just keep sanding until it's gone.
The surface is now level with 600 and no gloss is showing.
I then moved up to 1,000, 1,500 and 2,000. I am trying a new compound and it is exceptional. It has only been out a short while, but the reviews have been positive. It's called System 51 and is water based with zero smell. It has three levels of grit, but the first two do about 99 percent of the work. With the first level of grit I was able to get a better finish than I have ever been able to with 3M in half the time.
http://www.coastairbrush.com/products.asp?cat=5
Coast Airbrush needs to start paying me a commission!
Here is the gloss with the first level of grit. Exceptional.
These are pictures after using all three levels of grit.
The biggest challenge we have when doing a cut and buff finish is the chance of cutting past the clear. What I do is just stay away from all the edges as much as possible. I sand very carefully up to the trailing edge and just stay totally away from the tips and leading edge. These areas will have a slight different look, but virtually know one will ever see it, and it will save you a massive amount of time and hassle. I don't sand those small areas, but hit them with rubbing compound to help them blend in.
Last edited by Portlandflyer; 01-26-2016 at 03:12 PM.
01-22-2016, 04:18 PM
#246
I dabbled in some automotive painting for a while and have painted a dozen or so cars. Can't say I'm an expert but get along "OK" with paint. I've never done anything fancy like you but I'm becoming inspired to do so...... If I can get a handle on my "wanting it done yesterday". Ken
Last edited by kenh3497; 01-22-2016 at 04:23 PM.
01-22-2016, 10:10 PM
#247
Thread Starter
Just the filter on the regulator and a filter at the gun. For whatever reason I don't seem to have an issue with solid colors, just the clear. That makes no sense but it's happening. I'm using a house brand (Auto Value) clear for what that's worth. I'll have to clean everything that supplies air to my gun before the next paint job. Might be what I'm wiping down with also I dabbled in some automotive painting for a while and have painted a dozen or so cars. Can't say I'm an expert but get along "OK" with paint. I've never done anything fancy like you but I'm becoming inspired to do so...... If I can get a handle on my "wanting it done yesterday".
Ken
I dabbled in some automotive painting for a while and have painted a dozen or so cars. Can't say I'm an expert but get along "OK" with paint. I've never done anything fancy like you but I'm becoming inspired to do so...... If I can get a handle on my "wanting it done yesterday". Ken
01-22-2016, 10:12 PM
#248
Thread Starter