Go Back  RCU Forums > RC Airplanes > RC Scale Aircraft
Reload this Page >

NEW BUSA 1/3rd Scale Fokker Triplane!!!!!!!!!!!!!!!!!

Community
Search
Notices
RC Scale Aircraft Discuss rc scale aircraft here (for giant scale see category above)

NEW BUSA 1/3rd Scale Fokker Triplane!!!!!!!!!!!!!!!!!

Thread Tools
 
Search this Thread
 
Old 02-22-2016, 09:05 PM
  #526  
foodstick
 
foodstick's Avatar
 
Join Date: Mar 2005
Location: ankeny, IA
Posts: 5,600
Likes: 0
Received 13 Likes on 11 Posts
Default

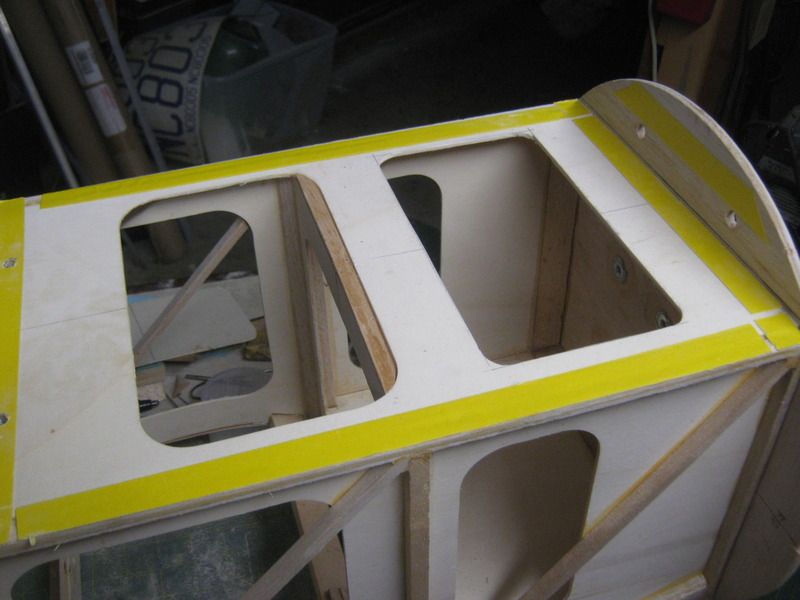
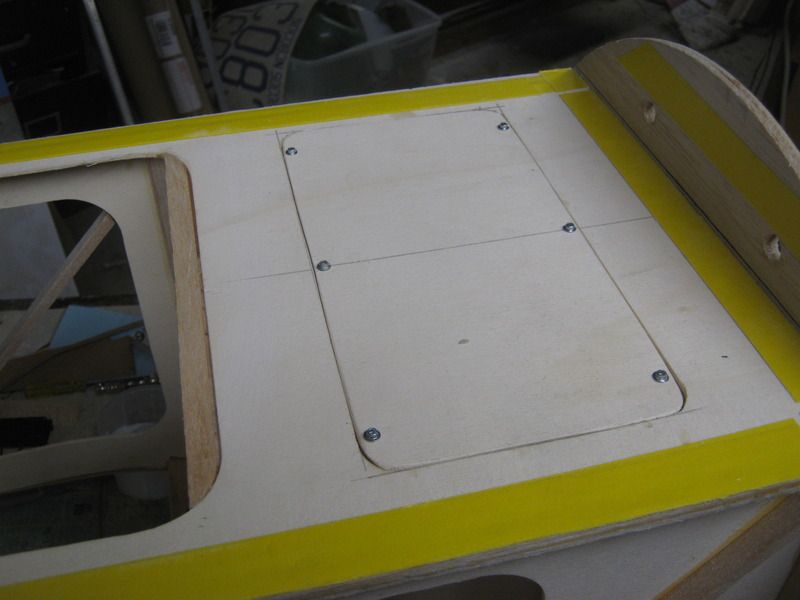
I thought sheeting the center was pretty straight forward.. But don't forget that if you want your guns down low on the hood you might have to make some mods where the receivers sit. I didn't have to modify it much other than making my gun post and magnet setup. Remember they (the guns) cross right over the rear wire hold down block.
Old 02-29-2016, 02:58 PM
  #527  
jeffEE
My Feedback: (5)
 
jeffEE's Avatar
 
Join Date: Nov 2002
Location: Lakeille MN
Posts: 1,572
Received 11 Likes on 11 Posts
Default

So the time has come to add all the guts. Fuel tank, servos, batteries, wires, etc. etc. etc. But I am finding that the area for the fuel tanks ( gas and smoke) is very small due to the set back of the fire wall. Toss in the batteries and nose weight, its going to be tight. Any thoughts on a nice clean way to shoehorn everything in?
Old 02-29-2016, 04:10 PM
  #528  
foodstick
 
foodstick's Avatar
 
Join Date: Mar 2005
Location: ankeny, IA
Posts: 5,600
Likes: 0
Received 13 Likes on 11 Posts
Default

Maybe you need to add a extra top access area under the mid wing....
Old 02-29-2016, 04:38 PM
  #529  
foodstick
 
foodstick's Avatar
 
Join Date: Mar 2005
Location: ankeny, IA
Posts: 5,600
Likes: 0
Received 13 Likes on 11 Posts
Default


Old 02-29-2016, 05:17 PM
  #530  
jeffEE
My Feedback: (5)
 
jeffEE's Avatar
 
Join Date: Nov 2002
Location: Lakeille MN
Posts: 1,572
Received 11 Likes on 11 Posts
Default

Or perhaps I should just go without the smoke tank for now. One tank is easy to do.
Old 03-07-2016, 03:24 PM
  #531  
jeffEE
My Feedback: (5)
 
jeffEE's Avatar
 
Join Date: Nov 2002
Location: Lakeille MN
Posts: 1,572
Received 11 Likes on 11 Posts
Default

Well the cowl came out pretty good. I admit it, I flat out stole Foodsticks idea to build up the front area. It really helps the look. I could not find any local store that had the "Green Stuff" so I went with bondo. A little bit hard to sand, but it's tough as nails. I did not have any small nails that looked correct, but my wife had a bunch of small beads that were flat on one side. Looks like rivets to me after the paint takes the edge off them. And next to the new cowl is my project after the Tripe is done. Its a 1/6 scale pfalz DIII. I am still looking for information about the U.K. kit. Should be fun to build.
Attached Thumbnails Click image for larger version

Name:	cowl.jpg
Views:	290
Size:	2.53 MB
ID:	2151334  
Old 03-07-2016, 03:46 PM
  #532  
jeffEE
My Feedback: (5)
 
jeffEE's Avatar
 
Join Date: Nov 2002
Location: Lakeille MN
Posts: 1,572
Received 11 Likes on 11 Posts
Default

I wish I had looked at this web page http://www.vintagewings.ca/VintageNe...Air-Force.aspx before I had started painting. I think a PINK tri plane from Canada would be PERFECT! LMAO.
Old 03-07-2016, 04:25 PM
  #533  
foodstick
 
foodstick's Avatar
 
Join Date: Mar 2005
Location: ankeny, IA
Posts: 5,600
Likes: 0
Received 13 Likes on 11 Posts
Default

The cowl looks good, and don't bother stealing the idea from me as I lifted from a friend, and I think its been done many times before !
Old 03-07-2016, 04:56 PM
  #534  
jeffEE
My Feedback: (5)
 
jeffEE's Avatar
 
Join Date: Nov 2002
Location: Lakeille MN
Posts: 1,572
Received 11 Likes on 11 Posts
Default

On my 1/4 scale I cut the cowl into two parts and made an insert for the front. This was MUCH faster and really easy. Its still just a Balsa USA cowl, but it is better than just flat.
Old 03-08-2016, 10:05 AM
  #535  
jeffEE
My Feedback: (5)
 
jeffEE's Avatar
 
Join Date: Nov 2002
Location: Lakeille MN
Posts: 1,572
Received 11 Likes on 11 Posts
Default

I was thinking a bout doing a build thread about this little Pfalz. I can find no information about it. But the spinner was worth the price I paid at the auction.
Attached Thumbnails Click image for larger version

Name:	444.jpg
Views:	51
Size:	2.32 MB
ID:	2151465   Click image for larger version

Name:	555.jpg
Views:	80
Size:	2.56 MB
ID:	2151466  
Old 03-16-2016, 05:24 PM
  #536  
jeffEE
My Feedback: (5)
 
jeffEE's Avatar
 
Join Date: Nov 2002
Location: Lakeille MN
Posts: 1,572
Received 11 Likes on 11 Posts
Default

The build goes on and on. Motor is mounted and tank/ fuel/ batteries all plumbed. Pull pull wires cut to length and servo rails ready for installing. Just waiting on covering and wheels. I must be getting near the end, as my interest is turning away from this build and starting to set up build table for the Pfalz.
Attached Thumbnails Click image for larger version

Name:	gauge.jpg
Views:	74
Size:	2.30 MB
ID:	2152881   Click image for larger version

Name:	tail.jpg
Views:	80
Size:	2.82 MB
ID:	2152882  
Old 03-22-2016, 03:51 PM
  #537  
jeffEE
My Feedback: (5)
 
jeffEE's Avatar
 
Join Date: Nov 2002
Location: Lakeille MN
Posts: 1,572
Received 11 Likes on 11 Posts
Default

Just got my RX and satellite back from Horizon service center, and it is brand new. NO CHARGE! A one week turn around, new RX and zero cost. Man you gotta love that kind of service. I will try not to splatter this one all over the runway.
Old 03-23-2016, 02:36 PM
  #538  
foodstick
 
foodstick's Avatar
 
Join Date: Mar 2005
Location: ankeny, IA
Posts: 5,600
Likes: 0
Received 13 Likes on 11 Posts
Default

Yeah, I am still in a holding pattern waiting for the weather to turn favorable for covering out in the garage. I should be messing with small details like the pilot.. but haven't been in the right mood for that lately
Old 03-23-2016, 05:23 PM
  #539  
jeffEE
My Feedback: (5)
 
jeffEE's Avatar
 
Join Date: Nov 2002
Location: Lakeille MN
Posts: 1,572
Received 11 Likes on 11 Posts
Default

Yep. Its funny how the build goes along some days. I seem to build in spurts of about 2 - 3 weeks, then back off for about the same amount of time. Unless there is an event that I am getting ready for. I just put the paint to the rear view mirror I built for the Tripe. Now to find a way to attach it to the strut. Oh well. something will come to me or I will drift off into another project and forget about it. I just looked out the window and we are up to about a foot of new snow. sigh.....
Old 03-25-2016, 02:13 PM
  #540  
jeffEE
My Feedback: (5)
 
jeffEE's Avatar
 
Join Date: Nov 2002
Location: Lakeille MN
Posts: 1,572
Received 11 Likes on 11 Posts
Default

Just keep swimming, just keep swimming. Do a little each day.
Attached Thumbnails Click image for larger version

Name:	dfg.jpg
Views:	62
Size:	2.74 MB
ID:	2154174  
Old 03-29-2016, 10:38 AM
  #541  
jeffEE
My Feedback: (5)
 
jeffEE's Avatar
 
Join Date: Nov 2002
Location: Lakeille MN
Posts: 1,572
Received 11 Likes on 11 Posts
Default

OK, time for me to ask your opinion. ( I know that everybody has one!) I painted the spreader box that covers the axel. It came out looking like it needs another coat of paint. But another flyer said it looks like it has been flown and has some wear to it. I think that would be OK too. So... another coat of paint or fly it as is?
Attached Thumbnails Click image for larger version

Name:	jjjhh.jpg
Views:	60
Size:	2.23 MB
ID:	2155001   Click image for larger version

Name:	hhhggg.jpg
Views:	61
Size:	2.43 MB
ID:	2155002   Click image for larger version

Name:	mmmkkk.jpg
Views:	74
Size:	2.47 MB
ID:	2155003  
Old 03-29-2016, 12:53 PM
  #542  
foodstick
 
foodstick's Avatar
 
Join Date: Mar 2005
Location: ankeny, IA
Posts: 5,600
Likes: 0
Received 13 Likes on 11 Posts
Default

Once you get gas,exhaust and grass stains on it.. it will be perfect...
Old 03-30-2016, 11:24 AM
  #543  
jeffEE
My Feedback: (5)
 
jeffEE's Avatar
 
Join Date: Nov 2002
Location: Lakeille MN
Posts: 1,572
Received 11 Likes on 11 Posts
Default

LOL. I think you are right. And its not going to win any scale contest anyway. Not that I enter them. I was a little bit worried about the new muffler and where the pipes point. Straight down at the gear, but it is far enough away to keep it from burning up and some black gook/smoot/soot could be a nice touch. We have to get them together Foodstick. What did you decide on for warpaint? Jasta 11 was where 144/17 was last assigned. Although I have read different reports about the red on 144/17. One artist painting shows it with red others show it without. And the black and white pictures are, well, black and white. But I like the contrast of the red front and dark tail, and most (?) Jasta 11 aircraft were red highlights, so that's how it goes for me.
Old 04-06-2016, 01:12 PM
  #544  
jeffEE
My Feedback: (5)
 
jeffEE's Avatar
 
Join Date: Nov 2002
Location: Lakeille MN
Posts: 1,572
Received 11 Likes on 11 Posts
Default

SO next question. Is there a good guide to the strut markings on the DRI? I have the works number, but I have found a lot of different pictures about how the struts are marked. Interplane struts, is it U-L upper wing, O-L lower wing? Or is that backwards? Or is it WK 6887? I have found pictures of reproductions and they are all marked different. And the pictures from WWI are hard to find the perfect one that shows what I am looking for.
Old 04-09-2016, 06:58 AM
  #545  
jeffEE
My Feedback: (5)
 
jeffEE's Avatar
 
Join Date: Nov 2002
Location: Lakeille MN
Posts: 1,572
Received 11 Likes on 11 Posts
Default

So this is what found, and its good enough for me.
Attached Thumbnails Click image for larger version

Name:	dr1.jpg
Views:	93
Size:	37.0 KB
ID:	2156509  
Old 04-12-2016, 04:41 PM
  #546  
jeffEE
My Feedback: (5)
 
jeffEE's Avatar
 
Join Date: Nov 2002
Location: Lakeille MN
Posts: 1,572
Received 11 Likes on 11 Posts
Default

Next thing to work out. How to attach the wire cross bracing on the landing gear. I need to figure out how to make it stand up to the landings and flexing that the gear will be put through without tearing up the balsa additions. I could strip It down and weld an anchor point. But that would be a big step backwards in the build. Any thoughts or comments about how you fixed this issue?
Old 05-13-2016, 01:08 PM
  #547  
jeffEE
My Feedback: (5)
 
jeffEE's Avatar
 
Join Date: Nov 2002
Location: Lakeille MN
Posts: 1,572
Received 11 Likes on 11 Posts
Default

OK, so all the parts are in the workshop to finish the project, except the nomenclature on the aircraft. The pilot weight, aircraft number 144/17, that sort of thing. I was all set to use Getstenciles.com but they are no longer doing anything for RC. Any suggestion? I could never hand paint it well enough to make me happy. I am welcome to any help?
Old 05-13-2016, 05:45 PM
  #548  
BobH
My Feedback: (2)
 
Join Date: Mar 2003
Location: Springfield, VA,
Posts: 8,049
Received 21 Likes on 21 Posts
Default

Flightline graphics work well. http://www.flightlinegraphics.com/
EXCELLENT service.
Old 05-14-2016, 04:39 AM
  #549  
jeffEE
My Feedback: (5)
 
jeffEE's Avatar
 
Join Date: Nov 2002
Location: Lakeille MN
Posts: 1,572
Received 11 Likes on 11 Posts
Default

Thanks. I went to his web site and it said he is not taking any new orders until Aug 2016. Nice site, good work, i'm just not able to wait that long. But thanks for the information.
Old 05-14-2016, 05:58 AM
  #550  
BobH
My Feedback: (2)
 
Join Date: Mar 2003
Location: Springfield, VA,
Posts: 8,049
Received 21 Likes on 21 Posts
Default

Try Callie Graphics .. She does good work too..


Contact Us - Archive - Advertising - Cookie Policy - Privacy Statement - Terms of Service -

Copyright © 2024 MH Sub I, LLC dba Internet Brands. All rights reserved. Use of this site indicates your consent to the Terms of Use.