


Securing flying wires?
 04-27-2016, 04:50 AM
#26


Join Date: Jul 2007
Location: Elm Grove,
WI
Posts: 486
Likes: 0
Received 0 Likes
on
0 Posts
I'm just an average sport builder without the skills to do a great scale model. I did start a Concept Fleet biplane some time ago with the intention of using scale flying wires. After a lot of looking on the various forums including RCScalebuilder it seemed there were only two options: The first was to use R/C available hardware and have it come out looking like R/C hardware was used. The advantage was easier field setup. The second was to build it as scale as possible so it looked like a scale airplane. The disadvantage was it has to be assembled like a real airplane.
I thought the only way to quicken the assembly was to hide the connections somewhere out of sight within the structure. The plan on the Fleet was to use a large (maybe 3") turnbuckle within the fuselage at lower wing level to pull the preassembled flying wires tight. The exterior visible rigging would be preset and to scale. The fuselage bracket would slide inward as the big turnbuckle was tightened. An over center "turnbuckle" as used on sailboat rigging would serve the same purpose.
While it sounded good to me, I never worked it out. I ended up screwing only sorta-scale brackets to the fuse and will have to tighten the turnbuckles and safety wire before flying. The Fleet used streamlined wire; mine rigging looks more like WWI; not even close to scale.
Proctor's Antic biplane has a good, fast assembly system. The left and right wing bays are fully assembled with struts and wires set to length. The bottom wing plugs in, then the top wing is kind of stretched up against the wire tension and plugged in. Nylon fishing line connects the halves. The wires are drum tight, and there is no messing with turnbuckle length. While the rigging itself approximates scale (on a non-scale plane) the visible nylon lines aren't. I think the Mick Reeves biplanes use a similar assembled bay system. I don't know whether turnbuckle adjustment is necessary with his method.
I also built Proctor's Monoplane. It's more of a pain to assemble than the biplane was. The monoplane wires are preset to length; I used turnbuckles on all wires, Proctor uses only a couple of turnbuckles. All wires are permanently attached at the wing end. Each wing half is plugged in and the bottom wire ends are slid over the lower king post. The ends of the top wires then must be pulled tight and fastened to the upper king post using nylon fishing line. There's a bit of pulling and the wings are flopping about while the pulling takes place. It works in the end though.
It seems modelers have been struggling with this forever. It will probably take some 14 year old kid with a 3D printer to fabricate some invisible miracle bracket that does the job.
Jim
 04-27-2016, 11:47 AM
#27

It aint rocket science, there are lots of fully rigged biplanes out there and I don't see anyone fooling with their turnbuckles to assemble their aircraft. Maybe you should attend some larger fly ins or a dawn patrol event somewhere and get there early on the first day and observe how guys are putting the models together and ask some questions. I have a half a dozen rigged biplanes from 1/6 to 1/3 scale and none take over 25 minutes to assemble. The rigging runs from quite scale to , well, not so much but none of them look bad or do they appear to be rigged with RC stock hardware.
Doc
Doc
04-27-2016, 02:49 PM
#29

Thread Starter

It aint rocket science, there are lots of fully rigged biplanes out there and I don't see anyone fooling with their turnbuckles to assemble their aircraft. Maybe you should attend some larger fly ins or a dawn patrol event somewhere and get there early on the first day and observe how guys are putting the models together and ask some questions. I have a half a dozen rigged biplanes from 1/6 to 1/3 scale and none take over 25 minutes to assemble. The rigging runs from quite scale to , well, not so much but none of them look bad or do they appear to be rigged with RC stock hardware.
Doc
Doc
But, yeah, I could really use some photos. So far, I've haven't seen anything I could use here.
04-27-2016, 02:54 PM
#30
Thread Starter
I'm just an average sport builder without the skills to do a great scale model. I did start a Concept Fleet biplane some time ago with the intention of using scale flying wires. After a lot of looking on the various forums including RCScalebuilder it seemed there were only two options: The first was to use R/C available hardware and have it come out looking like R/C hardware was used. The advantage was easier field setup. The second was to build it as scale as possible so it looked like a scale airplane. The disadvantage was it has to be assembled like a real airplane.
I thought the only way to quicken the assembly was to hide the connections somewhere out of sight within the structure. The plan on the Fleet was to use a large (maybe 3") turnbuckle within the fuselage at lower wing level to pull the preassembled flying wires tight. The exterior visible rigging would be preset and to scale. The fuselage bracket would slide inward as the big turnbuckle was tightened. An over center "turnbuckle" as used on sailboat rigging would serve the same purpose.
While it sounded good to me, I never worked it out. I ended up screwing only sorta-scale brackets to the fuse and will have to tighten the turnbuckles and safety wire before flying. The Fleet used streamlined wire; mine rigging looks more like WWI; not even close to scale.
Proctor's Antic biplane has a good, fast assembly system. The left and right wing bays are fully assembled with struts and wires set to length. The bottom wing plugs in, then the top wing is kind of stretched up against the wire tension and plugged in. Nylon fishing line connects the halves. The wires are drum tight, and there is no messing with turnbuckle length. While the rigging itself approximates scale (on a non-scale plane) the visible nylon lines aren't. I think the Mick Reeves biplanes use a similar assembled bay system. I don't know whether turnbuckle adjustment is necessary with his method.
I also built Proctor's Monoplane. It's more of a pain to assemble than the biplane was. The monoplane wires are preset to length; I used turnbuckles on all wires, Proctor uses only a couple of turnbuckles. All wires are permanently attached at the wing end. Each wing half is plugged in and the bottom wire ends are slid over the lower king post. The ends of the top wires then must be pulled tight and fastened to the upper king post using nylon fishing line. There's a bit of pulling and the wings are flopping about while the pulling takes place. It works in the end though.
It seems modelers have been struggling with this forever. It will probably take some 14 year old kid with a 3D printer to fabricate some invisible miracle bracket that does the job.
Jim
I thought the only way to quicken the assembly was to hide the connections somewhere out of sight within the structure. The plan on the Fleet was to use a large (maybe 3") turnbuckle within the fuselage at lower wing level to pull the preassembled flying wires tight. The exterior visible rigging would be preset and to scale. The fuselage bracket would slide inward as the big turnbuckle was tightened. An over center "turnbuckle" as used on sailboat rigging would serve the same purpose.
While it sounded good to me, I never worked it out. I ended up screwing only sorta-scale brackets to the fuse and will have to tighten the turnbuckles and safety wire before flying. The Fleet used streamlined wire; mine rigging looks more like WWI; not even close to scale.
Proctor's Antic biplane has a good, fast assembly system. The left and right wing bays are fully assembled with struts and wires set to length. The bottom wing plugs in, then the top wing is kind of stretched up against the wire tension and plugged in. Nylon fishing line connects the halves. The wires are drum tight, and there is no messing with turnbuckle length. While the rigging itself approximates scale (on a non-scale plane) the visible nylon lines aren't. I think the Mick Reeves biplanes use a similar assembled bay system. I don't know whether turnbuckle adjustment is necessary with his method.
I also built Proctor's Monoplane. It's more of a pain to assemble than the biplane was. The monoplane wires are preset to length; I used turnbuckles on all wires, Proctor uses only a couple of turnbuckles. All wires are permanently attached at the wing end. Each wing half is plugged in and the bottom wire ends are slid over the lower king post. The ends of the top wires then must be pulled tight and fastened to the upper king post using nylon fishing line. There's a bit of pulling and the wings are flopping about while the pulling takes place. It works in the end though.
It seems modelers have been struggling with this forever. It will probably take some 14 year old kid with a 3D printer to fabricate some invisible miracle bracket that does the job.
Jim
 04-27-2016, 02:59 PM
#31
Thread Starter
Hmm...and idea is forming. What about a turnbuckle with the fork-end on the inboard side? This could slot onto a tab in the scale bracket and be held in place with a pin. Something to roll around in my mind.
04-27-2016, 03:07 PM
#32
Join Date: May 2007
Location: winchester, va. VA
Posts: 176
Likes: 0
Received 0 Likes
on
0 Posts
 04-27-2016, 03:34 PM
#33
Thread Starter
All of the fittings I have so far are from one of the model boat websites, and I do have some M2 fork-ends. However, I'd be a little more comfortable with a beefier steel connection.
 04-28-2016, 02:45 AM
#35
First of all scale is scale and I do the best I can but the undersurface of the top wing is sort of no mans land if you're not competing (that's a whole other case) and wont be judged on every little thing. The turnbuckles are generally ( I said generally) are on the lower ends of the wires,ie the inside ends of flying wires and the outer ends of landing wires. For landing wires I fix the Top (inner) end of the wire to an eyelet that the cabane screws go through during assembly. Landing wires are as a rule (I said as a rule) a single cable or RAF style wire and the turnbuckle is fixed to the bracket at the interplane strut with as scale looking a mounting as possible parts from steel or brass having to be made in many cases, if you cant make it pure scale then make it plausible so it looks like it might have been done that way, once again if you're not competing 99and44 100ths of a percent of the people looking at your model wont know the difference. Don I know you're different and it has to be perfect even for you so you will have to suffer through whatever it takes, for the rest of us ease of assembly is really rather important. The flying wires are often dual cables or RAF wires and attach in a scale looking (plausible) manner at the lower inside end and they attach to the wing via a tab that the wires are fixed to and a single bolt through said tab into a hard point in the wind that's threaded hardwood or a ply plate with a blind nut, whatever you care to do . I hade many done this way and I'm sorry I cant put up any pix but all my models are in Tennessee and I'm in Texas hoping to be in Tennessee by Sunday for good. There are pix and blow by blow coverage on my build thread on RCSB in the BUSA forum a thread titled !/3 Scale Nieuport 28 DOC don't be overwhelmed by the number of pages the flying and landing wires are covered I'm sure in the first 30 pages There are a couple other N28 threads there that are prolly helpful one by Shelstrm and one from Whit
04-28-2016, 05:05 AM
#36
My Feedback: (10)
Join Date: May 2008
Location: Kingston,
ON, CANADA
Posts: 535
Likes: 0
Received 0 Likes
on
0 Posts
I've suggested before, but why not use Mick Reeves' clevises in conjunction with his 2mm turnbuckles? Take the RH tread eye out of the turnbuckle and replace it with a threaded MR clevis on a short length of 2mm bolt, (with its head cut off). The clevis pin is threaded all the way through, so you unscrew it halfway, (or a little more), and the fitting is free of the rigging. The opposite end is the usual swaged loop. The resulting fitting is pretty small and unobtrusive.
04-28-2016, 05:18 AM
#37
Join Date: Jul 2007
Location: Elm Grove,
WI
Posts: 486
Likes: 0
Received 0 Likes
on
0 Posts
Proctor does sell their turnbuckles with clevis ends. They are brass, though. I've used them on a 60" sailboat for 30 years and never had one fail. I think at one time just the clevis ends could be ordered.
04-28-2016, 07:25 AM
#38
Thread Starter
I've suggested before, but why not use Mick Reeves' clevises in conjunction with his 2mm turnbuckles? Take the RH tread eye out of the turnbuckle and replace it with a threaded MR clevis on a short length of 2mm bolt, (with its head cut off). The clevis pin is threaded all the way through, so you unscrew it halfway, (or a little more), and the fitting is free of the rigging. The opposite end is the usual swaged loop. The resulting fitting is pretty small and unobtrusive.
04-28-2016, 07:43 AM
#39
Thread Starter
I think that half the trick with doing scale is just not to use things that are recognizable and standard commercial products. That's why I tend to stay away from "linen" or "antique" Solartex. It's a great product but it's also recognizable from a hundred yards as linen or antique Solartex. It fairly well screams out the fact. The WB guns are fantastic but it's important to put some effort into making them look a bit more realistic (for example the trick of painting them flat black then smearing with pencil graphite for a good worn metal look). Same goes for clevises. Clevises are actually a pretty clever little device, but they are just so obvious on a model...particularly a smaller scale one. By using something like the MR turnbuckles (and/or fork-ends) it looks "different somehow" and that can trick people (me) into believing that they are somehow actually correct...or at least they don't distract from the total effect.
I do appreciate each and every suggestion here as they all help my often slow thought processes.
I do appreciate each and every suggestion here as they all help my often slow thought processes.
04-28-2016, 07:56 PM
#41
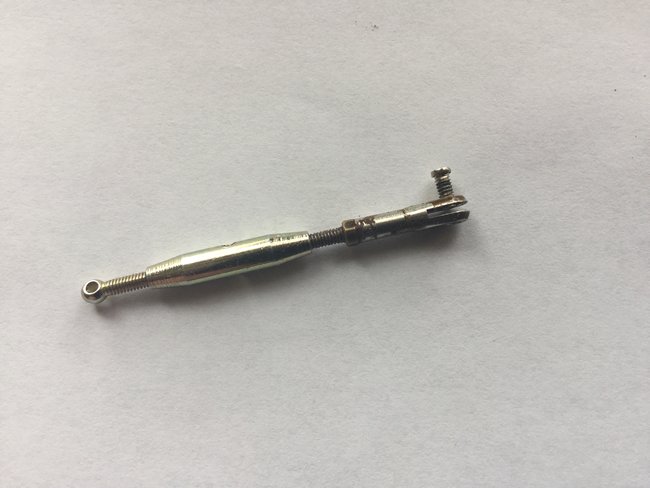
Thread Starter
Here's one of the finished undercarriage brackets, which are also the connection points for the flying wires. Whatever setup solution I decide on has to work with these. I've put in way too much work on them to back out now.


