


1/6 Scale F4U Corsair Group Build
 08-16-2008, 06:57 AM
#751

Thread Starter

ORIGINAL: Chad Veich
I was wondering if it wouldn't be beneficial to make the canopy similar to the full size in having a sliding framework to which the canopy attaches. I think it would be easier to get a good, solid sliding mechanism attached to a built up frame rather than trying to attach it to the plastic canopy. Plus, it would look more accurate when it was all said and done. What do guys you think?
I was wondering if it wouldn't be beneficial to make the canopy similar to the full size in having a sliding framework to which the canopy attaches. I think it would be easier to get a good, solid sliding mechanism attached to a built up frame rather than trying to attach it to the plastic canopy. Plus, it would look more accurate when it was all said and done. What do guys you think?
 08-16-2008, 07:14 AM
#752
Thread Starter
ORIGINAL: saramos
I'll look into taking a trip to Planes of Fame and try and get permission to photograph thier F4U-1A.
Scott
I'll look into taking a trip to Planes of Fame and try and get permission to photograph thier F4U-1A.
Scott
I have requested pictures of the PoF -1A before but they have wanted me to join the museum and then "maybe" they would grant my request for pictures...
If you get permission, see if you can get as many close-ups of the cockpit as you can. Close enough so that you can read the labels. I specifically need pictures of the switch panel on the left console highlighted here:
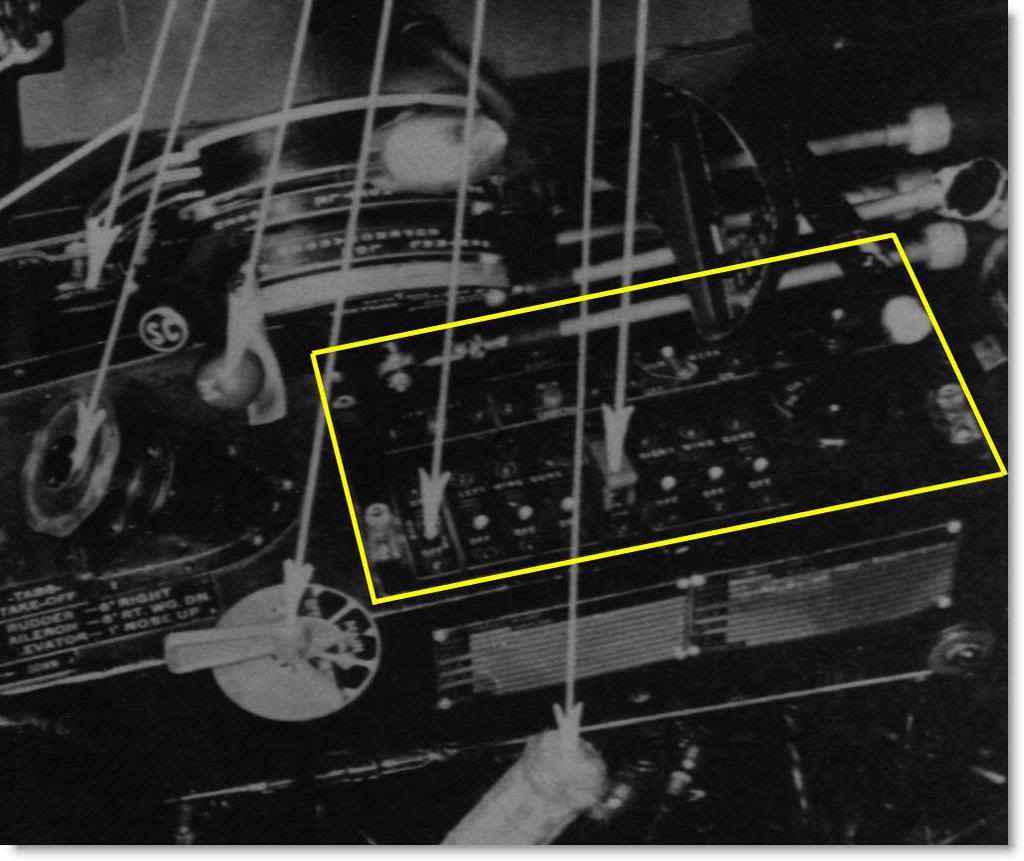
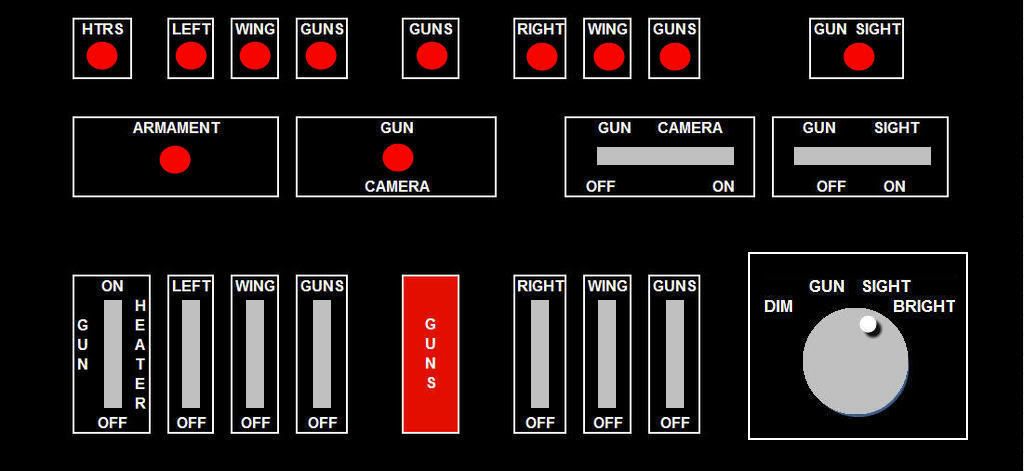
I have a wiring diagram and by using that and the picture above I came up with what I think is close enough:
The PoF -1A may be different but since you are going to visit the museum maybe they will let you get close enough to shoot it so I can read the lettering. If you do go, get as many closeups of the entire cockpit as you can because closeup, detailed, -1A cockpit pictures are scarce! I'll even pay your admission!

Good luck and thanks in advance!
08-16-2008, 10:00 AM
#753

A friend of mine called me yesterday to let me know that the PoF 1A is going to be at Camarillo this weekend. I contacted PoF to request permission to get close up for photographing. They said it would be up to the Director of the air show at the location. I'm getting ready to head out. I'll try and gain permission when I arrive. It was not my intention to get access to the cockpit, but I will try.
Scott
Scott
08-16-2008, 08:02 PM
#754
I just got back from the airshow in Camarillo. The bad news is, the Corsair didn't make it to the show. I spoke with a friend who is the pilot who flew the A6M5 down to the show. He said the Corsair developed a fuel leak and could not be brought down.
On the good side, there was a Hellcat which has the same old style wheels that are used on the Corsair, so I got 27 photos of it. I also took a number of photos of an F7F Tigercat and an SBD5 Dauntless. I photographed startups and flights of the DC3, F7f, F6F, F8F, A6M5, P-40, P-51 and B25. I also took some video, but Murphy's law was at work and my battery died when the flights started!!
Looks like I'll need to go to Chino. Hopefully I can ask my friend (well,more of an aquaintence) if he can help to get me access to the Corsair.
Edited to add photos.
Scott
08-18-2008, 01:54 PM
#755
Senior Member

Join Date: Dec 2007
Location: Haarlem, NETHERLANDS
Posts: 257
Likes: 0
Received 0 Likes
on
0 Posts
Gentlemen,
I have some good and unfortunately some bad news.
The good news is that I have started production of the elevator and rudder control-horns.
The material for the first 10 elevator control horns has been cut, grinded and partly bend.
The bad news however is that my previous estimate of $7 for an elevator and $5 for a rudder control-horn was slightly on the optimistic side.
I have had to buy some more silver-solder, flux, steel rods, butane and brass tubing.
I thought I could make all from material I have had lying around the shop, but the current list tells me I need to make 14 elevator and 11 rudder control horns.
I hope you guys can live with $10 for the elevator and $7.50 for the rudder control-horn.
I am really sorry about this, if anyone wants to withdraw, I can understand.
The list I have at the moment is as follows:
[ul][*] Riddle4U: 1 elevator[*] RWright142: 1 elevator, 1 rudder[*] Chad: 1 elevator, 1 rudder[*] GRH_70: 1 elevator, 1 rudder[*] Rustypep: 2 elevator[*] Daddysam: 2 elevator, 2 rudder[*] Saramos: 1 elevator, 1 rudder[*] Redrooster: 2 elevator, 2 rudder[*] Tripower455: 2 elevator, 2 rudder[*] Joe_snaproll: 1 elevator, 1 rudder
[/ul]
08-19-2008, 12:53 AM
#761

I feel a little bad that I haven't made more progress on the sliding canopy prototype. When we get our usual 8 weeks in Seattle where it doesn't rain every day, I play a lot of golf, do some flying, and [link=http://main.nationalmssociety.org/site/TR/Bike/WASBikeEvents?px=1726158&pg=personal&fr_id=7600]serve as the Captain for Team Microsoft in the MS 150 Bike Ride.[/link] Want to donate to the cause?
In any case, I did get the sail winch servo over the weekend. The good news is that the pulley wheel is perfect for our needs. With two independent tracks, it will handle each side of the canopy nicely. I worry about two things:
[ul][*] It's bigger and heavier than a standard servo. If someone wants to take a shot at the mod on a standard servo to remove the end points and make it travel continuously, that could be a good option. Danny posted the link earlier.[*] I think that we will want the pulley on the same plane with the servo rails. If we do this, the servo will need to be mounted with the pulley facing the top of the fuselage making it very difficult to service once mounted and the fuse planking is in place.
[/ul]
I do feel like I have a good handle on the canopy rails. I'll make the fixed rail out of 3/16 square brass that is slotted to accept the canopy attach points (Ball links) and a pin that drops in to the retraction block (tractor). The tractor will be made from smaller brass square about 1/4 inch long that has a hole to accept pins from the canopy hard points. This will make the canopy completely detachable. I realize that this may be hard to visualize until I post a drawing or get on with the prototype.
I found some rivets and bushings that should work well as pulleys for the cable. I didn't find anything off the shelf that works as a pulley. If you know of anything, drop me a note.
The next couple of weeks are going to be tough on time due to a 3 day golf tourney and being the best man in Chris's wedding, so I may not have too much to add until after Labor Day.
Tom
08-19-2008, 06:05 PM
#762
Senior Member
Join Date: Sep 2006
Location: atlanta,
GA
Posts: 921
Likes: 0
Received 0 Likes
on
0 Posts
[
I found some rivets and bushings that should work well as pulleys for the cable. I didn't find anything off the shelf that works as a pulley. If you know of anything, drop me a note.
Tom
[/quote]
Tom these might work http://www.jannsnetcraft.com/roller-guides/281200.aspx http://www.jannsnetcraft.com/roller-guides/280530.aspx
08-19-2008, 09:38 PM
#764
Junior Member
Join Date: Feb 2003
Location: Princeton ,
MN
Posts: 17
Likes: 0
Received 0 Likes
on
0 Posts
I have followed this great build and thought you guys might use this info. I saw this plane as a window test machine in the early 80's in St. Louis, and in the hanger in Danville IL in the 90's. The cockpit is totally military having never been converted for civilian use. I have a couple of Corsair wheels in the barn if any further detail shots are needed. Below is a link to Warbird information exchange and the Corsair cockpit photos.
Keep up the great work!
http://warbirdinformationexchange.or...ic.php?t=23831
Pirate Lex
[link=http://www.BrewsterCorsair.com]BrewsterCorsair.com[/link]
08-19-2008, 11:47 PM
#765
Hi Lex,
I really appreciate your post and link. Do the wheels that you have still have the tires on them? I'd love to see some photos of the back side of the wheels.
Thank you for your generous offer.
Scott
I really appreciate your post and link. Do the wheels that you have still have the tires on them? I'd love to see some photos of the back side of the wheels.
Thank you for your generous offer.
Scott
08-20-2008, 05:11 AM
#766
Thread Starter
Hey Lex, thanks for your input and offer. There are many times when we need pictures, measurements, etc and none of us have a full scale Corsair in our barn .
For those who don't know Lex, he recovered a crashed full scale Brewster build Corsair from a swamp in North Carolina, fought and won a legal battle over it with the U.S. Navy, and has it in his possession and is in the process of restoring it.
Thanks for the link too. There was a Corsair for sale on Barnstormers several months ago and it was used for testing windows but I don't think this is the same one. I'm glad to see they will restore it to airworthiness instead of a static display.
.For those who don't know Lex, he recovered a crashed full scale Brewster build Corsair from a swamp in North Carolina, fought and won a legal battle over it with the U.S. Navy, and has it in his possession and is in the process of restoring it.
Thanks for the link too. There was a Corsair for sale on Barnstormers several months ago and it was used for testing windows but I don't think this is the same one. I'm glad to see they will restore it to airworthiness instead of a static display.
08-20-2008, 10:34 PM
#767
Junior Member
Join Date: Feb 2003
Location: Princeton ,
MN
Posts: 17
Likes: 0
Received 0 Likes
on
0 Posts
Richard,
The link I sent was of the Corsair sold in the Barnstormers add from last fall. It was the plane that was in the St. Louis window manufacturers rear lot to wind/rain blast new windows to hurricane conditions.
I have attached photos of a early Corsair one piece wheel with the brake assembly seperate and in place. Dash 4 Corsairs had a split, two piece wheel for easier tire replacement. I do not have any main gear tires to photo.
Best wishes to you and the rest of the gang here.
Pirate Lex
[link]http://www.BrewsterCorsair.com[/link]
08-20-2008, 11:20 PM
#768
Thank you Lex!
These photos provide a wealth of information on the wheels that without your assistance, would have surely remained a mystery to me. I hope I can do justice to the generosity you've shown.
Scott
These photos provide a wealth of information on the wheels that without your assistance, would have surely remained a mystery to me. I hope I can do justice to the generosity you've shown.
Scott
08-21-2008, 04:54 AM
#769
Thread Starter
ORIGINAL: F3A1
Richard,
The link I sent was of the Corsair sold in the Barnstormers add from last fall. It was the plane that was in the St. Louis window manufacturers rear lot to wind/rain blast new windows to hurricane conditions...
Richard,
The link I sent was of the Corsair sold in the Barnstormers add from last fall. It was the plane that was in the St. Louis window manufacturers rear lot to wind/rain blast new windows to hurricane conditions...
Thanks for the pictures!
08-21-2008, 09:08 AM
#770

My Feedback: (60)
Join Date: Dec 2001
Location: Litchfield Park,
AZ
Posts: 7,677
Likes: 0
Received 25 Likes
on
23 Posts
Thanks for your input and the links and pictures Lex, most helpful. I've been a WIX junkie for a long time, what a great site. I hope to get my 1/6 scale Corsair finished in less time than it takes you to piece back together a full size but no guarantees! 
08-23-2008, 08:08 PM
#771
My Feedback: (60)
Join Date: Dec 2001
Location: Litchfield Park,
AZ
Posts: 7,677
Likes: 0
Received 25 Likes
on
23 Posts
Well, I have not updated in a while but I have been working. The canopy plug has not progressed as fast as I would have liked but I do have it glassed and the first couple of layers of Bondo have been applied and sanded back. One or two more spots of Bondo and I should be ready to progress to spot putty and filler primer. With any luck I'll be pulling the first test canopies by next weekend if not sooner. About a week behind where I hoped to be but I have made progress elsewhere.
I've got about 75% of the parts cut for the dummy center section as seen below. The dummy will serve to test the fit of the parts as well as help me to decipher a construction sequence. I also hope it will serve as a test bed for the flap construction and hinging and possibly for figuring out the funtional flap doors. Last, but certainly not least, I will use it to create the tooling for the parts of the oil coolers that I hope to either vacuum form or mold from glass. The oil cooler intake is one area where it seems every single model of the Corsair comes up short in my opinion. I hope to create something that both captures the scale appearance while still being relatively easy to accomplish for the novice builder. Please note in the pics below that the center jig is present but does not have the brass tubes installed. ( I did not have any more brass or anything else 1/4" in diameter!) Also note that nothing you see in these pics has any glue applied. The spars are assembled to their doublers with dowel pins which hold everthing in alignment. The ribs are all slotted to slide into place on the spars. My plan is to carefully locate and tack glue the jigs to the building board and then start gluing.
The fuselage design is essentially complete save for the sliding canopy mechanism and possibly a few minor alterations to allow for the cockpit kit. Richard and Tom are working out those areas and as soon as those hurdles are cleared I will begin the process of cleaning up the drawings for distribution. If anyone out there prefers to work out the sliding canopy mechanism for themselves and is ready to build a fuselage I could probably have a fuse kit for them pretty quickly. Just let me know. I don't want to hold anyone up if they are ready to go and prefer to engineer the details themselves.
08-24-2008, 12:58 PM
#773
Thread Starter
Nice job Chad! It's looking great. Any thoughts on lightening holes?
Here's an update on the cockpit.
I had already assembled a cockpit for the Brian Taylor Corsair I was making so I attempted to place it into the cockpit tub for this build. At first I thought F6 was too close to F7 but after a good nights sleep and approaching it from a new perspective I verified the spacing is fine.
I started out with a new 1/6 cockpit kit and carefully measured and cut out the major parts. Then I tacked them together and placed them into the tub and took these pictures.
Next I will look at the floor to make sure there is room for the pilot's legs, etc. Some surgery will need to be made on F6 to allow for more room down there but Chad says that should not be an issue.
Here's an update on the cockpit.
I had already assembled a cockpit for the Brian Taylor Corsair I was making so I attempted to place it into the cockpit tub for this build. At first I thought F6 was too close to F7 but after a good nights sleep and approaching it from a new perspective
I verified the spacing is fine.I started out with a new 1/6 cockpit kit and carefully measured and cut out the major parts. Then I tacked them together and placed them into the tub and took these pictures.
Next I will look at the floor to make sure there is room for the pilot's legs, etc. Some surgery will need to be made on F6 to allow for more room down there but Chad says that should not be an issue.
08-24-2008, 01:18 PM
#774
My Feedback: (60)
Join Date: Dec 2001
Location: Litchfield Park,
AZ
Posts: 7,677
Likes: 0
Received 25 Likes
on
23 Posts
ORIGINAL: rwright142
Nice job Chad! It's looking great. Any thoughts on lightening holes?
Nice job Chad! It's looking great. Any thoughts on lightening holes?
ORIGINAL: rwright142
Next I will look at the floor to make sure there is room for the pilot's legs, etc. Some surgery will need to be made on F6 to allow for more room down there but Chad says that should not be an issue.
Next I will look at the floor to make sure there is room for the pilot's legs, etc. Some surgery will need to be made on F6 to allow for more room down there but Chad says that should not be an issue.
08-26-2008, 04:56 PM
#775
Senior Member
Join Date: Jun 2008
Location: BORGHETTO DI VARA LA SPEZIA, ITALY
Posts: 142
Likes: 0
Received 0 Likes
on
0 Posts

