


Dumas-Tuna boat
 11-15-2005, 03:29 AM
#26
Green-Boat
Your seiner has different equipment then I have made, and it can be easily modified if you want to go into more detail. It would not be that big a deal to install a power system. I will take close up pictures of my set up. The rudder is easy to do too.
I made my deck gear close to the one on my last ship...My power winch for the net purse, is a three drum unit. I also made the purse block for the purse winch cables. I made the large net boat, the "Bogeta'"-or small net boat, and four speed boats/w all the deck beds to sit on and equ. for launching. That's standard for the newer seiners today. I also have two cranes, one forward and one on the aft bridge deck. Stairs-for, and aft and hand rails. I've the main net and boom hydrolic station too...and I've the helicopter to finish.
The stick has two radar antenna's, and the crows nest has the cross bar for flags. I've an anchor light (non functioning), anchor windless, and anchors up forward too. As you can see...I had a lot of time on my hands. When the weather was bad or in rough sea's, and I couldn't fly...I worked on my model.
When the Capt. was drunk and on my case...I worked on my boat. I was the only gringo on the ship...the Capt. and crew were from Portugal. I don't drink...never did, still don't. And life is what it is...I just try to keep happy, and I try not to take my self so serous anymore.
If you would like to see a picture of each piece...I'll post more pictures.
Safe port always,
Bobby of Maui
 11-15-2005, 01:26 PM
#27
Senior Member

Join Date: Jun 2005
Location: Arnold,
MO
Posts: 392
Likes: 0
Received 0 Likes
on
0 Posts
The details on the deck are not up to my standards in regards to detail and they will come off. Some say that I tend to go over board but I like detail no matter how small. I would love to see more pictures. Did you find the photos that you took when you were aboard ship.
11-20-2005, 02:28 AM
#29
Dear Green Boat,
I have had family in town, and was out making like a tourist guide. It was fun, and now getting back to what's important, my hobby.
I checked out your gallary of pictures...nice boats.
I will be taking pictures of all my deck gear for you and you can see what I have made so far for my hull. Her name is the Pacific Mistress, and I've the name plate made. I'm still waiting for my replacement bow truster from Hobby Lobby, and thats what is going in first. I will be installing the motor, gear box and running gear.
I've found my next project...and it's now inbound to me. It's a large sailing boat, a 72" R/C Gaff Rigged Topsail Yawl Cutter. It has a 60" main mast and a 42" mizzen. 72" from the bow sprint to the mizzen boom and a 12" beam. Kit is made by Barn Stormer Boats. I was looking for a wood planked older boat to build...a clipper ship, R/C. There ain't' no such kit that I could find, and this was the only kit near what I was looking for. So now I'm really fired up to finish my tuna boat.
I'll have more for you in a few day's.
Safe port always,
Bobby of Maui
05-20-2016, 01:59 PM
#31
Junior Member
Join Date: May 2016
Posts: 5
Likes: 0
Received 0 Likes
on
0 Posts
I just purchased this kit from Dumas... seems the price has gone up since this thread started, it's $85 USD now... And this thread is the best one I've found so far. It's been quite a while since this thread started though... Does anyone have finished photos of their boats?
This is not my first boat build, but it IS my first wooden-hull build. Using YouTube and other forums like this one, I have learned quite a lot that I didn't know. Does anyone have any tips specific to this boat?
Bob Paris, you were going to install a bow thruster... How did that work out for you? Any issues you can warn me about? It looks like a pretty straight-forward idea... but we all know what looks easy sometimes isn't...
Since the time of these postings, there's been a lot of tech advances in RC motors and ESCs... I have a 160 amp water-cooled Turnigy ESC and a 100 amp water-cooled Turnigy brushless motor, as well as the transmission out a Team Associated T2 truggy for gear reduction. I'm planning on about an 8.1 total reduction. From a motor speed of 25k rpm, that will put the prop around 3.1k, and I'm using a 2.5" diameter brass 3-blade with ball bearings in the shaft tunnel. Twin 12 volt, 7.5 AH gel-cells, bilge pumps, 12 volt cooling pumps for motor and ESC... camera in the pilot house... It's gonna be fun.
I'd REALLY love to see pics of finished boats, if anyone is still paying attention to this thread. I just got my first parts delivery today. The boat itself hasn't even shipped yet. I am on Facebook, with photos of the planned build components. My profile photo is a red and white "Politically Incorrect" sign. Advice, input, pics of your builds beyond what you have here... anything would be appreciated.
05-20-2016, 06:59 PM
#32
Hayj F/V Sunset Rae,
Hay buddy...this was my first boat too and it will take some time to put together. I've been over in the R/C Universe airplane's and I've not been into this thread in over ten years. The model Tuna Super Seiner is still sitting in my garage and waiting for me to finish it. I even found an ACE Boat Tx and need to get a Rx for it and a water proof servo. I purchased through a German model company a Bow Thruster...but I've yet to install it. I will one day...and if I get a real feather up my tail...I may just finish the model. I built it while I was on the Lone Wolf, a San Diego based ship that usually runs out of American Samoa.
That too was over a decade ago and I retired in 2007. The ship hull was a trip to build and you will need to take your time and just enjoy the experience. I also have all the rigging, and parts to finish the ship...and since I left my work flying off of the tuna boats...kind of let it go. I flew a Hughes 500 C & D models off of the boats and worked as a pilot, mechanic and fish spotter. After 15 years at sea...I got kind of good at spotting tuna. Uncle Sam taught me to fly helicopters in 1965/66 and I flew in the army.
Its not the easiest boat model to build...even Dumas admits its a bit of a challenge to put this one together. The end result is quite amazing and I made sure my hull was water tight. I used aircraft adhesive on the inside and many coats of spar vanish to seal the hull. It took me nine months to build the hull and upper deck, but it kept me sane...while at sea. I would spend anywhere from six to twelve months at a time at sea. Good pay...lots of traveling...and lots of time off to work on model boats. Quite a few guys built boats at sea...some were real works of art.
I've a twin mast schooner RC sail boat kit I've never built...and its up stairs stored for now. Its over 6 ft. long and a nice old fashion rigging for the sails and a fiberglass hull. Maybe one day...
Keep your sea legs happy...
Aloha,
Bobby of Maui
05-20-2016, 07:45 PM
#33
Junior Member
Join Date: May 2016
Posts: 5
Likes: 0
Received 0 Likes
on
0 Posts
Yeah I found that German company that makes the bow thrusters, from your post earlier in the thread no less, and they really aren't all that expensive either.
I grew up on family owned sailboats, we did some coastal cruising in the Pacific Northwest, but never did get the big boat finished for circumnavigation like she was designed. I built a twin-gas powered model of the "Amsterdam", an Artesania Latina tug boat kit, but that was an ABS hull, so it was easy. This one... I'm looking forward to it.
Curiosity asks... How much was the shipping on your bow thruster, and which one did you get?
Thanks bud.
05-20-2016, 11:14 PM
#34
Hay Bud,
I purchased it so long ago...I really don't remember for sure. But it wasn't all that bad ten years ago...more today. I mailed a small package to France...returned some Lado electrical retracts in for overhaul...and it cost me over $80.00. The return postage was 1/3rd. as ours, so it may be more reasonable coming here...then going there. Installing the bow thruster is not all that difficult, but with a bit of patience it will go in. I will use JB weld...4 hour dry stuff to set it into the hull...on the I inside. I believe mine is 6~12v and I'm running a 6v Dumas electric motor-so I'll run 6v. I've the gear box they set up and an automatic bilge pump too-it runs on its own 9v dry battery. One can't be to cautious...and the only place I can run the boat is in the ocean...when its calm enough. There are no lakes here or big ponds...so its the ocean or its in the dry-dock.
I used 3/8" wide, thin Philippine Mahogany for the planking-some came in the kit...some I bought. I purchased the stripped Mahogany in General Santos City, in the PHI when we made port there to discharge our fish. The boat kit came from Dumas, with all the other gear for the kit and I used 5-minute epoxy to glue the planks in place. I had to hold them or use clamps...but I mostly held the epoxy until it got hard (I told you I had a lot of time on my hands). Some times you just have to do what you have to do to do the project. At sea...you just can't call up the nearest hobby shop. The only hobby shop I found was on Guam and I made good use while there in port. Guam is where the helicopter company I worked for was stationed and we usually did a good annual inspection on our birds when there. But I always took the time to see what was available while there and purchased enough to last six months or more. Believe me...I used what I could from the ship and was able to find some thin plywood to make my upper deck for the ship-and a few other goodies. It took time to build the hull and I spent a good bit of time on the bow. It came out beautiful.
I installed a rub rail along the water line on my model...just like the Chambal boat I was on. I also installed a few other additions and a full working deck with well doors on the aft deck. I've the floats, net and chain for the boat too...I just need to finish the radio and electronic goodies, the bow thruster and paint the model.
Safe Port Always,
Bobby of Maui
Last edited by Bob Paris; 05-20-2016 at 11:23 PM.
05-21-2016, 01:17 PM
#35
Junior Member
Join Date: May 2016
Posts: 5
Likes: 0
Received 0 Likes
on
0 Posts
Believe you me partner, I have gone through every photo you posted to this thread as carefully as resolution will allow. My project cost is up to almost $700 now... And I haven't even begun buying stuff for the OUTSIDE of the boat. This is all stuff going INSIDE it. Nice thing is... outside stuff (details, winches, etc) is fairly easy to put on later. Since when is a boat ever done? Even a MODEL boat... 
I liked your epoxy idea... I'm going to use a modified version of it. Coat the interior with just an epoxy resin, but the outside will get a very thin coat of fiberglass... just some very fine, light cloth... to seal it and lend some strength. That will also give me a good base to add any fairing needed to smooth out my screw-ups.
Do you happen to have any idea what this thing is supposed to displace? I just got my 12 volt batteries today... they're as heavy as I expected which will make for great ballast, but how much is needed? Any ideas? I'm guessing 10-15 pounds, but that's just a guess. My "Amsterdam" weighed 22 pounds, but it was quite a bit bigger, and a tug-hull, not the finer lines of this boat. This one should be quite a bit more stable with that flat-bottom hull.
This is my first foray into an on-line forum like this, so if I make a fool of myself... not a difficult thing for me to do... I am quite sure you, with your history at sea, will have no problem letting me know.
06-09-2016, 05:11 PM
#36

Join Date: Jul 2005
Location: Auburn, AL
Posts: 410
Likes: 0
Received 0 Likes
on
0 Posts
I have this boat as well. My dad built it in the 70's and we ran it often in the neighborhood pond where I still run boats today. The Tuna Clipper sat on his workbench for 10 or 12 years until I talked him into letting me take it home and get it back into shape. Not a hard job but there were some structure repairs, a few leaks and mostly I had to take the old Kraft servos out and update to Airtronics. After all these years though it still runs fine on the original Dumas speed control. If I can find it I will post the photo of it being followed by a line of three Mallard ducks. For some reason I am tempted to order another one of these kits just to build one myself. Maybe after the other two Dumas kits waiting for my attention.
Rick H.
Rick H.
06-09-2016, 06:25 PM
#37

Do you happen to have any idea what this thing is supposed to displace? I just got my 12 volt batteries today... they're as heavy as I expected which will make for great ballast, but how much is needed? Any ideas? I'm guessing 10-15 pounds, but that's just a guess. My "Amsterdam" weighed 22 pounds, but it was quite a bit bigger, and a tug-hull, not the finer lines of this boat. This one should be quite a bit more stable with that flat-bottom hull.
1) No two boats, even built from the same kit or plans, weighs the same.
This could be due to different ways of building the model. One person might want to use more glue in the joints so they can be faired into fillets where someone else won't.
The wood used in one kit may be more dense than in another, meaning it will weigh more than a a kit with less dense material.
2) The more details you add, the more a boat will weigh, especially up high. To keep the boat stable, you will need to add weight below the water line to compensate.
All of that said, I read your question to be "how much ballast do I need?". The easy answer is "enough to get the boat to float at the scale waterline". Obviously, as you know from building your tug, that doesn't tell the whole story. The location of the ballast is just as important as the amount of weight. Therefore, my answer is:
1) Install your drive and control systems and batteries and then test float the hull. For best results, try to get it to float level using just these components to begin with.
2) Install the deck, superstructure and masts and float test again. Now add your ballast as needed to get the boat to float at the water line.
There isn't really any other way to do this. What someone else's boat weighs probably won't be the same as what yours does any more than a 1/8th scale hydroplane I'm building will weigh the same as someone else's version of the same boat.
Last edited by Hydro Junkie; 06-09-2016 at 06:30 PM.
06-11-2016, 02:40 PM
#38
Junior Member
Join Date: May 2016
Posts: 5
Likes: 0
Received 0 Likes
on
0 Posts
Yeah I was referring to total displacement.
I'm sorta building this boat backwards, to make it easier to build the interior. I've got the camera installed inside the pilothouse, with Velcro on the stock cabin roof so I can access it easily. Now I'm working on the drive train and battery racks. I'll have to install a "shaft alley" on the keel because my shaft is riding in sealed ball bearings, so the shaft tube is HUGE compared to the stock system. Since I'm doing that, I might as well thicken the rudder post area because it too barely fits through the skeg.
These batteries are friggin HUGE too! I'm darned lucky I didn't get them any bigger. They JUST fit between the frames, and under the shear-line. Less than 1/4" clearance on each beam, and about 1/8" under the shear. With that much weight in one place, I'm using the scrap from the parts racks to build cradles around them. They slide in and out straight up between frames 4-5 and 5-6.
I can't post photos here because my camera takes too big of a photo, but if anyone wants to see the build plan I have it posted in a public album on my Facebook profile, here: https://www.facebook.com/shaun.oling...7744695&type=1
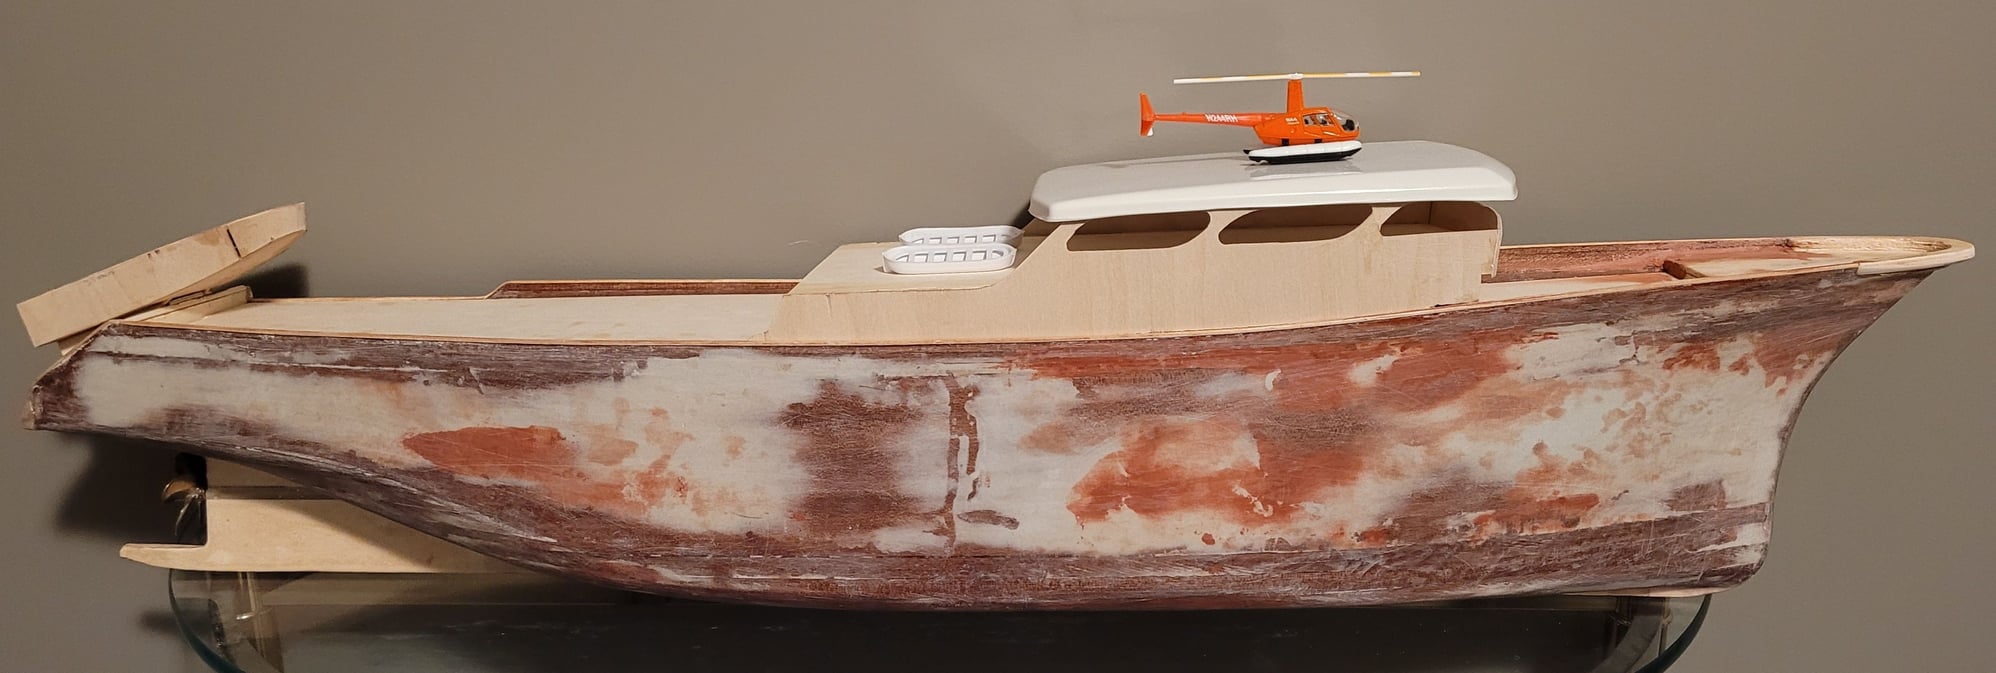
02-09-2022, 08:14 AM
#39

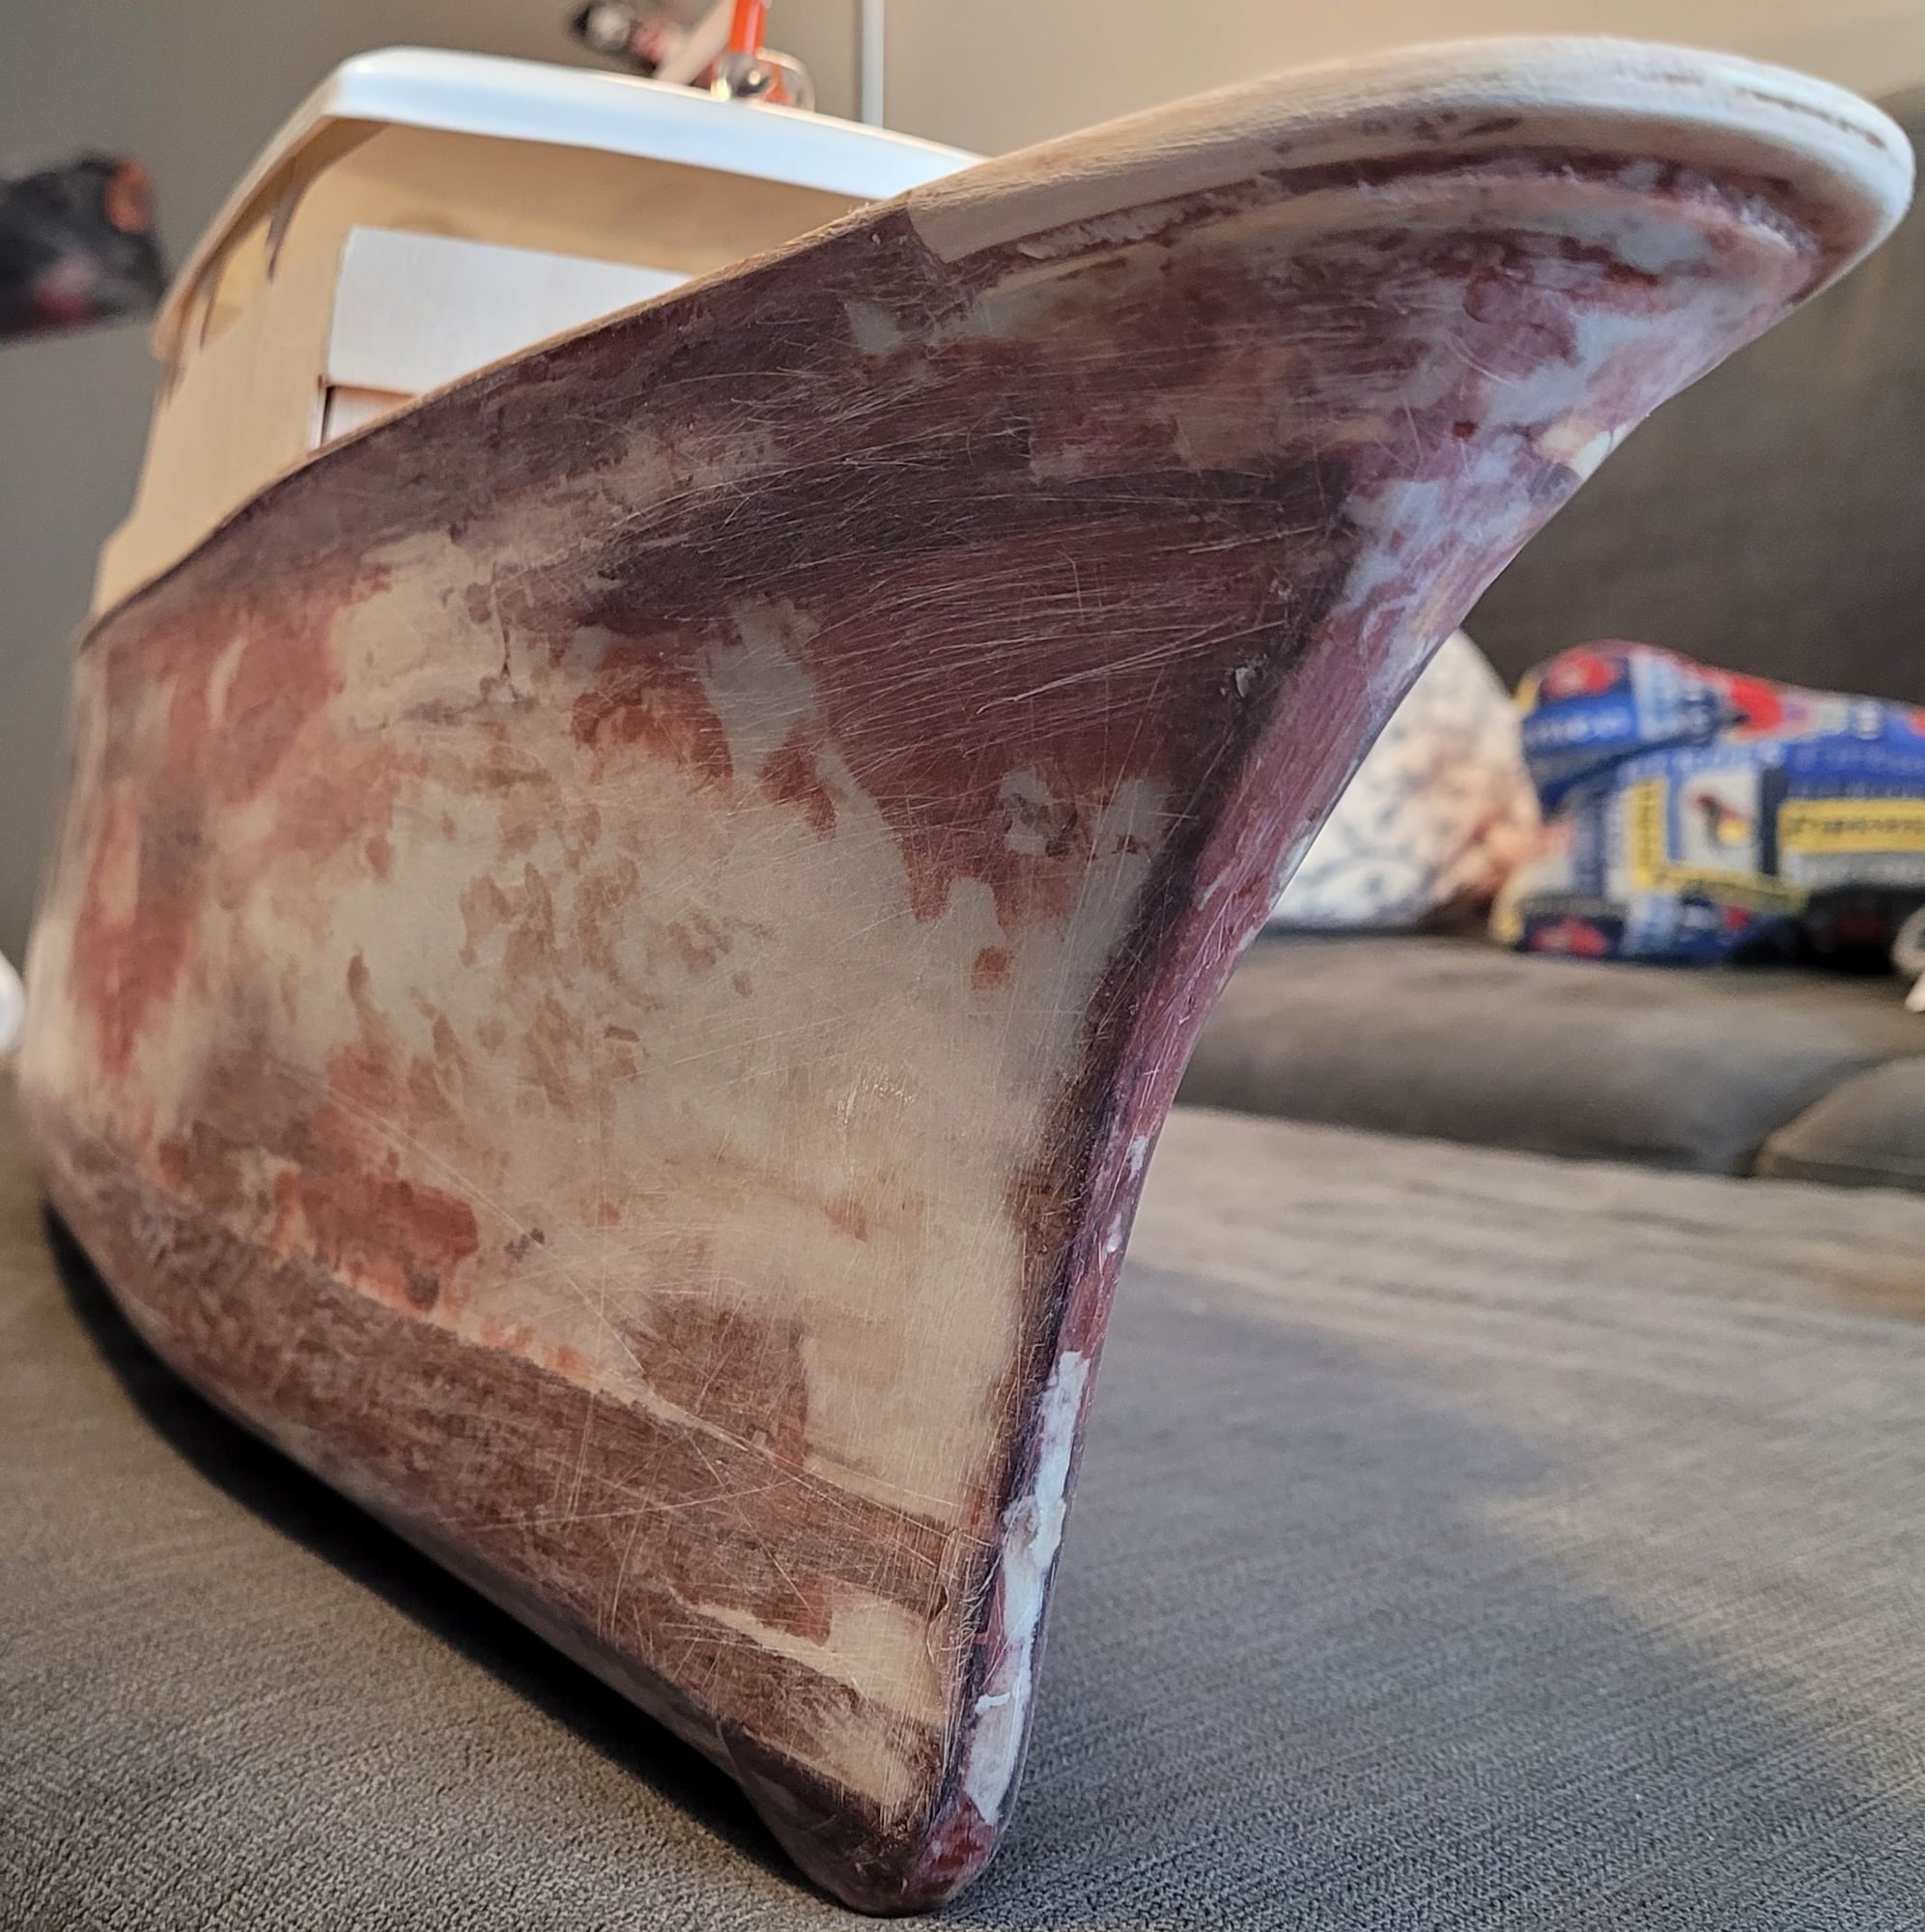
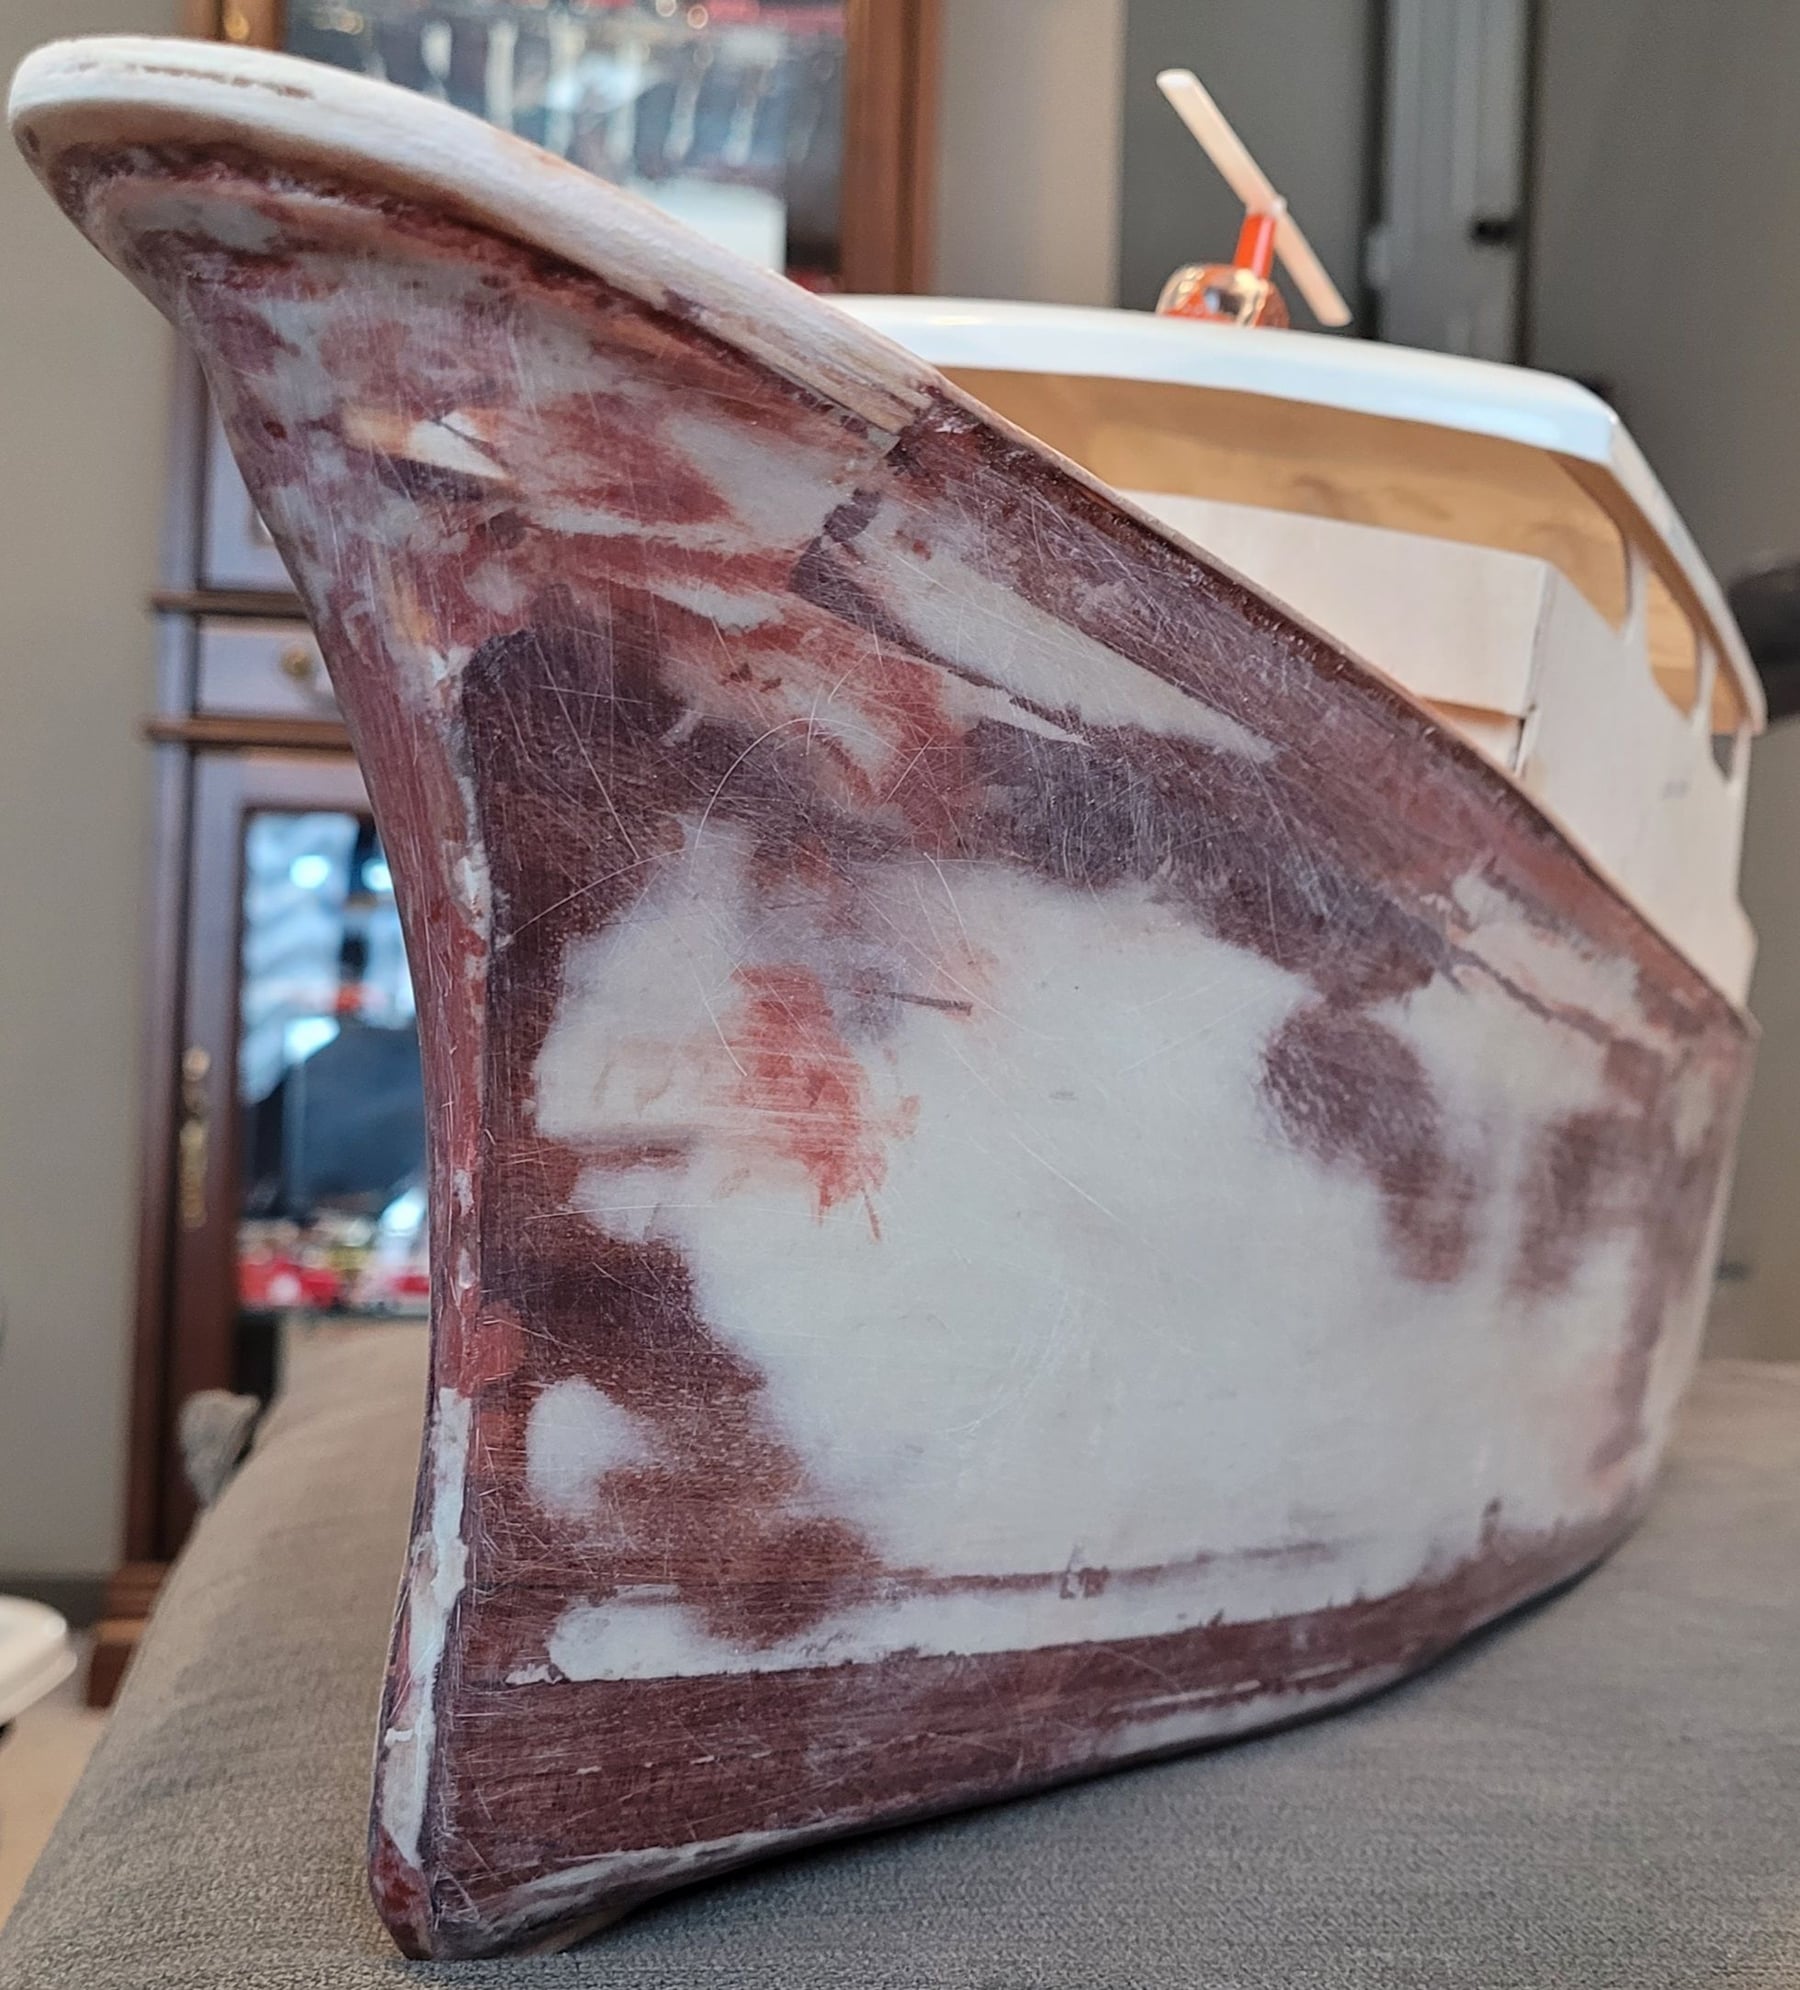
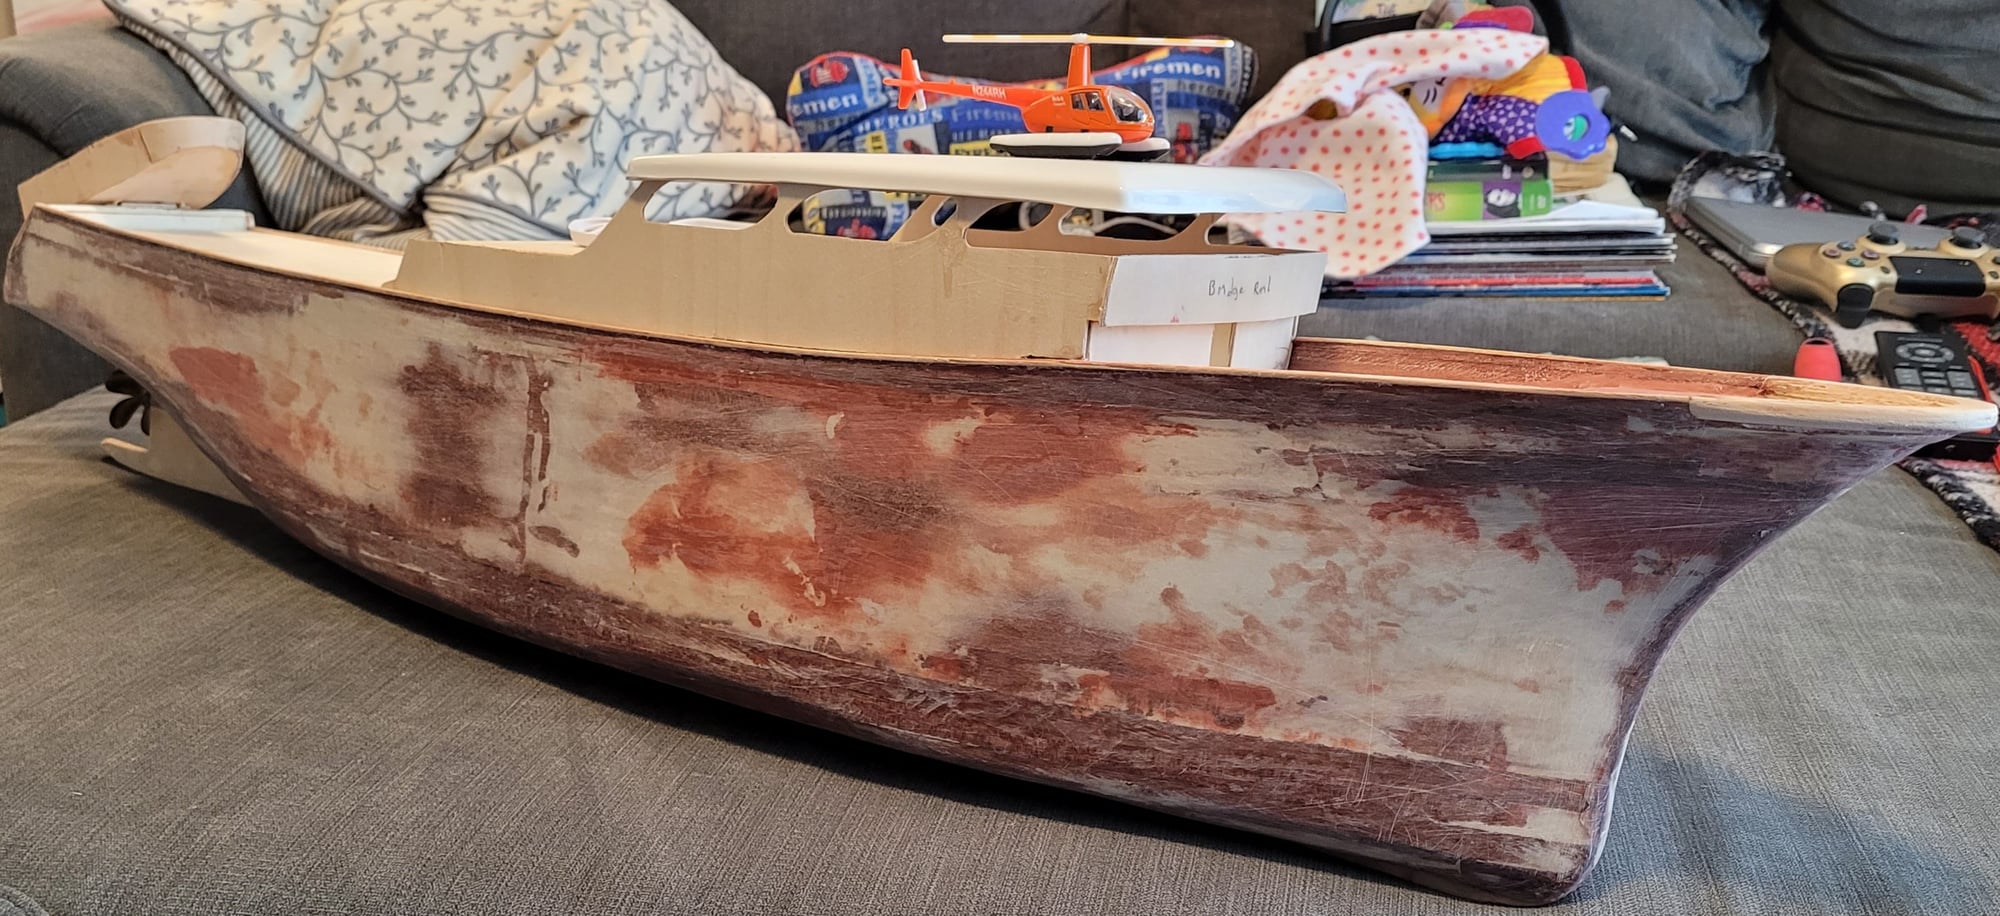
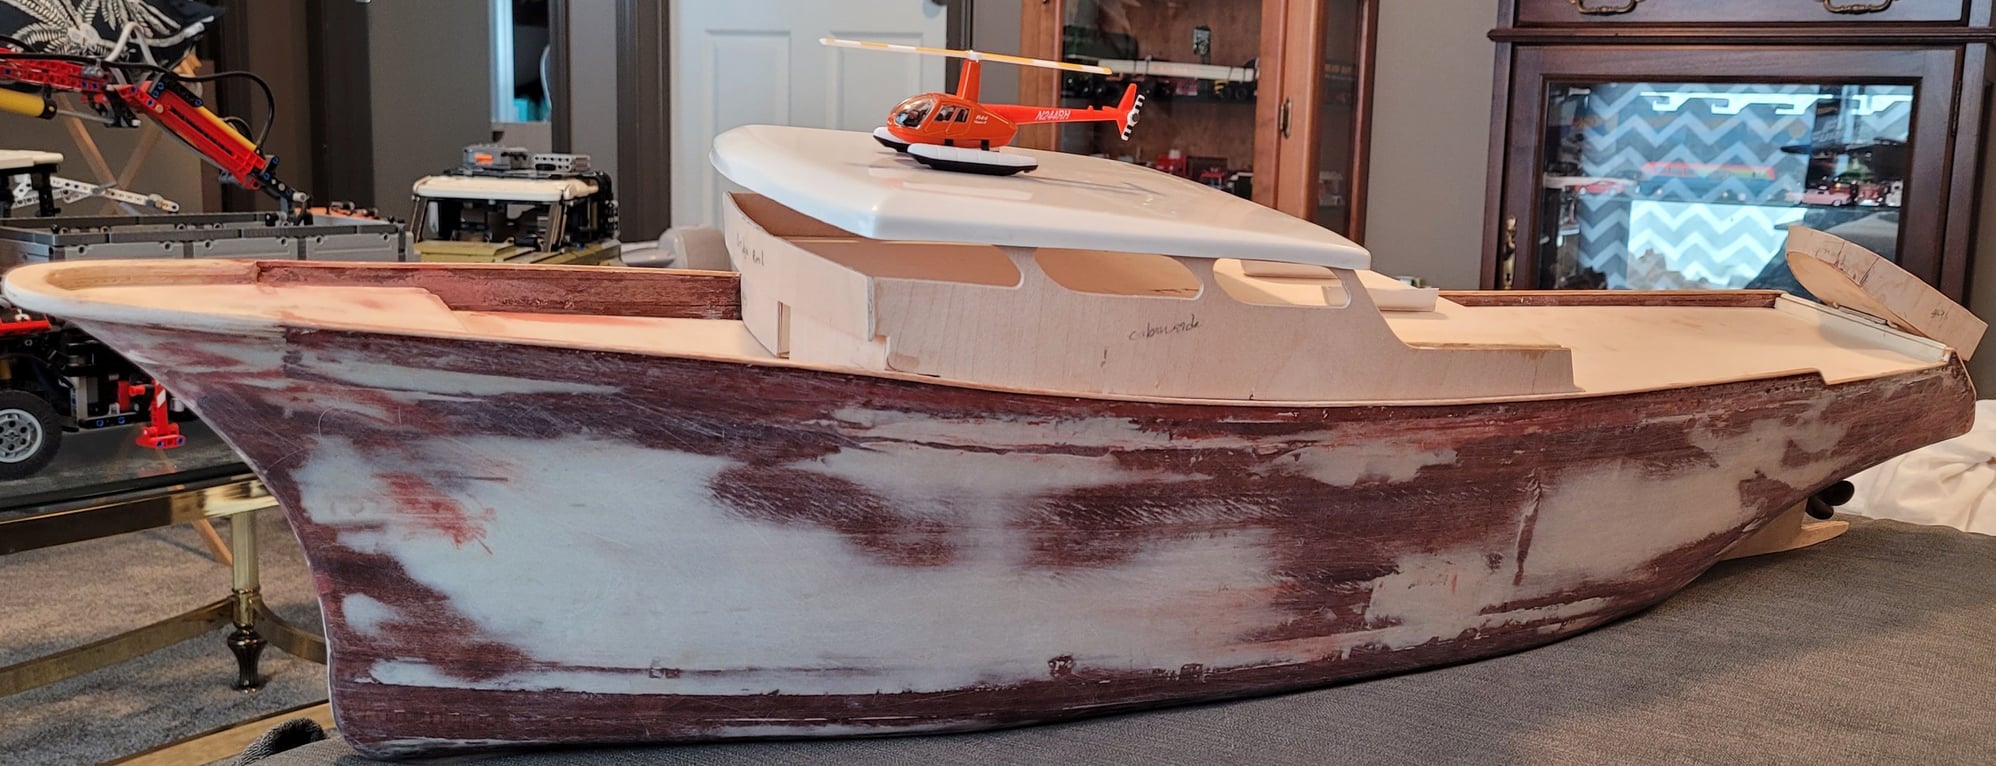
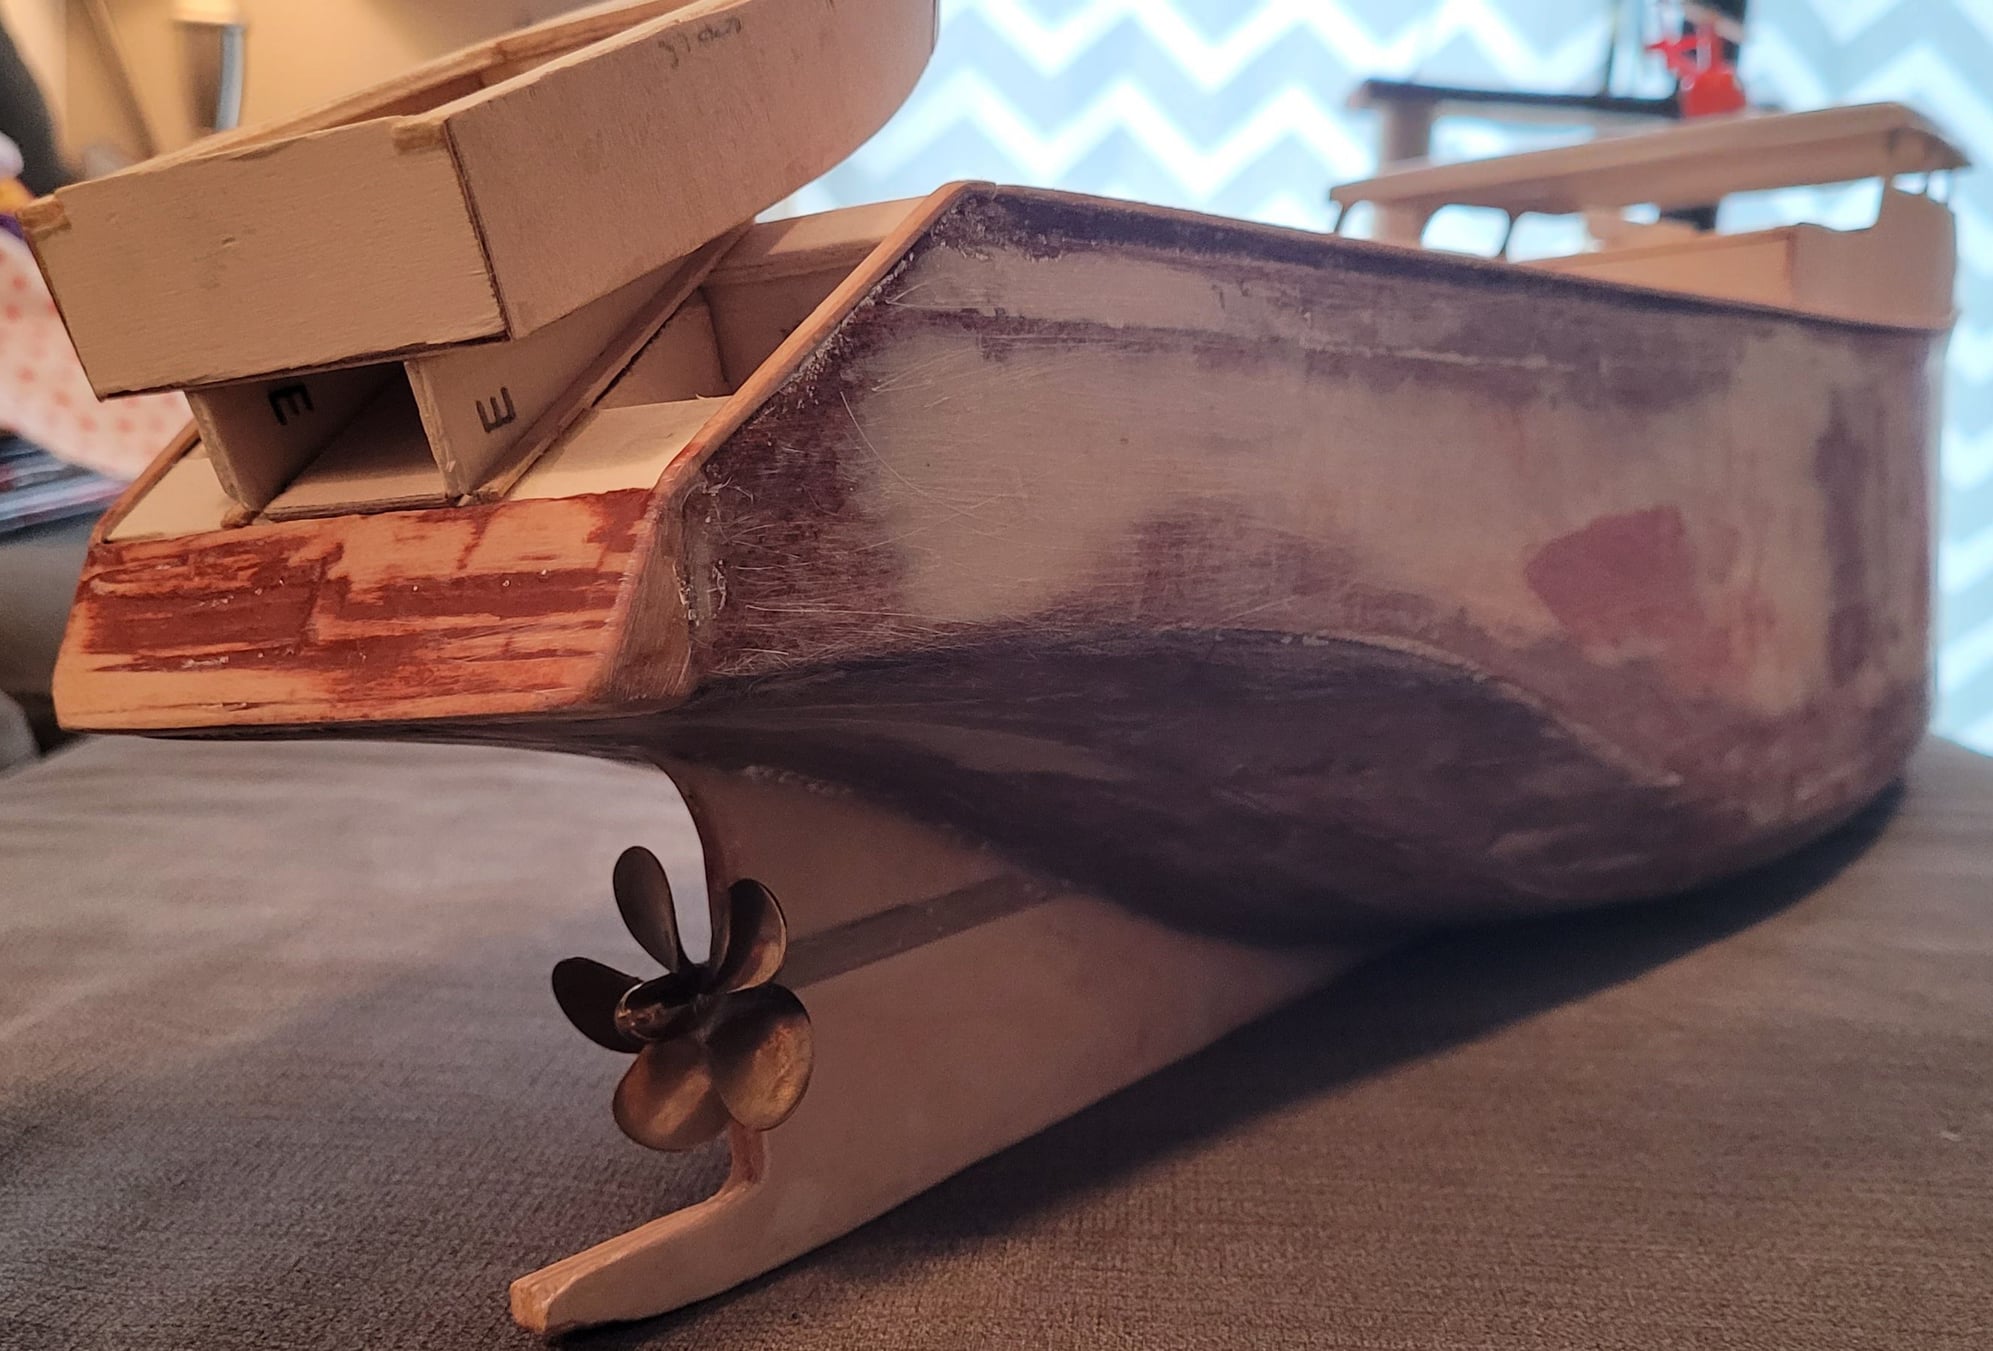
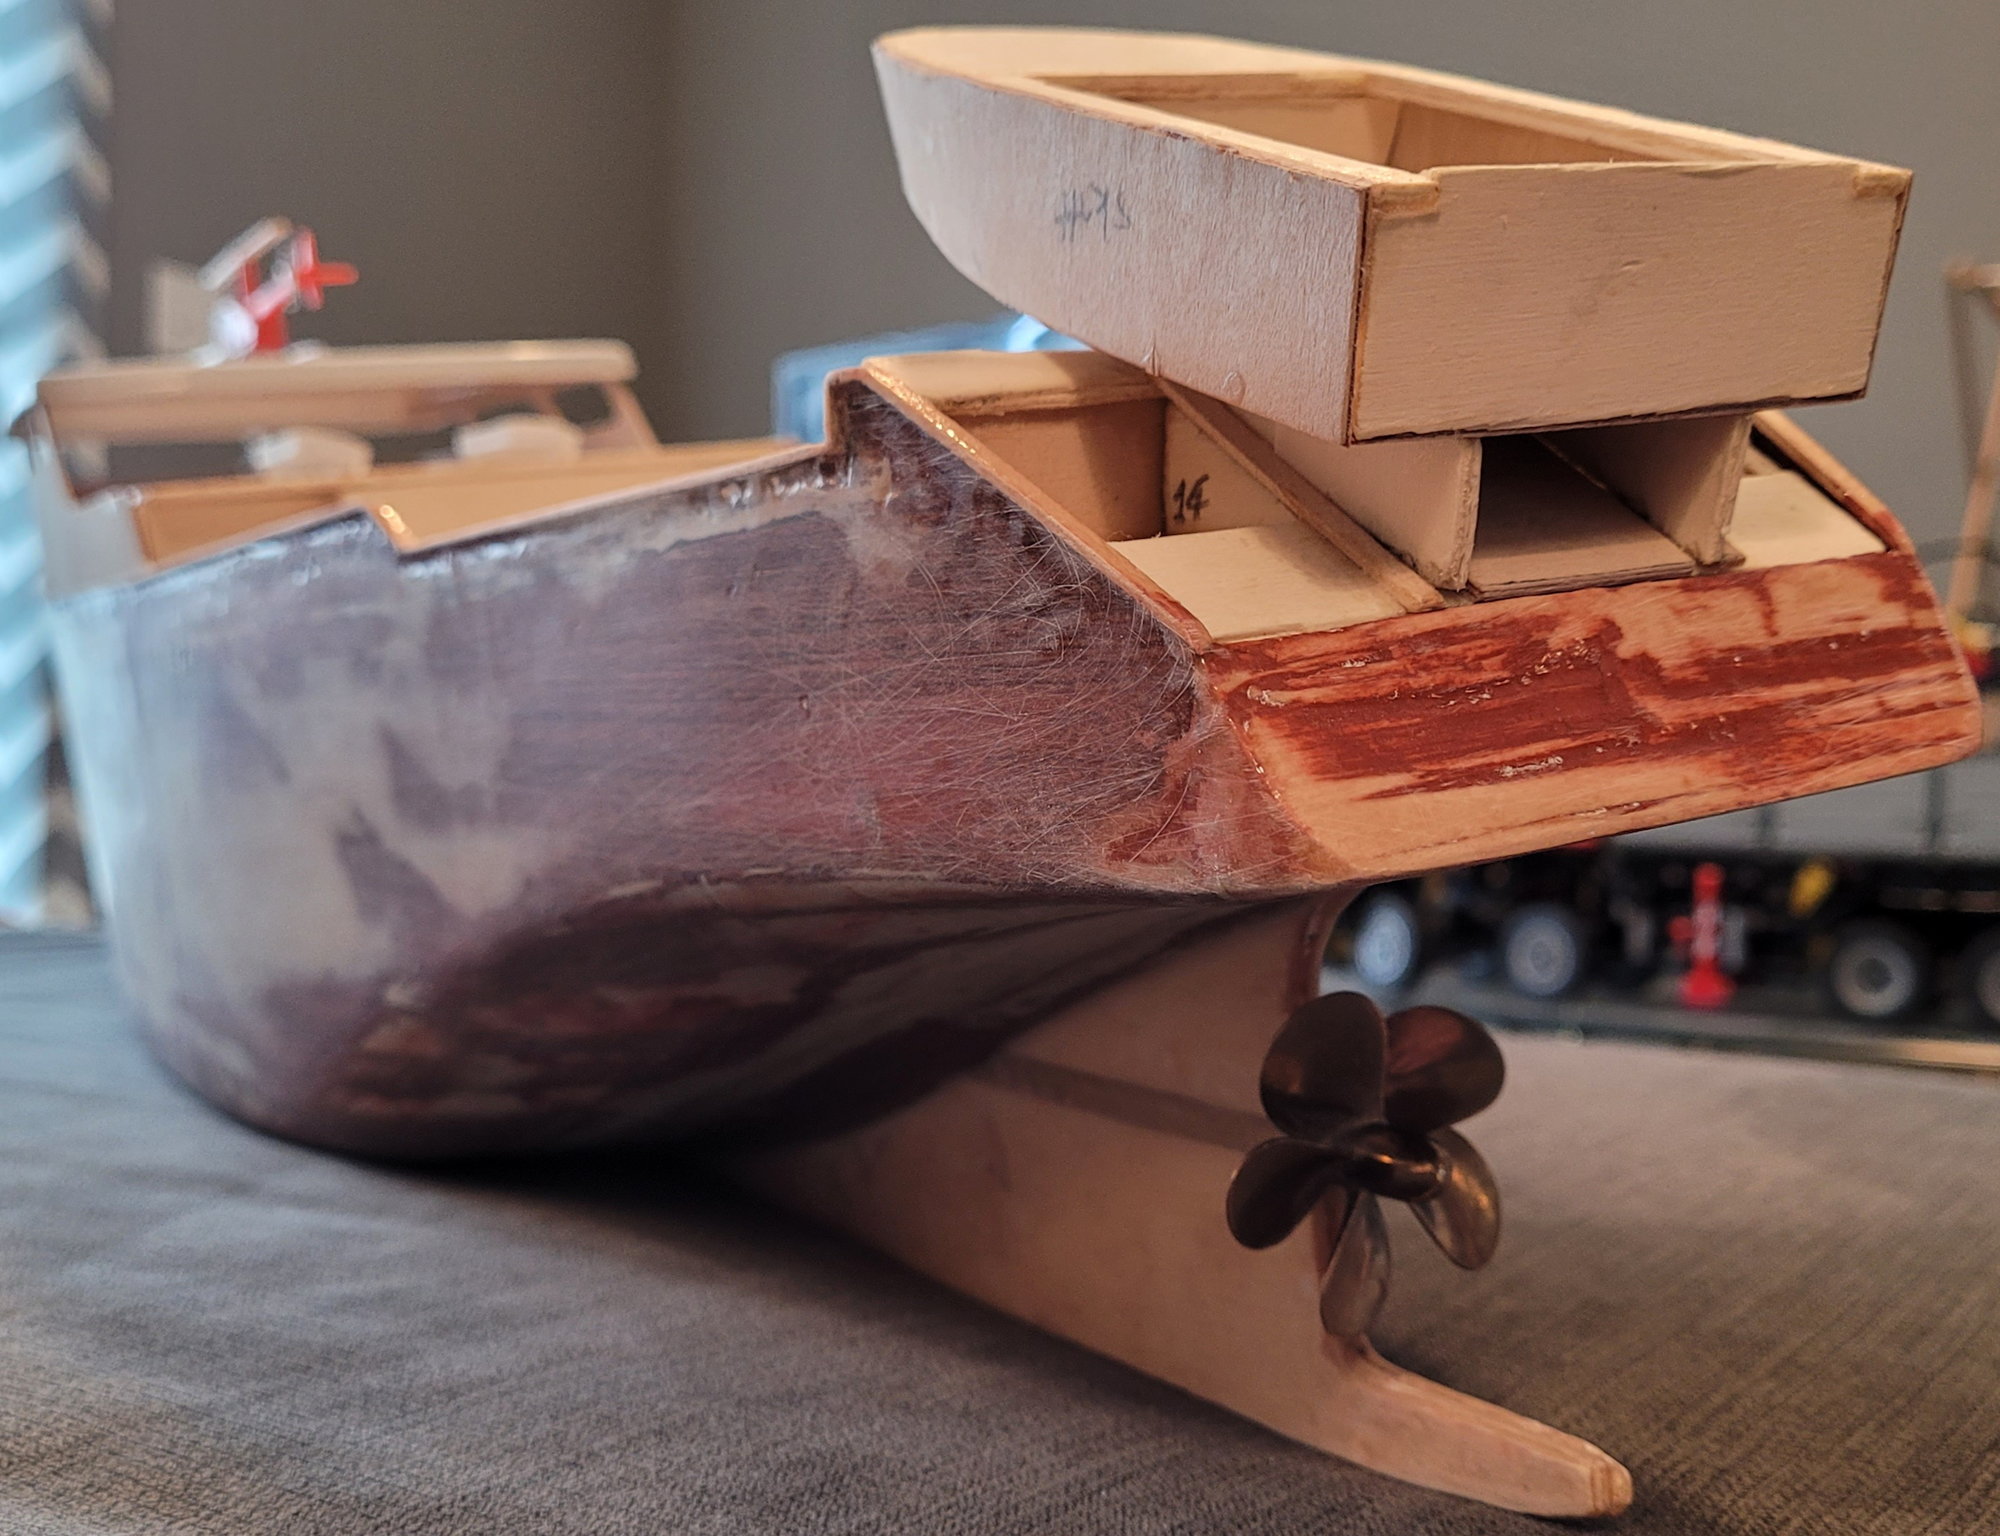
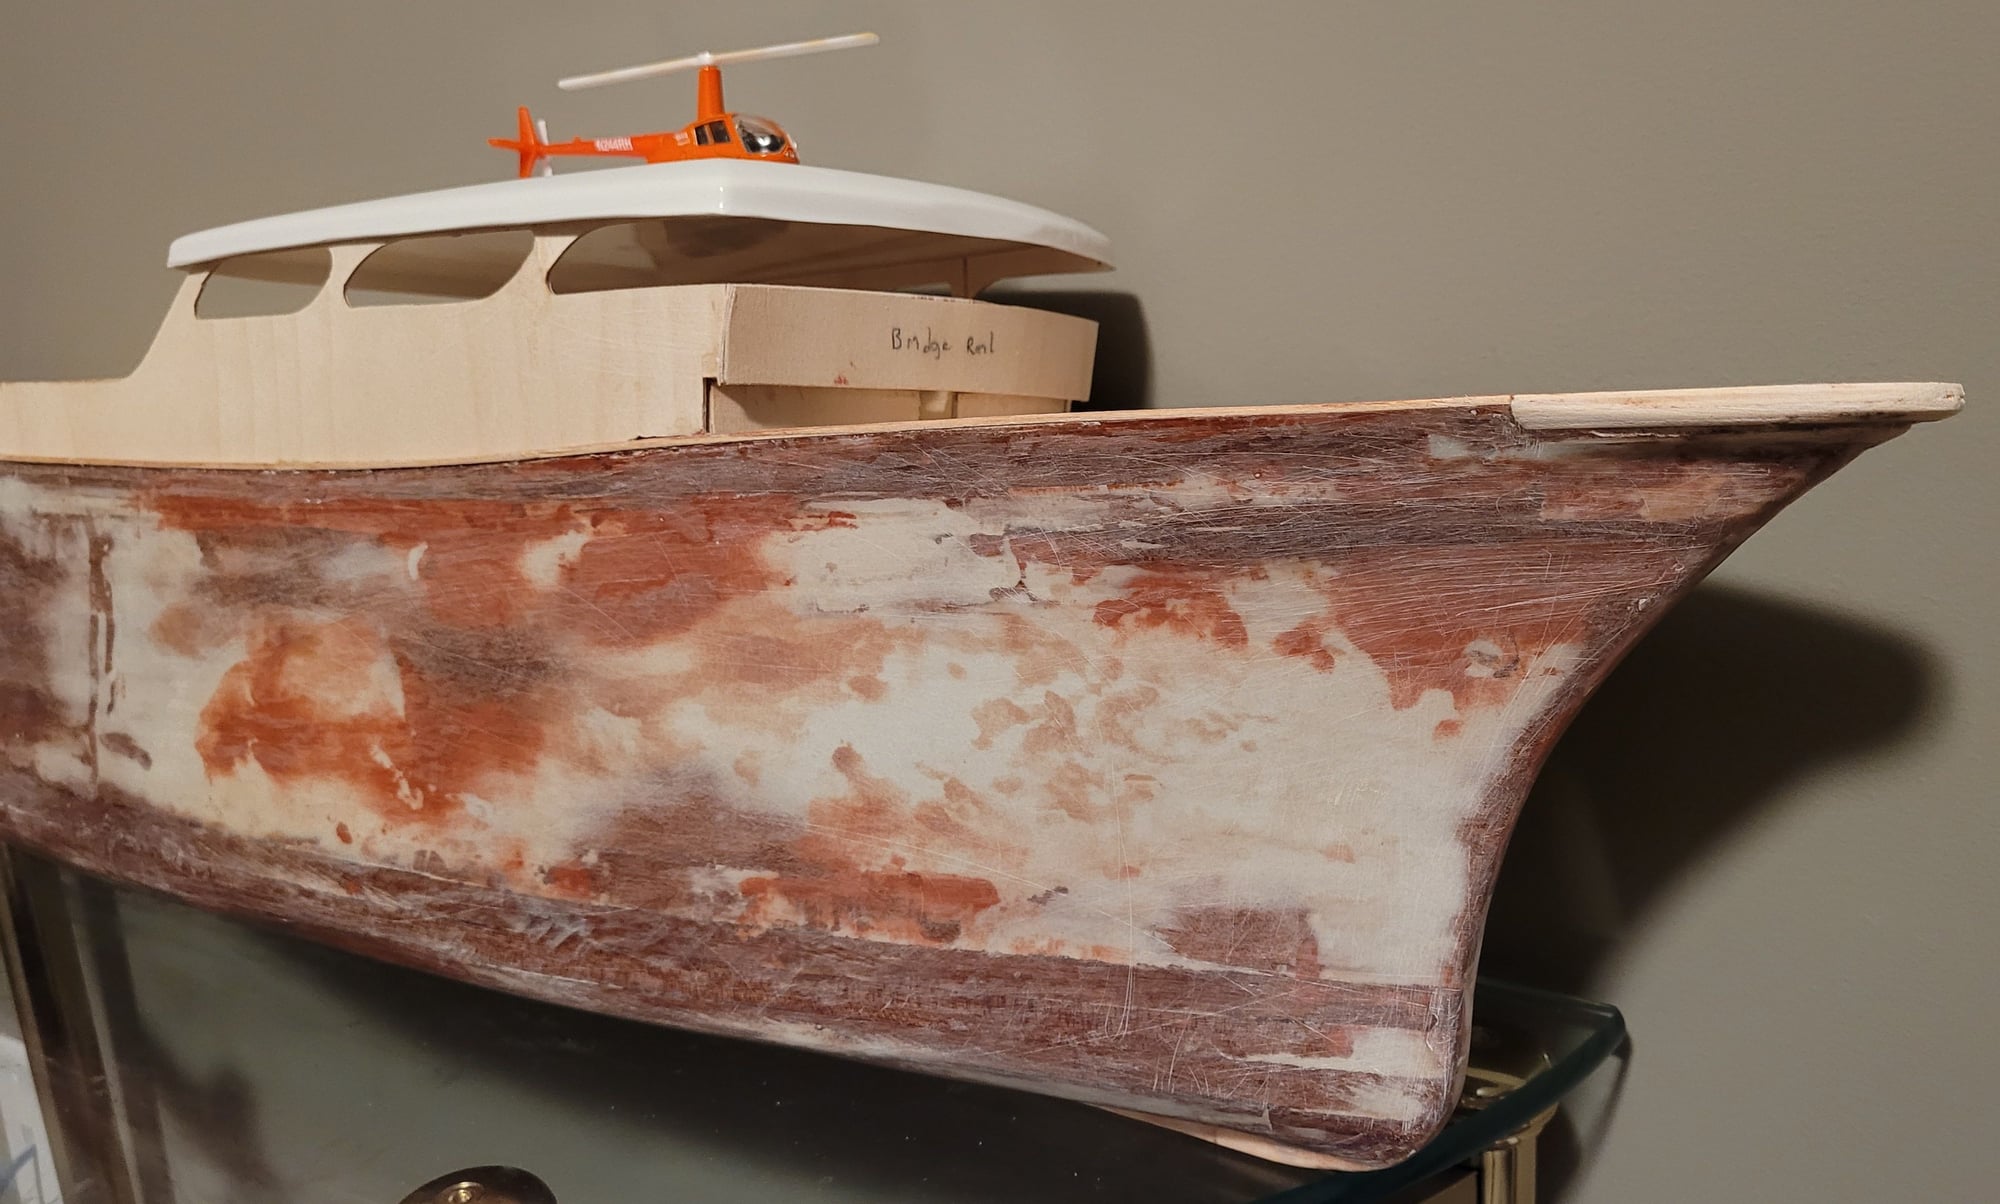
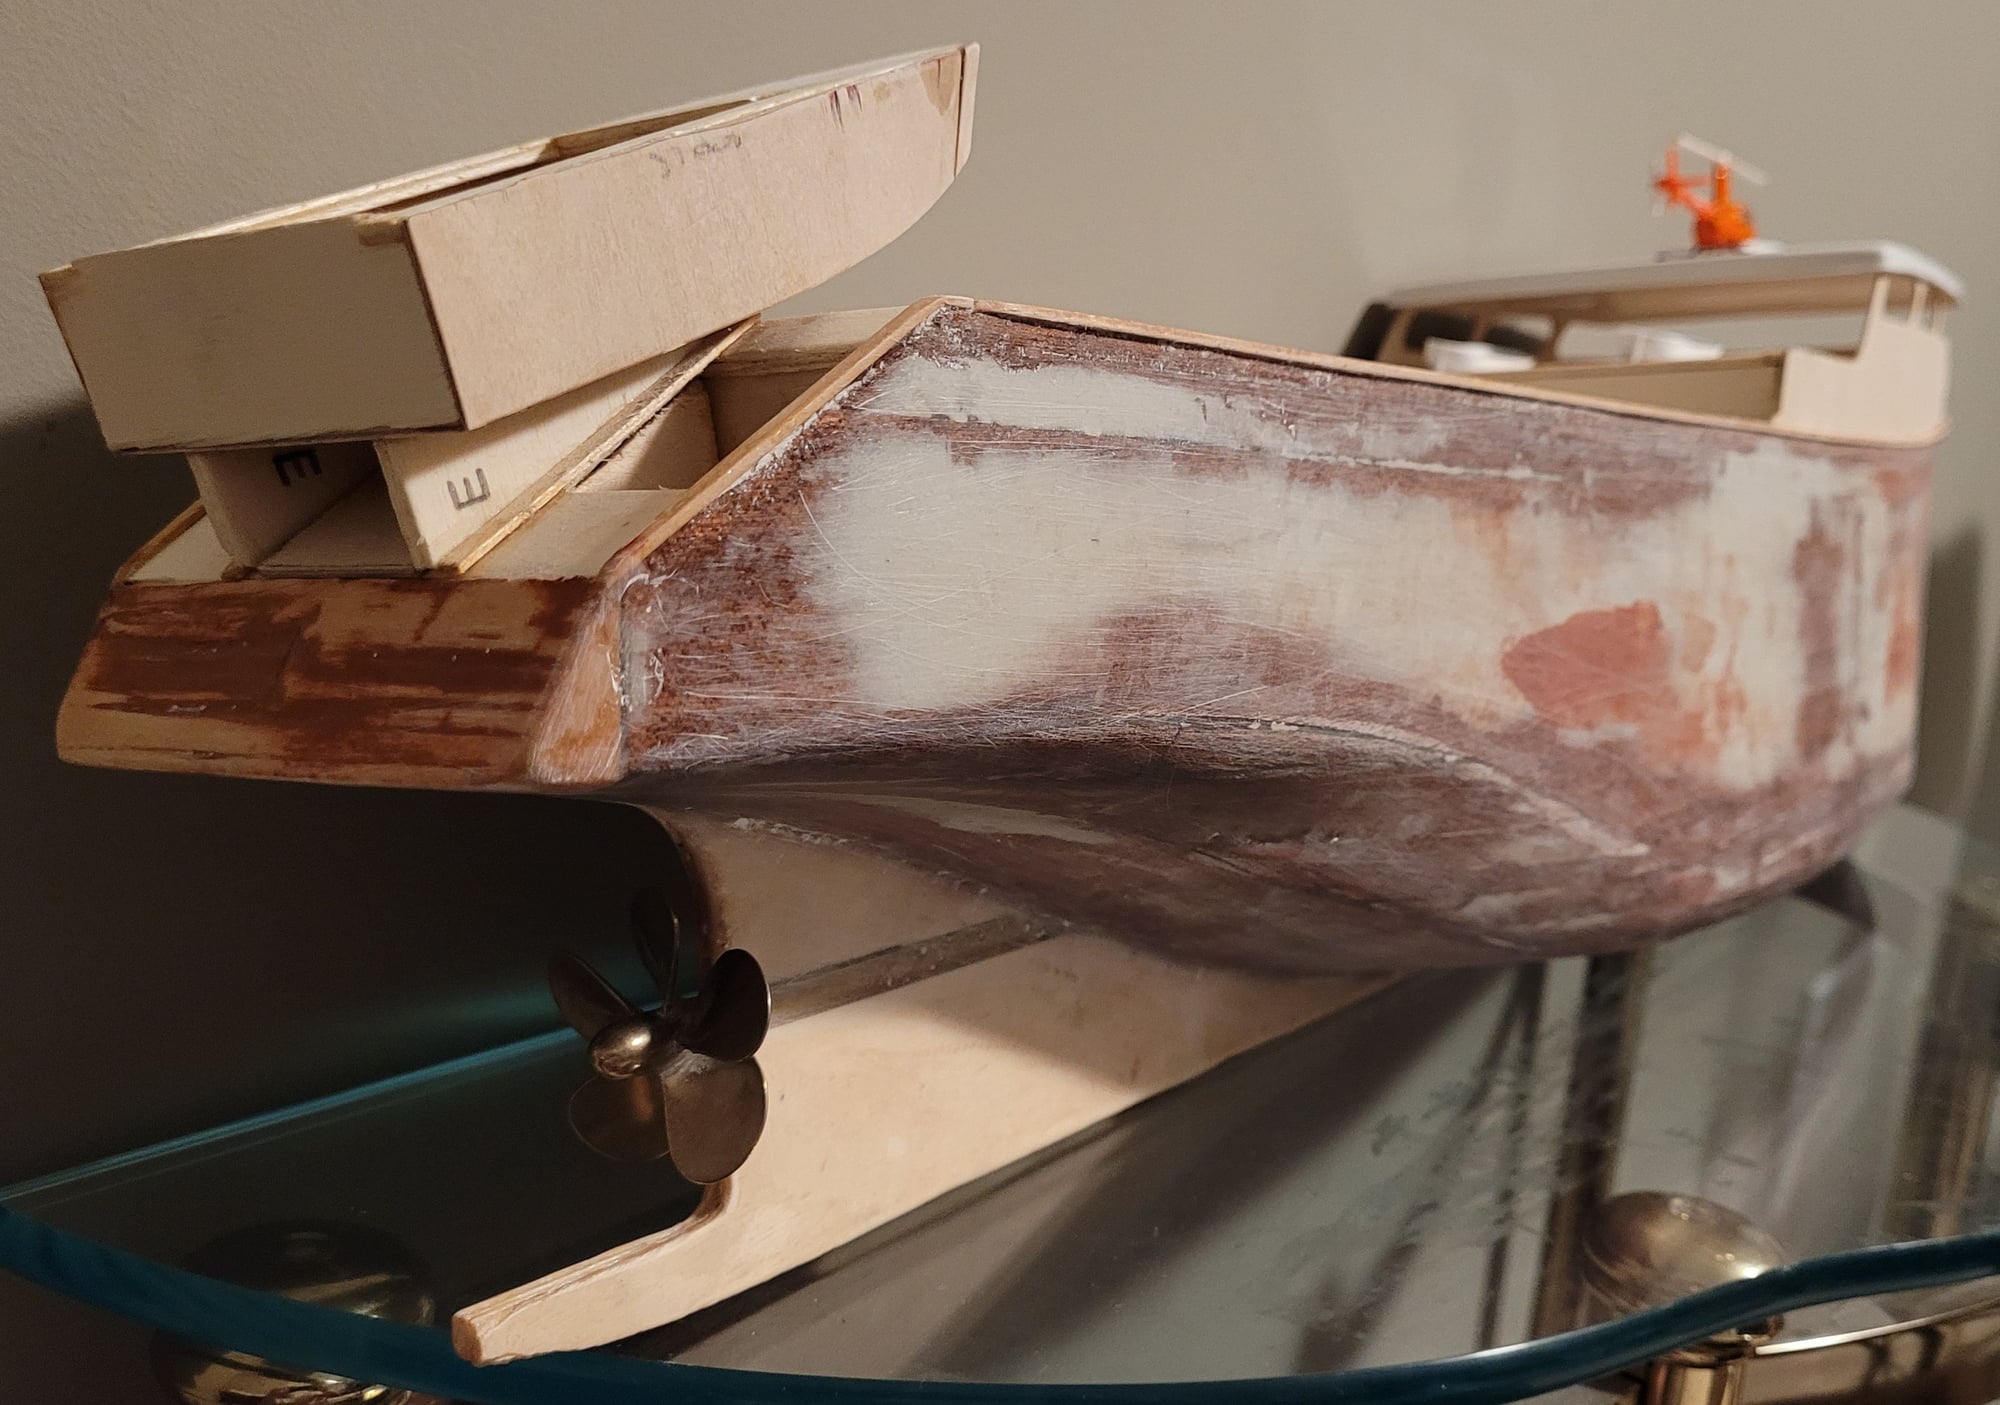
I know I'm joining this thread at the last minute but love the content of the thread and thought to share my current progress. The hull and planking is the biggest pain in the you know what! Also like mentioned the cabin doesn't go exactly on how it should. I had to do some much fine tuning to get it right. Still lots of work to do but fiberglass is mostly done. Then prime, sand, filler and paint once satisfied.
02-09-2022, 08:21 AM
#40
I know I'm joining this thread at the last minute but love the content of the thread and thought to share my current progress. The hull and planking is the biggest pain in the you know what! Also like mentioned the cabin doesn't go exactly on how it should. I had to do some much fine tuning to get it right. Still lots of work to do but fiberglass is mostly done. Then prime, sand, filler and paint once satisfied.
Last edited by Mambamonster; 02-09-2022 at 11:51 AM.
02-09-2022, 02:52 PM
#41
Dumas boats are not known for their fit and all, mostly due to the die cutting of the wood. l've never dealt with any of their fiberglass parts so I can't really say anything about those but, what I can say is that, most fiberglass parts are not perfect out of the mold, regardless of how good the plug and mold are, based on the fiberglass parts I have bought/used. For that matter, I've found that, unless a boat has a lot of framing to make the skin meet the desired shape, wood boats require just as much, if not more, filling as a fiberglass hull
02-09-2022, 03:26 PM
#42
Oh for sure! I have gained so much experience from doing this type of build. The knowledge and skills that this kit has been teaching me is going to pay dividends for future builds.
