


the unofficial home of the dumas dauntless
 03-15-2014, 07:01 PM
#4951
Member
Join Date: Feb 2014
Posts: 91
Likes: 0
Received 0 Likes
on
0 Posts
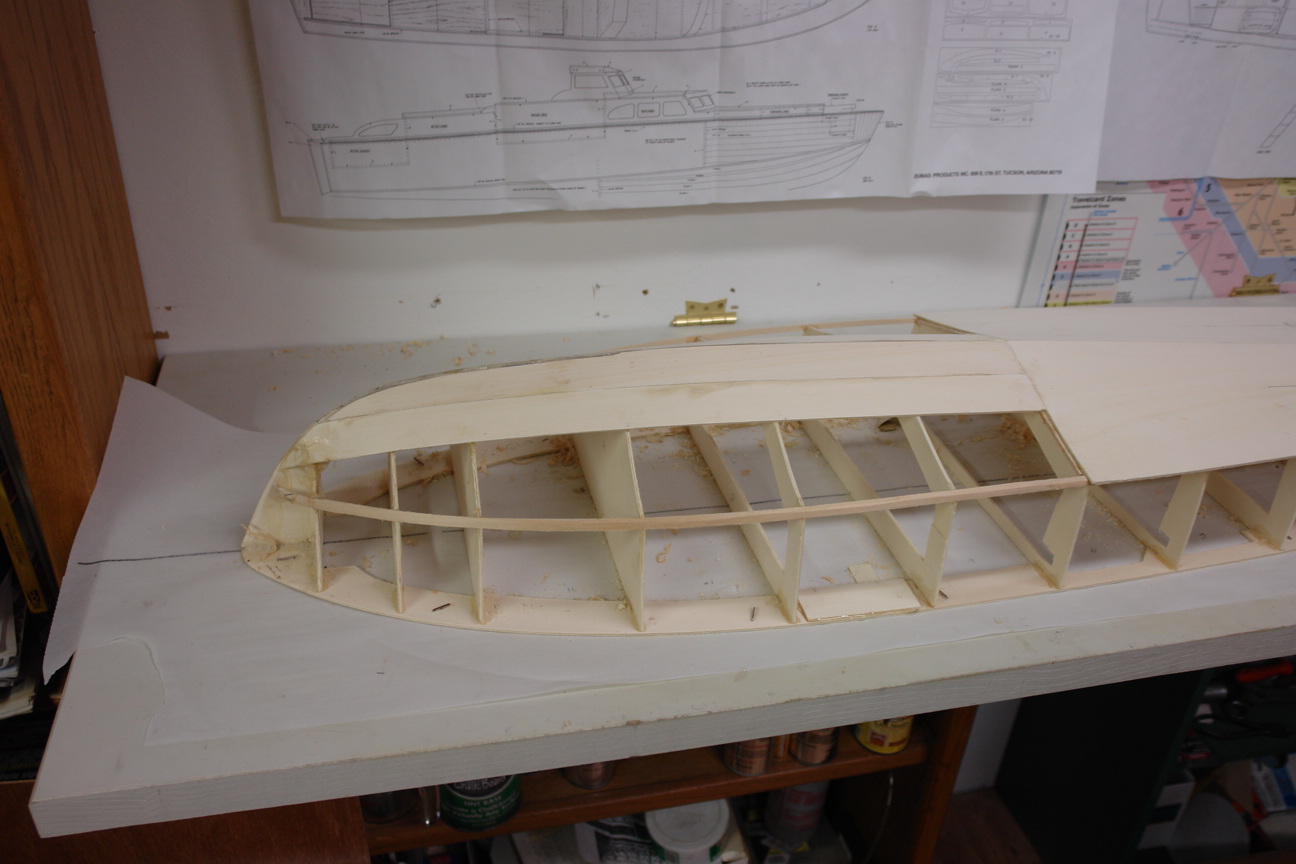
Well two days work and I am 3/4 way through the planking of the lower hull! I can see why these boats take years to finish or don't get finished at all!! anyway the rear pieces went on very well just lots of weight needed to form them to the bulkhead shape. I added a stiffner of the rear of the shear to the lower sheet as it looked like this might be a weak area if the boat gets bumped on the transom.


As you can see I have a couple of helpers to get into those little places I cant manage...................................
As you can see I have a couple of helpers to get into those little places I cant manage...................................
 03-15-2014, 07:12 PM
#4952
Member
Join Date: Feb 2014
Posts: 91
Likes: 0
Received 0 Likes
on
0 Posts
Then on to the front planks. After mocking them up with clamps it seemed to me once again to reverse the order of gluing than the instuctions state. Seems I'm just not good at following instructions! anyway starting at the keel and working down seemed to work well for me so thats how I did it, I took plenty of time and shaped each plank for a good fit before gluing and it seems to work as there would appear to be not much shaping to do now it's dry. So another day to do the other side and it's on to the side planks. Oh one excellent little tool I found in my airplane stuff was the mini plane made shaping the planks so much quicker and more accurate than sanding.


 03-15-2014, 11:27 PM
#4954
Member
Join Date: Feb 2014
Posts: 91
Likes: 0
Received 0 Likes
on
0 Posts
Another quick question, how much finishing resin does it take to do the hull? I was thinking of doing the inside as well as the outside just to stiffen it up and make it nice inside. also as I've heard a couple of people saying that they have had problems with crack's along the keel I'm going to make some shaped blocks to fit down on the keel/bottom skin's to try and stop it happening on my boat, Thoughts?
I'm also going to build her as first built without the upper bridge roof just the screens as I think it makes her look more "Racy"....................................
I'm also going to build her as first built without the upper bridge roof just the screens as I think it makes her look more "Racy"....................................
 .
03-16-2014, 11:18 AM
.
03-16-2014, 11:18 AM
#4956

My Feedback: (5)
Coat the inside of the hull first; you can sand off any bleed through.
However, if you sand the outside of the hull then go over it with wood filler, i.e., Timbermate Wood Filler next sanding it down one more time, you won't have any bleed through epoxy.
You probably already knew that. Seems I have a habit of stating the obvious and have been told so a couple of times.
Bob
03-16-2014, 06:50 PM
#4957
Member
Join Date: Feb 2014
Posts: 91
Likes: 0
Received 0 Likes
on
0 Posts
No Bob thanks for the tip, I don't get much bleed through when I'm working with brass! so it will be put to good use! I managed to get my seams pretty good and used plenty of epoxy to make sure any gaps were filled but yes I think a skim coat of filler before I glass the bottom will help smooth out the contours and mean less final prep work before painting.
Another question, do you epoxy the propshaft struts to the hull as well as screw them? sort of belt and braces?
Another question, do you epoxy the propshaft struts to the hull as well as screw them? sort of belt and braces?
03-21-2014, 12:02 AM
#4960
Member
Join Date: Feb 2014
Posts: 91
Likes: 0
Received 0 Likes
on
0 Posts
Well not much to report except I got a little bored waiting for glue to dry! So as I've said i'm more used to working with brass I got started on making window frames for the boat just to pass the time and I think it's going to be good...............
I used the scrap from inside the window to form some 1/16X1/4 brass strip then soldered on a strip of brass wire around the outside to add a little thickness and detail it took about 20min to make this one so not to bad and it gives me something to do while the glue drys otherwise I want to do something before I should..........Paul


I used the scrap from inside the window to form some 1/16X1/4 brass strip then soldered on a strip of brass wire around the outside to add a little thickness and detail it took about 20min to make this one so not to bad and it gives me something to do while the glue drys otherwise I want to do something before I should..........Paul
03-21-2014, 01:45 PM
#4962
My Feedback: (5)
Paul,
Very ibvative and smart looking. You could also get some Timbermate Wood Filler,follow the instructions given, and "paint" the cabin parts to fill the grain thus making it smooth and ready to receive paint. Check out this build site, report 181 for details:
http://www.rcgroups.com/forums/showt...+build&page=13
Bob
03-22-2014, 09:25 AM
#4963
Member
Join Date: Feb 2014
Posts: 91
Likes: 0
Received 0 Likes
on
0 Posts
Kokaneer the brass wire is 3/16 I am going to do all the windows and vents in brass I think.
Bob thats a good idea on the wood filler, my wood is fairly smooth I think the newer kits have an improved wood content! Mine will probably just get a coat of primer filler and that should take care of it. after I've put this one together I will sort out the aluminium one and then wont have to worry about it! I was going to build one in brass but when I made up the materials list I almost fainted at the cost of the brass.....................................
Bob thats a good idea on the wood filler, my wood is fairly smooth I think the newer kits have an improved wood content! Mine will probably just get a coat of primer filler and that should take care of it. after I've put this one together I will sort out the aluminium one and then wont have to worry about it! I was going to build one in brass but when I made up the materials list I almost fainted at the cost of the brass.....................................
03-24-2014, 12:06 PM
#4967
Member
Join Date: Feb 2014
Posts: 91
Likes: 0
Received 0 Likes
on
0 Posts
I'm trying to fit the cockpit windows and the piece provided is not fitting very well at all! I also think the window openings are far too big? looking at pictures of Dauntless the fore cabin roof has a definate curve downwards to flush fitting windows? Alot smaller than the Dumas ones, has anybody remied this on there boat? I think I might leave the roof alone but make a new window section with smaller window.
I am going to build the pilot position as built without the roof I can only find a couple of grainy pictures of her in this configuration, does anybody have any more they would care to share?
I did think she would look good with the forecabin roof extended out to make a peak over the windows?


I am going to build the pilot position as built without the roof I can only find a couple of grainy pictures of her in this configuration, does anybody have any more they would care to share?
I did think she would look good with the forecabin roof extended out to make a peak over the windows?
03-24-2014, 01:48 PM
#4969
Paul you are correct on those cabin windows. I ran into the exact same issue when I first built mine. I could never get that flimsy piece to fit. I ended up improvising and shaping my own window frames.
But you're in luck because if you scratch-build this area it's going to look much meaner and leaner IMO! A while back, I worked with Rich to totally rebuild that area from scratch and make it more accurate to the original and a lot stronger structurally. I glued oversized balsa strips in place and sanded them down to shape, then a few coats of epoxy, which after painting made everything seamless. One key point was to sand down a nice big curve where the deck top and window areas meet (like in the S & S drawing). Just this alone makes the boat look much more streamlined. Notice how thick the pillars were (B&W pic). Check out discussion on the subject around pages 84-86 here.
But you're in luck because if you scratch-build this area it's going to look much meaner and leaner IMO! A while back, I worked with Rich to totally rebuild that area from scratch and make it more accurate to the original and a lot stronger structurally. I glued oversized balsa strips in place and sanded them down to shape, then a few coats of epoxy, which after painting made everything seamless. One key point was to sand down a nice big curve where the deck top and window areas meet (like in the S & S drawing). Just this alone makes the boat look much more streamlined. Notice how thick the pillars were (B&W pic). Check out discussion on the subject around pages 84-86 here.
Last edited by dauntlessfan; 03-24-2014 at 02:47 PM. Reason: Obsessive Compulsive Disorder
03-24-2014, 02:51 PM
#4970
Funny how when I zoom in on these pics there's usually a new detail I hadn't noticed before. Look at the center pillar of the real boat, there's something mounted on it. I'm guessing it's a step to put your foot on when transitioning to that second deck?
03-24-2014, 03:59 PM
#4971
Member
Join Date: Feb 2014
Posts: 91
Likes: 0
Received 0 Likes
on
0 Posts
Perfect Dauntless fan! Thank's, just what I needed, That roof really does have a curve to it, I may have to put that on it's so obvious in those pictures. I have just spent a couple of hours re-reading the whole thread and now have lots of things to do before I think of epoxy and paint! I will go round and frame the bridge walls like Rich did but I'm not going to include working cuboard door's!! I see now why Riches boat has taken so long..............Paul
PS I think I need to get one of my old lap-tops working to have it in the shed while I'm working to make the info handy.
PS I think I need to get one of my old lap-tops working to have it in the shed while I'm working to make the info handy.
Last edited by minimans; 03-24-2014 at 04:01 PM.
03-24-2014, 04:18 PM
#4972
Great. That curve gave my boat a whole new attitude.
Here's some insight into the original topless Dauntless. Had four supports you could remove then fold the hinged glass windshield assembly down out of the way (drawing shows outer two only).
Here's some insight into the original topless Dauntless. Had four supports you could remove then fold the hinged glass windshield assembly down out of the way (drawing shows outer two only).
Last edited by dauntlessfan; 03-24-2014 at 04:28 PM.
03-24-2014, 04:40 PM
#4973
Member
Join Date: Feb 2014
Posts: 91
Likes: 0
Received 0 Likes
on
0 Posts
Just found this, one of my other hobbys is aviation related to Rolls-Royce and the Merlin family of engines also used in various boats which is how I came to find out about Big D in the first place as I assume the Packards fitted were packard built Merlins? any way here is the updated commuter!! Shes powered by a Rolls-Royce merlin and called the Aeroboat a snip at 3 million dollars................................